While He Was Napping

momma gets stuff done

  • Home
  • About
  • Archive
  • Do It Yourself
    • Crafts
      • No Sew
      • Painting
      • Paper Crafts
      • Repurpose Projects
      • Vinyl
      • Washi Tape
      • Kid’s Crafts
      • Fonts
    • Sewing
    • Decorate
      • Home Decor
      • Holiday Decor
    • Celebrate
      • DIY Gifts
      • DIY Your Party
  • Recipes
    • Beverages
    • Appetizer
      • Bread
      • Other Appetizers
    • Snacks
    • Main Dish
      • Meat
        • Chicken
        • Beef
        • Pork
        • Seafood
      • Vegetarian
      • Slow Cooker
      • 30 Minute Meals
    • Dips & Sauces
    • Salads
    • Pasta
    • Soup
    • Dessert
      • Cookies
      • Brownies
      • Cupcakes and Cake
      • Box Mix Recipes
      • Other Sweet Treats
    • Breakfast Food
      • Pancakes
      • Waffles
      • Muffins
      • Other Breakfast Food
  • Family
    • Babies
      • Pregnancy
      • Newborns
      • The 1st Year
    • Toddlers
    • Preschoolers
    • Kindergartners
    • 6-8 Year Olds
    • The Grown Ups
      • Date Night
      • Romantic Gifts
    • Self Care
  • For the Home
    • Cleaning
    • Organizing
    • Emergency Preparedness
  • Travel
    • Travel Tricks & Tips
    • Traveling with Kids
  • Tech & Gadgets
    • Must-Have Apps
    • Techy Home Appliances
    • Gadgets & Electronics
    • Blogging Tips
  • Printables
    • Posters
      • Quote Printables
      • Subway Art Printables
    • Printable Organizers
    • Printable Journals
    • Learning Printables & Worksheets
    • LDS Printables
  • Holidays
    • New Year’s
    • Valentine’s Day
    • St. Patrick’s Day
    • Easter
    • Cinco de Mayo
    • Mother’s Day
    • Father’s Day
    • 4th of July
    • Back to School
    • Halloween
    • Thanksgiving
    • Christmas
    • Holiday & Seasonal Printables

January 24, 2014 by Krista

DIY Toilet Fizzers

We have a swamp monster living in our toilet.  Okay, not really.  But there’s gotta be something in the water here, because I can clean our toilets twice a week and they still grow a nasty, slimy substance that resembles mold.  I’ve never investigated it much to determine exactly what it is, because who wants to put their head in a toilet?

So, I just scrub it out when I notice it – most of the time I catch it fairly early, but occasionally we have a swamp-looking water surface in the toilet.  Awesome, since my  “monster” is the alligator.  Not sure why, but it always has been – My mom once threw a toy plastic alligator in the bathtub when I was two or three and I literally climbed up the side of the shower.  At least that’s the story they repeatedly tell me.  And, based on my dislike of them now, I totally believe it.

Anyway, I’ve tried lots of things to stunt the growth of our swamp monsters and nothing has really worked.  I tried the scrubbing bubbles disks you drop in the water and it turns the water blue.  Nada.  And it kinda freaked out one of my friends.  They were over one night and she kinda grabbed me while I was doing some dishes in the kitchen and was like “uhhhh, so is the water in your toilet supposed to be blue?”  And those suckers aren’t cheap!  I’ve tried a couple other similiar products and they worked (or didn’t) about as well, with a little less of the freaking out our house guests part.

Then, I saw this recipe for DIY toilet fizzers on Maria’s Self.  These cost pennies to make and I figured they couldn’t be any worse than the other things I’d tried, so I decided to give it a go.
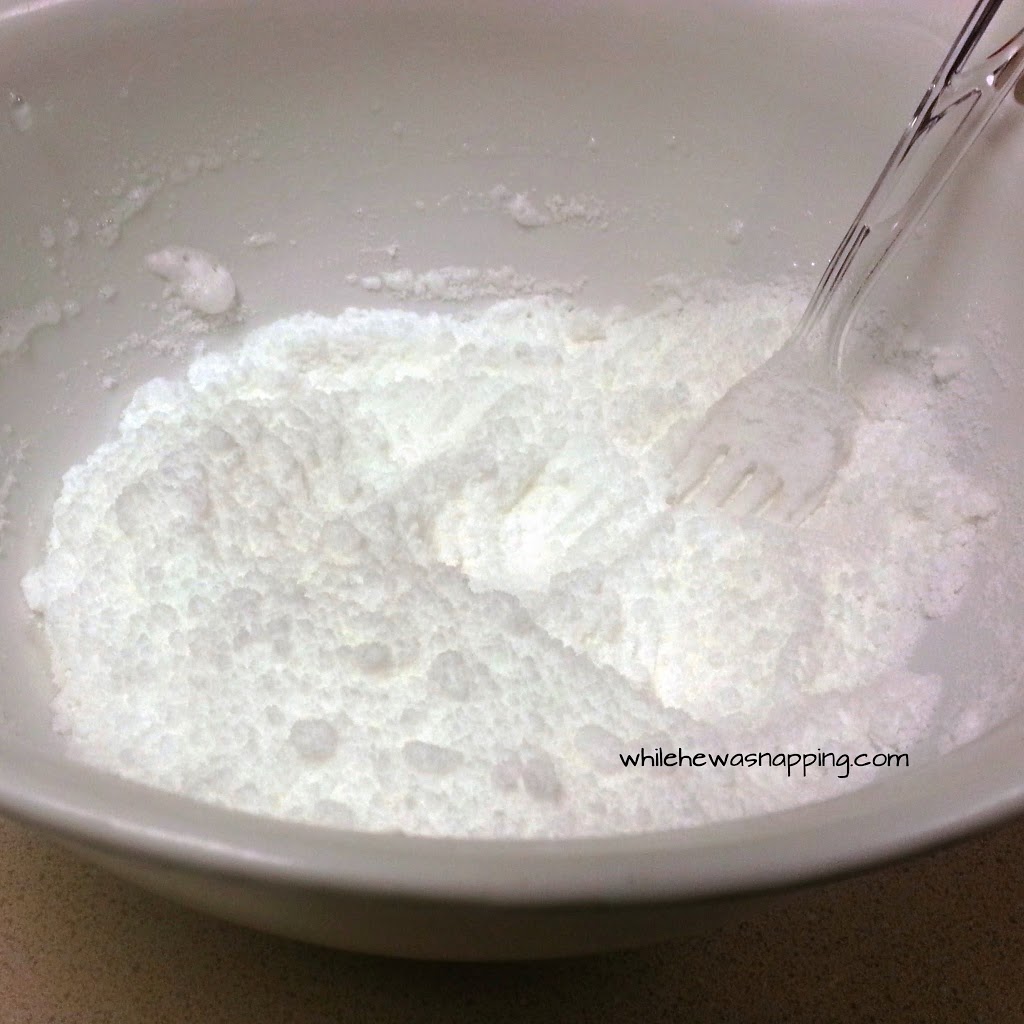
DIY TOILET FIZZERS

Materials:
– Baking Soda
– Citric Acid (found in the canning section of the grocery store or Wal-Mart)
– Essential Oils (I used peppermint, lavender, and lemon)
– Small Spray Bottle of Hydrogen Peroxide 3% (this was the only thing I did differently than Maria, she used water.  You can get hydrogen peroxide in the pharmacy or health department of the grocery store, Wal-Mart, Target and the like.  I wanted a little more cleansing power for the swamp monster.  Oh, and the spray bottle was one of those Travel Size Spray Bottles – affiliate link, FYI.)
– Something to cover your face (I kinda brushed this off when I read “medical mask” on Maria’s site – don’t.  The powders are so fine, it’ll be irritating when you stir them together.  I just tied a dish towel around my face, bandanna style.  And then I called myself The Kitchen Bandit.  Only joking… mostly.)
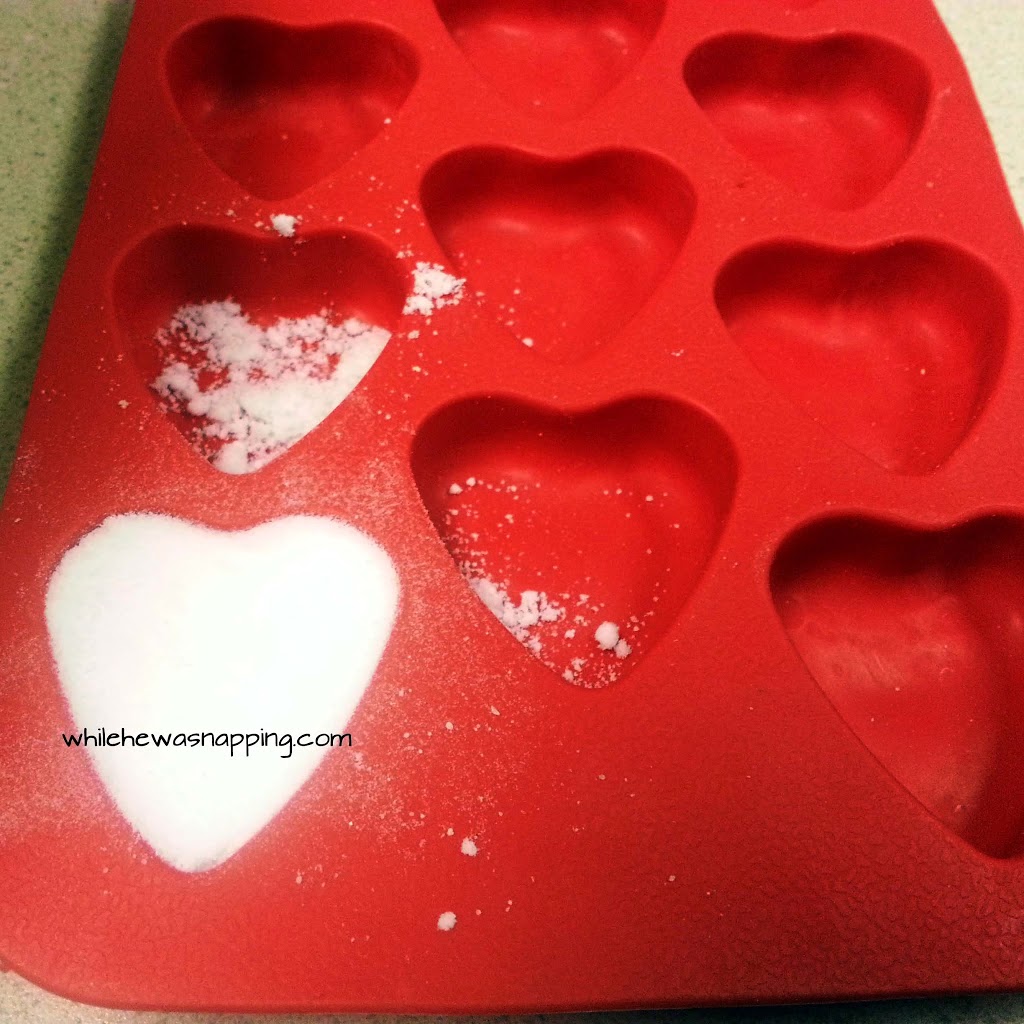
– Silicone molds

The process is pretty basic.  Mix it all together, spritz until damp enough to stick together and then press into the molds and let them dry.  It didn’t take terribly long – pressing the powder into the molds took the longest.  But, I’d say I was finished with the whole thing in about 30 minutes.

This is what the powder should look like before you press it in to the molds.  Kinda like powdered sugar…
 Press the powder in well and level off the backs.  Brush any extra powder into the other empty cavities.
Big J kept asking me if he could put a train in the toilet.  I kept telling him, “no, we don’t put trains in the toilet”.  “But you did,” he responded.  It took me a few minutes to figure out he meant these…

I followed Maria’s directions, so I’ll send you over there to get them.  Find all the details HERE.  These have been working pretty well so far.  And they smell pretty awesome.  Definitely check them out!

This post was written by Krista and originally appeared on While He Was Napping.

November 21, 2013 by Krista

{Pneumatic Addict Furniture} DIY Headboard Bench

Today, we’ve got another contributor here to share some awesome ideas with you.  Elisha from Pneumatic Addict Furniture will show you that power tools aren’t just for boys!  She’s got a super cute project for you… take it away, Elisha!

______________________________________
Hi Everyone! I’m Elisha from Pneumatic Addict Furniture. Krista is letting me drop by today to share some wood-working tips.
This is me officially jumping on the band wagon. I am gearing up for the Vintage Charm Holiday Boutique and I had a request for a headboard bench. When I happened upon this complete, solid-wood, twin bed (rails not in photo) at a garage sale for $10, I knew it was time for me to make a bench.

Depending on the bed you start with, you may or may not need to fill holes, remove hardware, etc. This bed was assembled with large lag bolts inside even larger holes. I could have left them alone, but that’s not how I do things.

You can buy pre-made hole plugs, but it was 9 pm when I started this project. Plus, plugs this size are hard to find in the store. Its easy to DIY some yourself. I busted out my husband’s “hole hog” set and cut 16 plugs from a piece of scrap plywood.

Once they were glued in place, I filled any empty space with Bondo. After letting it dry over night, it was easy to sand the excess smooth. I knew I was planning on painting this bench, so the Bondo would be covered. Had I planned on staining it, I would have chosen stainable wood filler instead.

With the holes filled, it was time to butcher the footboard. This is one of those areas I haven’t heard talked about much in regards to building a bench. How wide should I cut each side? Had I simply cut this footboard in two, it would have been around 21 inches deep. Not terrible if you had pillows, but deeper than a typical chair. I decided a slightly shallower bench would look better and cut the footboard into 2, 18 inch wide pieces, using a circular saw.

Then, using a pocket hole jig, I created 6 pocket holes on the inside of the cut edge. At this point, its nice to have a “helper” to hold the footboard in place. If not, try to prop it up with blocks, clamps, etc. I made sure the side was square with the back leg and joined the two with 3 inch wood screws and wood glue.

Next, I needed rails to attach my seat to. The plan was to use the original side rails to make the slats. Standard seat height is approximately 18 inches high. Knowing that the slats were 1 1/2 inches thick, I attached a scrap piece of 2 x 2 lumber at 16 1/2 inches from the ground, using more glue, 3 inch wood screws and making sure it was level

For the front rail, I found a scrap piece of 2 x 6 lumber and cut it the same length as the headboard’s width, minus the legs. You don’t have to use something so beefy, but I wanted to match the thickness of the the original wood. I drilled 4 pocket holes on each end of the rail. Making sure to flip the pocket holes to the inside where they won’t be seen, I joined the rail with the two front legs, using glue and 3 inch wood screws.

What’s up with the bungee cords? Well, this too would be a nice time to have a helper, pulling the front legs close together while you attach the rail. If no such helper exists, just use a strong bungee or tie down to bring them in.

Time to add the slats. I used the original side rails that came with the bed for donor wood, but you could buy new wood. Measure how many you will need to fill up the width and cut them to length. Measuring from the headboard, my slats were 17 inches long. In order to run them the full width of the bench, I had to notch the corners of the outside slats. That involved using my arch nemesis, the jigsaw.

*Keep in mind, if you plan on using this bench outside, you will need to leave spaces between the slats for drainage.

At this point, I could have called the bench done. I’ve seen benches like this, but I thought it was missing something to truly make it a bench and not just a Frankenstein bed…. Armrests!

I sat on the bench, bent my arm, and marked the height on the back post. Then, I dug up some leftover pieces of 2 x 2 lumber, and cut them to fit between the posts. The front was a bit more challenging because it was curved at that point. I think that’s why so many ladies chose not to add armrests. They are scared of the curved posts. To account for the curve, you can do what I did and shape a groove using an electric sander. It wasn’t too difficult, at it doesn’t have to be perfect. As long as you have the general shape, Bondo or wood filler will make up the difference.

I attached them using, once again, pocket holes, glue and screws.

At that point, the construction was done! Time to make it pretty.
Without sanding or priming, I brushed on two coats of Salem Red milk paint. Once dry, I painted a bee and laurel wreath I designed using PicMonkey, in the center of the arch. I originally tried the old fashioned pencil transfer trick, but had little success and ended up free handing a good portion of it.

The milk paint chipped all by itself (just like I wanted), but the bee design took a scraper and some sand paper to distress. I then glazed the entire thing with a custom mixed, dark brown glaze and to finish it off, I sealed it with 3 coats of spar urethane in satin.

Here’s the final product!

I’m so glad I added the armrests. Not only does it look better, it is so much more comfortable to sit in.

Gotta love milk paint and its chippyness!

Spar urethane is an extremely durable, water-resistant finish. I chose to seal the bench with it so it could be used indoors or out.
Well, she soon will be packed up to take to the boutique with me. What do you think? Are you ready to try a headboard bench?

______________________________
That’s just adorable!  I love it.  Makes me want to go hit up the thrift stores and find an old headboard.  And only $10?!  What a score!  Maybe after this baby gets here, I’ll get ambitious enough for this… My to-do list is plenty long at this point!  Thanks so much for sharing, Elisha!  Go check out more of Elisha’s awesomeness at Pneumatic Addict!

This post was written by Krista and originally appeared on While He Was Napping.


November 18, 2013 by Krista

Thanksgiving No-Sew Place Mats #turkeytablescapes

This post is sponsored by Jo-Ann Fabric and Craft Stores.  I was provided supplies and a gift card for incidental purchases in order to create the projects mentioned within.  All content is 100% original and all opinions are 100% mine and truthful.

So, I will be the first to admit I wasn’t super excited when I got the keywords for this month’s Celebrate the Season post with Jo-Ann: Turkey Tablescapes And here’s why: the last Thanksgiving I was home for was my freshman year in college.  I stayed home while the rest of my family went on our annual trip to my grandma’s because I was working retail.  At my grandma’s house there are usually 35+ people there, so we’re super classy and use paper plates, plastic cups and silverware and plastic tablecloths.  Who wants to be doing 3 hours of dishes anyway?!

During the year, we’re lucky if we eat at the table in our house.  The poor design has the dining room behind the kitchen wall and it’s just more effort to set and clear the table each night than we usually put into it.  We usually dine at the island in our kitchen, and not in the formal dining room.  So decorating the table is almost laughable in our house.  Admittedly, it’s kind of my craft table.  In desperation of a great tablescape, I went to Pinterest and wound up with overwhelming frustration.  Tablescapes are sooooo very not my thing.  I’m the cheap, quick and kid-friendly kind of crafty.  There’s no way I can pull off a gorgeous tablescape like the ones I saw on Pinterest.  So, I decided to do a kid’s table tablescape so I didn’t feel so very out of place.

There are three crafts on this tablescape: no-sew place mats, turkey napkin rings and turkey name cards.  All are easy and quick.  I’ll do the place mats today and the other two in the next couple days, so as not to overwhelm you and keep this post from being so long your fingers fall off from scrolling.

THANKSGIVING NO-SEW PLACE MATS
DIY No-Sew Placemats at Kid's Thanksgiving Table
Materials:
– Two fat quarters in coordinating fabrics
– Glue gun and glue sticks
– Iron
Directions:
– Iron your fat quarters and cut them in half.
DIY No-Sew Placemats at Kid's Thanksgiving Table
 – Place two halves right side together.
DIY No-Sew Placemats at Kid's Thanksgiving Table
– Slowly glue the edges together.  Press them firmly until the glue is mostly dry.  A thick line of glue will stick better than a thin one.  It will also take longer to dry, giving you more time to get the fabric pressed together.  Leave a few inches to turn your no-sew place mat right side out.
DIY No-Sew Placemats at Kid's Thanksgiving Table

– Turn the place mat right side out. Press with a hot iron. You glue will melt again, so don’t leave the iron too long or it will seep through the fabric and get on your iron. Just enough to press them. Let your no-sew place mats cool.

DIY No-Sew Placemats at Kid's Thanksgiving Table

That’s it.  Simple and easy peasy.  I’m thinking I’ll try to find something to do with them, since we won’t be using them as actual place mats at our house (Ha.)  A car caddy for Big J maybe?  He loves the green fabric…

You can use this coupon to save some moolah on your own Thanksgiving projects (or any projects!) until the end of the month.  Need some inspiration?  Check out the Craft Catalog and the Celebrate the Season site for lots of great project ideas.

Here’s a sneak peek at the whole table…  Come back tomorrow and Wednesday for the other tutorials.

DIY No-Sew Placemats at Kid's Thanksgiving Table

This post was written by Krista and originally appeared on While He Was Napping.
 

February 19, 2013 by Krista

{Printable} Life is Good

These printables come from a quote suggested by Jessie on my Facebook page.  Thanks for the quote Jessie!  I love this quote, it is so true.  Usually.  We had a great day yesterday!  The boys and I did a photo shoot.  I wanted some 1 year pictures of Gator {I’ll post a few in a few days} and they turned out waay too cute.  We also spent the afternoon out riding the ATV’s.  One of the many perks of living down the street from BLM land!  =)  I love my family.  Life, most definitely, is good.

You can download these images by clicking on the link below them.


Download these images as a single PDF file HERE.

THANKS!
This post was written by Krista and originally appeared on While He Was Napping.

February 6, 2013 by Krista

{Project GO-FO} His & Hers Towel Hooks – Gift Idea

What’s more romantic than a hot tub full of bubbles followed by some soft, fluffy towels or bathrobes?  Well, how about grabbing those soft, warm fluffy towels off of a His & Hers towel hook set?  Mr Napping got this little baby for Christmas – okay, busted.  Basically, I wanted something cute to replace our single towel bar in the Master bathroom.  I’m a two-toweler and we just didn’t have enough towel hooks to meet our bathroom needs.  It was super easy and looks great in our natural-themed bathroom (well, it will be natural-themed… if I ever get it done………………..)  This would be really cute scaled down and made into a key hook… just an idea.  If you run with it, I want to see photos!

HIS & HERS
TOWEL HOOKS  


Materials:
– Board(s) – I used a scrap piece of 1″x12″ oak that was about 6″ long.
– “His” vinyl and “Hers” vinyl
– 2 Hooks with screws
– Stain or paint/sealer (optional)
– Drill with drill bits
– Screwdriver or screwdriver bits for the drill

*In my rush to finish this for Christmas, I failed to take process photos.  I’m sorry.  If you have questions, let me know and I’ll do my best to clear things up.  Hopefully, it’s pretty simple.

Directions:
–  Because I used a piece of oak scrap, I didn’t need to stain or paint my board.  It was already finished.  If you used something else and you want to stain or paint the board, do so now.  Let it dry thoroughly.
–  Apply the vinyl “His” and “Hers” decals.  Play around with placement to find what layout you like the best. If you opt to use two boards, do one on each board, obviously.  Make sure there will be adequate room for the towel hooks and the towels to hang and dry.  I didn’t want to cover up any of my vinyl with the towels so I went with an off-set layout for my hooks.
–  Decide on the layout of you hooks as well, but don’t attach them yet.  When you find a layout you like, stick down the vinyl.  If you want to apply a sealer, do so now.  Let it dry completely.
–  Lay down your hooks again and  mark the holes for the screws.  Drill small holes where you marked.
–  Sink your screws and tighten down the hooks.

You will need a way to attach the board(s) to your wall.  I opted to just attach the boards to the walls with screws.  I located studs in the walls and then sunk two screws into each board to secure them.  You could also put a sawtooth picture hanger or a wire hanger on the back and then put them on the wall with nails or cute little cup hooks or something.  If you personalize this project, I’d love to see how.  Towel hooks for your kids would be super cute!

This post was written by Krista and originally appeared on While He Was Napping.
If you’d like to get more While He Was Napping, you can find me here:
http://www.facebookloginhut.com/facebook-login/ Photobucket http://www.facebookloginhut.com/facebook-login/ Photobucket http://www.facebookloginhut.com/facebook-login/

  • « Previous Page
  • 1
  • …
  • 7
  • 8
  • 9
  • 10
  • 11
  • …
  • 25
  • Next Page »

I'm Krista. Ringleader here on While He Was Napping, wife to my handsome Mr. Right & momma to my THREE energetic boys, Big J (9), Little J (6) & Little N (4). We FINALLY added a beautiful little girl to our family last December.

I’m knee-deep in Tonka trucks & Thomas trains. I survive our crazy days with Vanilla Coke, Sonic slushies, sweet snuggles and little giggles. When I tuck them in tight & kiss them good night, I get a little time to create & just be me.


It all happened
while (s)he was napping
Want More of My Story?

Privacy Policy

While He Was Napping respects your privacy and is committed to keeping any personal information collected on this website confidential. To find out what information we collect and how it is used or what options you have regarding your information, see our full privacy policy here. Creative Commons License The website found at whilehewasnapping.com and all subdomainsauthored and published by Krista is licensed under a Creative Commons Attribution-NonCommercial-NoDerivs 3.0 Unported License.

Pretty Chic Theme By: Pretty Darn Cute Design