While He Was Napping

momma gets stuff done

  • Home
  • About
  • Archive
  • Do It Yourself
    • Crafts
      • No Sew
      • Painting
      • Paper Crafts
      • Repurpose Projects
      • Vinyl
      • Washi Tape
      • Kid’s Crafts
      • Fonts
    • Sewing
    • Decorate
      • Home Decor
      • Holiday Decor
    • Celebrate
      • DIY Gifts
      • DIY Your Party
  • Recipes
    • Beverages
    • Appetizer
      • Bread
      • Other Appetizers
    • Snacks
    • Main Dish
      • Meat
        • Chicken
        • Beef
        • Pork
        • Seafood
      • Vegetarian
      • Slow Cooker
      • 30 Minute Meals
    • Dips & Sauces
    • Salads
    • Pasta
    • Soup
    • Dessert
      • Cookies
      • Brownies
      • Cupcakes and Cake
      • Box Mix Recipes
      • Other Sweet Treats
    • Breakfast Food
      • Pancakes
      • Waffles
      • Muffins
      • Other Breakfast Food
  • Family
    • Babies
      • Pregnancy
      • Newborns
      • The 1st Year
    • Toddlers
    • Preschoolers
    • Kindergartners
    • 6-8 Year Olds
    • The Grown Ups
      • Date Night
      • Romantic Gifts
    • Self Care
  • For the Home
    • Cleaning
    • Organizing
    • Emergency Preparedness
  • Travel
    • Travel Tricks & Tips
    • Traveling with Kids
  • Tech & Gadgets
    • Must-Have Apps
    • Techy Home Appliances
    • Gadgets & Electronics
    • Blogging Tips
  • Printables
    • Posters
      • Quote Printables
      • Subway Art Printables
    • Printable Organizers
    • Printable Journals
    • Learning Printables & Worksheets
    • LDS Printables
  • Holidays
    • New Year’s
    • Valentine’s Day
    • St. Patrick’s Day
    • Easter
    • Cinco de Mayo
    • Mother’s Day
    • Father’s Day
    • 4th of July
    • Back to School
    • Halloween
    • Thanksgiving
    • Christmas
    • Holiday & Seasonal Printables

June 6, 2017 by Krista

How to make DIY Sunscreen that will protect your family

Hi there! I’m thrilled you’re here today! Summer is about to hit with full force and sunscreen sales are increasing dramatically. Here, in the desert, we’ve been putting sunscreen on for a few weeks already. My oldest is allergic to one of the major brands of sunscreen and I’ve never loved slathering all those chemicals on my kids – or myself – especially after the research I did on sunscreens last year. So, I decided to try making my own DIY sunscreen.

While the initial cost was more than a bottle of sunscreen from the store, I had enough supplies to get my family of 5 through all of last summer – we spent 6 weeks of our 8 week summer traveling and were outside A LOT. I also only used a fraction of the ingredients, so I didn’t have to buy anything this year. Overall, it’s evened out to be comparable to the cost of sunscreen from the store and it’s actually good for your skin. If you don’t want to recoup your costs over time, this would be a great project to split with a friend or two.

DIY Sunscreen that provides chemical-free, good-for-your-skin protection with ingredients you can pronounce

DIY SUNSCREEN: PROTECTION WITHOUT THE CHEMICALS

I will let you do your own research on sunscreen because my goal here isn’t to try to convince you that homemade is right and wonderful and store bought is wrong and bad. We are actually a divided house on this matter. From personal experience, I prefer homemade sunscreen. My husband does not. We still use store bought sunscreen and our home is definitely not an organic, all-natural only home (she types as she sips her Vanilla Coke).

I simply want to offer another option to what’s out there. Using chemical-free sunscreen is an option. It’s relatively simple to make, it will protect your family and it is good for your skin. My favorite thing about DIY sunscreen is that it doesn’t make me feel oily and greasy. I hate feeling sweaty, which often happens when you’re out in the sun, and it is 100 times worse to have that feeling compounded by an oily lotion. That has been a huge complaint of mine since I was a child and this homemade version solves that problem for me. This DIY sunscreen feels like any other body lotion I routinely use.

DIY SUNSCREEN: THE PROS AND CONS

What’s the benefits of making your own sunscreen? Well, here’s what I discovered last year. The actual making part is relatively easy. However, not everyone loves homemade sunscreen. My husband prefers the stuff from the store, while I prefer the homemade stuff.

PROS:

  • All natural ingredients – no allergic reactions to unknown chemicals
  • Easy to make in small or large batches
  • Protects as well as store bought sunscreen with no harsh chemicals
  • Costs about as much per ounce as sunscreen from the store – if you want to off-set the initial cost, share ingredients with some friends.
  • Doesn’t feel greasy after application

CONS:

  • Slightly whitens skin – doesn’t bother me any, but this is a definite downside for my husband.
  • Lower SPF – Did you know that an SPF 40 is not equivalent to 2x the strength of an SPF 20? A SPF 20 blocks about 94% of UVB rays, a 40 blocks around 98%. We’re so fair skinned that we reapply every couple hours and a lower SPF doesn’t make much of a difference for us.
  • Takes a little longer to apply – This is the biggest reason my husband doesn’t like homemade sunscreen, however our leftovers from last year are spreading better now.


DIY Sunscreen made with natural ingredients that are good for your skin

HOW TO MAKE DIY SUNSCREEN

Making your own sunscreen lotion is easy, once you find your ingredients. However, I’ve tried to make that super easy too. I’ve included links to the exact products I use in my sunscreen. I buy from Bulk Apothecary and have since 2011. I’ve always been happy with their products and their pricing is hard to beat (although shipping sometimes feels a little pricey). The only thing Bulk Apothecary doesn’t have is the Raspberry Seed Oil, which you can get on Amazon. You could probably find all the ingredients on Amazon, but it can be hard to know what quality you’re getting. I trust Bulk Apothecary.

I use this kitchen scale to measure out my ingredients and highly suggest this method if you can. You’ll get more precise ratios. I did include measurements in tea and tablespoons too, but your results will be more reliable if you use the weight measurements.

This sunscreen recipe has an approximate SPF 37. You can omit any of the ingredients and still create sunscreen, but it will change the SPF and possibly the physical make up of the lotion. I’ve included each ingredient’s purpose; so, if you do omit something, you’ll know what you’re losing. Okay, ready to protect your skin with all the good stuff?


The purpose of each ingredient:

Beeswax – makes the lotion waterproof, anti-oxidant, anti-inflammatory and anti-bacterial.
Coconut oil –  natural SPF of about 2-8, anti-bacterial, natural moisturizer, full of anti-oxidants
Jojoba oil – natural SPF 4, anti-bacterial, anti-inflammatory, anti-fungal
Aloe vera – soothes skin irritations, anti-oxidants, anti-inflammatory, natural moisturizer, helps make sunscreen easier to spread
Unrefined shea butter –  natural SPF of 3-8, natural moisturizer, good source of vitamins for skin, anti-inflammatory
Zinc oxide – sun protectant, anti-bacterial, anti-inflammatory, anti-aging properties
Vitamin E – can extend life of the sunscreen, natural moisturizer, anti-oxidant, anti-inflammatory
Raspberry seed oil – natural SPF 30-40, anti-inflammatory, can substitute carrot seed oil; this is expensive, but you don’t use much and it’s worth the SPF protection – you could get 24 batches of sunscreen with a 2 oz bottle


Materials/Ingredients:

Makes enough lotion to fill a 3 oz cosmetic tube

  • 10 grams (1 Tbsp + 1 tsp) white beeswax | Get it here
  • 26 grams (1 Tbsp + 2 tsp) coconut oil | Get it here
  • 10 grams (2 1/2 tsp) jojoba oil | Get it here
  • 10 grams (2 tsp) 1x aloe vera Liquid | Get it here
  • 15 grams (approx 1 Tbsp) Unrefined Shea Butter | Get it here
  • 20 grams (4 slightly heaping Tbsp) non-nano zinc oxide powder | Get it here
  • 1/4 tsp liquid vitamin E | Get it here
  • 1/4 tsp raspberry seed oil | Get it on Amazon
  • double broiler or a small pot and a glass jar (I use an old pot and a small measuring glass or a mason jar)
  • wooden skewer or small spatula or whisk
  • ziptop bags
  • cosmetic tubes to put your lotion in (I found empty soft squeeze tubes at Walmart last year in their travel cosmetics, but when I looked this year, they didn’t have the same kind. I got what they did have and they are stiffer and harder to squeeze. I don’t like them as well; this is the kind I prefer.)

Instructions/Directions

SET UP YOUR DOUBLE BROILER

Step #1: If you’re using an actual double broiler, follow the directions it comes with. If you don’t have a double broiler, you can use a pot and glass jar. This is my method. Fill the pot with water until it is about 4 inches from the top. Place on the stove burner.

Step #2: Measure out all your ingredients with the kitchen scale and put them in the glass jar. Put the glass jar in the water on the stove and turn the stove on to low-medium heat. You want the water to come to a rolling boil. Once achieved, turn down the stove if you need to. You just want to maintain that rolling boil. Too rapid a boil can tip your jar and your sunscreen will be ruined.

DIY Sunscreen made with all natural ingredients at home

MELT AND MIX YOUR SUNSCREEN

Step #3: Let the ingredients melt and liquefy. Stir with your skewer, spatula or whisk to thoroughly combine. It should be white in color and creamy in texture with no lumps. The bubbles will pop as the lotion cools.

Step #4: Remove from heat, turn off the stove, and remove the jar from the water. Be CAREFUL!! The jar will be VERY HOT! Let the lotion cool for several hours to room temperature, stirring occasionally to keep combined.

DIY Sunscreen will get creamier in texture and whiter in color as it melts


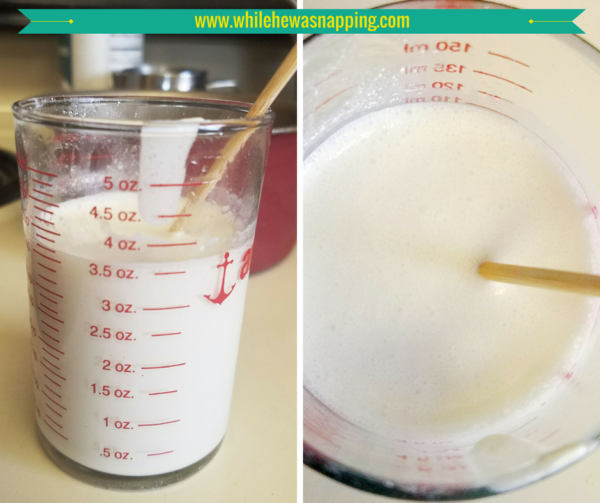
In the photo below, you’ll notice there is 3.5 oz of melted lotion in the measuring cup. You’ll lose some of the volume to the jar and zip bag when you transfer the lotion. It will also condense as it solidifies. A 3 oz cosmetic tube is the size you want.

Stir your DIY Sunscreen as it cools to keep a smooth, homogeneous consistency.

Note: I actually tried pouring the hot lotion directly into the cosmetic tube and skipping the ziptop bag. It worked… alright. The tube didn’t melt like I worried it might, but it got pretty soft. This tube was a thicker plastic than the tubes I prefer, so a thinner tube may melt. The biggest issue though was mixing the lotion while it cooled. It’s really hard to mix anything well when there’s no room to stir it up. If you want a well mixed lotion, let it cool in the jar and use the ziptop bag.

FILL YOUR COSMETIC TUBES

Step #5: Using the skewer, spatula or whisk, scrape as much of the cooled lotion into a ziptop bag. Snip a small corner off the bottom of the bag.

Step #6: Carefully, fill the squeeze tubes with the lotion by squeezing it out of the bag and into the cosmetic tube. Squeeze the lotion to the bottom of the tube occasionally so you can fill the entire tube.

Transfer DIY Sunscreen to cosmetic tubes for easy transportability and on-the-go use all summer long.


That’s it. You just made your very own sunscreen! Use and store as you would any other sunscreen lotion. The shortest shelf life of these ingredients is 1-2 years. The vitamin E may help extend that. You’ll know it’s gone bad if it has an acidic or rancid oil smell. If so, toss it and start over. The leftovers from the batch I made last year are still going strong though.


DIY SUNSCREEN THAT PROTECTS YOUR SKIN & YOUR FAMILY!

DIY Sunscreen made with all natural ingredients and doesn't leave you feeling oily


If you’ve been wanting a different option than all those brightly colored bottles lined up on the store at the shelves, something with ingredients you can pronounce, something that will protect your family’s skin without harsh chemicals, then making your own sunscreen is a great choice. You get to choose exactly what is in the sun protectant you’re putting on your skin.

I have loved making my DIY sunscreen over the past year. If I can do it, you can too. So, get out there and have a safe summer! Protect your skin with DIY Sunscreen!

November 18, 2015 by Krista

Do More with Levana Ayden™ Baby Video Monitor

I’ve had three babies. All three of them have been different kinds of sleepers – My oldest was a dream, my middle baby was a nightmare and my youngest is somewhere in between. Mr. Napping was unemployed for much of my pregnancy with my oldest and we had to really decide what were needs and wants for our new baby. Big J was our first baby and we had nothing. We depended heavily on hand-me-downs and consignment store finds. We lived in a multi-level townhouse when my oldest was a baby and we used some two-way audio receivers Mr. Napping already had as our baby monitors. They worked and we already had them – if it ain’t broke, don’t fix it – so we didn’t look at baby monitors much. They weren’t in the budget.

With my middle little one we started out in a two-bedroom apartment that was less than 1000 square feet and there was no need for monitors. You couldn’t get far enough away to not hear the baby. When he was three months old, we moved into our single-story home and we still didn’t need a monitor. He was (and still is!) such a restless sleeper that it was better if I didn’t have a monitor on him because every movement he made put me on edge… Is he getting up? Is he gonna cry? Should I go get him? We both slept better without a monitor – I wasn’t constantly hovering over him while he was trying to sleep. He expected me to be there every time he stirred and he was terrible at putting himself back to sleep because of it. It didn’t help that I need sleep or I am one grouchy momma. It really was better for both of us.

Between my middle baby and my youngest, my sister-in-law had their first baby. They went all out with the changing tables, video monitors, diaper pails and more. I thought it was a little unnecessary… Then we were at my grandma’s house with the whole family and it was loud! Both of my younger boys still napped. Our room was too close to the noise and kept them from getting a good nap unless we put them in the attached apartment my parents were staying in. But we had no easy way to make sure our kids were still sleeping, safe and sound. My brother’s video monitor suddenly seemed like more of a need than a want, or at the very least not unnecessary. We made do with some apps on our mobile devices and tablets, but it meant someone had to leave their device in with the sleeping kids and the apps chewed through the battery!

Enter Levana’s Ayden™ Baby Video Monitor. Even though my little Baby N is closer to being two than one, I am so excited to have this monitor now. I know it will be so useful while we are traveling next week! I absolutely love this thing. It has all kinds of features I am so excited about. The most important feature to me, though, was a secure signal – I want to be confident that I am the only one checking in on our children. The Ayden™ Baby Video Monitor offers Private ClearV­u® Digital Signal that is private, secure and interference-free from up to 750 feet away.

The picture quality is fantastic on the 3.5 inch screen and there is even an LED Night Vision option to give you a clearer picture of your baby in the darkness. This is amazing and essential for me, as our nursery is incredibly dark even during the day. I love being able to see my baby without having to shine a bunch of light in on him and worry about waking him. The actual picture clarity is even better than this photo.

Another feature I was very excited about was the option to use battery or wall power for both the monitor and video screen units. This means we can even take it camping! I am very excited about the freedom that will give me! You can turn on PEEP mode and your monitor and camera will enter sleep mode if it’s quiet. You see what you need to see when you need to see it and don’t use up lots of battery when there’s nothing to check on. This allows for up to 48 hours of battery life before you need to recharge.

3 TIMES I LOVE BEING ABLE TO USE MY LEVANA AYDEN™ BABY VIDEO MONITOR

1. When my Baby N finds himself overstimulated and tired. When this boy has had enough, he needs his space. Even momma is too much company. The worst case overstimulated scenario has the poor boy in hysterics and cuddles from momma or daddy just make it worse. I like being able to keep an eye on him while he calms himself enough for a snuggle before going to sleep. I don’t have to worry that he’s going to hurt himself or be naughty – he’s climbing all the things these days – while he’s alone in his crib.
2. To check on Baby N before I go to bed. You know what they say – Let the sleeping beast lie! Baby N regularly kicks his blankets off, but not all the time. I love being able to check and see if he needs to be tucked in again without entering the room and disturbing his slumber.
3. In the middle of the night. Baby N gets up usually once during the night, but he’s been sleeping all night more often lately. It’s really nice to be able to check on him when I first hear him fussing to see what he needs. Is he cold? Hungry? Did he just lose his pacifier? It helps me get him taken care of and back to bed faster.


The temperature monitoring is a nice feature. My youngest two boys kick the covers off all the time. With the Ayden™ Baby Video Monitor you can check on the temperature in their room and see if they need to be recovered without risking waking them up. There’s nothing worse than checking on them and them waking up just as I’m heading to bed. My boys have usually been asleep long enough they think it should be time to get up and play. Not what a tired momma wants!

The smart indicator ring was also something I thought was very cool. The ring around the directional pad will change colors according to the noise level in the baby’s room. You can keep an eye on your baby even when the sound is turned down. This would be a great option for times when your surroundings are loud already and for hearing-impaired parents and caregivers.

Two more features are a night light option and a lullaby option that you can turn off and on from the video screen menu. You don’t even have to go into the room. There are three lullaby options and the night light is a calming yellowy-orange color that comes from the top of the camera. There is a two-way communication feature that lets you talk to baby.

I am incredibly happy with this monitor. It’s feature-rich, I can keep eyes on my kiddo and I will be able to do more knowing my child is safe. That’s all this momma wants! Enter the giveaway below for a chance to win your own baby video monitor.

a Rafflecopter giveaway


Get more info and stay up with all the latest and greatest from Levana on their Facebook page. Or check out the Ayden™ Baby Video Monitor and get your own with the button below!

This is a sponsored conversation written by me on behalf of Levana. The opinions and text are all mine. Pinky Promise.

July 27, 2015 by Krista

Road Trip Snacks Kit

We love a good road trip. One of our goals is to squeeze every little bit we can out of summer, including all the road trips we can manage. But traveling with kids can be tricky if you’re not prepared. And great road trip snacks are a major factor of success.

I have put together a road trip snacks kit that is sure to save the day.  It’ll keep the whole car happy – and that means momma doesn’t have to spend the whole trip opening juice boxes and chucking bags of chips into the back seat.

ROAD TRIP SNACKS KIT

Road Trip Snack Kit Summer Fun Road Trip Snacks Baskets

PUTTING YOUR SNACK KITS TOGETHER

This part is the most crucial part. But that’s ok, it’s important but it’s also pretty easy. You’re just dividing up snacks for each person – yes, like you do every day – but, today it’s for the entire day… at one time. You got this! It’s a little more work, but it will be worth it. Ready?

Materials for your road trips snacks kit:

– small baskets that are easy to see inside – it will be easier to find what you are looking for if you can see it.
– snack friendly foods – I’ll get more in-depth in just a second.  It’ll be worth it, promise.
– small containers or ziptop bags – consider serving sizes when selecting these.

Directions to put together a road trip snacks kit:

– Purchase or make your snack-friendly foods and divide your road trip snacks into single serving sizes.  Not single serving in terms of nutrition facts, but how much you want to consume (or to be consumed) at a single time.

– Fill your small containers with your single-serving sized road trip snacks.  Consider the age of the kit’s owner as to how much you put in each container.  For example, I wouldn’t give my husband and my three-year-old the same sized snacks.  There would be a mutiny on my hands.

Road Trip Snack KitTwizzlers Summer Fun Road TripSnacks Kit

Road Trip Snack KitTwizzlers Summer Fun Snacks Labeled
– Store all road trip snacks inside the small baskets.  Each person gets their own basket.  Place the baskets within easy reach of each person’s seat.  If you will have to hand out snacks to the kids, make it so you can reach them.

Road Trip Snack Kit Twizzlers Summer Fun Road Trip Snacks Baskets
– Depending on the length of your trip, you can decide if you will refill the road trip snacks baskets at a certain time or not.  On our nearly-900 mile trip, I will be refilling the baskets about every 200 miles.  This will help my family pace themselves in their snacking and, hopefully, help avoid any carsick episodes from overeating.

ROAD TRIP SNACK IDEAS

DISCLAIMER: These are just ideas. Depending on the age and diets of your travel companions, you may want to adjust this list and consider choking hazards. Choose foods your family enjoys and focus on your specific snacking needs. The kit I created was for me and it doesn’t include all the items listed. I would make adjustments to my kit for both my kids and my husband. Do what is best for each member of your family. That’s why everyone gets their own kit.

– licorice
– candies
– chips
– pretzels
– trail mix
– fruit cups
– granola bars
– applesauce
– dried apple slices
– dried apricots
– dried bananas
– dried mangos
– crackers
– string cheese
– cheese cubes
– raw almonds
– raw pecans
– pistachios
– peanuts
– grapes
– apple slices
– cucumber slices
– grape tomatoes
– baby carrots
– celery sticks
– jicama slices
– mango cubes
– fruit snacks or leather
– Water

ROAD TRIP BINGO!

I also made a little game up for my kids.  Because 900 miles is a long way.  And they are on a Bingo kick right now.  This is super simple to put together and it might help pass a few miles with out the “are we there yet?” version of 20 questions.  There are two ways to play.  You can mark off the boxes as you see the item in each box along the road.  Or you can print an extra Bingo card and make little cards out of them that you draw and then each player can mark off the picture on their game board.

Materials:
– The Road Trip Bingo game boards.  There are three versions of the boards.  All the boards have the same pictures, but in different spots.  Make prints of the same game board to see who is being the most observant and race each other to Bingo!  Or print off all three boards and see who can get Bingo first the traditional way.
– Laminator and laminating sheets (or contact paper will work too)
– Scissors

Directions:
– Download the game boards.  You’ll have to click each link to download and save it to your computer.
Version 1          Version 2          Version 3          
– Print the game boards.  If you opt to make a set of cards to draw and play that way, I would suggest printing at least the extra game board on card stock so you can’t see through the paper.  I didn’t even think about it and just used regular paper – so my cards are see through.  Do as I say, not as I do.  It’ll save you some paper and ink.  And time when you have to print and laminate them again.

Road Trip Snack KitTwizzlers Summer Fun Bingo Print
– Laminate the boards.

Road Trip Snack KitTwizzlers Summer Fun Bingo laminate
– Cut the extra board apart on the black lines.

Road Trip Snack KitTwizzlers Summer Fun Bingo Cut out cards
– Lay out the squares on a laminating sheet.  Make sure there’s enough space between each card.  Laminate the cards and cut them apart.

Road Trip Snack KitTwizzlers Summer Fun Bingo laminate cut out
– I made a little pocket on the back of one of the game boards to hold the cards when they aren’t being played with.  I just took some duct tape and taped a ziptop bag onto the back of the board.  Totally optional and it doesn’t look real pretty, but it will help us keep from losing the pieces.

Road Trip Snack KitTwizzlers Summer Fun Bingo Pocket

That’s it!  Super easy.  You can use a dry erase marker or pencil to mark off the boxes as you play.  If you put the pocket on the back of one of the game boards, you could store the dry erase markers in there too.  Or just use pieces of your road trip snacks kit to mark off the boxes.  First one to “Bingo!” gets to eat their board markers!

HAPPY ROAD TRIPPING!

AND HAPPY ROAD TRIPS SNACKS!

I'm Krista. Ringleader here on While He Was Napping, wife to my handsome Mr. Right & momma to my THREE energetic boys, Big J (9), Little J (6) & Little N (4). We FINALLY added a beautiful little girl to our family last December.

I’m knee-deep in Tonka trucks & Thomas trains. I survive our crazy days with Vanilla Coke, Sonic slushies, sweet snuggles and little giggles. When I tuck them in tight & kiss them good night, I get a little time to create & just be me.


It all happened
while (s)he was napping
Want More of My Story?

Privacy Policy

While He Was Napping respects your privacy and is committed to keeping any personal information collected on this website confidential. To find out what information we collect and how it is used or what options you have regarding your information, see our full privacy policy here. Creative Commons License The website found at whilehewasnapping.com and all subdomainsauthored and published by Krista is licensed under a Creative Commons Attribution-NonCommercial-NoDerivs 3.0 Unported License.

Pretty Chic Theme By: Pretty Darn Cute Design