While He Was Napping

momma gets stuff done

  • Home
  • About
  • Archive
  • Do It Yourself
    • Crafts
      • No Sew
      • Painting
      • Paper Crafts
      • Repurpose Projects
      • Vinyl
      • Washi Tape
      • Kid’s Crafts
      • Fonts
    • Sewing
    • Decorate
      • Home Decor
      • Holiday Decor
    • Celebrate
      • DIY Gifts
      • DIY Your Party
  • Recipes
    • Beverages
    • Appetizer
      • Bread
      • Other Appetizers
    • Snacks
    • Main Dish
      • Meat
        • Chicken
        • Beef
        • Pork
        • Seafood
      • Vegetarian
      • Slow Cooker
      • 30 Minute Meals
    • Dips & Sauces
    • Salads
    • Pasta
    • Soup
    • Dessert
      • Cookies
      • Brownies
      • Cupcakes and Cake
      • Box Mix Recipes
      • Other Sweet Treats
    • Breakfast Food
      • Pancakes
      • Waffles
      • Muffins
      • Other Breakfast Food
  • Family
    • Babies
      • Pregnancy
      • Newborns
      • The 1st Year
    • Toddlers
    • Preschoolers
    • Kindergartners
    • 6-8 Year Olds
    • The Grown Ups
      • Date Night
      • Romantic Gifts
    • Self Care
  • For the Home
    • Cleaning
    • Organizing
    • Emergency Preparedness
  • Travel
    • Travel Tricks & Tips
    • Traveling with Kids
  • Tech & Gadgets
    • Must-Have Apps
    • Techy Home Appliances
    • Gadgets & Electronics
    • Blogging Tips
  • Printables
    • Posters
      • Quote Printables
      • Subway Art Printables
    • Printable Organizers
    • Printable Journals
    • Learning Printables & Worksheets
    • LDS Printables
  • Holidays
    • New Year’s
    • Valentine’s Day
    • St. Patrick’s Day
    • Easter
    • Cinco de Mayo
    • Mother’s Day
    • Father’s Day
    • 4th of July
    • Back to School
    • Halloween
    • Thanksgiving
    • Christmas
    • Holiday & Seasonal Printables

November 28, 2017 by Krista

The Easy Christmas Countdown You Need This Year

Hi there! Happy holiday wishes coming at ya! I’m so glad you stopped by to check out this easy Christmas countdown.

I’m a sucker for a good, and easy, Christmas countdown; but, December is a busy month! Can you relate? So, when the calendar gets around December 8th, I find myself struggling to keep up with the fun we started just a week before.

I need simple. Do you need simple too?

A countdown where, if you miss a day or two (or five), it doesn’t ruin the whole thing. I totally get that! I also wanted a visual representation, because my kids ask “how many days until Christmas?” every single day. For 25 days. This year I plan to just point my kids to this countdown.

EASY CHRISTMAS COUNTDOWN CHAIN

Super Simple, No-Stress Christmas Countdown Chain that'll only take 20 minutes to put together! 2 styles available and if you miss a day, it's okay!


WHY SHOULD YOU USE THE EASY CHRISTMAS COUNTDOWN CHAIN?

Of course, we have some Christmas traditions that I look forward to every year. But, not having an activity assigned to every single day means I can relax more. I can enjoy the traditions without worrying about tomorrow’s activity. This countdown was designed with busy families in mind. This easy Christmas Countdown Chain will help you because:

  • It’s super simple. 20 minutes and it’ll be ready to go. Or just print it and give it to the kids to put together.
  • If you miss a day or two, just remove the extra links to catch up. No stress or drama when life gets crazy.
  • And the kids can see just how close Christmas really is. You won’t feel like you’re stuck on a month long car ride with the kids asking, “are we there yet?” on repeat.


KEEPING TRADITIONS PART OF YOUR EASY CHRISTMAS COUNTDOWN

But, what about the traditions you DO want to keep? Don’t worry, I thought of that. There are THREE ways to put together the Easy Christmas Countdown Chain so that it works for your family:

  1. One of them has nothing but numbers and is simply just a countdown.
  2. The other one, though, has some fun Christmas activities to do. There’s even blank chain links so you can add your family’s special traditions.
  3. A combination of the two, with activities interspersed through out the month on days you think you’ll be able to accommodate.

So, now you get to customize your chain in whatever way best fits YOUR family. Use whichever Easy Christmas Countdown fits into your schedule better – or – combine the two!

Want an example? My kids will be in school until 3 days before Christmas, so we will have to keep up our school routine during the week. We will also have a brand new baby (we’re talking less than a month old). We won’t have a lot of time this year to throw in extra activities. Weekends will be our best bet, so those days will get an activity link and we can make sure our favorite traditions make it into our schedule.


No-Stress Christmas Countdown Chain with Activities

MAKING YOUR EASY CHRISTMAS COUNTDOWN CHAIN

When I said this is simple, I really meant it will take you about 20 minutes to put together. Maybe 30 if you let the kids “help”. Simple, yeah?

There’s one more thing you need to know before we get started. You already know there are two versions of the chain (the one with the daily countdown and the other one with the activities), but each version of the Easy Christmas Countdown Chain is also available in color and in monochrome.

This is meant to help you save ink by printing on colored paper instead of on white paper. Or in case you only have a monochrome printer (I dream of upgrading to a color laser printer someday). So, just be aware of that when we download your chosen files.

MATERIALS NEEDED FOR YOUR EASY CHRISTMAS COUNTDOWN CHAIN:

  • Easy Christmas Countdown Chain Printable Files (preview the different files below under step 1)
    • Countdown Only: Color | Monochrome
    • Countdown with Activities: Color | Monochrome
  • Printer and paper
  • Scissors or paper cutter
  • Tape, glue or stapler and staples


DIRECTIONS FOR MAKING YOUR EASY CHRISTMAS COUNTDOWN CHAIN

1. Print the Easy Christmas Countdown Chain links. If you’re using the countdown only monochrome file to print on colored paper, make sure the pages alternate colors. For two colors, page 1 and page 3 should be the same.

Simple Christmas Countdown Chain that will only take 20 minutes to make. A great visual of just how many more days until Christmas!

Simple Christmas Countdown Chain that will only take 20 minutes to make. A great visual of just how many more days until Christmas! And it's okay if you miss a day (or five)!  Christmas Activities Countdown Chain


2. Cut the chain links apart with the scissors or paper cutter.

3. Take the first chain link and bend it until the ends overlap and the strip forms and circle.
Secure with glue, tape or a staple.

Simple Christmas Countdown Chain that will only take 20 minutes to make. A great visual of just how many more days until Christmas and you can choose to include fun activities! Best of all - it's okay if you miss a day (or five)!


4. Slip the next chain link through the first link and bend until the ends overlap. Secure.

Simple Christmas Countdown Chain that will only take 20 minutes to make. A great visual of just how many more days until Christmas and you can choose to include fun activities! Best of all - it's okay if you miss a day (or five)!

Simple Christmas Countdown Chain that will only take 20 minutes to make. A great visual of just how many more days until Christmas and you can choose to include fun activities! Best of all - it's okay if you miss a day (or five)!

Simple Christmas Countdown Chain that will only take 20 minutes to make. A great visual of just how many more days until Christmas and you can choose to include fun activities! Best of all - it's okay if you miss a day (or five)!


5. Repeat the process with each chain link, slipping the new link through the previous one and
creating a chain.

Simple Christmas Countdown Chain that will only take 20 minutes to make. A great visual of just how many more days until Christmas and you can choose to include fun activities! Best of all - it's okay if you miss a day (or five)!


6. Hang your Easy Christmas Countdown Chain where you can remove a link each day.

No-Stress Christmas Countdown Chain that'll only take 20 minutes to put together! And if you miss a day, it's okay!


That’s it, super easy, right?

I hope this makes counting down to Christmas with your family simpler. And I hope you have a very Merry Christmas with your family, making memories and having fun together.

Happy Holidays!
October 31, 2016 by Krista

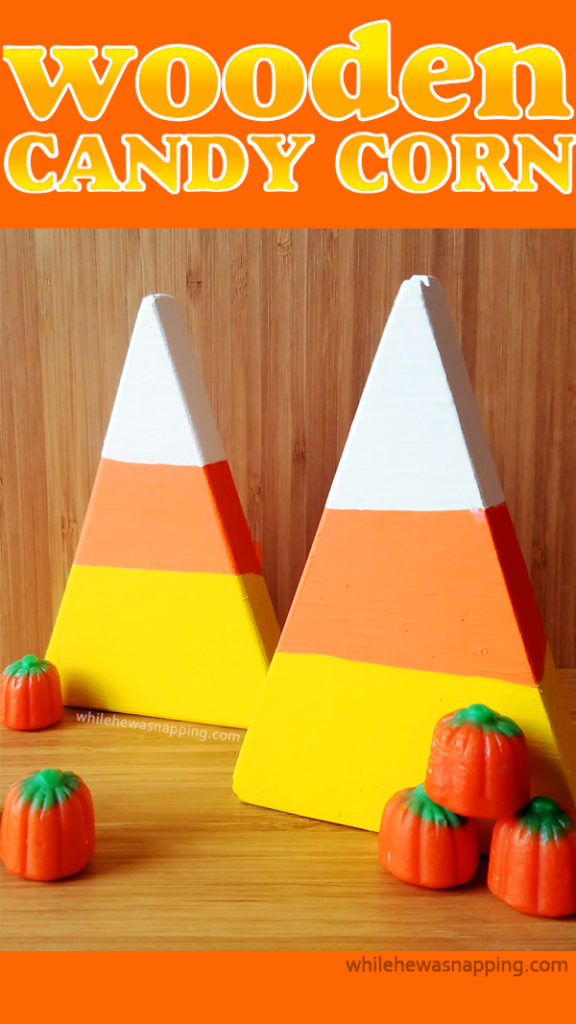
Wooden Halloween Candy Corn Decorations You’ll Want to Eat!

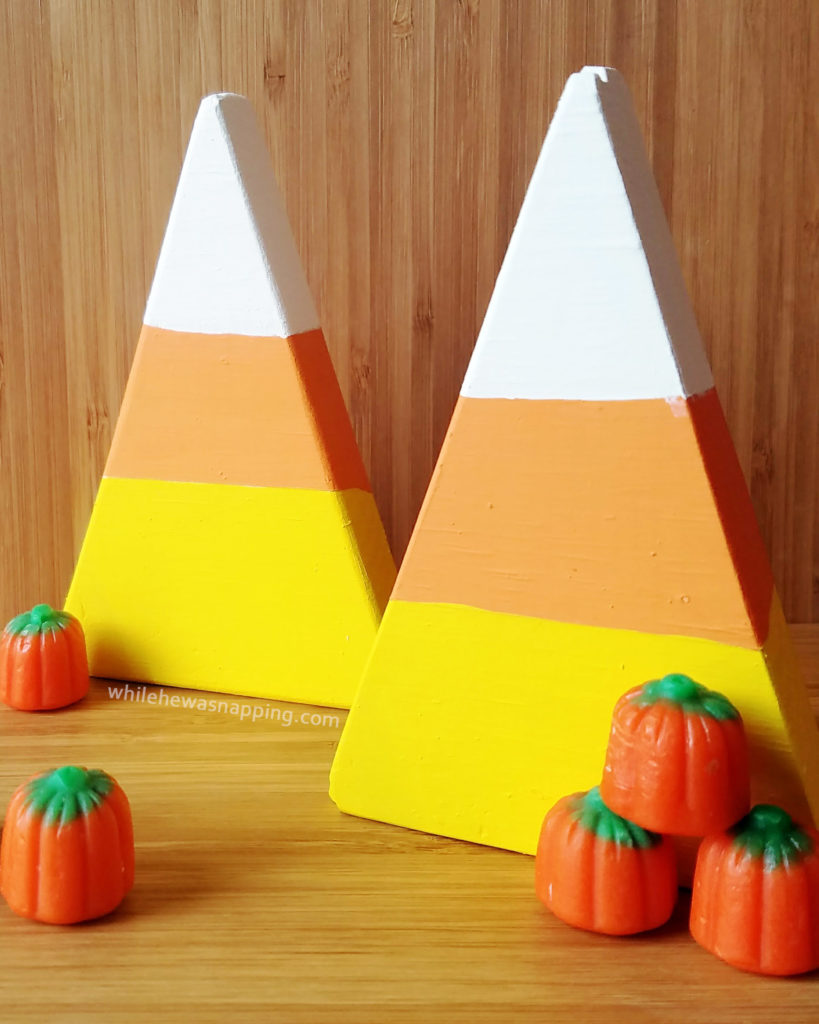
Halloween decorations. It seems like it’s an all or nothing deal. Either we go all out and spook out the whole house or we don’t even so much as put up wreath or change the chalkboard quote. I am definitely in the latter of those two groups. Clearly, right? I’ve got two wooden candy corn decorations and that’s about all the decorating I’ve done for Halloween this year. Halloween is hard for me to decorate for because I know it’s the kick-off to what is always a CRAZY holiday season. I tend to skip Halloween because I’m trying to get ahead of Thanksgiving and Christmas. Halloween ends of being a rushed afterthought.

Enter these candy corn decorations. This project piggybacks off another one that is coming next month and I just happened to have these two extra pieces that I thought would look good as candy corn decorations, so they are last-minute.

WOODEN HALLOWEEN CANDY CORN

 DECORATIONS

Wooden Candy Corn Halloween Decorations


Materials:

  • 1″x6″ board
  • Tape measure or ruler
  • Pencil
  • Sand paper
  • Masking tape
  • White acrylic paint
  • Orange acrylic paint
  • Yellow acrylic paint
  • Paintbrush
  • Circular saw or other saw

Directions:

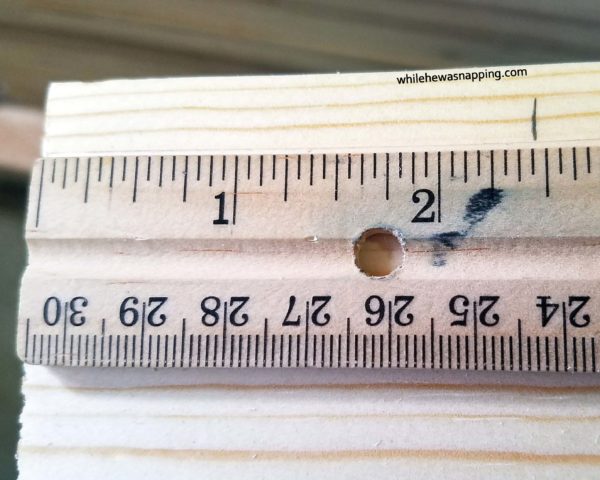
1. Use the tape measure or ruler and, on the top edge of the board, measure 2.5 inches from the end of the board. Make a small mark with the pencil.

Halloween | Decor | Decorations | Candy Corn | Wood

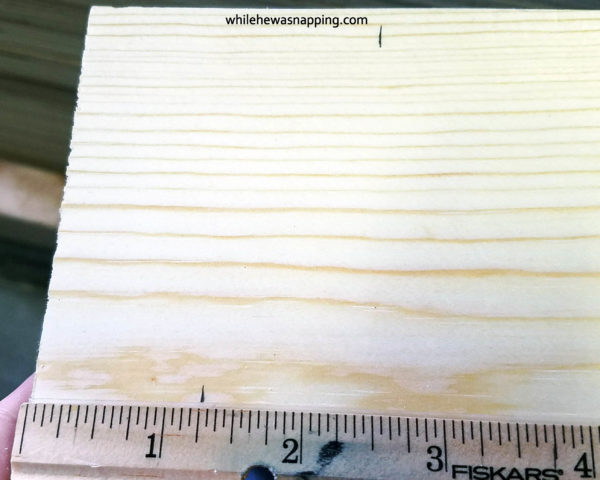
2. Move the tape measure to the bottom edge of the board, and measure 1.25 inches. Make a mark with the pencil.

Halloween | Decor | Decorations | Candy Corn | Wood

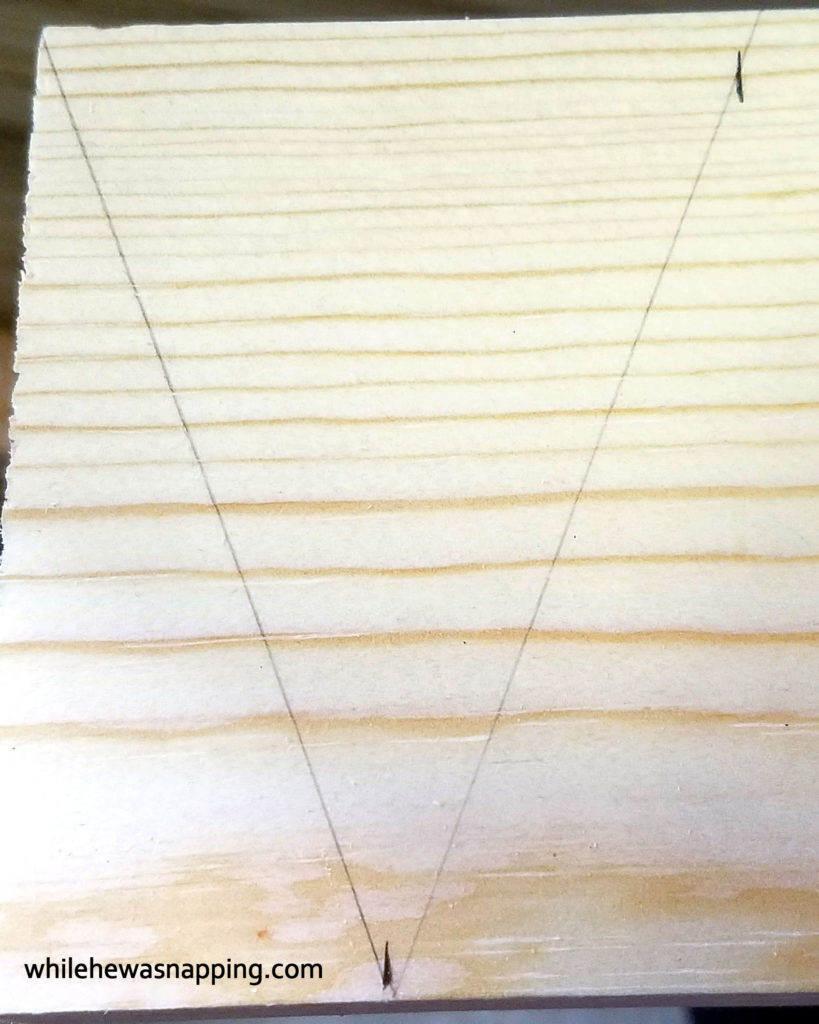
3. Use the straight edge of the ruler and line up the bottom mark with the top corner of the board. Draw a line to connect the two marks. Do the same from the bottom mark to the mark at the top.

Halloween | Decor | Decorations | Candy Corn | Wood

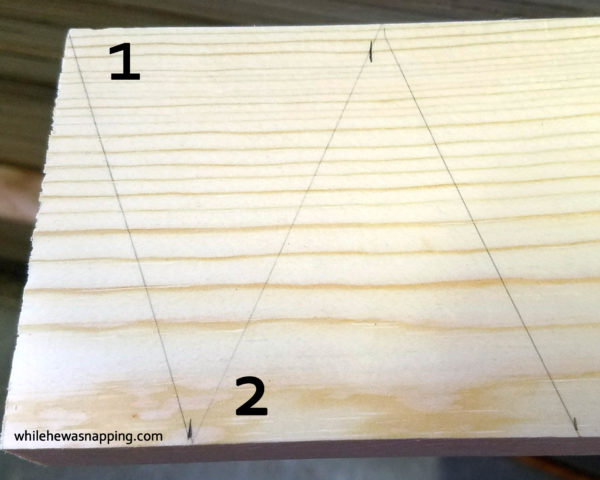
4. Repeat the measurements for the remaining length of the board. Use the saw to cut along your marks.

Halloween | Decor | Decorations | Candy Corn | Wood

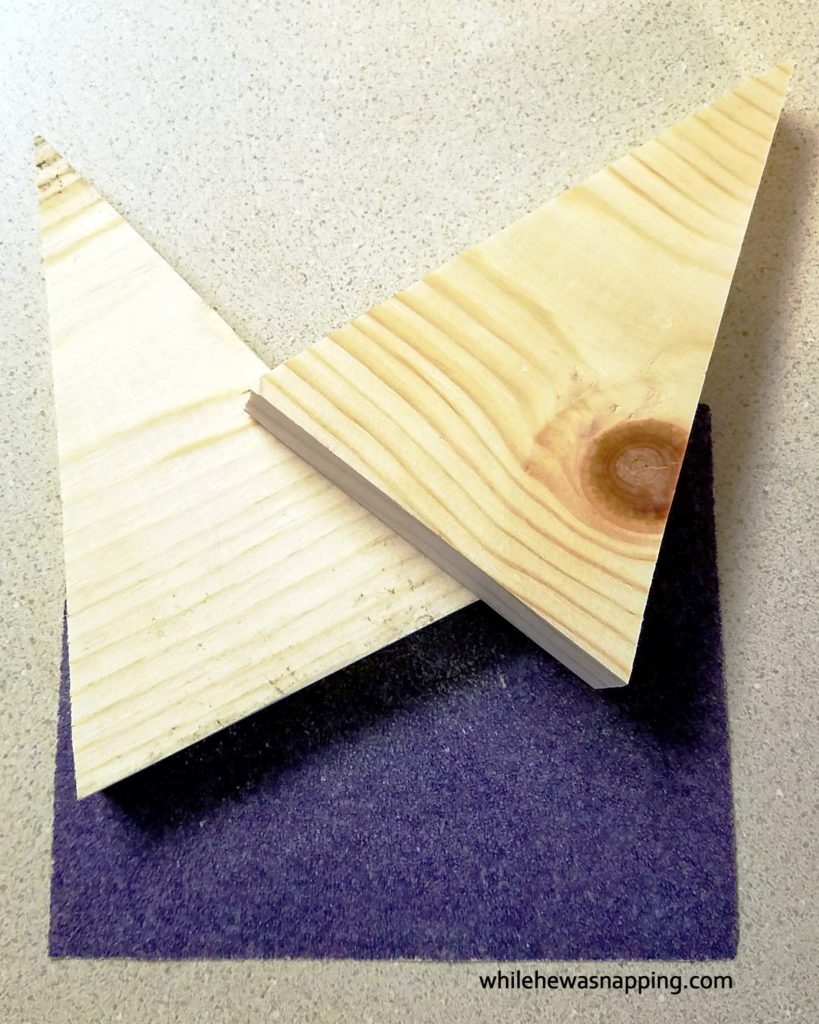
5. Use the sand paper to clean up the edges of each of the triangles. A rougher grit will take the edges down more than a finer grit paper.

Halloween | Decor | Decorations | Candy Corn | Wood

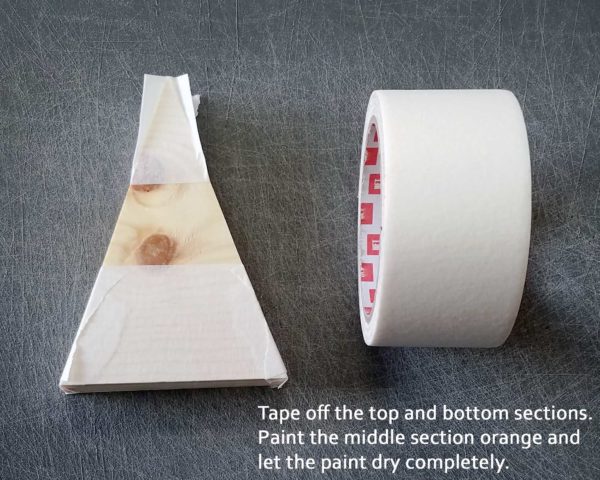
6. Use your masking tape to tape off the middle section of each triangle so your paint won’t bleed into the other sections. You can measure the sections, but I just free handed and eyeballed it on mine.

Halloween | Decor | Decorations | Candy Corn | Wood

7. Paint the top section of each triangle white and allow to dry for 20-45 minutes. Continue to add coats of paint so the wood is adequately covered.

8. Paint the bottom section yellow on each triangle. Allow to dry for at least 20-45 minutes. Repeat and continue to apply thin coats of paint until you have adequately covered the wood.

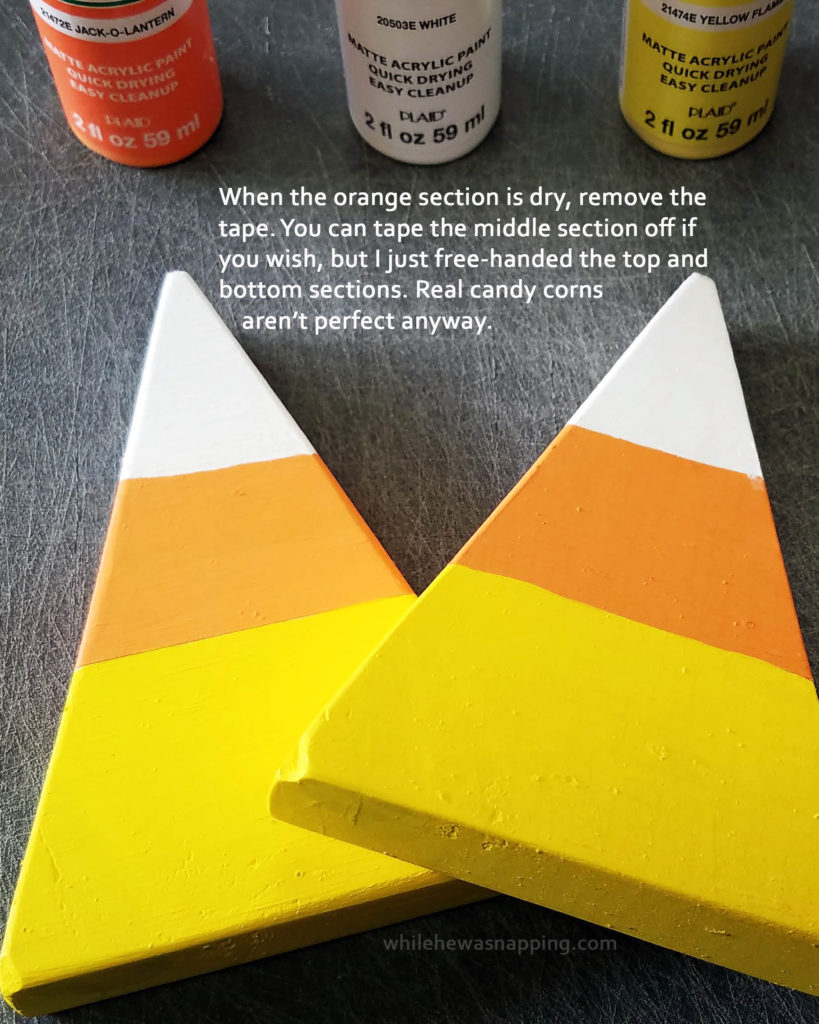
9. Remove the masking tape when the paint is completely dry. Wait at least 2-4 hours, or overnight if possible so you don’t have any paint bleed or smudging.

Halloween | Decor | Decorations | Candy Corn | Wood

10. Paint the middle section orange. You can tape it off if desired, but I just free handed it carefully. Candy corn lines aren’t perfectly straight in reality, so I wanted mine to be unperfect too.

11. Allow the paint to dry overnight so you can set them out to display.

Halloween | Decor | Decorations | Candy Corn | Wood

October 11, 2016 by Krista

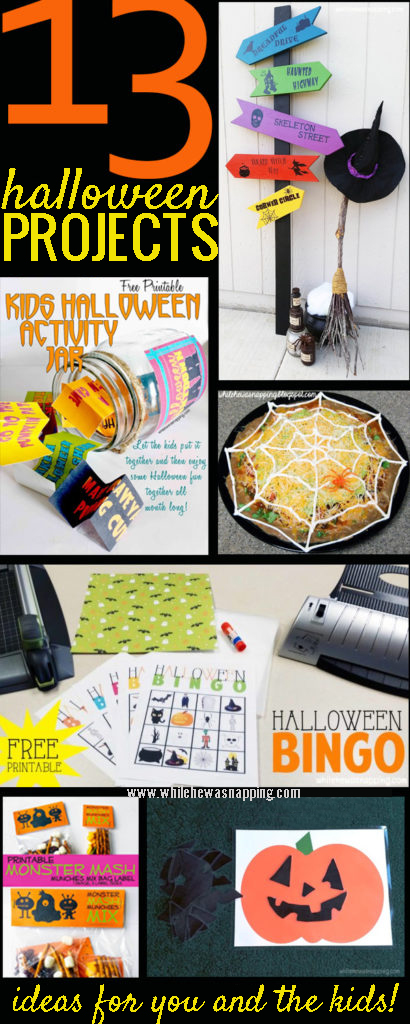
13 Spooky Fun Halloween Projects {for you and the kids!}

October is zooming by! That’s okay though, there’s still time to get some great Halloween projects in before another one comes and goes.

Want some fun craft projects for you? These Halloween projects are some of my very favorite projects I’ve ever done. Seriously. I’m glad Halloween is at the end of the month so I get to enjoy them for 31 whole days.

Looking for kid activities to do with the kids this month? We’ve got some fun ones (#9 has been a TOTAL hit this year! I had to make another set so my little ones would stop fighting over it!).

And, of course, there’s some fun snacks to help you celebrate this month.

13 HALLOWEEN PROJECTS

13 Halloween Projects for you and the kids to try this October. Home decor, crafts, spooky eats, printables, and kids activities! There's a little something for everyone!


HALLOWEEN PROJECTS FOR YOU

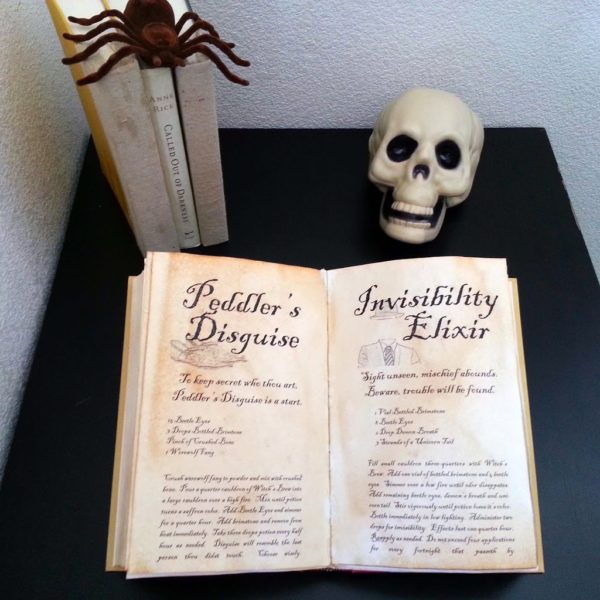
#1. DIY Spell Books with 12 Spells. For several years, I had dreamed of creating some spell books. I want to be able to open up the books and to even have spells in them. I got the project done a couple years ago and it is still one of my favorite Halloween decorations. 
DIY Spell Books


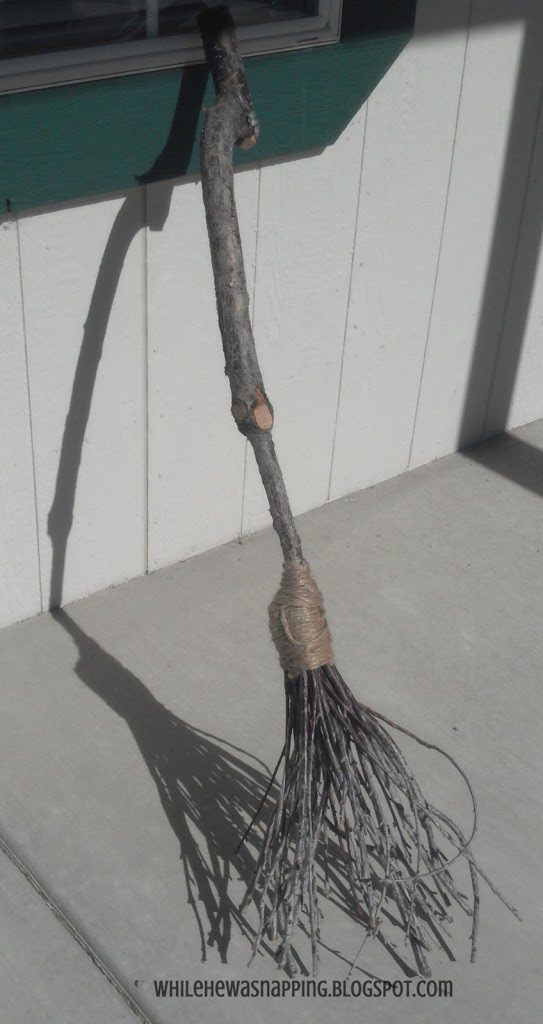
#2. Life-Size Witch’s Broom. You’ve got the spell books, but what about the broom? This project is practically free and you can find all your supplies while you’re out for a walk. The kids can help with this one too!
DIY Witch's Broom

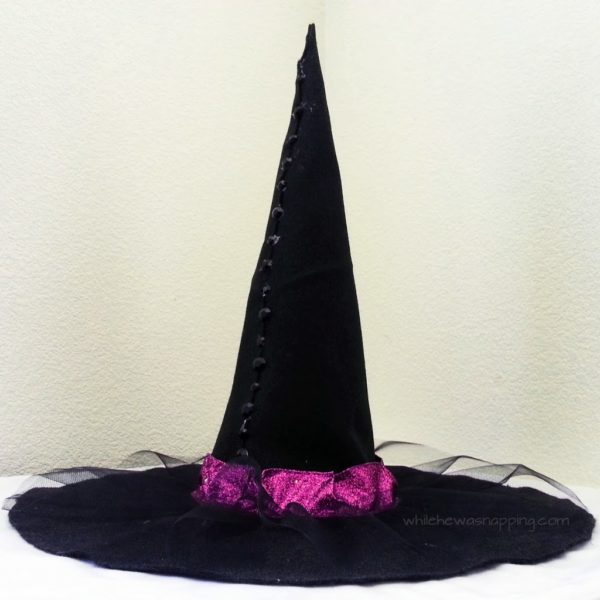
#3. No-Sew Witch’s Hat. Finish up your witchy collection with this no-sew DIY hat that you can really wear. It’s a great afternoon project that will really kick up your witchy ways this Halloween.
No-Sew DIY Witch Hat


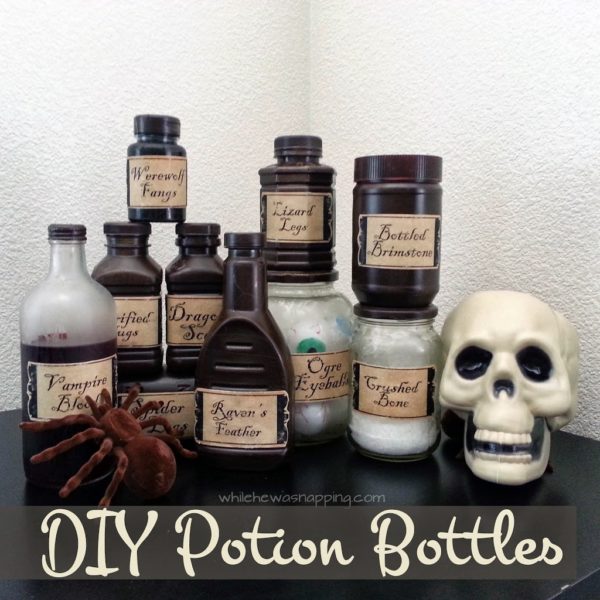
#4. DIY Potion Bottles. Whether you use these with your spell books or because you have a mad scientist, you’re gonna love these potion bottles. The best part is coming up with what to put in each bottle and what to call it. Don’t worry, there’s a list of suggestions if you get stuck.
DIY Witch's Potion Bottles


#5. Directional Halloween Sign. This was a project I did last year and didn’t get to show off nearly as much as I wanted to. I love the color on this sign and all the fun street names. It’s definitely set up camp in my flower bed for the month.
Behr Marquee Halloween Directional Sign and Halloween Decor


HALLOWEEN PROJECTS FOR THE KIDS

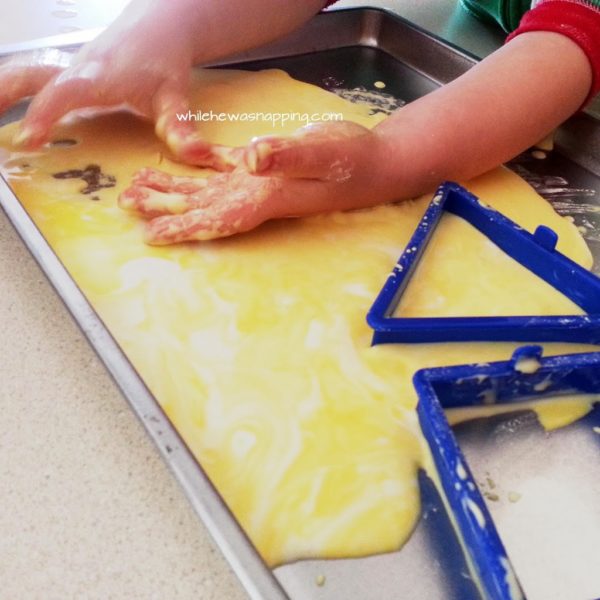
#6. Slime. This is one of my boys’ favorite activitites and they love it when we creep in up just a bit for Halloween. Add plastic spiders, creepy crawers or have a contest to see who can hold the most slime for the longest.
Cornstarch and Water Slime


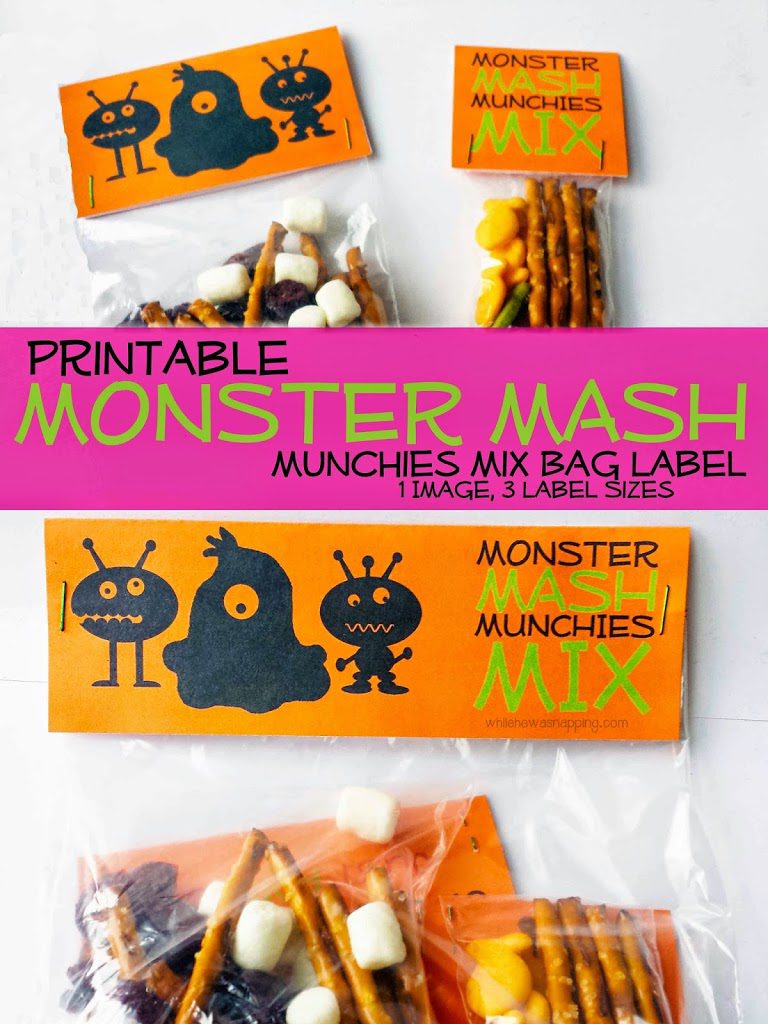
#7. Monster Mash Munchies Mix Printable Snack Labels. A fun way to give our your Halloween goodies this year. Just print, cut and staple to the top of plastic ziptop bags for a hauntingly good treat.
Monster Mash Snack Labels


#8. Halloween Bingo Printable Game. The kids will love this Halloween Bingo game and it’s FREE! Come grab your set and keep the kids entertained while you cook dinner tonight.
Halloween Bingo Printable


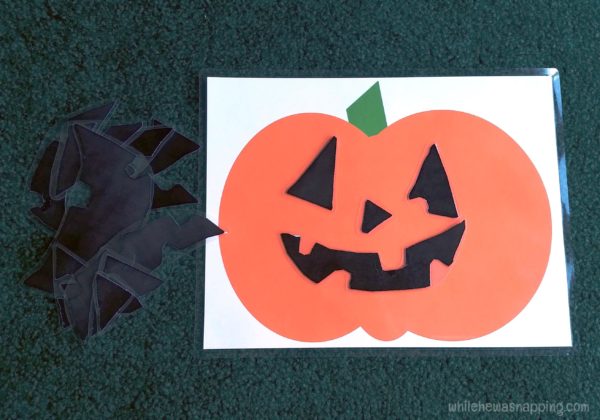
#9. Build a Jack-O-Lantern Printable. We love this printable because there are SO many ways to play with it. Play a game of pin the face on the jack-o-lantern, practice numbers, talk about emotions, and see how many different faces you can make. My little especially love this one.Build a Jack-O-Lantern Printable


#10. Halloween Countdown Jar Printable. Want to make some memories and maybe a few traditions too. This fun FREE printable countdown jar is super easy to put together. Just print, cut and fold. Put all your October bucket list activities in the jar or use the included ones for fun all month long.
Printable Halloween Countdown Activity Jar


#11. 5 Ways to Get a Great Last Minute Halloween Costume {on a Budget}. Creating costumes with the kids is the way to go! These are some of my favorite go-to ways to create costumes that don’t break the bank, whether it’s last minute or not. Way #1 is especially my favorite, I love that they can wear them for more than one night!
5 Ways to Get a Great Halloween Costume on a budget


HALLOWEEN PROJECTS YOU CAN EAT

#12. Make Halloween Cookies. Here is a collection of 10 cookies that anyone can make. No amazing crafty, super baker skills needed. These are perfect to do with the kids… or without. They are all pretty quick and easy too!
Ten Halloween Cookies anyone can make


#13. Halloween Treats That Aren’t Candy. Maybe you’re on sugar overload (or the kids are!) and you just need something that isn’t dripping with sickly sweetness. Try one of these great treats. Fun Halloween eats without the sugar rush? Yes please.
10 Halloween Treats that AREN'T Candy


BONUS HALLOWEEN PROJECTS TO EAT:

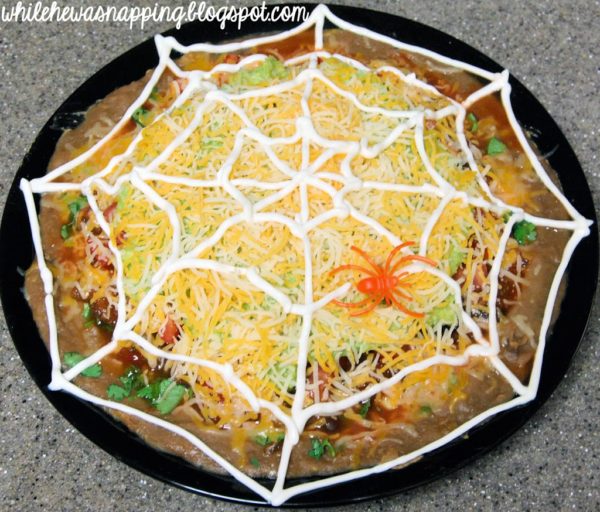
Thirteen was too perfect a number to stop at, but these nachos are still some of my favorite Halloween food we’ve enjoyed. In fact, they are tradition in our family on Halloween night.

Spiderweb Nachos

Spider Web Nachos


Happy Halloween! Now, go do some celebrating!

December 14, 2015 by Krista

Cork Reindeer Ornament

I have been wanting to make this cork reindeer ornament since I made my cork jewelry organizer. Yeah, almost three years ago… But, I made the cork jewelry organizer in February. After Christmas. So, I saved it. And saved it. Annnnnnd saved it. But no more! I have put those extra corks to great use and turned them into some fabulous Christmas ornaments! This would be great for little bit older kids – there was a little too much hot glue for my not-so-careful kiddos. But it was super cathartic for me… so there’s that.

CORK REINDEER ORNAMENT

Cork Reindeer Ornament


Materials:
– cork
– googly eyes
– small black or red pom pom
– 2 brown pipe cleaners
– paper clip and wire cutters
– glue gun and glue sticks

Cork Reindeer Ornament Materials

Directions:
– Hot glue the eyes in the middle of the cork, close together.Cork Reindeer Ornament glue on eyes
– Hot glue the pom pom on the end of the cork for the nose.
Cork Reindeer Ornament glue on nose
– Shape the pipe cleaners into antlers and hot glue them to the sides of the cork.
Cork Reindeer Ornament make antlers out of pipe cleaners

Cork Reindeer Ornament glue antlers to cork
– Shove the end of the paper clip into the top of the cork. Leave about an inch of space after the paper clip comes out of the cork. Use the wire cutters to carefully bend the paper clip into a small eye hook.  Secure with a bit of hot glue to keep it in place if desired.
Cork Reindeer Ornament paper clip in top of cork

Cork Reindeer Ornament cut paper clip about an inch from the cork

Cork Reindeer Ornament use round nose pliers to make an eye hook
– Attach a hook to the paper clip loop and hang it on your tree.

Cork Reindeer Ornament Trio

These went together so quickly that I ended up with three of them… so now we have three cork reindeer ornaments. Maybe I’ll slap years and names on the backs of those babies and give them to my boys as gifts. But seriously – so EASY! I would have (should have!) made them with the 8-11 year old girls I used to have Activity Days with a couple years ago. They would have loved these reindeer ornaments!

Cork Reindeer Ornament Rudolph Ornament

December 11, 2015 by Krista

Glass Snowman Ornament

This snowman ornament turned out cuter than expected, considering the simple materials. And that it was kind of a last-ditch effort to salvage the ornament I originally made. The original wasn’t as awesome as I’d pictured and I was rather disappointed with it at first. Luckily, attempt #2 turned out much better in the form of this cute snowman ornament. Quick, easy and cute. Just my kind of craft. Ready to make yours?

GLASS SNOWMAN ORNAMENT

Epsom Salt Snowman Ornament - Great project for kids


MAKING YOUR SNOWMAN ORNAMENT

Materials:
– Glass ornament. I used these glass disc-shaped ornaments I found on Amazon (affiliate link)
– Epsom salt
– School glue
– Hole punch
– Scissors
– Construction paper – orange and black
– Hook or paper clip to hang the ornament

Directions:
– Take the cap off the ornament carefully and set it aside. Pour some glue into the ornament. If you want the salts only on one side like I did it, be careful and only get glue on one side of the ornament. If you want the whole thing to have salts on it, pour the glue in and spread it around the entire ornament.

– Pour Epsom salt into the ornament and shake the ornament until salt covers all the glue. I left a little extra in the glass ornament too. You can leave it or empty it out, your choice.

– Use the hole punch to punch out circles from the black construction paper. If you want larger eyes (like I did) use the scissors to cut larger circles for the eyes also from the black construction paper.

Snowman Ornament using glass ball, black construction paper & glue stick

– Use the glue to put the eyes and mouth on the outside of the glass ornament.

Snowman Ornament cut eyes from construction paper and glue onto glass ball

– Cut a small triangle from the orange construction paper for the nose. Glue it on with the glue too.

Snowman Ornament made with a glass ball and construction paper
– Let the glue and Epsom salt dry and then carefully put the cap back on the top of the ornament. Attach a hook and hang on the tree.

Epsom Salt Snowman Ornament

That’s it. Who knew construction paper would work so well?! I was hoping to use craft foam to give it a little more dimension, but I didn’t have orange… or black. So, I improvised with the paper and it still turned out great. If the snowman pieces fall off I’ll use hot glue to stick them back on. I haven’t had a problem with them yet though. Despite the fact that my baby played Godzilla with the tree yesterday. Even attempted to ascend to the tip top… that boy will be the death of me.


A SNOWMAN ORNAMENT THE KIDS CAN MAKE

This was simple enough that my boys could have helped. They didn’t… because they were sent to bed early. We need to sing “Santa Claus is coming to Town” more often it seems. A more frequent reminder of all that’s at stake seems to be necessary.

Epsom Salt Snowman Ornament - Fun for the kids

Little J was pretty disappointed he didn’t get to make one… he thought they turned out great and wouldn’t stop touching it. His smile is pure joy. It’s my favorite.

Epsom Salt Snowman Ornament - The kids love these

All snowmen need a scarf, right? This little guy might get this little accessory in a day or two. And I just know you’re dying to know what was so awful with the first ornament that I had to try again… go ahead. You be the judge.

Snowman Ornament Disc Let It Snow Original

  • 1
  • 2
  • Next Page »

I'm Krista. Ringleader here on While He Was Napping, wife to my handsome Mr. Right & momma to my THREE energetic boys, Big J (9), Little J (6) & Little N (4). We FINALLY added a beautiful little girl to our family last December.

I’m knee-deep in Tonka trucks & Thomas trains. I survive our crazy days with Vanilla Coke, Sonic slushies, sweet snuggles and little giggles. When I tuck them in tight & kiss them good night, I get a little time to create & just be me.


It all happened
while (s)he was napping
Want More of My Story?

Privacy Policy

While He Was Napping respects your privacy and is committed to keeping any personal information collected on this website confidential. To find out what information we collect and how it is used or what options you have regarding your information, see our full privacy policy here. Creative Commons License The website found at whilehewasnapping.com and all subdomainsauthored and published by Krista is licensed under a Creative Commons Attribution-NonCommercial-NoDerivs 3.0 Unported License.

Pretty Chic Theme By: Pretty Darn Cute Design