While He Was Napping

momma gets stuff done

  • Home
  • About
  • Archive
  • Do It Yourself
    • Crafts
      • No Sew
      • Painting
      • Paper Crafts
      • Repurpose Projects
      • Vinyl
      • Washi Tape
      • Kid’s Crafts
      • Fonts
    • Sewing
    • Decorate
      • Home Decor
      • Holiday Decor
    • Celebrate
      • DIY Gifts
      • DIY Your Party
  • Recipes
    • Beverages
    • Appetizer
      • Bread
      • Other Appetizers
    • Snacks
    • Main Dish
      • Meat
        • Chicken
        • Beef
        • Pork
        • Seafood
      • Vegetarian
      • Slow Cooker
      • 30 Minute Meals
    • Dips & Sauces
    • Salads
    • Pasta
    • Soup
    • Dessert
      • Cookies
      • Brownies
      • Cupcakes and Cake
      • Box Mix Recipes
      • Other Sweet Treats
    • Breakfast Food
      • Pancakes
      • Waffles
      • Muffins
      • Other Breakfast Food
  • Family
    • Babies
      • Pregnancy
      • Newborns
      • The 1st Year
    • Toddlers
    • Preschoolers
    • Kindergartners
    • 6-8 Year Olds
    • The Grown Ups
      • Date Night
      • Romantic Gifts
    • Self Care
  • For the Home
    • Cleaning
    • Organizing
    • Emergency Preparedness
  • Travel
    • Travel Tricks & Tips
    • Traveling with Kids
  • Tech & Gadgets
    • Must-Have Apps
    • Techy Home Appliances
    • Gadgets & Electronics
    • Blogging Tips
  • Printables
    • Posters
      • Quote Printables
      • Subway Art Printables
    • Printable Organizers
    • Printable Journals
    • Learning Printables & Worksheets
    • LDS Printables
  • Holidays
    • New Year’s
    • Valentine’s Day
    • St. Patrick’s Day
    • Easter
    • Cinco de Mayo
    • Mother’s Day
    • Father’s Day
    • 4th of July
    • Back to School
    • Halloween
    • Thanksgiving
    • Christmas
    • Holiday & Seasonal Printables

February 4, 2019 by Krista

Kids Love Coupons are a DIY Gift That Will Last Forever

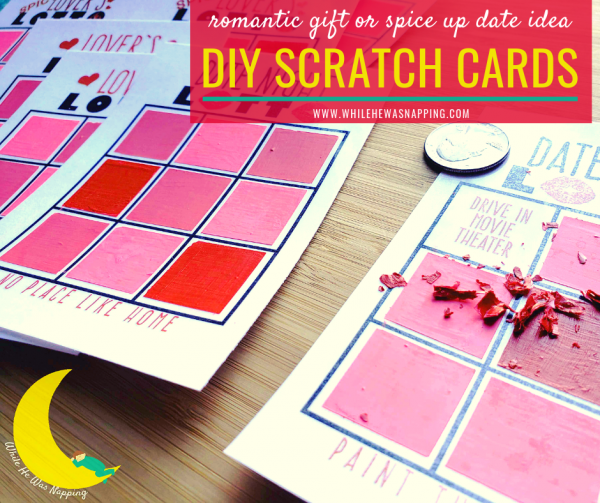
Hey there, do you have a favorite kid – or two or three – in your life? Do you know any kids that are hard to get gifts for? Maybe you’re struggling with giving meaningful gifts versus gifting more stuff? These cute Kids Love Coupons are perfect for kids that don’t need more toys.

Give those kids something they really want and that will last forever – and you’ll love it too! Give them some of your time and make some fun memories with them. Because, what kid wouldn’t want a special date or activity and to be the center of your attention? Carve out some special time for your favorite activities together with these printable Kids Love Coupons.

DIY Kids Love Coupons Book Gift


KIDS LOVE COUPONS: A MORE MEANINGFUL GIFT

As a mom of 4, I know all too well what it’s like when kids have plenty of stuff. Mine definitely don’t need more toys and things to leave on the floor. Because of this, I try to give my kids meaningful and worthwhile gifts. And, as a busy mom, time is one of the most precious things. I would much rather spend more time doing fun things with my kids than picking up more toys.

And I love that these kids coupons are perfect for every budget. The actual coupons cost some ink and paper. The outing redeemed with the coupon can be as expensive or frugal as you want or need it to be. My kids get just as excited about going to the park as they do about going to the movies.

They don’t need fancy, they just need you.

Things come and go. Toys break. Fun and memories can last forever.

DIY Kids Love Coupon Book


KIDS LOVE COUPONS: THE PERFECT GIFT ANYONE CAN GIVE ANYTIME

These Kids Love Coupons are a perfect gift to receive from anyone. What kid wouldn’t love to get some fun dates and special activities from one of their favorite people? Anyone can give someone their time: Parents to children, grandparents to grandchildren, favorite aunt or uncle to niece or nephew, even friend to friend.

And Kids Love Coupons are great for lots of occasions:

  • holidays
  • birthdays
  • big life events
  • as rewards for accomplishments and exceptional behavior

It can be hard to juggle life’s demands. Love coupons are one way we help ensure our kids get some quality one-on-one time. If they need some extra attention, they redeem a coupon. It’s a great non-confrontational or mom-guilt-inducing way for them to say “hey, I need a little extra right now.”


MAKING YOUR OWN KIDS LOVE COUPONS BOOK IS AS EASY AS 1-2-3

A good homemade gift is the best. But life is busy and there aren’t always hours to spend putting together something for every gift that comes along. This kids love coupons book is simple, quick and will look great when you’re finished.

With just a handful of materials you probably have already and a half an hour, you will be ready to hand your favorite kid some memory-making magic in the form of 9 awesome things to do with you.

Affiliate Link Disclaimer

KIDS LOVE COUPONS SUPPLIES:

  • Kids Love Coupons – free download below. There is a full set of 28 ready-to-print coupons, plus editable files to easily create your own custom coupons in my Etsy shop, if you want a larger set of coupons.
  • Printer and Paper – I recommend cardstock
  • Paper Cutter or Scissors
  • Washi Tape or Ribbon and Hole Punch
  • Craft Knife (optional)

Kids DIY Love Coupons

KIDS LOVE COUPONS DIRECTIONS:

1. DOWNLOAD AND PRINT YOUR COUPONS

Step #1a: Download your free printable coupons by clicking on the green “Click to Download” button below. Save the file to your computer.

Step #1b: *If you upgraded to the full set of coupons in my Etsy shop, make sure you personalize the cover and fill in any of your own special coupons before you print! Follow the directions on the Printing Guide.*

Print your coupons. This file is designed to print at “actual size” on 8.5″x11″ paper. I recommend printing on cardstock for added durability. Personally, I use THIS CARDSTOCK for most of my projects. I prefer a 110 lb weight and a brightness of at least 90.

This file is intended to be printed on a single piece of paper. If your printer has the option to print double sided, use it and flip on the long edge. If your printer does not print double sided, you will have to manually flip the page and put in back in the printer before printing the 2nd page.

Kids Valentine Love Coupons Double Sided Printable


PRO TIP: When manually printing double sided, I put a little ‘x’ in pencil at the bottom left corner of the page before I print anything so I know how to put the page back in the printer when I print on the back side. The ‘x’ will need to be at the same end of the printer, facing down when you put the page back in.


2. CUT APART YOUR KIDS LOVE COUPONS

Step #2a: Cut the coupons apart. I love my Swingline SmartCut paper cutter for this stuff. Makes cutting straight lines a breeze and so, so fast. And I love that the blade is fully enclosed with all the little fingers around my house.

Kids Valentine Love Coupons DIY Gift

PRO TIP: Your coupons may not have printed perfectly straight on the page. Make sure you check the edges of the coupons on your cutting line before you cut so your coupons don’t get cut crooked.

You could also use a ruler and craft knife or scissors to cut the coupons apart.


3. BIND YOUR KIDS LOVE COUPONS BOOK TOGETHER

Step #3a: Gather your coupons together and arrange them in the order you want them. Line up all the edges on the side you’re going to bind. The easiest way to do this is to hold the coupons loosely in your hand and knock the side you’re going to bind against the table a few times.

Step #3b: Cut a piece of washi tape a little longer than the length of the edge you’re going to bind. It doesn’t need to be precise, the tape just needs to cover the entire length of the edge. Place the tape on the edges of the coupons, pressing firmly. Wrap the excess tape around the front and back of the coupon book. Press each coupon firmly into the washi tape binding. Use your craft knife or scissors to trim the ends.

Kids Valentine DIY Love Coupons Binding with Washi Tape

Kids Valentine DIY Love Coupons Washi Binding


PRO TIP: If your coupons aren’t sticking to the washi tape and staying in the book, put a thin zigzag of white glue across the full length of your washi tape. Because washi tape isn’t a permanent tape, some kinds won’t be sticky enough to hold the coupons in place. A small line of white glue should help with that, without making the coupons hard to remove from the book.

DIY Gift for Kids Love Coupons

That’s it! You’re ready to wrap and give those love coupons to your favorite kid. And get ready for some awesome good times and memory making!


GIVE YOUR FAVORITE KIDS A GIFT THAT WILL LAST THROUGH THE YEARS: KIDS LOVE COUPONS

Theodor Seuss Geisel, maybe you know him better as Dr. Seuss, said “Sometimes you will never know the value of a moment until it becomes a memory.”

It might seem like building a fort or going to the library isn’t a big deal, but when your kids look back on their childhoods they will remember the people and the fun. They will remember the forts and the story times. They won’t remember the things.

Go make your favorite kids their very own Kid’s Love Coupons Book and give them something to remember. 

DIY Kids Love Coupons Gift

Want to expand your Kids Love Coupons collection? Check out my Etsy Shop for the full set of 28 ready-to-print coupons and an editable file that will help you make your own personalized, custom coupons in just minutes!

January 28, 2019 by Krista

DIY Scratch Off Cards that will Spice Up Date Night

Hi there! Are you looking for a fun way to spice up your love life that won’t break the bank? Or maybe you’re searching for a fun DIY gift? Do you ever play the “Well, whatcha wanna do?” game on date night? Do you love scratch off cards – or maybe know someone who does? Then these DIY scratch off cards are just what you are looking for!

In just 8 super easy steps and an afternoon, you’ll create a one-of-a-kind set of DIY scratch off cards that will add a little fun and mystery to date night. They are perfect for romantic gifts or just for a little change of pace.

DIY Scratch Off Cards Romance on a Budget


DIY SCRATCH OFF CARDS: SPICE UP DATE NIGHT WITH A LITTLE FUN AND MYSTERY

The best part about these DIY scratch off cards are that you can customize them to fit your needs. If date night has become predictable and lost it’s excitement, then something like a Date Night Lotto card would liven things up! Scratch off a square and you have a great date idea without adding a ton of stress or prep to date nights!

Or maybe you’re looking for a way to reconnect with your sweetie or to spice things up in the bedroom a bit? Then a set of Lover’s Lotto or Spicy Lover’s Lotto cards might fill your needs best. Scratch off one of those squares and forget your boring, old routine! Right at your finger tips is a great new romantic idea to fill your evening!

And I’ll give you the blank templates in just a minute! Doesn’t get much easier than that!

(But, if you do want it to get easier, I have pre-filled, ready-to-print cards as well as an editable PDF you can just plug your own ideas into in my Etsy Shop.)


ARE DIY SCRATCH OFF CARDS YOUR KIND OF PROJECT?

This project is pretty simple, but it’s not for everyone. So, how do you know if it’s the kind of thing you’re looking for? Who is this post written for? What demographics will benefit from this information? Make an emotional connection and hit a pain point.

  • Do you enjoy a good, simple DIY project?
  • Are you looking for a way to liven up your love life?
  • Do you need a romantic gift idea that doesn’t cost a lot, doesn’t take a ton of time to put together and is something your gift receiver will love?
  • Are you trying to stick to a budget?

If you said yes to those – or any combination of those – then this project is exactly what you’re looking for.


However, if you’re looking for something RIGHT NOW or don’t like DIY projects this might not be what you’re looking for. (My printable Date Night Jar or printable Truth or Dare: Couple’s Edition bedroom card game might fit your needs better right now. They are literally print and cut and done.)

Date Night Lotto DIY Scratch Off Cards


HOW TO MAKE DIY SCRATCH OFF LOTTO CARDS

With just a few simple supplies and an afternoon, you’ll have custom DIY scratch off cards perfect for your needs. A quick print job, some trimming and laminating, and a splash of paint is all you need to get one step closer to a spicier love life.

And don’t worry, most of the project time is waiting for the paint to dry. While it will take a few hours for your DIY scratch off cards to be all ready to go, you don’t need to carve out a whole afternoon to spend slaving away.

DIY SCRATCH OFF CARD SUPPLIES:

  • Blank scratch off card templates – Print your free blank templates HERE or you can grab all the pre-filled, ready-to-print cards and the editable PDF files to fill in yourself RIGHT HERE)
  • Printer and Paper
  • Scissors or paper cutter
  • Clear contact paper, cold laminating pouches or a thermal laminator and thermal pouches (I absolutely LOVE this thermal laminator starter kit – works great and totally affordable. I have the older model and it still works like a charm.)
  • Acrylic paint and paintbrush – any color will work, but a metallic paint will look most like a typical scratch off card. Follow your colorful heart, there is no wrong choice.
  • Paint palette or something to mix your paint on
  • Dish soap – the kind you hand wash dishes with, not the kind you put in the dishwasher.
  • Skinny 3mm washi tape – optional

DIY Scratch Off Cards made with simple supplies


PRINT & FILL IN YOUR DIY SCRATCH OFF TEMPLATES

Step #1: Download and print your blank lotto card templates. I recommend printing with a laser printer and on card stock for durability. Ink jet and regular paper will work just fine though.

*If you choose to grab my editable PDF files from my Etsy shop, you’ll want to fill those in before you print them.

Step #2: Fill in the blank templates with a pen or marker. Leave some space around your writing to make sure it won’t stick out from under the paint when you cover them up. You don’t need to leave a lot of space, but try not to write all the way to the borders of the boxes.

DIY Scratch Off Date Night Cards


COVER AND CUT YOUR DIY SCRATCH OFF CARDS

*If you use laminating pouches or a thermal laminator, you will want to switch steps #3 and #4. Cut the cards apart first and then laminate each individual card. After each card is laminated, cut it apart and trim the cards, if desired.*

Step #3: Cover the front of your lotto card templates with the clear contact paper. You can cover the back too, if you want, but it’s not necessary. This cover will help protect the cards and is how the paint will scratch off your DIY scratch off cards.

Step #4: After the contact paper is on the cards, cut the cards apart. The files are formatted to cut an 8.5″x11″ paper into quarters. You absolutely can cut the cards smaller though. I did trim mine smaller for neater edges and smaller margins.

DIY Scratch Off Cards DIY Gift Idea


PREPARE YOUR DIY SCRATCH OFF CARDS FOR PAINTING

Step #5: If you choose, mask off the edges of the cards. 3mm washi tape is perfect for this! Just put a line of tape on all the grid lines on the card. It’ll keep your paint lines nicer. Repeat with each card.

Step #6: Mix your acrylic paint and dish soap with an approximate 2:1 ratio – 2 parts paint, 1 part dish soap. It’s not rocket science and you don’t have to have precise measurements for this to work, so don’t stress over it.

DIY Scratch Off Cards


PAINTING YOUR DIY SCRATCH OFF CARDS

Step #7: Apply a thin layer of paint over the words on your card. Let the paint dry thoroughly.

Step #8: Repeat step #7 until you can no longer see the text through the paint. Depending on what color paint you use, you may need 3-5 coats. Let dry overnight once you can no longer see text through the paint layers.

DIY Scratch Off Cards with Acrylic Paint

That’s it, your ready to spice things up!


DIY SCRATCH OFF CARD TIPS & TRICKS

** A laser printer will keep your ink from smudging, should the cards get wet. Using laminating pouches will also accomplish this. An ink jet printer will work just fine, just be cautious not to get the cards wet if you don’t laminate them with pouches.

** Skinny 3mm washi tape is perfect for masking off your grid lines while you paint, however it is NOT a necessity. It will keep your paint lines neater, make painting easier, and make your cards look better overall, but free-handing the painting process is definitely an option and will save some time if you don’t have to mask off your grid lines. You could also cut down and use masking tape or scotch tape, if you prefer.

** Use fresh paint. By that, I mean not paint you’ve had in a cupboard for a few years… As you can see in that last photo, I started using silver paint. But it was old. It was clumpy and kept separating and didn’t mix well with the dish soap, so I ditched it for the red and pink paints. Newer, non-clumpy paint will give you a much better result with far fewer coats of paint.

** The painting and waiting to dry process is the longest part of this project, but it will turn out so much better if you do thin layers rather than a thick, globby one. You can use a blow dryer on low heat, low air flow to speed this process up.

** If all this masking off and painting thing is more than you want to deal with, you can use scratch off stickers to cover your date ideas instead. Take this cute idea and simplify! Find scratch off stickers on Etsy or on Amazon.

Got more questions? You’re always welcome to leave a comment or shoot me a message!


Romantic DIY Scratch Off Cards


READY TO MAKE SOME DIY SCRATCH OFF CARDS AND SPICE UP YOUR LOVE LIFE?

In just an afternoon you can spice up date night and add some fun and mystery to your romantic life. This project is simple and fun. It’s a great romantic gift idea that is customizable to fit your exact needs. And who wouldn’t love to get some DIY Scratch Off Cards like these?!

Turn on some mood music, grab a coin and start scratching off those fun ideas!

Spice up Date Night with DIY Scratch Off Cards


If you want more romantic gift and date night ideas, check out the Date Night Jar (or HERE is a printable version!)

September 8, 2017 by Krista

The Best Pumpkin Spice Play Dough Ever

Hi there! Welcome! I’m glad you’re here! Do you ever feel like the two hours after dinner seem to drag on for eternity? Or is that just me?

Everyone is cranky and snappy and whiny. And it’s only 6:11pm.

I’ve found that the best way to deal with this is to distract my kids.  If they are busy doing something, they aren’t fighting.

Usually.

If they aren’t fighting, I can cross a couple things off my to-do list. Like the the dishes or picking up toys or laundry. There’s always laundry.

This play dough has been my go-to lately. It’s fun, it’s easy and it smells amazing. Sure, it dries your hands out a bit, but that’s just the excuse you were looking for to give yourself a little DIY mani after the kids are in bed, right?


PUMPKIN SPICE PLAY DOUGH

Pumpkin Spice Play Dough is the perfect Fall and Halloween sensory activity! Soft, smells amazing and kids LOVE it!

 Affiliate Link Disclaimer

Pumpkin Spice Play Dough Ingredients

  • 1 cup salt
  • 1 cup water
  • 1/2 cup flour
  • 1 tbsp cream of tartar
  • 1 tbsp pumpkin pie spice
  • extra flour (I added about another 1/2 cup)
  • orange food coloring (I used red and yellow)

Pumpkin Spice Play Dough Directions

  1. In a medium saucepan, combine the salt, water, flour, and spice over low medium heat. Stir to combine. Texture should be like glue.
    Pumpkin spice play dough ingredients in the pot
  2. Turn off the heat and add the food coloring to get the shade you desire. I put in about 15 yellow drops and about 10 red drops. You can adjust the ratio to your liking.
    Pumpkin spice play dough and orange coloring
  3. Mix until well combined and texture is smooth.
  4. Add additional flour, approximately 1/4 cup at a time and mix until the paste becomes a dough. It should form a ball and be slightly difficult to stir.
    Pumpkin spice play dough turning from paste to dough
  5. Remove from heat and let the dough cool a bit. It will be hot.
  6. Sprinkle flour generously on counter top and, as soon as the play dough is cool enough to handle, dump the dough on the floured counter top and knead in the flour until it is no longer sticky. Keep adding flour until you reach your desired consistency.
    Pumpkin Spice play dough is perfect for sensory play

Store in an air-tight container or ziptop bag. Remove as much air as possible and seal. Play dough keeps for 4-6 months, depending on environment.

Pumpkin Spice Play Dough is super easy to make and a great sensory play kid's activity for Fall

Tips & Tricks to get the most out of your Pumpkin Spice Play Dough

  • Older kids can totally help with this, especially the kneading part.  Just make sure the play dough is cool enough for them to handle.
  • The cream of tartar will help preserve the dough, so don’t skip it if you want it to last longer. If you just need a few play sessions or a one-time-use activity, you can omit it.
  • There is nothing in this play dough that will harm your kids if ingested, although it won’t taste very good. So… they probably won’t eat much of it and will only try it once. There’s the silver lining.
  • We love using cookie cutters when we play with play dough. I especially love this set of cutters – there’s a full set of letters that are perfect for some fun letter practice, a great variety of holiday shapes and some fun everyday shapes – like animals and transportation – too.

July 12, 2017 by Krista

The Printable Toy Car Road Race Track Set your Kids will Love

Hey there! Welcome and I’m so glad you are here! Do you have a car-loving kiddo in your life? My three boys are all big into cars and have been since they could hold things in their hands. And, I’ll admit, I have a thing for fast cars too. I am an adrenaline junkie and fast cars are definitely good for that! And with my three boys, it seems faster is always better. We have been collecting diecast cars since my oldest was finally old enough to play with them! And a couple summers ago, my brother-in-law gifted us a HUGE collection of them. Which we gladly accepted. But what is a race car with no where to race? That’s why your little ones will LOVE this DIY Toy Car Road Set!

Does your kid love cars- Let them build their own race track with this printable track set! Get your download and instructions now!

EVERY TOY CAR NEEDS A TOY CAR ROAD!

Now that we have all these super cool cars to play with, I was itching for some fun play road time. Giving kids the chance to free play is high on my list, but sometimes it’s fun to have a little guided play too. This DIY is the perfect way to combine the two. Make your car-loving kids this printable toy car road track set for their cars, because what’s a race car with nowhere to race?

Play time with this DIY Printable Race Track Road and Fast & Furious die cast cars


The best part? It’s reusable and there is no right or wrong way to play. When my kids feel like they are in control of play time it tends to lead to longer and more engaged play, which means I can cook dinner without tripping over little boys in my kitchen. Between their imaginations and this DIY toy car road, they should be happy for quite a while.


MAKE YOUR TOY CAR ROAD IN 5 EASY STEPS

Life with kids is great, but play time can get rough and tough. A paper toy isn’t bound to last long in my house. Yours either? Well, I’ve got a few tips so you only have to print this toy car road once and to help it last as long as possible once you let the kids loose. Ready? Let’s do it!

Affiliate Link Disclaimer

Toy Car Road Materials:

  • Printable Track Pieces in Color | Track Pieces in Monochrome
  • Scissors
  • Laminating pouches or self-laminating sheets | I recommend these pouches. I haven’t used the self-laminating sheets, but these ones have been recommended to me
  • Laminator (if using thermal laminating pouches) | this is the new version of the one I use and love
  • 5/8″ hook and loop fastener dots | get them here

Printable Race Track Road Materials

Toy Car Road Assembly Instructions:

  1. Print the track pieces. I suggest a card stock or other thick paper for durability. You may want to print more than one copy of the pieces, so there will be more to play with. This tutorial uses 2 sets of the color track set.
  2. Cut the track pieces out with the scissors, getting as close to the edge of the road as you can unless you want a white border on the edges.

Printable Race Track Road Track Pieces Cut Out

  1. Laminate the pieces. I prefer a thermal laminator, but you can use self-laminating sheets too. Follow the directions on the packaging to get the best seal. A thicker sheet or pouch may help your track pieces last longer. I use these thicker 5mm ones and love them.

Printable Race Track Road Track Pieces in Laminating Pouches

Printable Race Track Road Laminating
Printable Race Track Road Laminate Track Pieces

  1. Cut around the track pieces with the scissors. Make sure to leave enough border so the seal stays intact.

Printable Race Track Road Laminated Track Pieces

  1. Attach the hook and loop fastener dots to the ends of each piece. Put the hook pieces on the front side of the track pieces and the loop pieces on the underside. This makes it so you can rotate the track pieces. Repeat for each track piece, trying to get them as close to the center as you can so they will line up.

Printable Race Track Road Fronts Hooks

Printable Race Track Road Backs Loop

That’s it. You’re ready to play! Store pieces in a ziptop bag or other container with a couple of cars so you’re always ready for some race time play! Not much room to play? Only get out a few track pieces out for a compact track. Or go all out and try to use all the pieces!

Printable Race Track Road DIY


NEED A TOY CAR ROAD THAT WILL LAST?

Let’s admit it, this version is pretty simple and not terribly expensive. A year later, ours is still in pretty good shape, all things considered. But, it definitely has some wear and tear on it. I’ve had to replace a couple of the hook and loop pieces and we’ve had things spilled on the pieces, like half a bottle of bubbles… So, if you’re looking for a toy car road set that will hold up just a bit better you should really check out this Felt Road Track. It takes slightly longer to create, but the pieces will hold up better – and just toss them in the washer if they need a quick cleaning.

RACE ON, MY FRIEND!


July 3, 2017 by Krista

DIY Rain Stick Noise Maker for kids

One of my favorite things about summer is summer rain storms. When I was in 4th grade, we studied the rain forest. As part of our study, we made rain sticks from 3-foot cardboard tubes. I kept that thing for a decade; I loved it.

TP Roll Rain Stick Noise Maker

TOILET PAPER TUBE OR BEST MOM EVER?

When I told my boys we were going to use toilet paper tubes to create noise makers, they were a bit skeptical. But, as we talked about it and Ii gave them more details you’d have thought I told them they had free reign in a candy store. They went crazy! It’s nice to score cool mom points on easy stuff like this. These noise maker rain sticks are great for parties, dress up boxes, celebrations, and they make a fun learning activity too! Ready to score some cool mom points of your own?

MATERIALS:

  • Empty toilet paper tubes
  • 1 3/8″ finish nails
  • Pencil
  • Cardstock
  • Hot glue gun and glue stick
  • Scissors
  • Colored duct tape or cardstock
  • Push pin
  • Filler material (we used both rice and dried beans. But other ideas include small beads, dried peas, and small pebbles. We experimented with the different sounds different fillers would make.)

TP Roll Rain Stick Noise Makers Materials

DIRECTIONS:

  1. Use the pencil and trace around the end of the toilet paper tube to make 2 circles that will cap the ends of the tube.
  2. Cut the circles out with the scissors.
  3. Hot glue one circle to one end of the tube. TP Roll Rain Stick Noise Makers Step 1
  4. Use the push pin to poke holes in the side of the toilet paper tube in 3 or 4 layers.
  5. Poke a finish nail into each push pin hole. TP Roll Rain Stick Noise Makers Step 2
  6. Put 1/8 – 1/4 cup of your chosen filler material in the tube. You can experiment with how much filler to use by placing your hand over the open end and turning the tube upside down to hear what it will sound like.
  7. Hot glue the other cardstock circle over the open end of the tube. TP Roll Rain Stick Noise Maker Step 4
  8. Cover the tube with colored duct tape or cardstock. You can decorate with markers, stickers, or adhesive foam if desired. TP Roll Rain Stick Noise Makers Step 5


CREATE A TON OF FUN WITH YOUR NOISE MAKER

Use your rain sticks to create your own rain storm. Or use your rain sticks as maracas. Add them to your dress up stash. Whatever you decide to do with your noise maker rain sticks, just have fun.

  • 1
  • 2
  • 3
  • …
  • 6
  • Next Page »

I'm Krista. Ringleader here on While He Was Napping, wife to my handsome Mr. Right & momma to my THREE energetic boys, Big J (9), Little J (6) & Little N (4). We FINALLY added a beautiful little girl to our family last December.

I’m knee-deep in Tonka trucks & Thomas trains. I survive our crazy days with Vanilla Coke, Sonic slushies, sweet snuggles and little giggles. When I tuck them in tight & kiss them good night, I get a little time to create & just be me.


It all happened
while (s)he was napping
Want More of My Story?

Privacy Policy

While He Was Napping respects your privacy and is committed to keeping any personal information collected on this website confidential. To find out what information we collect and how it is used or what options you have regarding your information, see our full privacy policy here. Creative Commons License The website found at whilehewasnapping.com and all subdomainsauthored and published by Krista is licensed under a Creative Commons Attribution-NonCommercial-NoDerivs 3.0 Unported License.

Pretty Chic Theme By: Pretty Darn Cute Design