While He Was Napping

momma gets stuff done

  • Home
  • About
  • Archive
  • Do It Yourself
    • Crafts
      • No Sew
      • Painting
      • Paper Crafts
      • Repurpose Projects
      • Vinyl
      • Washi Tape
      • Kid’s Crafts
      • Fonts
    • Sewing
    • Decorate
      • Home Decor
      • Holiday Decor
    • Celebrate
      • DIY Gifts
      • DIY Your Party
  • Recipes
    • Beverages
    • Appetizer
      • Bread
      • Other Appetizers
    • Snacks
    • Main Dish
      • Meat
        • Chicken
        • Beef
        • Pork
        • Seafood
      • Vegetarian
      • Slow Cooker
      • 30 Minute Meals
    • Dips & Sauces
    • Salads
    • Pasta
    • Soup
    • Dessert
      • Cookies
      • Brownies
      • Cupcakes and Cake
      • Box Mix Recipes
      • Other Sweet Treats
    • Breakfast Food
      • Pancakes
      • Waffles
      • Muffins
      • Other Breakfast Food
  • Family
    • Babies
      • Pregnancy
      • Newborns
      • The 1st Year
    • Toddlers
    • Preschoolers
    • Kindergartners
    • 6-8 Year Olds
    • The Grown Ups
      • Date Night
      • Romantic Gifts
    • Self Care
  • For the Home
    • Cleaning
    • Organizing
    • Emergency Preparedness
  • Travel
    • Travel Tricks & Tips
    • Traveling with Kids
  • Tech & Gadgets
    • Must-Have Apps
    • Techy Home Appliances
    • Gadgets & Electronics
    • Blogging Tips
  • Printables
    • Posters
      • Quote Printables
      • Subway Art Printables
    • Printable Organizers
    • Printable Journals
    • Learning Printables & Worksheets
    • LDS Printables
  • Holidays
    • New Year’s
    • Valentine’s Day
    • St. Patrick’s Day
    • Easter
    • Cinco de Mayo
    • Mother’s Day
    • Father’s Day
    • 4th of July
    • Back to School
    • Halloween
    • Thanksgiving
    • Christmas
    • Holiday & Seasonal Printables

April 2, 2016 by Krista

30 Minute DIY Musical Gift Box

WELCOME!!

Hey, I’m glad you’re here today! I’ve got a fun project for you and I can’t wait to share it! Have you ever wished there was a little more personal, fun way to gift a gift card? Well, what if I told you you can turn a musical card into a gift box that plays music when you open it? And it’s really pretty simple to do. Ready to give a gift card that won’t soon be forgotten? Let’s go!

Hallmark Song Card DIY Musical Explosion Boxes turn a card into a gift box

Do you like to give gift cards or cash for gifting occasions? Let’s face it, everyone likes to get a gift card or cash. No one opens a birthday card and thinks “oh, I hope there’s NOT money inside! That would be terrible!”

But gift cards and cash have a bad reputation of being thoughtless gifts. Wait, is there such a thing? It’s far from thoughtless, but there’s no denying that a gift card or cash can be less personal.

If you want to up your gift card or cash giving game and put that personal touch right back into your gift, I’ll show you how. You’ll need a musical greeting card for the best results, but you can definitely cut out the musical part and just use a regular card too.


Hallmark Song Card DIY Musical Explosion Box


Do you have someone in your life that is particularly hard to buy gifts for? Maybe more than one someone? I have two. My husband and my dad.

These are the guys that if they want something, they go out and get it. If they can’t afford it, I sure can’t either. Truly, the best gift for them is a gift card that they can use when the whim strikes.

But, gift cards can feel impersonal. No one wants their gift recipient to feel like their gift says, “Here’s something I picked up on my way here, HAPPY BIRTHDAY!” So, I worked to find a better way to give those hard-to-gift-to people in my life what they want and let them know that the gift really is from my heart.


DIY MUSICAL EXPLOSION BOX

Hallmark Song Card DIY Musical Gift Box


Materials Needed to Create your own DIY Musical Explosion Box:

– Two 12″ x 12″ pieces of scrap book paper –  card stock will make a sturdier box, I used card stock for the bottom and regular paper for the top.
– Musical card 
– Ruler
– Pencil
– Pen cap or something with a blunt edge you can use to score your paper – it’ll make the folding easier
– Glue stick – a hot glue gun and glue sticks will work even better.
– Clear tape
– Scissors
– Craft knife – like an X-acto


Directions to Create your own DIY Musical Explosion Box:

Want a sneak peek at the whole project, check out how easy it is to make your own Musical Gift Box!

1. Take the first piece of your 12″ x 12″ paper (the card stock piece, if you’re using only one piece of card stock) and measure 3 inches in on all four sides with the ruler. You’ll want the outside of your box to be face down on the table. Mark three inches and then use the ruler to draw straight lines to form a grid-like pattern. This means the bottom of your box will be 6″ x 6″ and the sides will be 3 inches tall.

Hallmark Song Card DIY Musical Explosion Box Measure Box Bottom

2. Use the pen cap or whatever blunt edge object you are using to score the paper on the lines you just drew. Fold on your score lines. Curl the corners into the box. Don’t cut or tape them though. These will help push your box open when you take the lid off and make the music play. Put the bottom of the box aside.

3. Take your musical card and unseal the inside of the card to reveal the music speaker and electronic board. Cut the plastic switch from where it is attached to the front of the card. Cut the front flap off of the card.

Hallmark Song Card DIY Musical Explosion Box Open Song Card

4. Cut the speaker and electronic board out of the song card. Be careful not to cut the wires. If you need to move the speaker closer to the electronic board, you can just pop it off the card back and then tape if back down. As long as you don’t damage the wires, it should still work.

5. Tape the little plastic piece you cut from the front of the card to the side of your card stock box with the clear tape. Use the craft knife to cut the tape along the edges of plastic piece. You’ll have to play with the placement of the speaker and electronic board to get it right. You want the plastic switch to interrupt the contact on the board when the box is closed, but to open the contact when the box pops open. Check out the step-by-step video for more direction on that.

Hallmark Song Card DIY Musical Explosion Box Secure Electrical Components

6. Set the bottom of the box aside and take your last piece of 12″ x 12″ paper and measure and mark 2 and 7/8 inches in on each side. Create a grid-like pattern on the page with your measurements. It’s just like you did on the first piece, minus an eighth of an inch. This will help your lid fit on your bottom box piece better.

7. Score and fold on the measurements. This time fold the corners out and use the glue stick or a small dot of hot glue to secure the triangular flaps. Folding them out will keep anything from getting caught on the inside when you’re trying to get everything inside the box. Do this will all four sides.

8. Use the inside and front of the song card to decorate the top and inside of your box. You can use another piece of 6″ x 6″ scrapbook paper to cover the speaker and electronic board or use the inside of the card to cover it. Just make sure you don’t tape or glue anything over the plastic piece that needs to move when the box opens so the music will play.

Hallmark Song Card DIY Musical Explosion Box

9. Find a fun way to attach your gift card so it isn’t sliding around loose inside the box. You can make a little spring for it to bounce on, or stick it on one of the flaps. Or use the gift card as your switch that makes the music play when it’s removed. Check out the video for more info on that.

Hallmark Song Card DIY Musical Explosion Boxes Secure Gift Card

10. Fold up the bottom of the box and stick a finger in each of the curled corners to hold it in place and slide the lid on top. Wrap it up and give it to your unsuspecting victim, er, recipient.

11. Bask in your awesomeness and know you’ll be giving the perfect gift!

Hallmark Song Card DIY Musical Explosion Boxes

The art of card giving is NOT dead! We live in this time of instant gratification. With all the digital technology, we don’t often have to wait long to send and receive communication with friends and family, even when we are separated by hundreds or thousands of miles. But snail mail is still going strong. Send a song card to create a memorable moment.

My kids (and myself!) love to get birthday cards in the mail. It’s a great way to let the special people in your life know that you were thinking about them, that you love them. A song card can help you express yourself with music. And, sometimes, music can speak louder than words.


 Let’s do this project together!

Gather your materials and then watch this video for step-by-step directions
on creating your own DIY Musical Explosion Gift Box!
January 13, 2016 by Krista

How to Make a Snack Stadium for The Big Game

This shop has been compensated by Collective Bias, Inc. and its advertiser. All opinions are mine alone. #GameDayGlory #CollectiveBias

It’s nearly here! The Big Game is only weeks away! Game Day is a day of celebration and what’s a celebration without food? I’ll be completely honest, we aren’t big sports people in the Napping house. I’m probably the biggest sports fan… However, we are big fans of awesome food. And I love sharing amazing food in awesome presentations. If you do too, I have the prefect answer for how to present your Game Day munchies: a Snack Stadium.

HOW TO MAKE A SNACK STADIUM

The Ultimate Game Day Snack Stadium Blimp View


Materials:
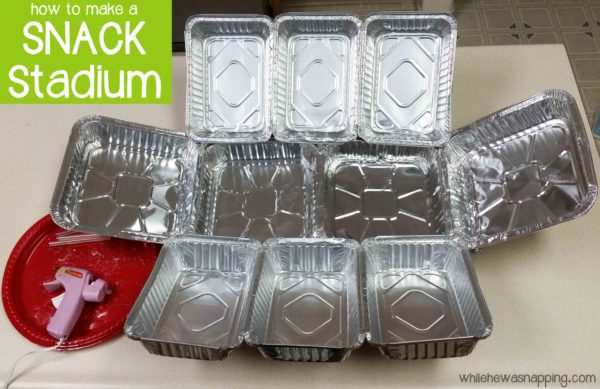
– Four 8×8″ aluminum foil pans
– Six 5×7″ aluminum foil pans
– Hot glue gun and extra glue sticks
– Pieces of cardboard for constructing supports
– Aluminum foil to cover cardboard pieces
– Tape, if desired

Direction:
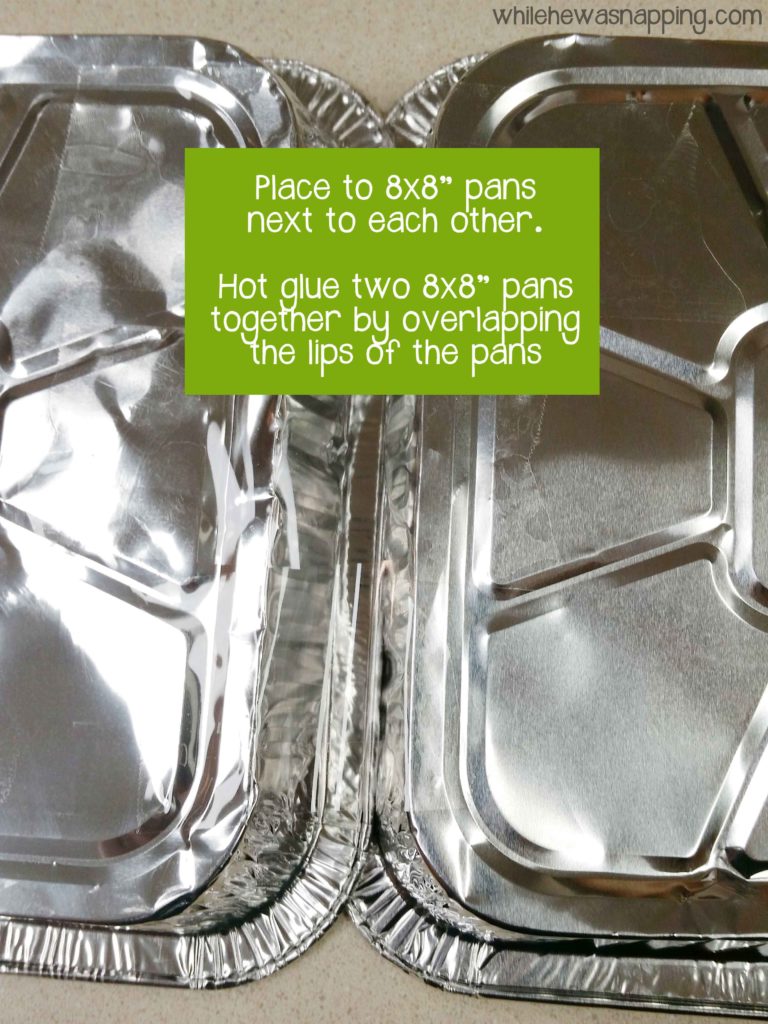
– Begin by laying out two of the 8×8″ pans side-by-side. Hot glue the lip of one pan on the top of the other pan. Press the pans together until the glue is cooled.

Snack Stadium for The Big Game with Aluminium Foil Pans Step 1
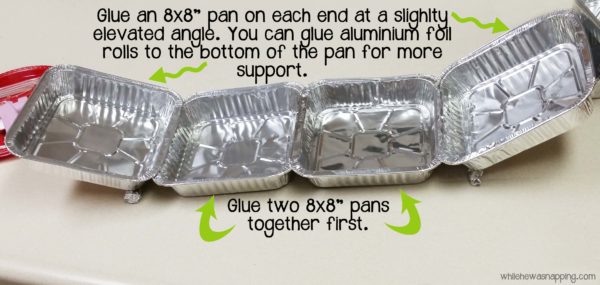
– Arrange the third 8×8″ pan at a slight angle to the two pans already glued together. A 30° angle is about right. This isn’t a math test though so you don’t need to pull out your protractor or anything. Glue it to the first two pans at the angle.

Snack Stadium for The Big Game with Aluminium Foil Pans Step 2
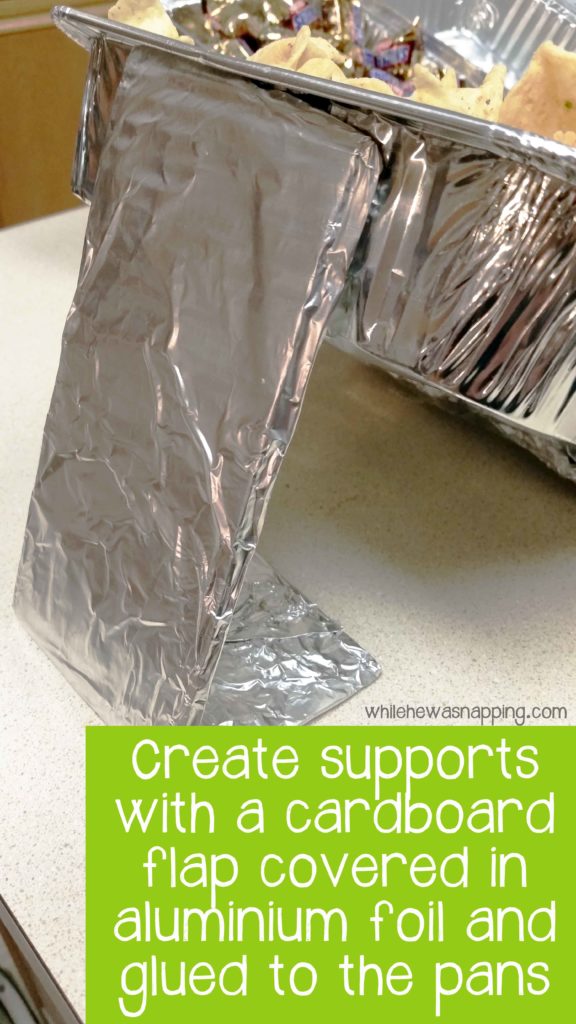
– As I began filling my pans, I found I needed more support on the end of the pan that was elevated. It will be easier to add supports now. I cut cardboard flaps off a box, scored them so they would bend and stand up and then wrapped the flaps in aluminum foil. I glued the aluminum foil support just under the lip on the pan. They worked perfectly. I made six of them.

Snack Stadium for The Big Game with Aluminium Foil Pans Supports
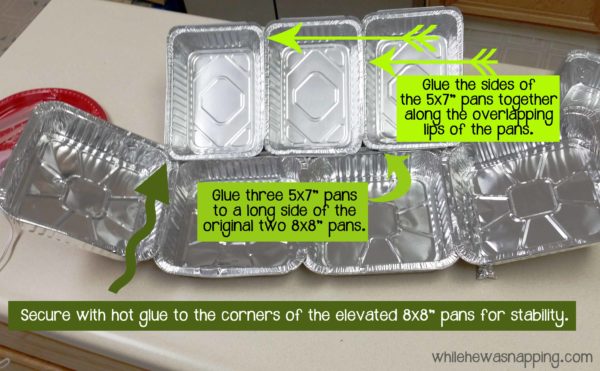
– Glue three 5×7″ pans together by the lips of the pans so they are in a row.
– Glue the three 5×7″ pans to the first set of 8×8″ pans with the end elevated to a 30° angle (approximately). Glue a support on each end of the line of 5×7″ pans.

Snack Stadium for The Big Game with Aluminium Foil Pans Step 4
– Repeat the above steps on the other side of the first set of 8×8″ pans.
– When you get the remaining pans attached to the first set of 8×8″ pans, the elevated pans will meet at the corners of the original set of 8×8″ pans. Glue the corners of the elevated pans to each other for more stability.
– You may also want a few drops of glue attaching the 5×7″ pans to the original set of 8×8″ pans to help hold everything in place.

How to Make a Snack Stadium for The Big Game with Aluminium Foil Pans

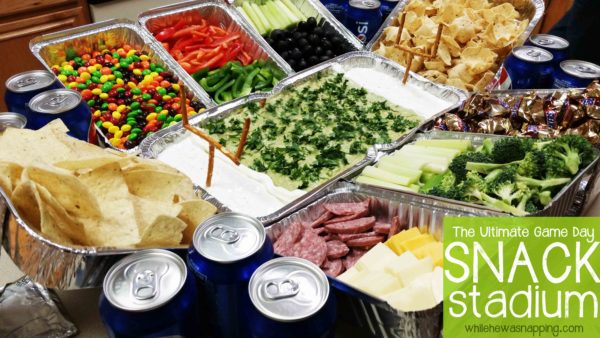
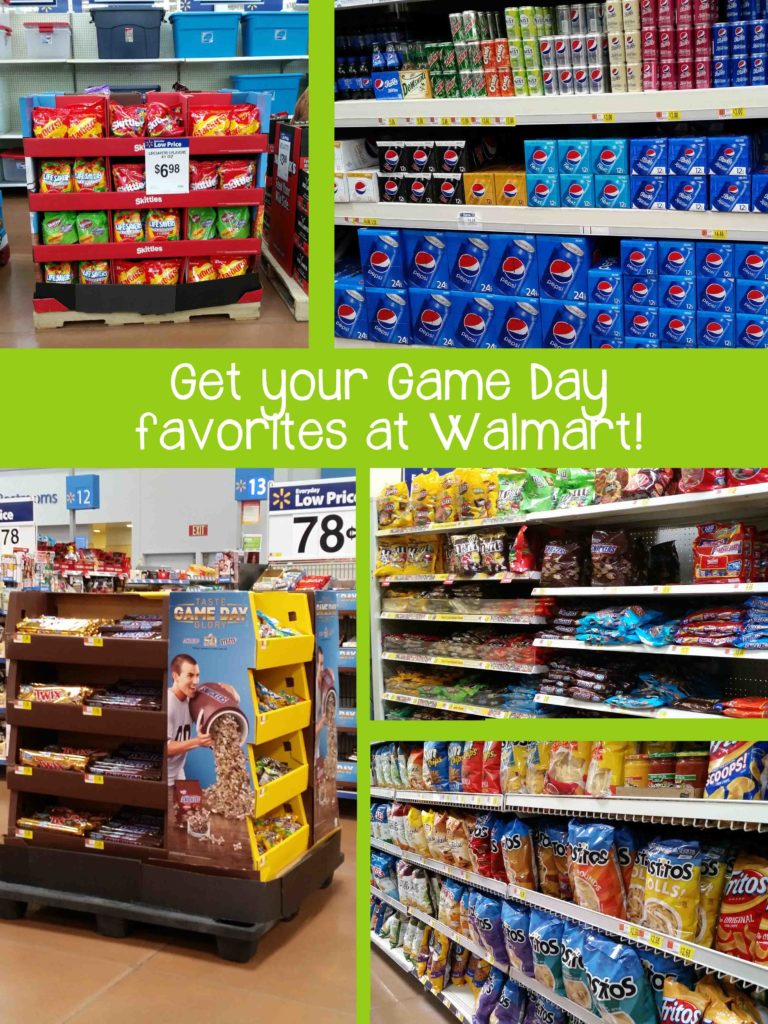
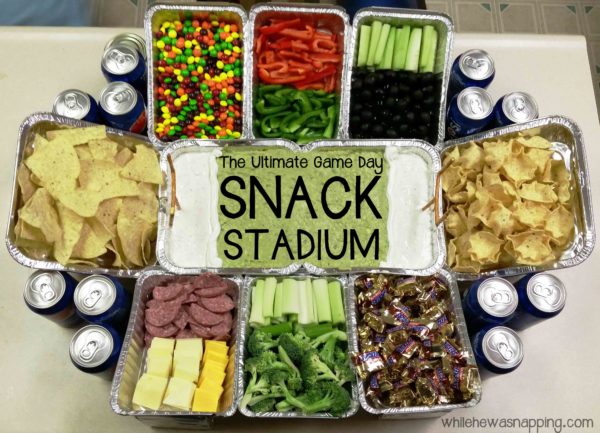
That’s it. Now comes the fun part: filling up the pans with amazing snacks! I used SNICKERS® Minis, Skittles®, a 12 pack of Pepsi™ 12 oz cans, TOSTITOS® Scoops Party Size, and TOSTITOS® Medium Chunky Salsa, all purchased at Walmart, in my stadium and filled in the remaining pans with some of our other favorite munchies. The best part of a snack stadium is that you can put in your favorites!

The Ultimate Game Day Snack Stadium

So, start planning your Big Game celebration! Find all the SNICKERS®, Skittles®, Pepsi™, and TOSTITOS® products you’ll need to make an amazing display on Walmart.com. Be sure to check out more amazing ideas to fuel your plans and build the best snack stadium ever!

Snack Stadium for The Big Game with Aluminium Foil Pans In Store

December 21, 2015 by Krista

Fill in the Blank Printable Coupons

This is a last minute stocking stuffer I’m giving to my kiddos and it’s so easy, I figured I’d share it with you too. These fill in the blank printable coupons are super versatile and you can use them for more than just your kids. Use them for your sweetie too. Because they are fill in the blank, they work for everyone. It’s an easy gift that will keep on giving through the year.

FILL IN THE BLANK PRINTABLE COUPONS

Fill in the Blank Printable Coupons Stocking Stuffer Ideas

Materials:
– Pen, Markers or Pencils
– Scissors or Paper Cutter
– Fill in the Blank Printable Coupons
– Hole Punch
– String or Yarn

Directions:
– Print out the high resolution Fill in the Blank Coupons. Click the link or the image to download the high resolution file.
Fill in the Blank Printable Coupons– Use the pen, markers or pencils to fill out the coupons however you want.
– Cut the coupons apart with the scissors or paper cutter.
– Punch a hole or two in each coupon, string the coupons together on the string or yarn and tie them together. Alternatively, you could staple the coupons together or put them in an envelop. Whatever method you want to use to keep all the coupons together. You can also embellish the coupons more if you want.
– Gift your coupons to your lucky recipient and enjoy some fun moments and memories for the next year. I purposely didn’t put an expiration date on mine, but you can write one in if you’d like.

Fill in the Blank Printable Coupons Stocking Stuffers

That’s it. Super simple, right? And it’s free! I know I definitely don’t need to spend any more money on Christmas, but this is still a meaningful gift. And I love that I was able to make one for each of my kiddos (well… the older two) and my husband without having to spend a lot of time create extra templates and doing redesigns.

October 13, 2015 by Krista

BOO It Forward with the Game Night BOO Kit

This shop has been compensated by Collective Bias, Inc. and its advertiser. All opinions are mine alone. #BOOItForward #CollectiveBias

I’ve mentioned before that when I was growing up, we didn’t do much celebrating of Halloween. My mom doesn’t particularly like the holiday and so it was minimally recognized. One thing we did get to do, though, was BOO’ing our friends. I have three siblings and each of us would get to choose a family to BOO. Some years, we would go all out and make fun Halloween cookies and treats to share and some years it was a little more simple. But, it wasn’t really about what was in the goody baskets, it was putting them together as a family. And, of course, delivering them was the best part!

This is a tradition I wanted to share with my family now. We made three kits to share with some friends. I wanted something simple and easy. Life is busy and I just didn’t have hours to spend baking Halloween goodies. Lucky for me, MARS/Wrigley has an amazing BOO it Forward campaign going on and putting together our BOO kits was super simple.

SUPER SIMPLE PRINTABLE GAME NIGHT BOO KIT

BOO it Forward Printable Game Night BOO Kit


Materials:
– BOO It Forward Printable Card for each kit
– MARS Mixed Minis Chocolate Candy Assortment (52 oz)
– MARS Chocolate Mix Fun Size Candy Assortment
– Sunkist® 8oz cans in 6pk
– Pin the Face on the Jack-O-Lantern Printable Game for each kit
– Halloween Bingo Printable Game for each kit
– Bowl or other container for each kit

PUT TOGETHER YOUR BOO IT FORWARD KITS

Directions:
– We grabbed some of our favorite goodies at Walmart: some Sunkist® soda and an assortment of delicious MARS chocolates. I also grabbed a couple of big bowls that were on clearance to stash all our loot in.

BOO it Forward InStore
– I decided we should probably put in something else and it was Big J who thought of including the Halloween games we’ve been playing around here the last couple weeks. So, I made up a few more of the Pin the Face on the Jack-O-Lantern game and some more of the Halloween Bingo game I shared yesterday. We put them in ziptop baggies to keep them together.

Halloween Bingo Printable Free Game

Build a Jack-O-Lantern Printable Pin A Face on the Jack-O-Lantern
– I put the minis on the bottom of the bowl.

BOO it Forward Printable Game Night BOO Kit Minis
– Then, I tucked the games at the back, just under the mini candy bars.

BOO it Forward Printable Game Night BOO Kit Jack-O-Lantern Game

BOO it Forward Printable Game Night BOO Kit Halloween Bingo Game
– Next, I stuck in two of the soda cans on each side of the bowl.

BOO it Forward Printable Game Night BOO Kit Soda Cans
– I took the BOO It Forward printable card, folded it in half and taped it together with some fun Halloween washi tape. This will let your friends know how they can pass on the fun Halloween cheer. Cut the directions off the We’ve Been BOO’d poster and put that in with the card. Your friends can then hang the poster in their window so others will know that they have already been BOO’d once.

BOO it Forward Printable Game Night BOO Kit BOO Card
– Then, I put in the last can of soda and filled in the spaces with the fun size candy.

BOO it Forward Printable Game Night BOO Kit Soda

BOO it Forward Printable Game Night BOO Kit Fun Size Candy

We loaded the kiddos up in the car and delivered our three baskets. Mr. Napping and the two oldest boys left the goody baskets on the doorsteps while Baby N and I stayed in the car. And just like their momma, they thought the best part was the delivery! Who could you BOO to share the Halloween spirit? Check out more awesome BOO kit ideas and get out there and share some goodies!

BOO it Forward Game Night BOO Kit


You can save $1.00 on TWO (2) 2L or 6pk 8oz cans of any flavor Sunkist® Soda, 7UP®, Canada Dry®, A&W®, Squirt®, or Sun Drop® by using this coupon when you purchase items for your BOO Kits! And how would you like a $1000 eGift Card to Walmart? Well, here’s your chance! Check out the widget below:
#booitforwardsweepstakes

I'm Krista. Ringleader here on While He Was Napping, wife to my handsome Mr. Right & momma to my THREE energetic boys, Big J (9), Little J (6) & Little N (4). We FINALLY added a beautiful little girl to our family last December.

I’m knee-deep in Tonka trucks & Thomas trains. I survive our crazy days with Vanilla Coke, Sonic slushies, sweet snuggles and little giggles. When I tuck them in tight & kiss them good night, I get a little time to create & just be me.


It all happened
while (s)he was napping
Want More of My Story?

Privacy Policy

While He Was Napping respects your privacy and is committed to keeping any personal information collected on this website confidential. To find out what information we collect and how it is used or what options you have regarding your information, see our full privacy policy here. Creative Commons License The website found at whilehewasnapping.com and all subdomainsauthored and published by Krista is licensed under a Creative Commons Attribution-NonCommercial-NoDerivs 3.0 Unported License.

Pretty Chic Theme By: Pretty Darn Cute Design