While He Was Napping

momma gets stuff done

  • Home
  • About
  • Archive
  • Do It Yourself
    • Crafts
      • No Sew
      • Painting
      • Paper Crafts
      • Repurpose Projects
      • Vinyl
      • Washi Tape
      • Kid’s Crafts
      • Fonts
    • Sewing
    • Decorate
      • Home Decor
      • Holiday Decor
    • Celebrate
      • DIY Gifts
      • DIY Your Party
  • Recipes
    • Beverages
    • Appetizer
      • Bread
      • Other Appetizers
    • Snacks
    • Main Dish
      • Meat
        • Chicken
        • Beef
        • Pork
        • Seafood
      • Vegetarian
      • Slow Cooker
      • 30 Minute Meals
    • Dips & Sauces
    • Salads
    • Pasta
    • Soup
    • Dessert
      • Cookies
      • Brownies
      • Cupcakes and Cake
      • Box Mix Recipes
      • Other Sweet Treats
    • Breakfast Food
      • Pancakes
      • Waffles
      • Muffins
      • Other Breakfast Food
  • Family
    • Babies
      • Pregnancy
      • Newborns
      • The 1st Year
    • Toddlers
    • Preschoolers
    • Kindergartners
    • 6-8 Year Olds
    • The Grown Ups
      • Date Night
      • Romantic Gifts
    • Self Care
  • For the Home
    • Cleaning
    • Organizing
    • Emergency Preparedness
  • Travel
    • Travel Tricks & Tips
    • Traveling with Kids
  • Tech & Gadgets
    • Must-Have Apps
    • Techy Home Appliances
    • Gadgets & Electronics
    • Blogging Tips
  • Printables
    • Posters
      • Quote Printables
      • Subway Art Printables
    • Printable Organizers
    • Printable Journals
    • Learning Printables & Worksheets
    • LDS Printables
  • Holidays
    • New Year’s
    • Valentine’s Day
    • St. Patrick’s Day
    • Easter
    • Cinco de Mayo
    • Mother’s Day
    • Father’s Day
    • 4th of July
    • Back to School
    • Halloween
    • Thanksgiving
    • Christmas
    • Holiday & Seasonal Printables

November 14, 2013 by Krista

{Mom’s Cup of Ambition} Apple Rosemary Scones

Jill from Mom’s Cup of Ambition is here again and has a delicious recipe to share today.  So, on to the good stuff!  Take it away, Jill!

______________________________________________________
APPLE ROSEMARY SCONES


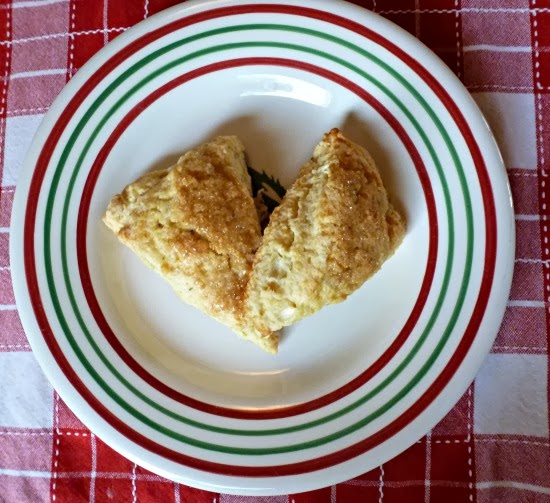
I’ve been experimenting with the combination of apples and rosemary lately.  The flavors really suit each other well.  My favorite output from one of these experiments is apple rosemary scones.  They’re best served warm, but so far no one has turned them down at room temperature either.  If you don’t have half and half on hand try substituting milk or buttermilk.
Put on your favorite sweater, rake some leaves, pop a batch of these in the oven to enjoy with hot tea, and you’ll remember why Fall is the undisputed best season on Earth.
Apple Rosemary Scones
2 1/4 cups all purpose flour
1/4 cup sugar
1 teaspoon baking powder
1/4 teaspoon salt
1 teaspoon dried rosemary
1/2 cup cold butter (1 stick), cut into cubes
1 cup peeled and chopped tart apple (like Granny Smith)
½ cup plus 2 tablespoons half and half
Egg wash – 1 egg beaten with 2 tablespoons milk
¼ C sugar for topping
Preheat the oven to 400 degrees.
Lightly grease a baking sheet and set it aside.
Combine the flour, sugar, baking powder, salt, and rosemary in a large bowl.  Use a pastry cutter, two knives, or a food processor to cut the butter into the flour.  The mixture should resemble coarse meal. Fold in the apples.  Mix in ½ cup half and half.  If the mixture is too dry, add the extra two tablespoons of half and half until the dough comes together.
Turn the dough out onto a lightly flowered surface, and pat it into a 6 inch round.  The dough should be about 1 ½ inches thick.  Use a pizza cutter to slice the dough into 6 pie shaped wedges.  Carefully place the scones on the prepared cookie sheets.  Brush the tops with egg wash.  Sprinkle the sugar evenly on top of the scones.
Bake the scones at 400 degrees for 20-25 minutes or until brown and firm to the touch.
 
______________________________________________________
Thanks, Jill!  Don’t those look so tasty?!  Add that to my already-incredibly long holiday baking list!  YUM!
 

This post was written by Krista and originally appeared on While He Was Napping.


November 5, 2013 by Krista

{Sweet Haute} Acorn Cookies

Hey everyone.  Today we have the treat to meet another contributor!  Christina from Sweet Haute is here to share a fun little project with us.  So, let’s get right to it.

_______________________________________________
Greetings, hi there blog ‘neighbors’ it’s me, Christina, from the SWEET HAUTE blog and I wanted to share something sweet and fun with you for my post over at While He Was Napping yay….Acorn Cookies! With Thanksgiving quickly approaching, now is the time to start planning your menu! These Acorn Cookies are perfect and so adorable, they would make amazing party favors for your guests to enjoy with their evening coffee {yum!}. But, if you are not hosting Thanksgiving Dinner this year, this edible craft recipe is also great to take to your hostess. Me and the kids had a blast making these cookies, the ingredients are easy to find and most of them I got at an inexpensive price at the dollar store, or dollar bins at Target!

This craft is something you can put together fast and easily with some delicious ingredients. They also keep well when stored in the refrigerator. My kids cannot wait to make the next batch, they are the perfect size for their little hands, and I even include one as a surprise in my son’s lunch…only sometimes.

Supplies:
Nutter Butter Cookies
Sandies Fudge Dipped Cookies (optional)
Cookie Frosting
Hershey Kisses
Chocolate Chips

I selected two different flavors, original chocolate and pumpkin spice which happened to be a seasonal item at the time…perfect! I also selected mixed bag of butterscotch and milk chocolate flavor chips as my chocolate chips acorn tops. I was lucky to find a mixed bag.
Here is what the nutter butter cookies look like up close, you can choose anything similar in size and shape to get the same result. The pictures are pretty much self explanatory on how to assemble each cookie.
Step 1:
Set out each ingredient in an assemble line, or divide each for each child so they don’t fuss over who has what supplies. Cookies, hershey kisses, chocolate chips, etc.
Step 2:
Grab a cookie ‘top’ either the nutter butter cookie or sandies cookie and place a dot of frosting, then adhere the hershey’s kiss ‘bottom’ to all cookies. Set aside to dry and harden.
Step 3:
After dry, grab the pre-assembled bottoms and place a dot of frosting on the top and adhere a chocolate chip shaped to the top of acorn, completing the acorn shape. Set on their sides to dry.
Step 4:
Let acorn cookies harden completely before storing them in a container. I also placed ours in the fridge for long term storage. 
Here is what the shortbread Sandies cookies look like up close, if I would have done anything different…I would have selected a frosting that was a different color, such as brown, to act as the glue. The white frosting sort of stands out too much for the images, but the the people eating it….it didn’t matter, they didn’t even notice or mention it.
Have fun, and enjoy!

~Be Sweet
Sweetest Haute

Like on Facebook, Subscribe by Email, Follow on Pinterest and Instagram!


Thursday Linky Party

_______________________________________________

Too cute, aren’t they?!  What a great little treat for the kids (and adults) you’ll be entertaining this Fall season.  Thanks for sharing Christina!  Go check out all the awesome things Christina has going on at Sweet Haute!

This post was written by Krista and originally appeared on While He Was Napping.


October 29, 2013 by Krista

{Our Grace Filled Life} Pumpkin Streusel Muffins

I would like to introduce you to another amazing contributor!  Amanda is here to share a delicious recipe with us.  How does Pumpkin Streusel Muffins sound!?  Well, let’s get party started!  Take it away, Amanda!

__________________________________________________________

Hey there!  I’m Amanda Fisher & I blog at Our Grace Filled Life.  My interests are all over the place, so you see a bit of everything there, but my favorite things to blog about are food, healthy living, furniture makeovers, home renovation & adoption. Today, I am super honored to be here & sharing one of my favorite Fall treats with you!  I look forward to pumpkin season all year round.  On occasion, my love of pumpkin even flows into other seasons {gasp! :)}.  Pumpkin really is best enjoyed in the Fall though, there’s just something very comforting about savoring a pumpkin treat with a little chill in the air.

Pumpkin Streusel Muffins

For many years, I strictly used store-bought canned pumpkin, thinking that making homemade pumpkin puree was too difficult, too time consuming or simply wouldn’t taste as good.  Last year though, I ran across this tutorial from The Pioneer Woman & figured I’d give it a shot.  It really didn’t look too hard & because I try to make most everything else from scratch, it seemed silly that I’d never even tried it.  So, I gave it a shot & was pleasantly surprised by the results.  It really wasn’t difficult to do & we loved the flavor.  We’d also grown a few pie pumpkins in our garden last year, so it was fun knowing we’d made our own food from start to finish.

Pumpkin Streusel Muffins

Whatever type of pumpkin you use, store-bought or homemade, I think you’re going to LOVE these muffins.  I’m a big fan of using whole grains & sweeteners that are as unprocessed as possible, so I’ve included a couple of different options for some of the ingredients so that you can use what you have on hand or are able to find.  Hope you enjoy!

Pumpkin Streusel Muffins
Save Recipe
Print
For the muffins
  1. 1 1/4 c. pumpkin puree {canned or homemade}
  2. 1/4 c. applesauce
  3. 1/3 c. sucanat or brown sugar
  4. 1 egg
  5. 1 t vanilla
  6. 2 c. whole wheat pastry flour or all purpose flour
  7. 2 t baking powder
  8. 1 t pumpkin pie spice
  9. 1/2 t sea salt
  10. 1/2 c. walnuts or pecans, chopped
For the streusel topping
  1. 4 T butter, softened
  2. 1/4 c. sucanat or brown sugar
  3. 1/2 c. whole wheat pastry flour or all-purpose flour
  4. 1/3 c. walnuts or pecans, chopped
Instructions
  1. Preheat oven to 350*.
  2. Line a muffin tin with paper liners.
  3. Using a stand or hand mixer, beat together pumpkin, applesauce, egg & vanilla.
  4. Add in flour, baking powder, pumpkin pie spice & sea salt & stir until just mixed.
  5. Gently fold in chopped nuts.
  6. Using an ice cream scoop or two spoons, fill prepared muffin tin with batter, filling each liner just 2/3 of the way full.
  7. In another bowl, mix together the topping ingredients. The mixture should be nice & crumbly.
  8. Using your hands, divy out the topping onto the waiting muffins.
  9. Bake for 23-25 minutes, until the middles are set.
  10. Enjoy!!
__________________________________________________________
YUM!  Don’t you want to just head to the kitchen!  I will need to try these this holiday season for sure.  Thanks for sharing with us, Amanda!  Head over and check out the other great things on Our Grace Filled Life.

This post was written by Krista and originally appeared on While He Was Napping.


September 26, 2013 by Krista

{Guest Post} Mango Mint Freezer Jam by Mom’s Cup of Ambition

Today, Jillian from Mom’s Cup of Ambition is here to share a delicious recipe with us.  I do some very basic canning and making of jam and love it.  I will definitely have to remember this delicious recipe for future use!  So, here’s Jillian:

____________________________________________________

Mango Mint Freezer Jam Homemade jam is delicious – unlike most of the stuff you buy in the store it actually tastes like fruit. This mango mint freezer jam is a good one to keep in mind because it’s super easy, and it isn’t season dependent like many fruit and berry based jams. You can enjoy it as a spread, give it as a gift, or use it as a topping over yogurt.

I use Ball brand freezer jam containers when I make this, but you can use anything that is freezer safe. This recipe makes two 8 oz (1/2 pint) containers of jam, but it scales very well if you’d like to make more. When you fill your containers, make sure to leave room for the jam to expand – a half inch is a good rule of thumb.

MANGO MINT FREEZER JAM
 

Ingredients:
– 1 2/3 cups frozen, chopped mango, defrosted
– 2/3 cups granulated sugar
– 2 tablespoons instant pectin
– 1 tablespoon fresh mint, finely chopped

Directions:
– In a large bowl, mix the sugar and pectin together.
– Crush the mango using a potato masher, and add it to the sugar and pectin. Stir for three minutes.
– Add the mint and stir to incorporate.
– Ladle the fruit mixture into clean freezer safe jars. Let the jam stand for 30 minutes before serving.
– At this point you can refrigerate your jam for up to three weeks, or freeze it for up to a year.

____________________________________________________
Thanks, Jillian!  Oh my goodness, doesn’t that sound so yummy!  I am going to have to try this.  I bet my family would love it.  Go check out all the awesome stuff Jillian has for you over at Mom’s Cup of Ambition!

This post was written by Krista and originally appeared on While He Was Napping.
 

September 11, 2013 by Krista

Pumpkin Chocolate Chip Cookies

The weather here is still a warm, dry high 80’s to low 90’s with an occasional warm breeze.  But I’m not letting that stop me from doing a little Fall celebrating.  It’s been a while since I posted a recipe and I’ve got the perfect one today.  Who doesn’t love pumpkin, chocolate chips and cookies… (crazy people, that’s who… only joking, mostly)?

PUMPKIN CHOCOLATE CHIP COOKIES
Pumpkin Chocolate Chip Cookies
Ingredients:
– 3 1/2 cups flour
– 1 tsp baking soda
– 1/2 tsp salt
– 1/2 cup butter
– 2 cups pumpkin
– 1/2 cup applesauce
– 3/4 cup sugar
– 3/4 cup brown sugar
– 1 tsp vanilla
– 2 eggs
– 2 cups chocolate chips (I lie to put in half butterscotch chips sometimes… yum!)
Directions:
– Mix flour, baking soda and salt in a medium bowl.
– In a large bowl, mix butter, sugars, applesauce, pumpkin and vanilla.
– Add the eggs to the large bowl.  Mix.
– Slowly add in the flour mix and combine until well mixed.
– Mix in the chocolate chips.
– Drop approximately 1 inch cookies on a lightly greased cookie sheet about 2 inches apart.
– Bake for 8-12 mins (depending on elevation and size of the cookies) at 350F.
– Remove from oven when a toothpick is inserted into the center of a cookie and comes out clean.

– Let cool and store in an airtight container.  Keeps for a week, probably longer.  They didn’t stick around much longer than that so I can’t vouch for that though. =)

This post was written by Krista and originally appeared on While He Was Napping.


  • « Previous Page
  • 1
  • …
  • 16
  • 17
  • 18
  • 19
  • 20
  • …
  • 30
  • Next Page »

I'm Krista. Ringleader here on While He Was Napping, wife to my handsome Mr. Right & momma to my THREE energetic boys, Big J (9), Little J (6) & Little N (4). We FINALLY added a beautiful little girl to our family last December.

I’m knee-deep in Tonka trucks & Thomas trains. I survive our crazy days with Vanilla Coke, Sonic slushies, sweet snuggles and little giggles. When I tuck them in tight & kiss them good night, I get a little time to create & just be me.


It all happened
while (s)he was napping
Want More of My Story?

Privacy Policy

While He Was Napping respects your privacy and is committed to keeping any personal information collected on this website confidential. To find out what information we collect and how it is used or what options you have regarding your information, see our full privacy policy here. Creative Commons License The website found at whilehewasnapping.com and all subdomainsauthored and published by Krista is licensed under a Creative Commons Attribution-NonCommercial-NoDerivs 3.0 Unported License.

Pretty Chic Theme By: Pretty Darn Cute Design