While He Was Napping

momma gets stuff done

  • Home
  • About
  • Archive
  • Do It Yourself
    • Crafts
      • No Sew
      • Painting
      • Paper Crafts
      • Repurpose Projects
      • Vinyl
      • Washi Tape
      • Kid’s Crafts
      • Fonts
    • Sewing
    • Decorate
      • Home Decor
      • Holiday Decor
    • Celebrate
      • DIY Gifts
      • DIY Your Party
  • Recipes
    • Beverages
    • Appetizer
      • Bread
      • Other Appetizers
    • Snacks
    • Main Dish
      • Meat
        • Chicken
        • Beef
        • Pork
        • Seafood
      • Vegetarian
      • Slow Cooker
      • 30 Minute Meals
    • Dips & Sauces
    • Salads
    • Pasta
    • Soup
    • Dessert
      • Cookies
      • Brownies
      • Cupcakes and Cake
      • Box Mix Recipes
      • Other Sweet Treats
    • Breakfast Food
      • Pancakes
      • Waffles
      • Muffins
      • Other Breakfast Food
  • Family
    • Babies
      • Pregnancy
      • Newborns
      • The 1st Year
    • Toddlers
    • Preschoolers
    • Kindergartners
    • 6-8 Year Olds
    • The Grown Ups
      • Date Night
      • Romantic Gifts
    • Self Care
  • For the Home
    • Cleaning
    • Organizing
    • Emergency Preparedness
  • Travel
    • Travel Tricks & Tips
    • Traveling with Kids
  • Tech & Gadgets
    • Must-Have Apps
    • Techy Home Appliances
    • Gadgets & Electronics
    • Blogging Tips
  • Printables
    • Posters
      • Quote Printables
      • Subway Art Printables
    • Printable Organizers
    • Printable Journals
    • Learning Printables & Worksheets
    • LDS Printables
  • Holidays
    • New Year’s
    • Valentine’s Day
    • St. Patrick’s Day
    • Easter
    • Cinco de Mayo
    • Mother’s Day
    • Father’s Day
    • 4th of July
    • Back to School
    • Halloween
    • Thanksgiving
    • Christmas
    • Holiday & Seasonal Printables

March 22, 2011 by Krista

Soft Pretzels

The Christmas after My Mr Right and I got married, my mother-in-law gave all of us this AWESOME recipe book with recipes from generations back, as well as ones she used in her family and recipes her kids and good friends use in their families.  It’s quite the feat, this recipe book, and one of my favorite resources.  This recipe is one of our very most favorites!

SOFT PRETZELS

Ingredients:
1Tbsp Yeast
1/8 Cup Warm Water
1 1/3 Cups Warm Water
1/3 Cup Brown Sugar
3 3/4 Cups Flour
1 Tsp. Salt

Directions
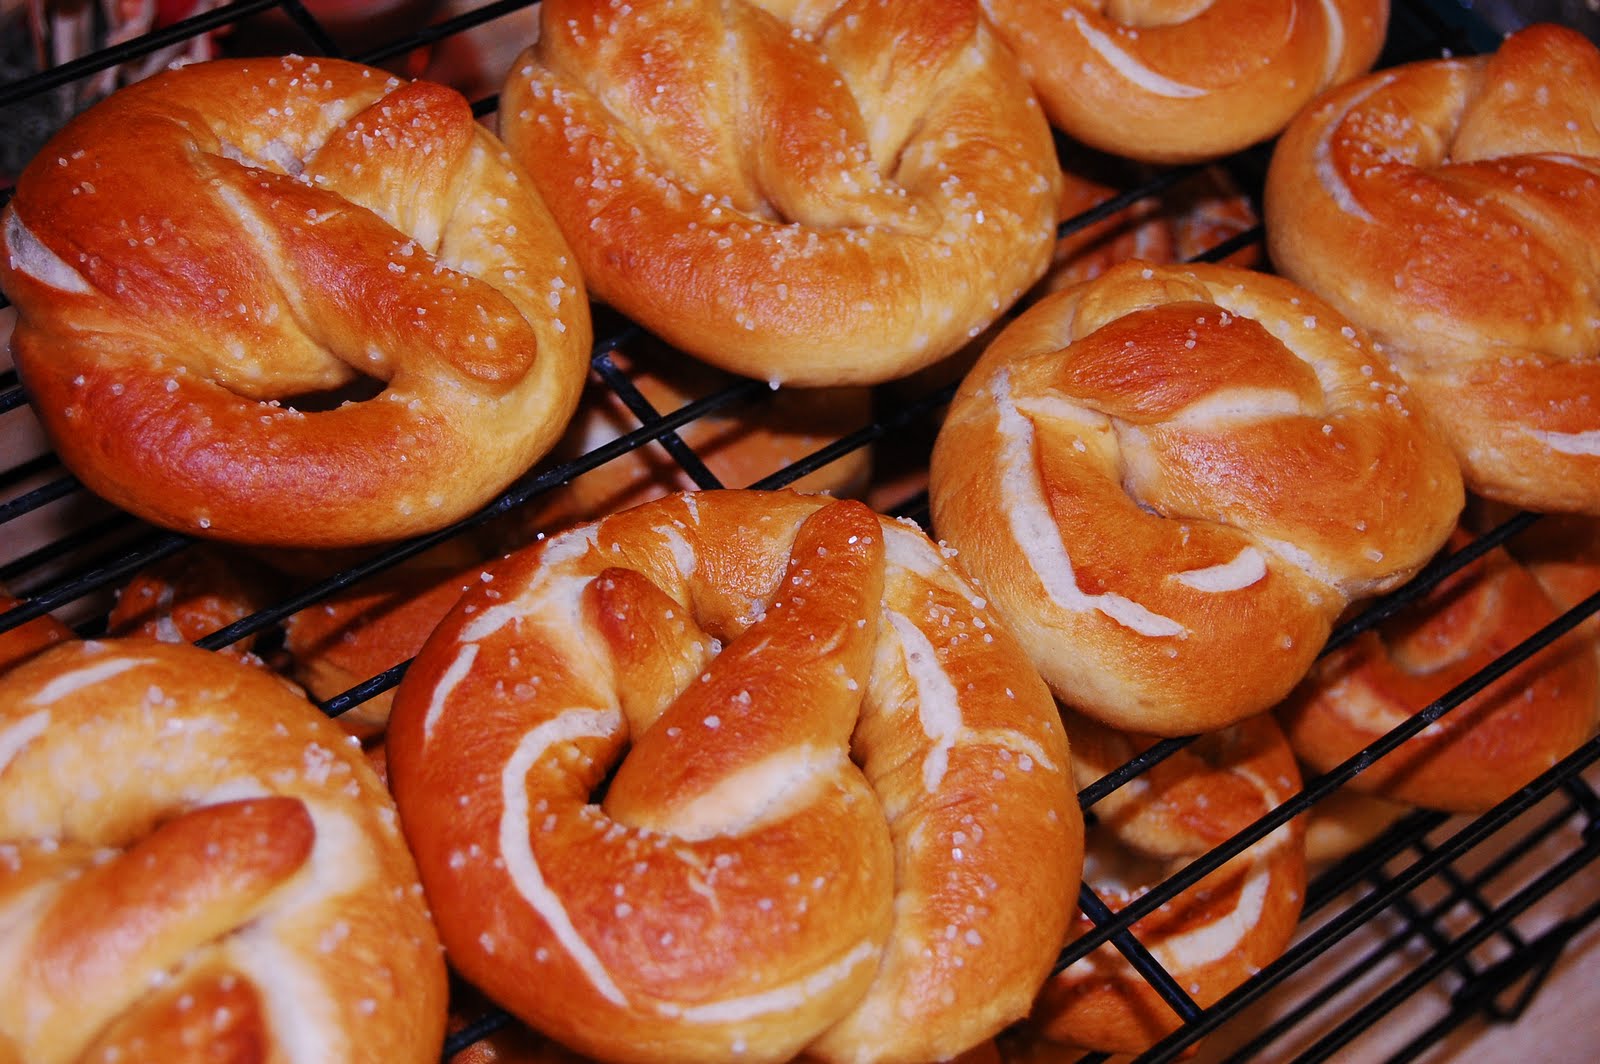
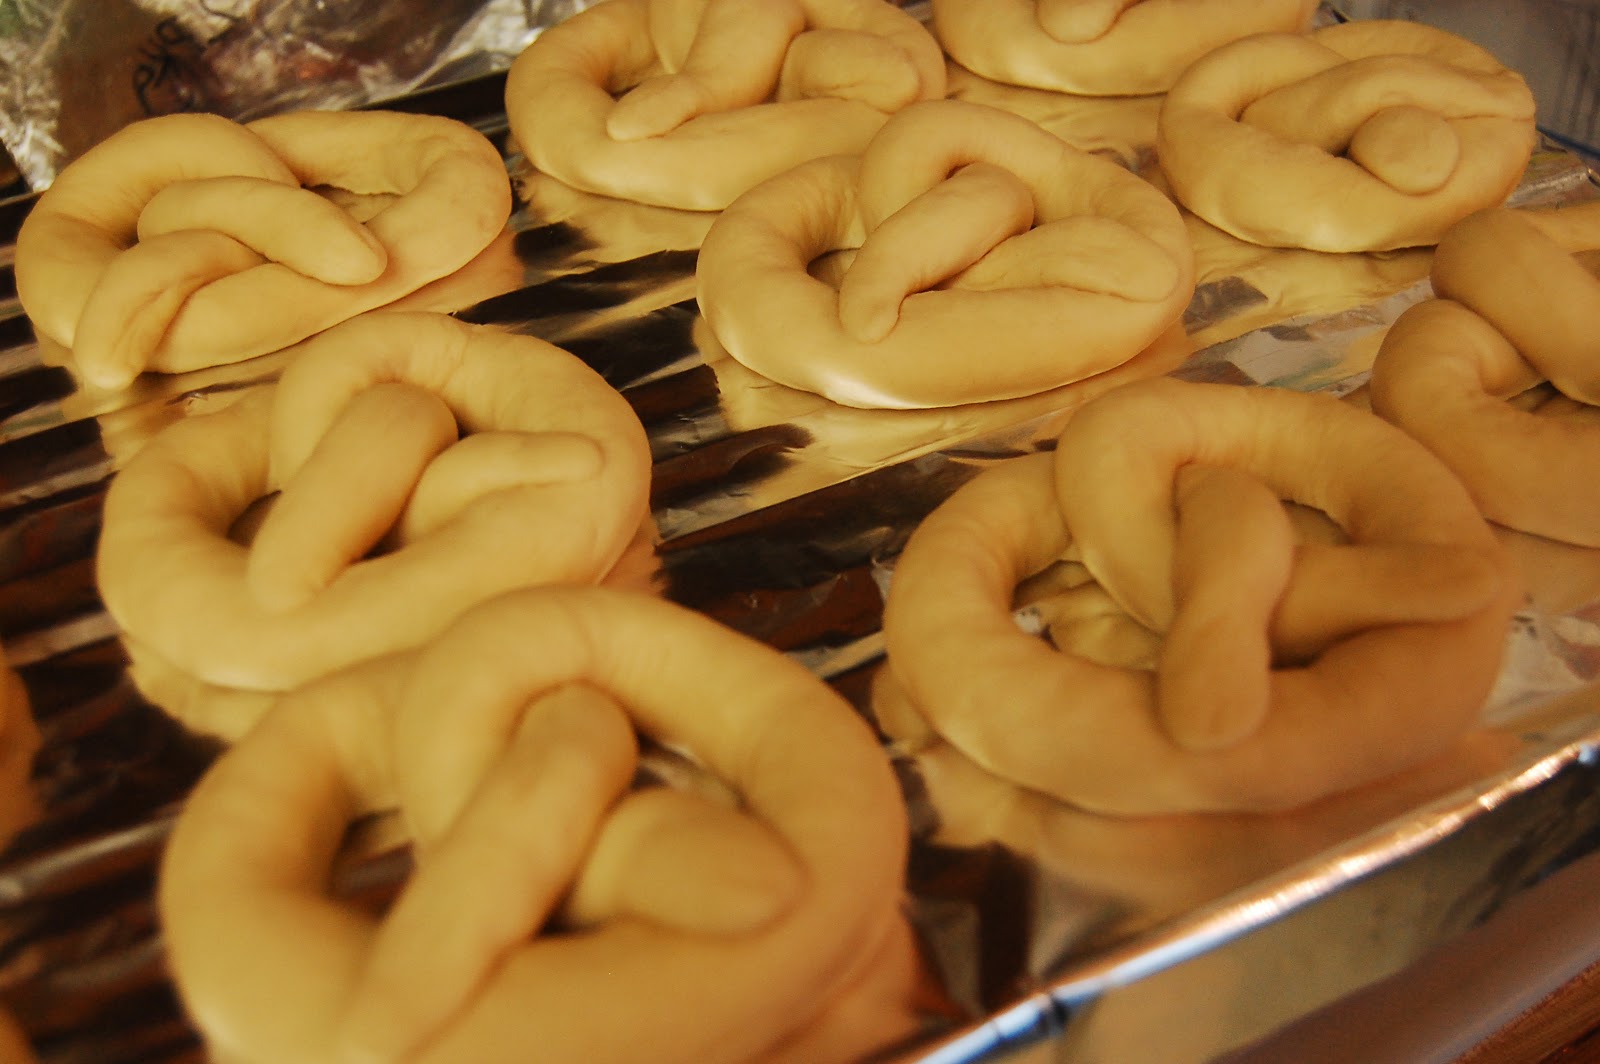
Dissolve yeast in 1/8 cup warm water. Add remaining ingredients and beat until smooth. Kneed until smooth.  Sometimes I just throw the stuff in the bread maker on the dough cycle… a lot less arm work.  Optional: Let dough rise in an ungreased bowl, uncovered, for 1 hour.  Divide into 12 pieces and shape into pretzels.

Bring to a boil:
1 Quart Water
3 Tbsp. Baking Soda
3 Tsp. Sugar
Drop pretzel into boiling mixture. About 15 to 20 seconds on each side, Place on cookie sheet. Sprinkle with course sea salt. Bake at 400° for 10 to 15 minutes, until golden brown.  Watch the bottoms… they over-cook first.

Yum!  This takes some time, but they are SOO worth it.  Store any extras in a bowl covered with a dish towel.  If you put them in an air-tight container it gets too moist and the pretzels absorb the salt crystals.  And they are always better fresh… we triple the recipe (for 8 people) and rarely have leftovers.  Carb overload?  Yes, please.

March 10, 2011 by Krista

Recipe Exchange!

Calling all housewives, college students, mommas, working women, househusbands, stay at home dads and anyone that prepares meals!  Do you find your family eating the same few meals time after time?  Have you ever wanted lots of new recipes, but lack the time to sit down and find them all?  Well, come join us for a recipe exchange!

<a href=”http://whilehewasnapping.blogspot.com/2011/03/recipe-exchange.html”><img src=”http://i769.photobucket.com/albums/xx332/WhileHeWasNapping/RecipeExchangeButton-1.png” width=”125″/>

Here’s the How:
This will be simple.  All you have to do is link up a recipe to participate.  You don’t have to follow me or anything to join this exchange, although I’d love to have you.  This is open to any and everyone.  Easy peasy, right?

If you have questions or comments, let me know.  It doesn’t need to be a fancy recipe, in fact the easier, the better.  We’re trying to help each other out here, so easy recipes are definitely welcome.  I’d love for you to take a button to let other’s know… the more people participate the more recipes you get back.  Linky will be open until next year, so come back often.  I will feature recipes from this party through out the year, so keep linking up your yummy goodness.

March 9, 2011 by Krista

Spring Fever: How to Meal Plan

My family, we like to eat well.  Fish, steaks, fruit (and it always seems to be the out of season fruit) and other more expensive food items are often on our table.  If things work out like we hope (cross your fingers for us… and toes and anything else you can cross), we will be living on a rather strict budget soon.  So, to cut down our spending we’re going to have to tighten the belt.  Bad pun.  Our food budget will be slim with very little wiggle room.  Now, we could eat Mac & Cheese for dinner every night for the next three years, but I’m pretty certain My Mr. Right would leave me.  He hates Mac & Cheese.  Top Ramen is ok though… weird, right?!  Anyway, if you meal plan you can cut down your grocery bills considerably.  It takes some time to do, but right now, I have more time than money.  Any one else out there feel that way?

Here are 10 pointers on how to organize your meals:
1)  Make a list of things your family enjoys eating.  Put down anything and everything that comes to mind.  If and when you find new recipes you want to try, add them to your list.
2)  Decide how long you are going to plan for.  How many meals a day you have to prepare might help you decide.  If you just have to do dinner, you could go as much as planning a month at a time.  I, personally, do two week increments.
3)  Write it down.  Decide which meals to have when.  Write it on the calendar.  It’s, by no means, set in stone that you have to have chicken casserole on Tuesday.  But, by scheduling it on the calendar, you will have the ingredients when you need them.
4)  Make a list of all the ingredients you need for each meal.  Make recipe cards if that will help.  Save this list for the next time you schedule this meal.  It’ll save you time.  Feel free to use the printout below.  Just click on it, after the image opens in a browser window, right click and “save as”.  Save it to your computer and print as many as you’d like.
5)  Try to plan meals that use similar ingredients near each other.  For example, my little family doesn’t use a whole bottle of spaghetti sauce in one meal, so the leftovers go in the fridge.  Well, plan another meal that will use the extra before it goes bad sitting in the fridge.  That’s one of the biggest ways people throw money in the trash, literally.  You don’t have to eat spaghetti again, just use the sauce.
6)  Make your shopping list.  Use your ingredients lists to make sure you don’t forget anything.  Also, compare lists and only buy how much you will need.  If you have a recipe that calls for carrots, potatoes and celery and another recipe that calls for pasta, sauce and celery one bag of celery will probably be enough – depending on the size of your family.  You may print the image below if you’d like.  Follow the same steps as are listed in #4.

7)  Use coupons.  This is an area that I don’t excel in.  I love a good sale, but I don’t often take the time to collect and use coupons.  I have seen women with carts full of food and other household items hand over twenty dollar bills and get change back!  And I suddenly understand why they handed over a stack of coupons and ignored the groans from everyone in line behind them.  If you’re looking to cut back your food bill, take the time to use coupons.
8)  Use coupons… responsibly.  It’s one thing to use coupons and save money.  It’s something else when you end up buying more than you need and spending four dollars instead of two, just so you can save 55 cents.  Make sense?  Do you really need 27 tubes of toothpaste (and do you have room to store it)?
9)  Stick to your plan.  I don’t mean that you HAVE to have lasagna on Friday.  If you want baked potatoes and chicken on Friday instead, go for it!  BUT, only if it’s a meal you have planned for and haven’t already had in your current two weeks, or whatever length your planning for.  If you have the ingredients for it, go for it!  Just realize that you will at some point have to eat the lasagna.
10)  Don’t cook more than you need.  If you are a family of four, don’t cook enough to feed seven.  And eat any leftovers before they spoil.  It’s common sense, but something my household struggled with.  A lot.  Now, every week I plan a “Leftover” meal.  We clean out the fridge before the food goes bad.  Some weeks there are lots of leftovers, and other weeks there’s hardly any.  You may have to adjust accordingly for the rest of the meal, but you’ll throw out far less food… and money.

Those are my tips and, pretty much, the way I meal plan.  We compared a month of meal planning to a month of no meal planning, just for fun, and our grocery bills were cut in HALF!  Yes, HALF!  We didn’t throw out hardly anything.  We ate it before it went bad.  I wasn’t running to the grocery store three times a week because I needed one or two things and coming home with WAAY more than one or two things.  That alone saved us a ton of money.
And when 4 o’clock rolls around and I don’t know what to do for dinner, its so much easier to glance at my plan and know what I have all the ingredients for already.  Way less stressful than trying to pull something together while standing with the pantry doors open, hoping something will jump out at me.  It’s a win-win for everyone!
Krista

Want some ideas on how to display your meal plan?  Check out these menu boards.  Click the photos for tutorials on each one.  And if you have a menu board you use, link it up below!


Do you meal plan?

March 2, 2011 by Krista

Mint Chocolate Chip Ice Cream

Ok, I know there are still snow drifts of varying heights all over the country, but any day is a good day for home made ice cream in my book.  Last week we tried a new recipe.  My Mr. Right’s favorite ice cream flavor in Mint Chocolate Chip and, while digging around in the black hole my family calls a garage, he found an ice cream maker.  Of course, we didn’t have the patience to wait for warmer weather.  So, here is the Mint Chocolate Chip ice cream we tried.  It turned out pretty tasty! 

MINT CHOCOLATE CHIP ICE CREAM

Ingredients:
2 cups Whole Milk
2 cups Heavy Cream
1 cup Sugar
1/2 tsp Salt
1 tsp Vanilla Extract
1 tsp Mint Extract
5 drops of Green Food Color
1 cup Andes Mint Chips

Directions:
In a large bowl, stir together the milk, cream, sugar, salt, vanilla extract and peppermint extract until the sugar has dissolved. Color to your liking with the green food coloring, I used about 5 drops.  Pour the mixture into an ice cream maker, and freeze according to the manufacturer’s instructions. After about 10 minutes into the freezing, add the mint chips. If you’re going for soft-serve, you can eat it about 30 minutes later.  If you want a thicker, firmer ice cream, dish it into a container and freeze for a couple hours. 

I actually found this recipe at allrecipes.com.  We tweaked it a bit and it worked out well.

February 16, 2011 by Krista

Super Simple Mini Chocolate Cream Pies

This is awesome if you want an elegant dessert with super little prep.  It doesn’t taste quite as fabulous as making real chocolate cream pie, but when you can do it in a quarter of the time, you’ll think this heaven.

SUPER SIMPLE MINI CHOCOLATE CREAM PIE

Ingredients:
1 Small (4oz) Package of Instant Chocolate Pudding
4-5 Graham Crackers (the big ones that divide into 4 rectangles)
1/4 cup Butter
1/4 cup of White Sugar

Directions:
Put the graham crackers in a zip top baggie and smash them until they are crumbs.  Using a rolling pin to roll over the crackers will help smash them fine enough.  

Once you have crumbs instead of crackers, melt your butter in a microwave-safe glass.  Mix sugar in with the graham cracker crumbs.  Stir until evenly distributed.  Pour your butter in the graham cracker crumbs and sugar.  Mix well.  (I do all my mixing in the zippered baggie.)  Press the graham cracker mixture into small bowls.  Mix up the pudding according to the package instructions.  Pour your pudding in on top of the cracker crusts.  Refrigerate until used.  Serve.

Serves 2-3, Depending on how thick you make your crusts.  You could probably squeeze 4 out of it if you tried.
If you want to dress up your mini pies, add some whipped cream, a drizzle of chocolate sauce. Add a fresh raspberry or strawberry for some color.  Chocolate shavings are also a good way to dress it up.  You can also substitute the graham cracker crust for an Oreo crust.  This is a great dessert that the kiddos can help prepare, but it can be a fancy date-night dessert too,
  • « Previous Page
  • 1
  • …
  • 25
  • 26
  • 27
  • 28
  • 29
  • 30
  • Next Page »

I'm Krista. Ringleader here on While He Was Napping, wife to my handsome Mr. Right & momma to my THREE energetic boys, Big J (9), Little J (6) & Little N (4). We FINALLY added a beautiful little girl to our family last December.

I’m knee-deep in Tonka trucks & Thomas trains. I survive our crazy days with Vanilla Coke, Sonic slushies, sweet snuggles and little giggles. When I tuck them in tight & kiss them good night, I get a little time to create & just be me.


It all happened
while (s)he was napping
Want More of My Story?

Privacy Policy

While He Was Napping respects your privacy and is committed to keeping any personal information collected on this website confidential. To find out what information we collect and how it is used or what options you have regarding your information, see our full privacy policy here. Creative Commons License The website found at whilehewasnapping.com and all subdomainsauthored and published by Krista is licensed under a Creative Commons Attribution-NonCommercial-NoDerivs 3.0 Unported License.

Pretty Chic Theme By: Pretty Darn Cute Design