While He Was Napping

momma gets stuff done

  • Home
  • About
  • Archive
  • Do It Yourself
    • Crafts
      • No Sew
      • Painting
      • Paper Crafts
      • Repurpose Projects
      • Vinyl
      • Washi Tape
      • Kid’s Crafts
      • Fonts
    • Sewing
    • Decorate
      • Home Decor
      • Holiday Decor
    • Celebrate
      • DIY Gifts
      • DIY Your Party
  • Recipes
    • Beverages
    • Appetizer
      • Bread
      • Other Appetizers
    • Snacks
    • Main Dish
      • Meat
        • Chicken
        • Beef
        • Pork
        • Seafood
      • Vegetarian
      • Slow Cooker
      • 30 Minute Meals
    • Dips & Sauces
    • Salads
    • Pasta
    • Soup
    • Dessert
      • Cookies
      • Brownies
      • Cupcakes and Cake
      • Box Mix Recipes
      • Other Sweet Treats
    • Breakfast Food
      • Pancakes
      • Waffles
      • Muffins
      • Other Breakfast Food
  • Family
    • Babies
      • Pregnancy
      • Newborns
      • The 1st Year
    • Toddlers
    • Preschoolers
    • Kindergartners
    • 6-8 Year Olds
    • The Grown Ups
      • Date Night
      • Romantic Gifts
    • Self Care
  • For the Home
    • Cleaning
    • Organizing
    • Emergency Preparedness
  • Travel
    • Travel Tricks & Tips
    • Traveling with Kids
  • Tech & Gadgets
    • Must-Have Apps
    • Techy Home Appliances
    • Gadgets & Electronics
    • Blogging Tips
  • Printables
    • Posters
      • Quote Printables
      • Subway Art Printables
    • Printable Organizers
    • Printable Journals
    • Learning Printables & Worksheets
    • LDS Printables
  • Holidays
    • New Year’s
    • Valentine’s Day
    • St. Patrick’s Day
    • Easter
    • Cinco de Mayo
    • Mother’s Day
    • Father’s Day
    • 4th of July
    • Back to School
    • Halloween
    • Thanksgiving
    • Christmas
    • Holiday & Seasonal Printables

October 31, 2016 by Krista

Wooden Halloween Candy Corn Decorations You’ll Want to Eat!

Halloween decorations. It seems like it’s an all or nothing deal. Either we go all out and spook out the whole house or we don’t even so much as put up wreath or change the chalkboard quote. I am definitely in the latter of those two groups. Clearly, right? I’ve got two wooden candy corn decorations and that’s about all the decorating I’ve done for Halloween this year. Halloween is hard for me to decorate for because I know it’s the kick-off to what is always a CRAZY holiday season. I tend to skip Halloween because I’m trying to get ahead of Thanksgiving and Christmas. Halloween ends of being a rushed afterthought.

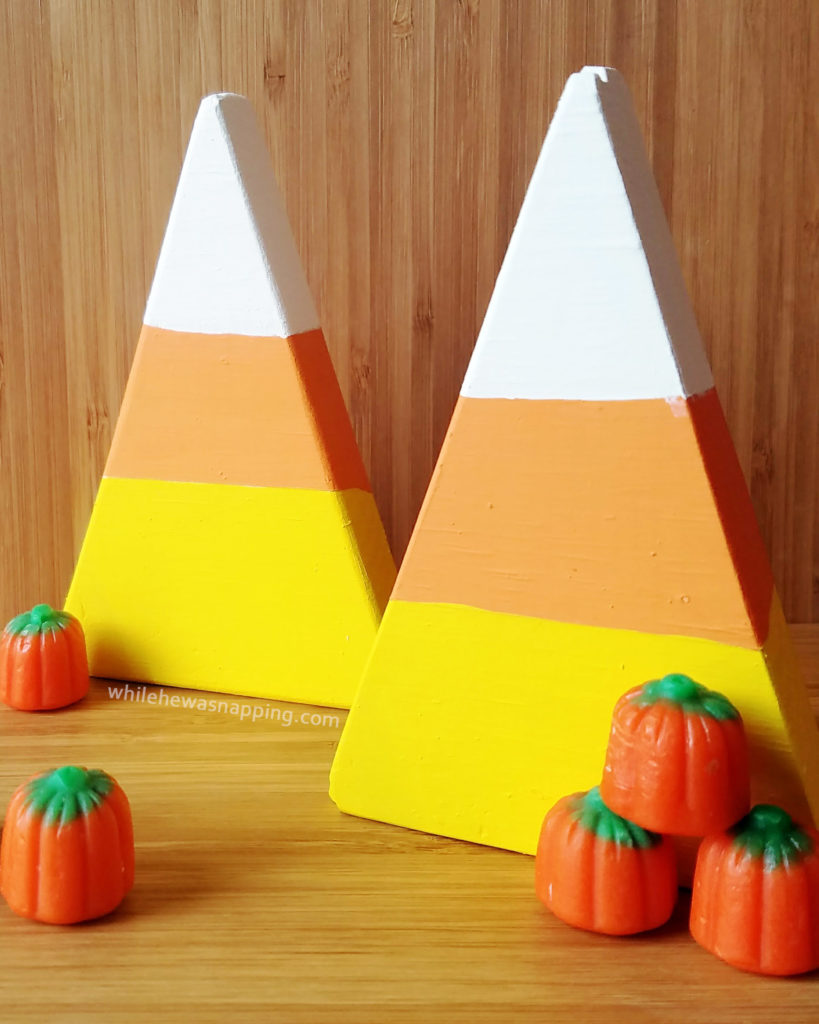
Enter these candy corn decorations. This project piggybacks off another one that is coming next month and I just happened to have these two extra pieces that I thought would look good as candy corn decorations, so they are last-minute.

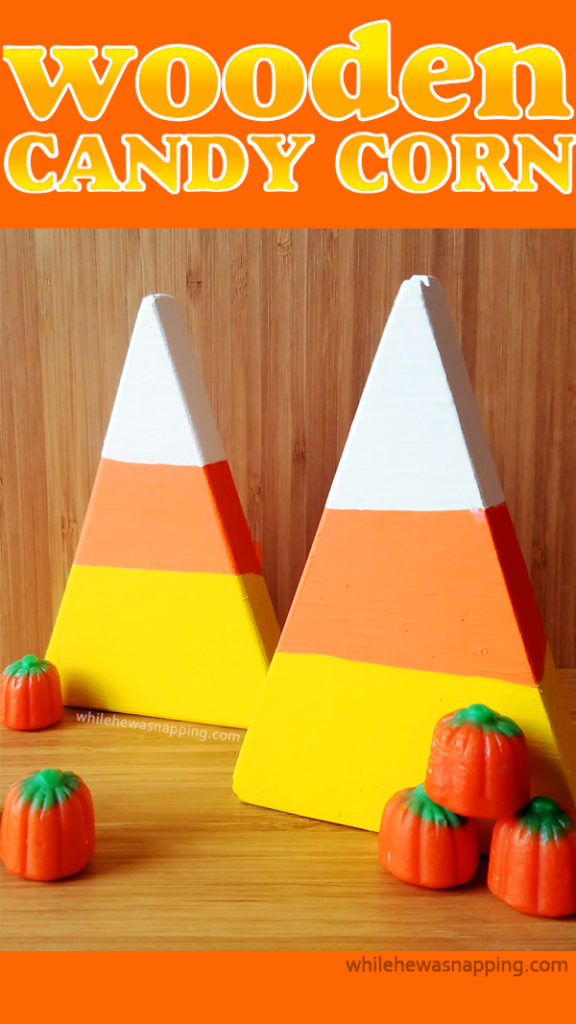
WOODEN HALLOWEEN CANDY CORN

 DECORATIONS

Wooden Candy Corn Halloween Decorations


Materials:

  • 1″x6″ board
  • Tape measure or ruler
  • Pencil
  • Sand paper
  • Masking tape
  • White acrylic paint
  • Orange acrylic paint
  • Yellow acrylic paint
  • Paintbrush
  • Circular saw or other saw

Directions:

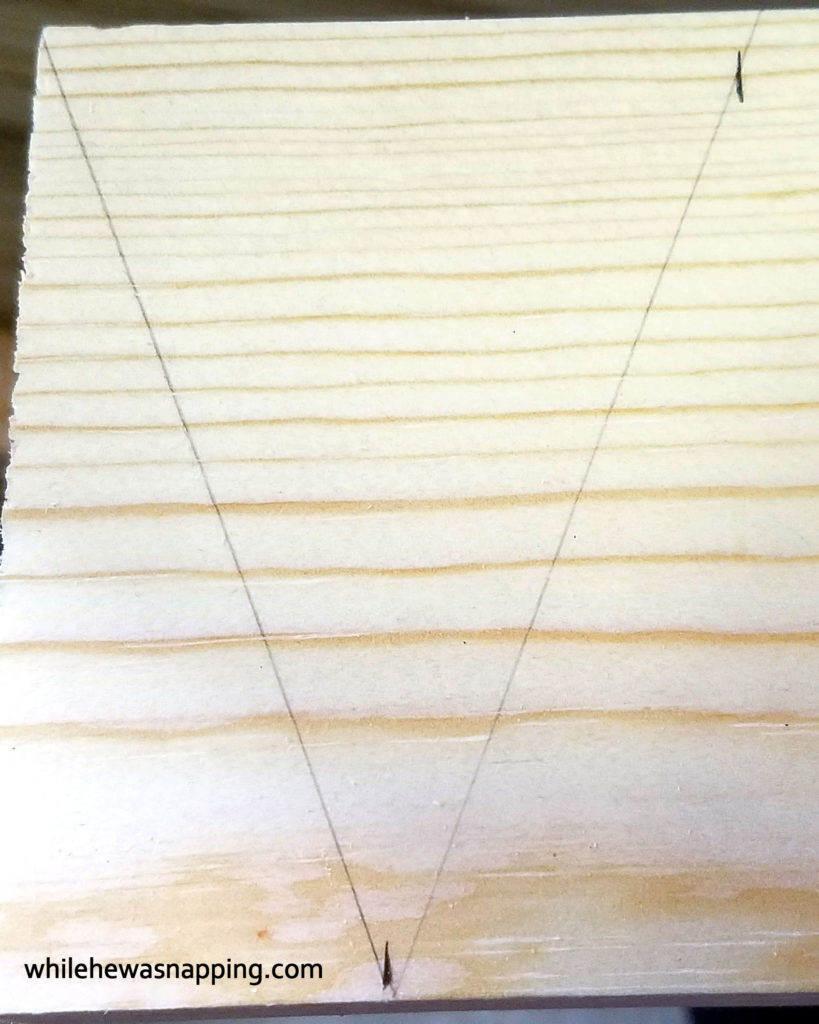
1. Use the tape measure or ruler and, on the top edge of the board, measure 2.5 inches from the end of the board. Make a small mark with the pencil.

Halloween | Decor | Decorations | Candy Corn | Wood

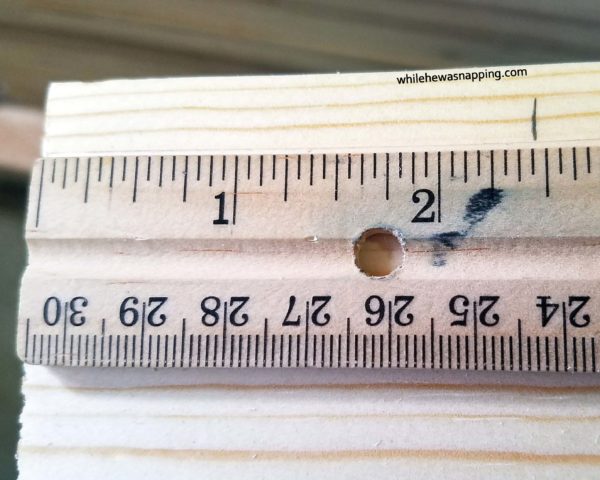
2. Move the tape measure to the bottom edge of the board, and measure 1.25 inches. Make a mark with the pencil.

Halloween | Decor | Decorations | Candy Corn | Wood

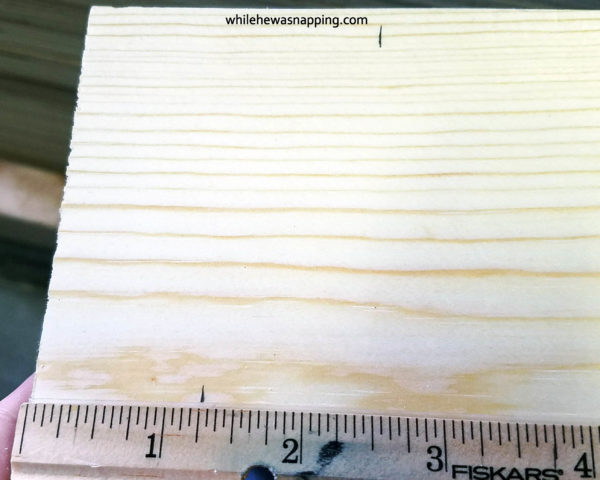
3. Use the straight edge of the ruler and line up the bottom mark with the top corner of the board. Draw a line to connect the two marks. Do the same from the bottom mark to the mark at the top.

Halloween | Decor | Decorations | Candy Corn | Wood

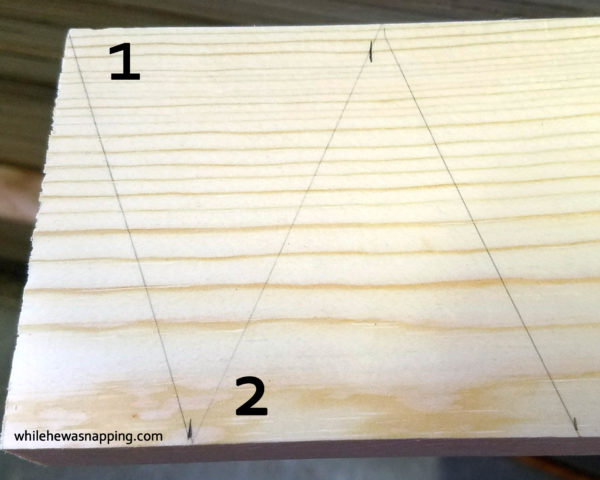
4. Repeat the measurements for the remaining length of the board. Use the saw to cut along your marks.

Halloween | Decor | Decorations | Candy Corn | Wood

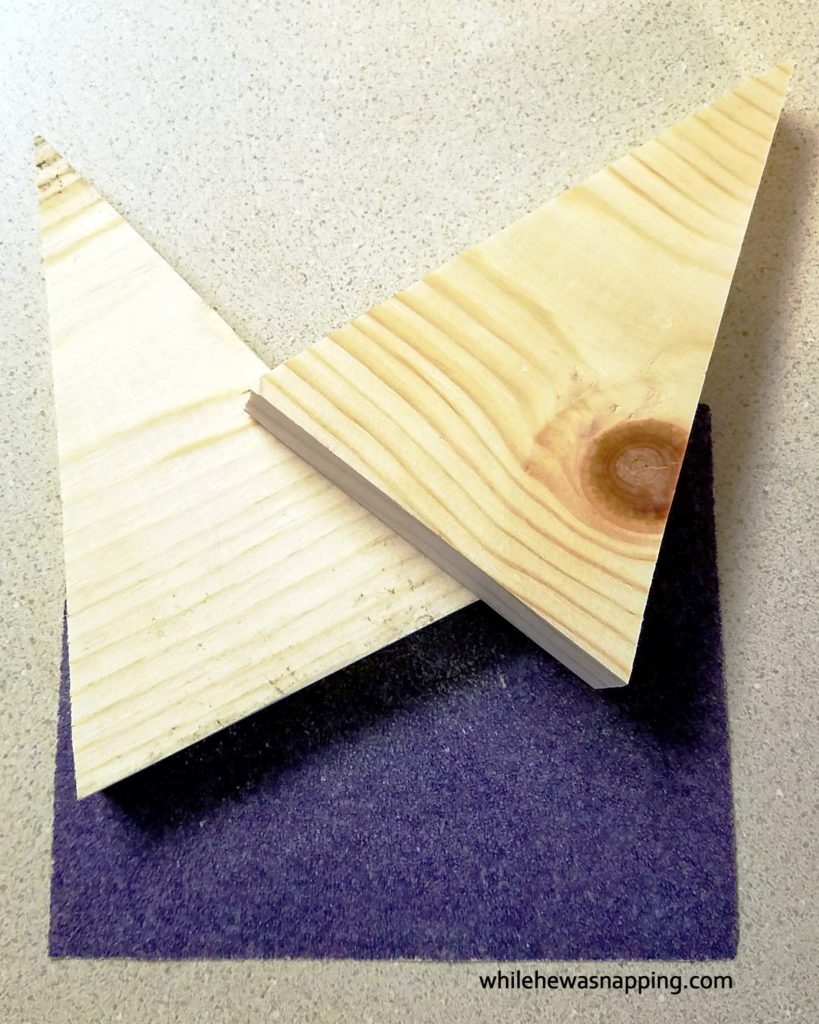
5. Use the sand paper to clean up the edges of each of the triangles. A rougher grit will take the edges down more than a finer grit paper.

Halloween | Decor | Decorations | Candy Corn | Wood

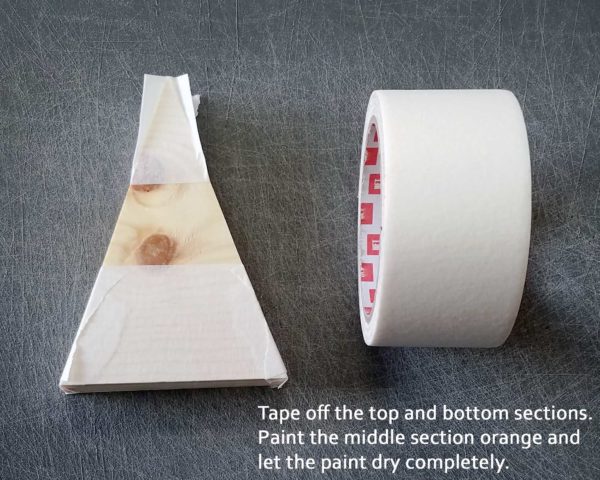
6. Use your masking tape to tape off the middle section of each triangle so your paint won’t bleed into the other sections. You can measure the sections, but I just free handed and eyeballed it on mine.

Halloween | Decor | Decorations | Candy Corn | Wood

7. Paint the top section of each triangle white and allow to dry for 20-45 minutes. Continue to add coats of paint so the wood is adequately covered.

8. Paint the bottom section yellow on each triangle. Allow to dry for at least 20-45 minutes. Repeat and continue to apply thin coats of paint until you have adequately covered the wood.

9. Remove the masking tape when the paint is completely dry. Wait at least 2-4 hours, or overnight if possible so you don’t have any paint bleed or smudging.

Halloween | Decor | Decorations | Candy Corn | Wood

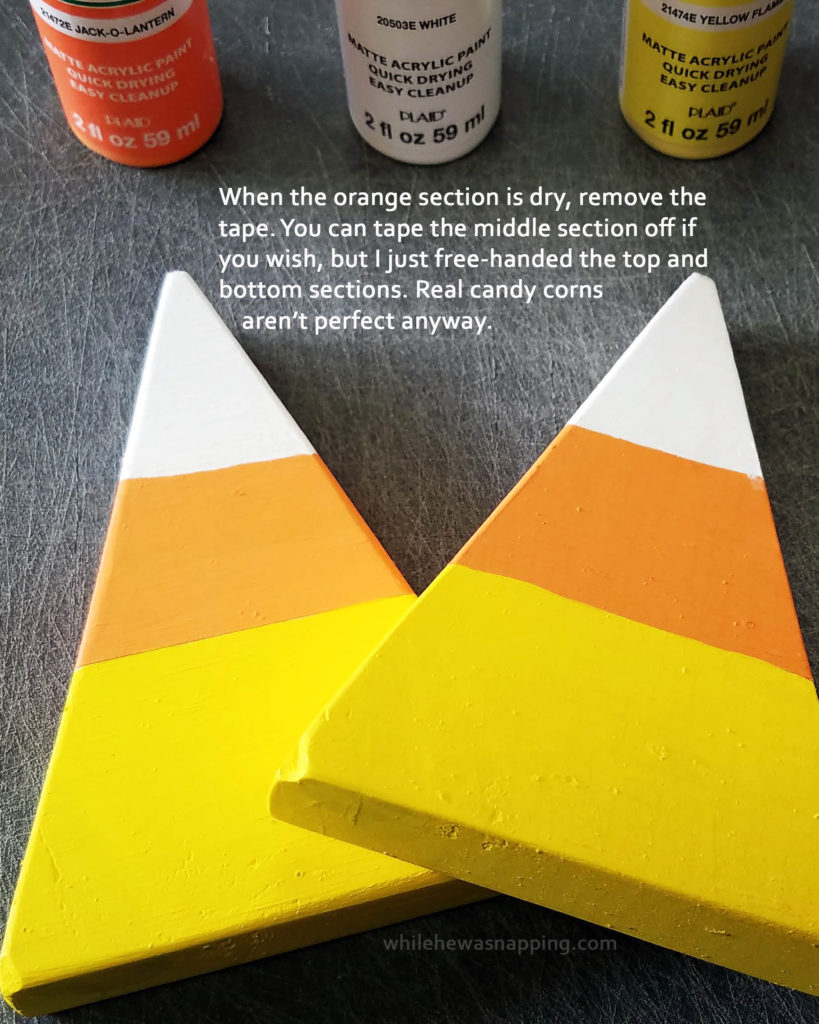
10. Paint the middle section orange. You can tape it off if desired, but I just free handed it carefully. Candy corn lines aren’t perfectly straight in reality, so I wanted mine to be unperfect too.

11. Allow the paint to dry overnight so you can set them out to display.

Halloween | Decor | Decorations | Candy Corn | Wood

October 11, 2016 by Krista

13 Spooky Fun Halloween Projects {for you and the kids!}

October is zooming by! That’s okay though, there’s still time to get some great Halloween projects in before another one comes and goes.

Want some fun craft projects for you? These Halloween projects are some of my very favorite projects I’ve ever done. Seriously. I’m glad Halloween is at the end of the month so I get to enjoy them for 31 whole days.

Looking for kid activities to do with the kids this month? We’ve got some fun ones (#9 has been a TOTAL hit this year! I had to make another set so my little ones would stop fighting over it!).

And, of course, there’s some fun snacks to help you celebrate this month.

13 HALLOWEEN PROJECTS

13 Halloween Projects for you and the kids to try this October. Home decor, crafts, spooky eats, printables, and kids activities! There's a little something for everyone!


HALLOWEEN PROJECTS FOR YOU

#1. DIY Spell Books with 12 Spells. For several years, I had dreamed of creating some spell books. I want to be able to open up the books and to even have spells in them. I got the project done a couple years ago and it is still one of my favorite Halloween decorations. 
DIY Spell Books


#2. Life-Size Witch’s Broom. You’ve got the spell books, but what about the broom? This project is practically free and you can find all your supplies while you’re out for a walk. The kids can help with this one too!
DIY Witch's Broom

#3. No-Sew Witch’s Hat. Finish up your witchy collection with this no-sew DIY hat that you can really wear. It’s a great afternoon project that will really kick up your witchy ways this Halloween.
No-Sew DIY Witch Hat


#4. DIY Potion Bottles. Whether you use these with your spell books or because you have a mad scientist, you’re gonna love these potion bottles. The best part is coming up with what to put in each bottle and what to call it. Don’t worry, there’s a list of suggestions if you get stuck.
DIY Witch's Potion Bottles


#5. Directional Halloween Sign. This was a project I did last year and didn’t get to show off nearly as much as I wanted to. I love the color on this sign and all the fun street names. It’s definitely set up camp in my flower bed for the month.
Behr Marquee Halloween Directional Sign and Halloween Decor


HALLOWEEN PROJECTS FOR THE KIDS

#6. Slime. This is one of my boys’ favorite activitites and they love it when we creep in up just a bit for Halloween. Add plastic spiders, creepy crawers or have a contest to see who can hold the most slime for the longest.
Cornstarch and Water Slime


#7. Monster Mash Munchies Mix Printable Snack Labels. A fun way to give our your Halloween goodies this year. Just print, cut and staple to the top of plastic ziptop bags for a hauntingly good treat.
Monster Mash Snack Labels


#8. Halloween Bingo Printable Game. The kids will love this Halloween Bingo game and it’s FREE! Come grab your set and keep the kids entertained while you cook dinner tonight.
Halloween Bingo Printable


#9. Build a Jack-O-Lantern Printable. We love this printable because there are SO many ways to play with it. Play a game of pin the face on the jack-o-lantern, practice numbers, talk about emotions, and see how many different faces you can make. My little especially love this one.Build a Jack-O-Lantern Printable


#10. Halloween Countdown Jar Printable. Want to make some memories and maybe a few traditions too. This fun FREE printable countdown jar is super easy to put together. Just print, cut and fold. Put all your October bucket list activities in the jar or use the included ones for fun all month long.
Printable Halloween Countdown Activity Jar


#11. 5 Ways to Get a Great Last Minute Halloween Costume {on a Budget}. Creating costumes with the kids is the way to go! These are some of my favorite go-to ways to create costumes that don’t break the bank, whether it’s last minute or not. Way #1 is especially my favorite, I love that they can wear them for more than one night!
5 Ways to Get a Great Halloween Costume on a budget


HALLOWEEN PROJECTS YOU CAN EAT

#12. Make Halloween Cookies. Here is a collection of 10 cookies that anyone can make. No amazing crafty, super baker skills needed. These are perfect to do with the kids… or without. They are all pretty quick and easy too!
Ten Halloween Cookies anyone can make


#13. Halloween Treats That Aren’t Candy. Maybe you’re on sugar overload (or the kids are!) and you just need something that isn’t dripping with sickly sweetness. Try one of these great treats. Fun Halloween eats without the sugar rush? Yes please.
10 Halloween Treats that AREN'T Candy


BONUS HALLOWEEN PROJECTS TO EAT:

Thirteen was too perfect a number to stop at, but these nachos are still some of my favorite Halloween food we’ve enjoyed. In fact, they are tradition in our family on Halloween night.

Spiderweb Nachos

Spider Web Nachos


Happy Halloween! Now, go do some celebrating!

May 17, 2016 by Krista

Top Ten Things To Do With Your Kids This Summer

Hey, I’m so glad you stopped by today!

What time of the year is it for you? Here, Summer is getting closer and closer. Which means my boys will be home. All my boys. All. Day. Long. I’ve discovered the best way to get through the long summer days is to have a plan. A fun plan!

With all the fun we’ll be having around here, we need to keep our energy up! Between my three boys and my husband, some one is eating AT ALL TIMES. But we can’t be tied down to the kitchen! There’s too much to do, too much fun to have. And, frankly, I get tired of cleaning it all day long.

We reach for Mott’s® products a lot around here. I love the quality and that they have options to take snacks with us on the go. One of our favorites is the new cherry apple juice. It’s such a delicious treat and pairs perfectly with lunch.

Motts Cherry Apple Juice Lunchtime

We also love the applesauce cups and the squeeze pouches are perfect when we’re going out. The occasional treat is great and we love Mott’s® fruit snacks for that. They are pretty much a staple in our diaper bag for church. They help keep my boys quiet, which is a huge feat all on it’s own!

Motts Cherry Apple Juice Motts Products

Mott’s® keeps up fueled up and running all through our summer fun! I love that they have boxtops on them too! Extra bonus for my kids’ school and products I already love?! Yes, please!

So, are you looking for some fun to schedule into your summer plans. Take a look at these fun projects and see which ones your kids would love to try out!

10 FUN THINGS TO DO WITH YOUR KIDS THIS SUMMER

Motts Cherry Apple Juice10 things to do with your kids this summer

1. Egg Toss Painting. Because sometimes it’s okay to throw eggs! This is tons of fun and super easy to clean up! Plus you get a fun piece of art when your finished.

all® Fresh Clean Essentials Egg Throw Painting
2. Cardboard Box Cars. A great upcycle for empty boxes! You can spend an afternoon making the cars and then play with them until they fall apart. We have a fun “drive-in” movie night and my boys watched the movie in their cars. They loved it!

Tyson Any'Tizers DIY Drive-In Cardboard Box Cars
3. Sun catchers. These are fun and so versatile. We made some for autumn and then did it again with valentine’s hearts. It’s a great project for those crayon stubs, but definitely needs adult supervision.

Hearts-in-the-Sky1
4. Make cookies. We love to make cookies. My boys don’t have a big attention span, so a package mix is perfect. They get to help dump the ingredients in. By the time they are no longer interested it’s time to put them on a pan and bake them. It’s perfect. And delicious!

Spread Cheer with Simple Surprises Peanut Butter Blossom Cookies Making Cookies
5. Preschool Olympics day. With the Olympics coming up, this could be a fun way to introduce it to your kids. This is a fun activity to introduce the Olympic rings. Throw in an obstacle course, run a race or two or do some water races and you have the perfect summer afternoon.

Olympics-craft11
6. Make Sparkle bottles. These are fun to make and almost as much fun to watch. But, they can be a bit messy. If you can, make them outside. You’ll also need to help with the hot water part. The kids love to pick the colors for their bottles and watching the glitter fall is super relaxing.

Small-Sparkle-Bottle1
7. Building with marshmallows. This is so fun! We did this as an activity for the little kids for a movie night we had. It was the perfect distraction when they got bored and wanted to run around. It was amazing to see what they came up with. Such a fun sensory and imagination-building activity!

Build A Baymax aftermath
8. Science projects. We love to do science projects! You could do a whole afternoon of projects or make some fun goop to play with.

Kid's Science Experiment Kit
9. Put together a boredom buster jar with some craft sticks and pretty washi tape. Write down all the fun things you want to do this summer and then pull them out when you need an activity or distraction.

Or for an even easier activity, check out this fun printable version. All you have to do is print, cut it out and fold them up and put them in a jar for the next time the kids start bickering or pull out the dreaded “I’m bored!”

Summertime-Boredom-Buster-Jar-for-Kids1
10. Headed out on some road trips this summer? Check out these fun ideas to keep your toddlers busy and happy while you’re on the road. Or maybe you have preschoolers? Here’s some ideas to help keep preschoolers busy too!

Car-activities-for-toddlers

Car-activities-for-preschoolers


But, that’s not all! Mott’s® is having a contest and YOU COULD WIN $100 e-gift card to Walmart! It’s super easy to enter. Here’s what to do:

  1. Take a photo and make a post on Twitter and/or Instagram and share why you think  is your perfect health partner – include the hashtag: #MottsMoments and #sweepstakes
  2. Register: CLICK HERE to register with your Instagram/Twitter handle and name/email
  3. Get Lucky! The lucky winners will win a $100 e-gift card to Walmart!

Tell me, what do you think of new Mott’s® Apple Cherry Juice? You can find it at Walmart! And don’t forget to enter for your chance to win a $100 e-gift card to Walmart!!

Motts Cherry Apple Juice In Store


This is a sponsored conversation written by me on behalf of Mott’s®. The opinions and text are all mine.

May 11, 2016 by Krista

Egg Throw Painting

This shop has been compensated by Collective Bias, Inc. and its advertiser. All opinions are mine alone. #allEssentials #CollectiveBias

WELCOME! I’m so glad you’re here!

Do you let your kids be kids, even when they get messy and their clothes get dirty? Do you have the confidence that you’ll be able to get those clothes clean again?

With three boys in our house, things get messy. In fact, things are pretty much always messy. There’s an endless supply of dirty dishes, toys on the floor and the laundry… oh, the laundry. There’s so much laundry. And these aren’t just dirty clothes, they are rough-and-tumble, explore-the-world, stains-on-everything kind of dirty.

But it’s important to me for my kids to have the chance to explore and have adventures. This world is so amazing and I want my kids to discover that. I want them to play with bugs and make mud pies and climb rocks and trees.

I need a laundry detergent that can keep up with my family. I know that my kids can play and explore and I can handle any stains they might pick up on their adventures.

And that’s where all® Fresh Clean Essentials™ Fragrance Free comes into play in our house. This new detergent is sulfate free and gives a powerful clean without the harshness. I love to use sulfate free shampoos – they leave my hair feeling clean and strong. I knew I had to try this detergent on the adventures that my boys wear on their clothes. I love that my boys can be rough and tumble kids and I can let all® Essentials™ worry about getting their clothes clean again!

all® Fresh Clean Essentials Egg Throw Painting all fresh clean essentials detergent

With my active boys, I have to find active and creative ways to get them to practice learning games. Little N is starting to learn colors and it’s good review for Little J too. And we couldn’t leave Big J out of all the fun. Because throwing eggs is naughty and sometimes it’s fun to be naughty!

EGG THROW PAINTING

all® Fresh Clean Essentials Egg Throw Painting

Materials:
– 12 eggs
– Pair of scissors
– bottle with a narrow neck
– toothpick
– container for the eggs
– paint (I like to use washable paint, because, well I’m not completely crazy)
– canvas or poster boards
– plastic drop cloths for super easy clean up

Directions:
1. Empty the eggs by poking a hole approximately the size of a dime in one end of the egg with the tip of the scissors. Gently tap the scissors on the egg until it breaks. Use your finger to clean the cracked egg shell out of the hole. If the membrane in the egg didn’t break, pierce it with a toothpick.

all® Fresh Clean Essentials Egg Throw Painting Egg Prep Top


2. Tip the egg so it sits on the mouth of the bottle with the hole pointed down into the bottle.

3. Gently tap a hole in the other side of the egg. This doesn’t need to be a big hole, but you do need to break the membrane.

all® Fresh Clean Essentials Egg Throw Painting Egg Prep Bottom


4. Blow into the hole you just made in the egg to push the egg yolk and white into the bottle.

5. Wash out the egg shell and set it to dry in the carton. You don’t have to let the shells dry, but your paint will be a little runnier if you don’t.

all® Fresh Clean Essentials Egg Throw Painting Eggs Prepped


6. Fill the eggs with a tablespoon or more of paint. The more paint, the bigger the splatter and the cooler the effect. Also, the bigger the mess. But it’s super easy to clean up. I suggest washable paint, just to make things easier.

all® Fresh Clean Essentials Egg Throw Painting Eggs and Paint


7. Lay the plastic drop cloths out over your work area. I definitely suggest doing this outside, but if you’re super brave you can try it in the shower. Or the garage maybe. It would be pretty easy to clean it up in either of those spots.

all® Fresh Clean Essentials Egg Throw Painting Aftermath


*Optional Step: you can let your kids put stickers or spell out their name with tape on the canvas. After they throw their eggs and the paint dries, remove the stickers or tape and you’re left with some cool negative space art.

8. Set the canvases or posters up on the drop cloth. I found that hanging the drop cloth on the fence and then setting the canvases up against the fence worked out well. You can lay them flat too. The paint will have more of a splatter pattern without the drips. This is good if you have a little one that isn’t very consistent with throwing yet. They can drop the eggs instead. The biggest thing is to make sure there is something solid behind your canvases.

all® Fresh Clean Essentials Egg Throw Painting Eggs The Wind Up


9. We did this one at a time, because I was trying to get photos, but it would’ve been more fun to do it all at once. Pandemonium is fun, right?! You’ll want your kids to stand close enough to hit their canvas each time they throw an egg. We found the eggs were actually much harder to break than expected. Which meant we could throw each egg multiple times, and that was fun.

all® Fresh Clean Essentials Egg Throw Painting Eggs Action Shot


10. Let your kids throw the paint-filled eggs at their canvas. We used a dozen eggs and each boy got 4 eggs. You can let them use a paint brush (or their fingers!) after they’ve thrown their eggs to finish off their masterpiece if they want.

all® Fresh Clean Essentials Egg Throw Painting Eggs TheFinishing Touches

11. Let the paint dry. Display your little painters’ works of art.

Clean up is as simple as throwing the drop cloth in the trash and a load of laundry in the washer.

all® Fresh Clean Essentials Egg Throw Painting CleanUp


I love knowing that with all® Fresh Clean Essentials™, my kids and I can do these messy projects together. And it’s super easy to get it online at Walmart.com! I can focus on having fun and being in the moment, not worrying about if I’m going to be able to get their laundry clean. And I’d much rather make memories than worries.

all® Fresh Clean Essentials Egg Throw Painting all detergent


Check out more fun ways to let your kids be kids and get their clothes clean again with all® Fresh Clean Essentials™.

April 15, 2016 by Krista

DIY Cell Phone Charging Station

I’m so glad you’re here! Have you ever needed to charge your cell phone somewhere than you normally do? Just wait until you see the Cell Phone Charging Station we’re going to make today!

But first, I have a couple questions for you…

  • Do you reuse what you can?
  • Do you like to recycle?
  • Is it something you are teaching your kids to do?

We do recycle. But, we don’t spend a lot of time doing it. We have a recycle bin under our kitchen counter that collects tin and aluminium cans, glass and plastic containers. Every two weeks, we sort it into the recycle baskets and set it out with the trash. Mr. Napping takes our cardboard to work and recycles it there, since we can’t do that from our residence at this point. We spend less than 20 minutes a week in our recycling efforts, but we are still reducing waste that would otherwise end up in the landfill.

I also re-use empty containers and things around our home. Old spice bottles makes great maracas. Empty toilet paper tubes are fun to make into play binoculars, race cars and rain sticks. Empty, clean tin cans are great for organizing pens, pencils, crayons and other art supplies. Reusing these items are just as much for the sake of fun, and recycling is just a bonus!

Care to Recycle Phone Charging Station Repurpose

There’s lots of things you can repurpose and reuse. And what you can’t reuse, you might be able to recycle. Most recycling is done in the kitchen. Have you ever thought about recycling in the bathroom?

WHERE DO YOU RECYCLE?

A 2016 consumer survey on in-home recycling habits, conducted in partnership with Johnson & Johnson Consumer Inc., shows that 34% of regular recyclers admit that it never even occurred to them to recycle in the bathroom! They found one of the main reasons people don’t recycle personal care products in the bathroom is a lack of tools and resources; only one in five recyclers have a recycling bin in their bathroom. We don’t! Do you?

Here’s a couple recycling pointers you might not know:

  • #1 and #2 plastics are the most widely accepted plastics in curbside and town recycling programs
  • #5 plastic bottle collection is increasing, but it’s still not generally accepted in curbside and town programs
  • Plastic tubes and plastic films are not accepted
  • Plastic caps can be left in place
  • Pumps need to be removed and discarded in the trash
  • Rinsing the bottles before recycling is appreciated

Care to Recycle Phone Charging Station Repurpose Recyclables

Johnson & Johnson Consumer Inc. have created the Care To Recycle® program to encourage recycling of personal care product packaging and as a gentle reminder to extend your recycling habits outside your normal areas. Care To Recycle® wants to help parents extend recycling habits outside the kitchen and into the bathroom. We can involve our children in the fun and ease of recycling and reusing.

Here’s a fun, quick and easy little project that will help you reuse and recycle things you use in the bathroom.

RECYCLED DIY CELL PHONE CHARGING STATION

Care to Recycle Repurpose Empty Bottle into Phone Charging Station

Materials:
– Empty plastic bottle large enough to hold your phone. I used an Aveeno lotion bottle. The stress relief lotion is amazing (because as a mom of three boys, I have stress. Lots and lots of it). The bottle is a great size for reusing. If you don’t want to reuse it, it is recyclable.
– Rubbing Alcohol and Cotton Balls
– Permanent Marker
– Scissors, Razor Blade and Craft Knife. You can get by with just one, but I ended up using all three of them.
– Washi Tape

Care to Recycle Phone Charging Station Repurpose Materials

Directions:
– Start by washing out your empty bottle. Get out all the gunk and goop. Keep rinsing…. Almost there. Great, it’s goop-free now.

Here’s a video of the next five steps. Watch me do this project in less than a minute and a half. Or read through the directions below. If you get confused, come back and watch the video.

– Remove the label. The lotion bottle I used just had a sticker label. It took a little coaxing on one corner – we’re talking like maybe 30 seconds tops – but the label came up relatively easy. If you can’t get it off or don’t want to deal with it, you’ll be covering it up in a few minutes. Taking the label off just gives you a cleaner, less textured surface to deal with when you’re covering your bottle.
– Use the rubbing alcohol to clean off any sticky residue left behind by the label.
– Take the permanent marker and draw the basic shape of the area you want to cut out. You will need enough space to put your phone into and take it out of the container. I opted to turn the bottle upside down and thread the USB charging cord up inside the bottle opening. If the majority of the cord is inside the bottle, hopefully it won’t get pulled on, played with or caught on anything and damaged. You could leave the bottle upright and just drop the cord in the bottom too.
– Then I thought It might be nice to be able to hang the charging station on the plug and keep it all together that way. I cut a hole in the back of the bottle large enough to put my plug through.
– You can go back over any stray permanent marker lines and clean them off your charging station with rubbing alcohol. Wax on, wax off and you’ve got yourself a clean bottle again.
– Now, it’s time to get fancy. I didn’t want just a boring charging station hanging around, so I used some washi tape and stuck it to the bottle. I only did the front, but you could do the whole thing if you wanted. I like washi tape because it’s easy to use, it’s simple to make adjustments if you make a mistake and it’s easy to remove if you ever decide you don’t want it anymore. You can still recycle the bottle that way.


That’s it. Your cell phone charging station is ready to use! What I really love about this is that there are so many possibilities! And, I turned the cut out part of the bottle into a sink spout extender in our bathroom so Little N can wash his hands without needing to be held! Double score!

Care to Recycle Phone Charging Station Repurpose Water Spout Extention

Do you have any great repurposing hacks? Leave a comment and tell me about it!


I was selected for this opportunity as a member of Clever Girls and the content and opinions expressed here are all my own.

  • « Previous Page
  • 1
  • 2
  • 3
  • 4
  • 5
  • Next Page »

I'm Krista. Ringleader here on While He Was Napping, wife to my handsome Mr. Right & momma to my THREE energetic boys, Big J (9), Little J (6) & Little N (4). We FINALLY added a beautiful little girl to our family last December.

I’m knee-deep in Tonka trucks & Thomas trains. I survive our crazy days with Vanilla Coke, Sonic slushies, sweet snuggles and little giggles. When I tuck them in tight & kiss them good night, I get a little time to create & just be me.


It all happened
while (s)he was napping
Want More of My Story?

Privacy Policy

While He Was Napping respects your privacy and is committed to keeping any personal information collected on this website confidential. To find out what information we collect and how it is used or what options you have regarding your information, see our full privacy policy here. Creative Commons License The website found at whilehewasnapping.com and all subdomainsauthored and published by Krista is licensed under a Creative Commons Attribution-NonCommercial-NoDerivs 3.0 Unported License.

Pretty Chic Theme By: Pretty Darn Cute Design