While He Was Napping

momma gets stuff done

  • Home
  • About
  • Archive
  • Do It Yourself
    • Crafts
      • No Sew
      • Painting
      • Paper Crafts
      • Repurpose Projects
      • Vinyl
      • Washi Tape
      • Kid’s Crafts
      • Fonts
    • Sewing
    • Decorate
      • Home Decor
      • Holiday Decor
    • Celebrate
      • DIY Gifts
      • DIY Your Party
  • Recipes
    • Beverages
    • Appetizer
      • Bread
      • Other Appetizers
    • Snacks
    • Main Dish
      • Meat
        • Chicken
        • Beef
        • Pork
        • Seafood
      • Vegetarian
      • Slow Cooker
      • 30 Minute Meals
    • Dips & Sauces
    • Salads
    • Pasta
    • Soup
    • Dessert
      • Cookies
      • Brownies
      • Cupcakes and Cake
      • Box Mix Recipes
      • Other Sweet Treats
    • Breakfast Food
      • Pancakes
      • Waffles
      • Muffins
      • Other Breakfast Food
  • Family
    • Babies
      • Pregnancy
      • Newborns
      • The 1st Year
    • Toddlers
    • Preschoolers
    • Kindergartners
    • 6-8 Year Olds
    • The Grown Ups
      • Date Night
      • Romantic Gifts
    • Self Care
  • For the Home
    • Cleaning
    • Organizing
    • Emergency Preparedness
  • Travel
    • Travel Tricks & Tips
    • Traveling with Kids
  • Tech & Gadgets
    • Must-Have Apps
    • Techy Home Appliances
    • Gadgets & Electronics
    • Blogging Tips
  • Printables
    • Posters
      • Quote Printables
      • Subway Art Printables
    • Printable Organizers
    • Printable Journals
    • Learning Printables & Worksheets
    • LDS Printables
  • Holidays
    • New Year’s
    • Valentine’s Day
    • St. Patrick’s Day
    • Easter
    • Cinco de Mayo
    • Mother’s Day
    • Father’s Day
    • 4th of July
    • Back to School
    • Halloween
    • Thanksgiving
    • Christmas
    • Holiday & Seasonal Printables

December 7, 2015 by Krista

Glass Ball Rudolph Ornament

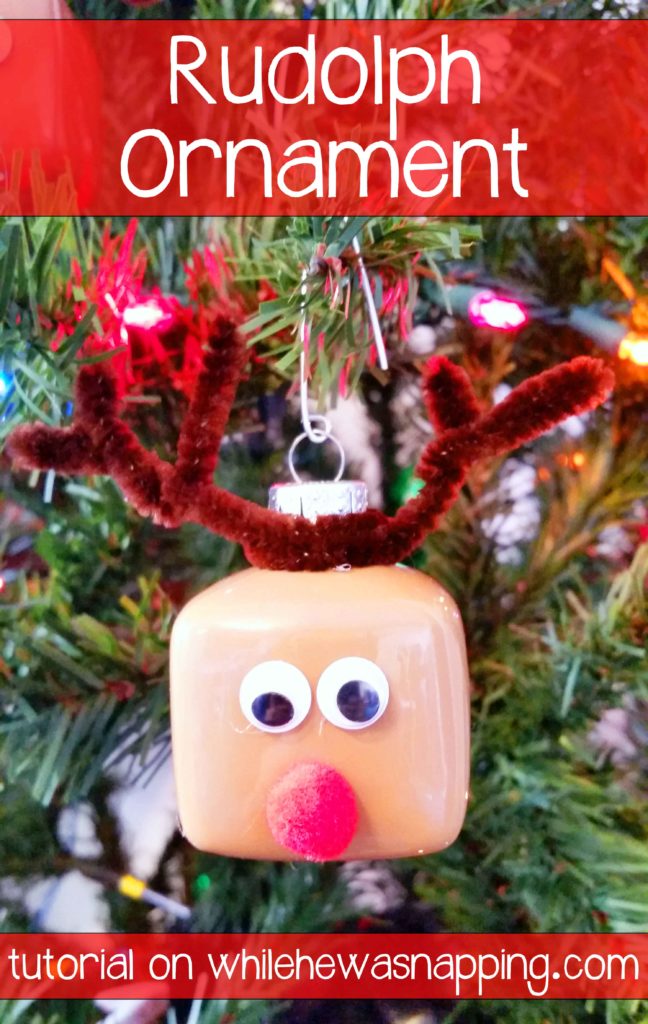
My boys and I are on an ornament mission this year. We are in the process of setting up our Christmas tree… for various reasons it’s taken us almost a week to get it all set up… But we are closing in on the home stretch. The worst part is over and tonight we get to decorate! I have a box of ornaments that I collected growing up and Mr Napping has his special ornaments as well. My boys don’t have much of their own yet. So, we’re changing that! We started with a fun Rudolph ornament. It’s super easy, even Little J (almost 4) was able to do most of it on his own and it only took about 10 minutes.

GLASS BALL RUDOLPH ORNAMENT

Rudolph Ornament DIY Christmas Ornament

Rudolph Ornament Materials:

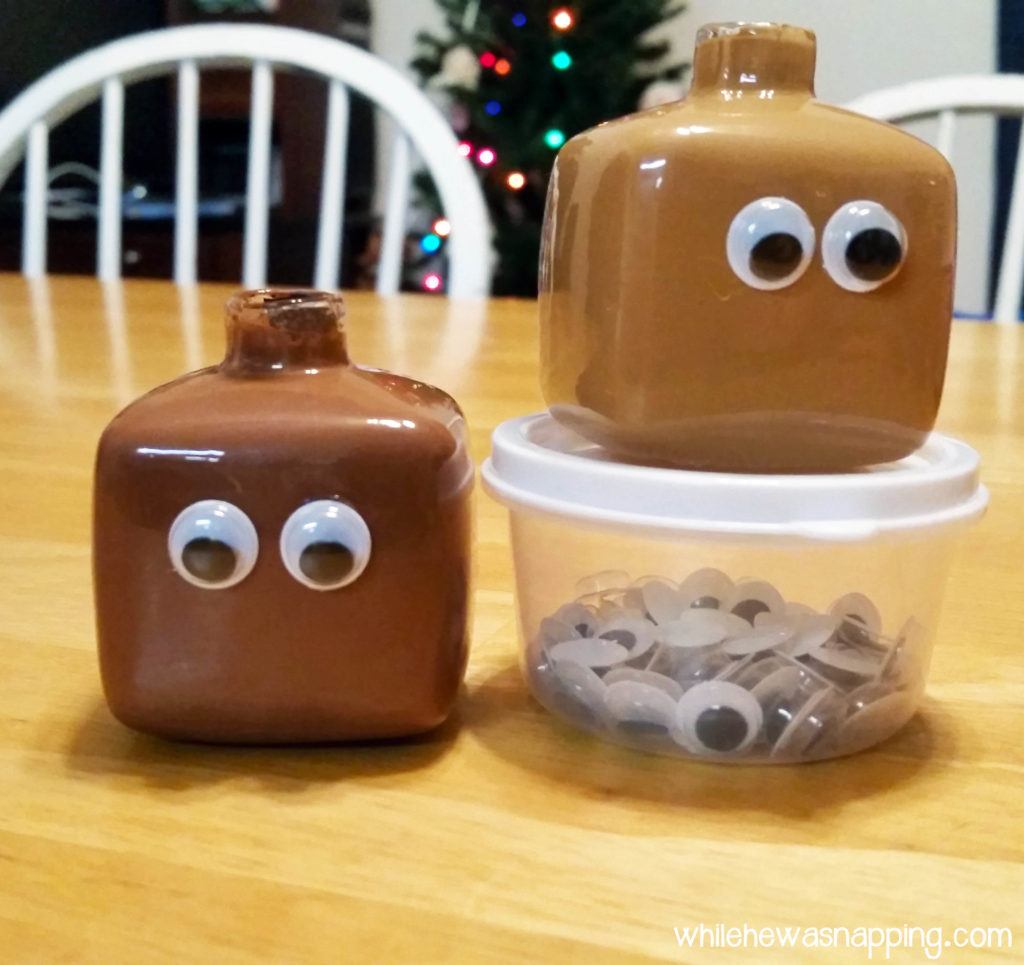
– Glass Ball. I realize that’s a little misleading because I actually used these fun square Glass Ornaments (affilate link) and I love how they turned out! A regular round glass ornament would work just as well though. The larger your ornament the larger googly eyes and pom pom ball you’re probably going to want, so consider size when you’re looking at the glass ornaments.
– Brown acrylic paint
– Hot glue gun and glue sticks
– Brown pipe cleaner
– Googly eyes
– Red small pom pom ball
– Paper cup

Rudolph Ornament Directions:

– Carefully take the top off the ornament and set it aside where it won’t get smashed.
– Squeeze some brown paint into the ornament. How much paint you’ll need will partially depend on the size of your ornament. You want enough to cover the entire inside of the ornament with paint. We used about a tablespoon to a tablespoon and a half.
– Roll the paint around inside the ornament until it completely covers the interior of the ornament. Be careful and don’t let it roll out the hole when you do the top. You can put your finger over the hole or just be super careful.
– Use the hot glue gun to glue the googly eyes in the middle of the ornament,

Rudolph Ornament glue on googly eyes
– Glue the pom pom nose at the bottom.

Rudolph Ornament glue on red nose
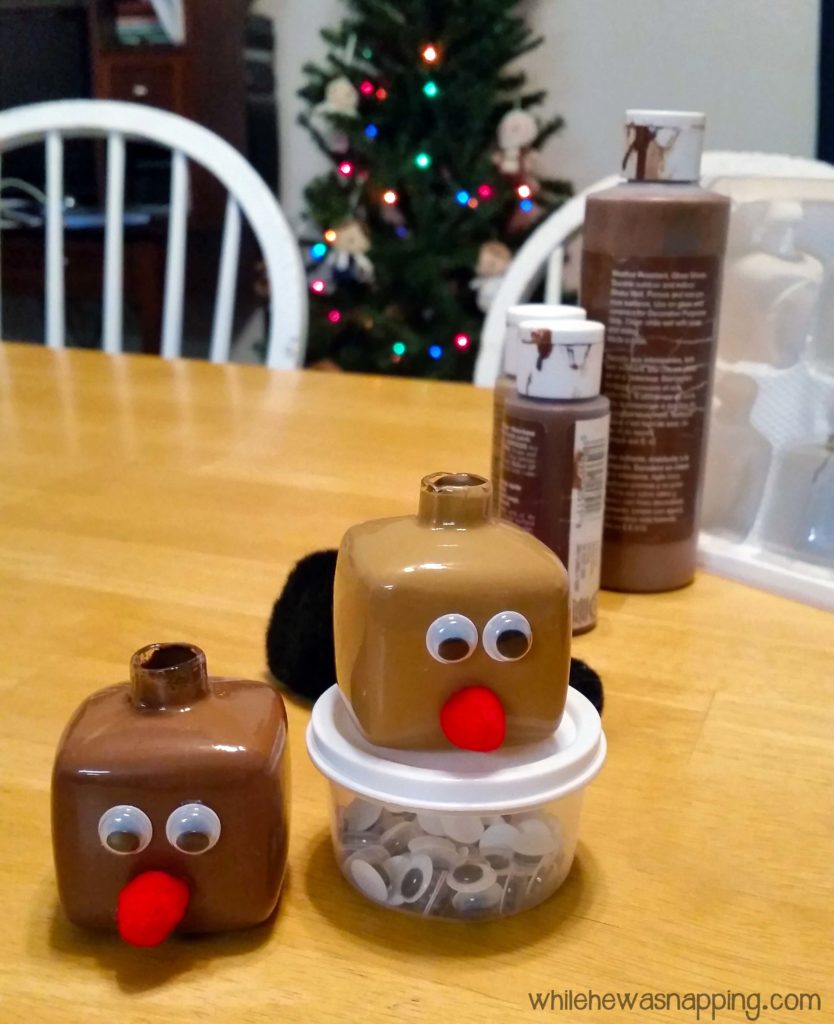
– Twist the pipe cleaner around the top of the ornament up by the hole. Glue it in place.
– Place the ornament over the paper cup and use the pipe cleaner to hang it upside down inside the cup so the extra paint can drain out of the ornament. Let it sit 24-48 hours or until the paint is totally dry inside the ornament.

Rudolph Ornament Draining Paint

Rudolph Ornament Drain Paint
– When the paint is dry, put the ornament cap back on the glass ball.
– Make antlers out of the ends of the pipe cleaner. You kinda just have to play with it until you get it like you want it. I made antlers for three of these Rudolph ornaments and I did each set of antlers differently. The easiest way was to pinch the pipe cleaner together where you want to create points on the antlers. Arrange and tweak it to lay how you like it best.
– Attach a hook to your ornament cap and hang. I created hooks out of paper clips because I didn’t know where all our extra hooks were, so that’s an option if you don’t have a bunch of extras laying around. Or ribbon works well too.

Rudolph Ornament Christmas Kid Craft

I loved this Rudolph ornament project because they turned out great and my boys were able to do a lot of it on their own. It was also easy and quick enough to put together that my kids didn’t lose interest half way through and leave me to finish them all on my own. It was a great before-bedtime activity during the dreaded witching hour. And my boys are still pointing out their Rudolph ornaments to anyone who comes to our house and will listen to them brag…

Rudolph Ornament the best part

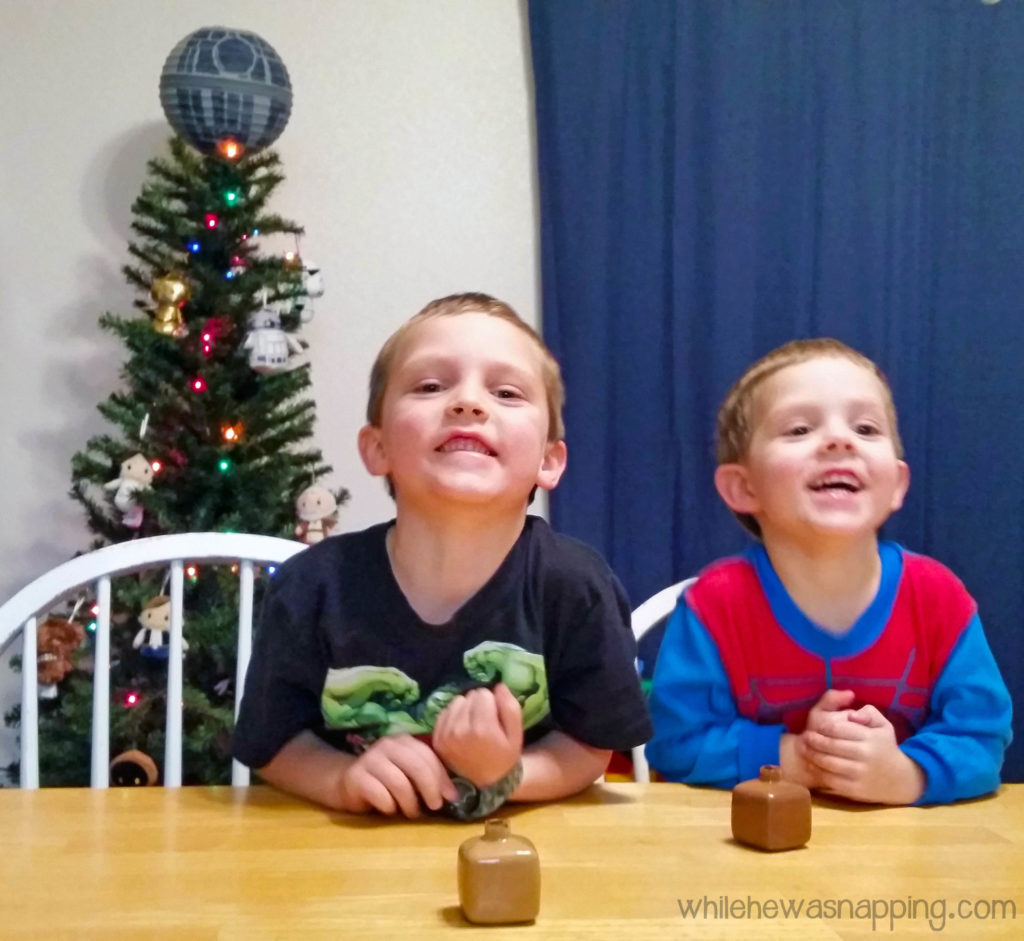
This was definitely my very most favorite part… They actually liked doing a project with mommy. My boys have never been ones to enjoy any kind of artistic creativity so it was kind of a big deal that they actually made Rudolph ornaments and they liked it!

November 16, 2015 by Krista

Star Wars Christmas Tree

Not so long ago in a galaxy not so far away, the day my husband has been anxiously awaiting finally arrived. No, the kids aren’t all potty trained – I WISH! No, we decided it was finally time to share Star Wars with our boys. My brother has always loved Star Wars and it was a big part of my childhood, so I was excited to share it with them almost as much as Mr Napping. The polling is complete and the results are in: my boys LOVE Star Wars, big surprise. It’s been the only thing to compete with superheroes lately. When Mr Napping and I found these Star Wars IttyBittys at our Hallmark Gold Crown store, we knew what we needed to do with them to make Christmas extra galactic!

STAR WARS CHRISTMAS TREE

The perfect Star Wars Christmas Tree for your Jedi-loving family topped with the only acceptable star - The Death Star


Now, the IttyBittys aren’t actual ornaments so I attached ribbons to each of them (which I will give you the details on in just a moment) and then we surprised our boys with an early Christmas present and a fun Christmas activity. We decided to make the IttyBittys into ornaments with the hope that my boys will play with that Christmas tree and not our big tree that will go up in December. They can pull off all the ornaments they want, decorate the tree again and again. If they want to play with the IttyBittys, it’s not a big deal and they won’t break them. Want to make your own ornaments? Here’s the how to:

Materials:
– IttyBitties available at Hallmark. Not so into Star Wars? That’s ok, Hallmark has lots of IttyBittys to choose from. There are nativity set IttyBittys, superheroes, Frozen, Rainbow Brite, winter-themed, Disney Princesses, Peanuts, Wizard of Oz, Toy Story, Finding Nemo, Inside Out, Monsters, Inc., and more – there’s something for everyone. Not all stores carry all the IttyBittys, see the Hallmark site for the complete selection.

itty-bittys-nativity-set-stuffed-animal-root-1kid3387_1470_1
– Skinny ribbon.
– Needle and thread
– Scissors

Hallmark IttyBittys Star Wars Christmas Tree Star Wars IttyBittys Plushes

Directions:
– Cut off a 3-inch length of ribbon.
– Loop the ribbon with the ends together and tie a knot in the ends. Trim the ends, but not too close. I trimmed a couple too close and my boys ended up pulling the knots out and I had to re-attach them to the IttyBittys.

Hallmark IttyBittys Star Wars Christmas Tree Making IttyBittys Ornaments Knot
– Thread the needle and tie a knot in the end of the thread. I actually used the thread doubled over for a little more strength.
– Attach the loop of ribbon to the top of the IttyBittys with the thread. I just stitched around the ribbon a few times and tied a knot. Trim the thread ends.

Hallmark IttyBittys Star Wars Christmas Tree Making IttyBittys Ornaments Sewing Ribbon On

Hallmark IttyBittys Star Wars Christmas Tree Making IttyBittys Ornaments Sew on Ribbon
– Repeat until all IttyBittys have ribbons attached to them.

Hallmark IttyBittys Star Wars Christmas Tree Star Wars IttyBittys


After I attached the ribbons to the IttyBittys, I put them in a fun gift bag (also from Hallmark) and told my boys we had a surprise for them. We let them open the bag and then we set up our small Christmas tree and let the boys decorate their hearts out. They had almost as much fun decorating the tree as they did just playing with the IttyBittys. I don’t know how many times that tree has been redecorated since Saturday.

Hallmark IttyBittys Star Wars Christmas Tree Surprise

We were still missing one thing though. Every Christmas tree needs a topper. And what kind of star tops a Star Wars tree? Why the Death Star, of course. I spent a good chunk of today bouncing between kiddos and making a Death Star to top our tree.

Hallmark IttyBittys Star Wars Christmas Tree Hallmark Star Wars Death Star

Hallmark IttyBittys Star Wars Christmas Tree

We are still adding to our Star Wars tree and we probably will keep adding to it until we take it down. My boys love to play with the IttyBittys and this was such a fun activity to do together as a family. They are still breaking out in the Imperial March every time they see the tree. Mr Napping likes to start humming and then bask in the resounding chorus of three boys.


SAVE TIME WITH HALLMARK THIS SEASON

Want to save some time this holiday season? Make Hallmark your one stop shop for your holiday shopping. Check out Hallmark’s new Crafters & Co. line of luxury soaps, teas and candles for decadent gifts to spoil the special people in your life. this holiday season.

crafters-and-co_pb

There are lots of great ornaments perfect for gift giving. Home decor elements are my go-to gifts for my favorite girlfriends and Hallmark has some awesome options. They’ve got you covered for all your gift wrap needs too! We seriously debated the Star Wars wrap, but went with the cute bag instead because well it’s just easier to wrap in a bag… And, of course, Hallmark has a fantastic selection of cards for your Holiday gifting. There are even Star Wars cards my boys would be crazy for.

October 27, 2015 by Krista

Directional Halloween Sign with BEHR® Marquee Paint

I want to thank Behr for sponsoring this post. I was provided with compensation for products used and my time to share this project. All content is original and honest, pinky promise!

Growing up, my family didn’t celebrate Halloween much.  I remember trick-or-treating maybe a handful of times and we attended a few carnivals and Halloween parties.  But, my mom doesn’t like Halloween.  And I get that.  Well, I kinda get that.  The gore and guts, no thanks.  No thanks at all.  I like the cutesy, fun part of Halloween.  And decorating with the cutesy, fun side of Halloween makes me happy.  It’s the kick off to the holiday season!  So I put together a fun Halloween project that turned out fabulously, thanks to BEHR® MARQUEE® Interior Paint & Primer!

DIRECTIONAL HALLOWEEN SIGN

Behr Marquee Halloween Directional Sign


MATERIALS

– 8 ft long 1″x6″ pine board
– 6 ft long 1″x4″ pine board
– Pencil
– Square box or other square to use as a template to make your arrows
– Tape measure
– Jig saw and saw blades
– Belt Sander and/or Sandpaper
– BEHR MARQUEE paint samples in:

  • Torch Red
  • Birthstone
  • Green Dynasty
  • Lamplit
  • Teal Motif
    Behr Marquee Halloween Sign Interior Paint Products

– BEHR PREMIUM PLUS ULTRA® Interior Paint & Primer In One in Black (I would’ve gotten this in MARQUEE as well, but the hardware store couldn’t mix the color I needed with MARQUEE.  The PREMIUM PLUS ULTRA was a great paint too.)
– Paint brushes or foam rollers (I used rollers and foam brushes)
– Newspaper or other covering to protect your work surface
– 1 1/4″ screws
– 3/32″ drill bit
– drill and screwdriver
– black vinyl
– craft cutter or craft knife
– masking tape or transfer tape
– blunt object to press down vinyl
– Polyurethane to seal boards


DIRECTIONS

MARKING THE BOARDS FOR THE HALLOWEEN SIGN

– Use the square box or other square to create arrows on the board.  Line up the point of your box in the middle of the board.  Mark the point of the box to create the point of the arrow.
Behr Marquee Halloween Sign Mark Board for Cutting
– Decide how long you want your arrows to be.  I made mine all different lengths: 12 inches, 16 inches, 18 inches, 20 inches, and 24 inches.  There was a little left over at the end of my board.  Measure and mark all your arrows with the box and the pencil.
Behr Marquee Halloween Sign Mark Board for Cutting Arrows

CUTTING THE BOARDS FOR THE HALLOWEEN SIGN

– Use the jig saw to cut the boards apart.  I let Mr. Napping do this part for me, as I hadn’t ever used the jig saw before and we were on a time limit; he was leaving on a work trip.  I didn’t want to end up missing fingers because of a lack of experience and familiarity.  Be sure to brace the board while you cut.
Behr Marquee Halloween Sign Cut the Board Arrows
– After you have all your arrows cut out, sand the wood until it’s smooth.  We used a belt sander for the majority of the sanding and then I did some touch up with sandpaper before I put on a coat of paint.  Don’t skip the sanding, your paint will turn out so much better if you take the time to prep your boards.
Behr Marquee Halloween Sign Sand the Boards


PAINTING THE BOARDS FOR THE HALLOWEEN SIGN

– Paint each board one of the five colors of the MARQUEE colors.  That’s right, no primer! The MARQUEE collection of paint has a One-Coat coverage guarantee over previously coated surfaces when tinted to any of the 372 colors in the MARQUEE Interior One-Coat Color Collection and applied to previously painted surfaces.  I was very impressed with the coverage even though the boards were not previously coated.  And not having to wait for a primer to dry was fabulous. My least favorite part about painting projects is all the waiting time between coats of paint.  The MARQUEE paint covered my project well and dried fast, which made me a happy momma because it meant I didn’t have a paint project on my kitchen counter for a week before it was completed.  There is also exterior paint available in the MARQUEE line which has some great weather-resistant properties.  If you’re new to painting, Behr has some great directions on how to correctly choose supplies, prepare and prime before you paint.

Behr Marquee Halloween Sign Paint the arrows

– Let the paint dry for a minimum of two hours.  Sand lightly with fine grit sand paper.  This mostly just removes any weird brush strokes or paint puddles that may have gathered and dried during that first coat so your next coat doesn’t just add to the weirdness.
Behr Marquee Halloween Sign Single Coat of Paint
– Paint another coat of paint on each board.  Let dry a minimum of two hours.
– Paint the 6-foot pine board with the black paint.  Let dry and set aside for now.
Behr Marquee Halloween Sign Paint Support Board


APPLYING THE VINYL FOR THE HALLOWEEN SIGN

– Cut out of black vinyl any text and graphics you want to use on your signs with a craft cutter or a craft knife.  I used my craft cutter for my signs.  You can find the links to the jpg files I used to cut from here: TEXT and GRAPHICS.  The files are formatted to 12×12 inches, as that is what fit my cutter.  You can alter the images as you need to fit the dimensions you have available.
Behr Marquee Road Signs Images Behr Marquee Road Signs Text
– Weed out all the negative space from your vinyl and discard it.  I prefer to use masking tape to transfer vinyl, rather than transfer tape.  To do so, place a layer of tape over the image either from top to bottom or bottom to top until it’s covered with tape.  I find it easier to get the vinyl to stick when I’m only pulling off a small layer of tape at a time – and masking tape is usually less sticky than transfer tape, so there’s never any gooey residue left behind.  Use whatever you prefer to transfer vinyl for this part.
– Place the vinyl on the board you choose and begin removing the masking tape a layer at a time.  If the vinyl pulls back up, replace the tape and rub firmly with a blunt object (the handle of a butter knife or scissor handles work well).  Then, pull the tape up again.  It works best if you pull the tape back at a 180-degree angle.
– When the tape is removed from the vinyl, rub the vinyl down firmly with the blunt object.
– Repeat the vinyl transfer process with each board.
Behr Marquee Halloween Sign Applying Vinyl with Masking Tape

SEALING THE BOARDS FOR THE HALLOWEEN SIGN

– Apply a thin layer of Polyurethane to each board.  I intend to use this sign indoors and only applied a single coat to the face of the board.  I didn’t seal the edges or the back.  Let dry thoroughly, overnight if possible.  Polyurethane can be a great sealant and protector once it’s dry, but it can bubble if it gets too hot, is applied too quickly or if items are placed on it before it completely dries.  So, let it dry really well.
Behr Marquee Halloween Sign Seal the boards

Behr Marquee Halloween Sign Let Sealant Dry Thoroughly


ASSEMBLING THE SIGN FOR THE HALLOWEEN SIGN

– On the BACK of the black board , lay out the arrows and arrange them however you like.  Mark the placement with your pencil.
Behr Marquee Halloween Sign Layout Sign
– Turn the black board over and drill pilot holes with the drill bit.  You can drill all the way through the black board.  I decided to do two screws in each board so that the boards won’t twist or spin.
Behr Marquee Halloween Sign Mark Board to Attach Arrows
– Once you have the pilot holes drilled, you can position the boards underneath the black board and sink the screws through the black board into the arrow boards.  By working from the back of the sign, your screws will be hidden.  The boards are also thick enough you won’t need to worry about the screws poking through the front of the arrows.
Behr Marquee Halloween Sign Screw Sign Together

Behr Marquee Halloween Sign Attach Arrows to Board

DISPLAYING THE HALLOWEEN SIGN

– This sign will be used at a Halloween party and I’m simply going to set the sign up against a wall in an infrequently trafficked area.  It’s large enough to see, but hopefully it won’t get played with too much.  Because all I really need to complete my day would be my three boys running around with pointy sticks screwed to a really long stick.  It’s like the ultimate sword.  Call the Emergency Room and alert them now.  My younger sister has also asked to borrow the ultimate sword, I mean sign, for decor for a Halloween party she is co-chairing for the all the college kids at church.
Behr Marquee Halloween Directional Sign and Halloween Decor


So, there you have it.  A fun and cutesy Halloween sign.  No guts or gore here.  Skeleton Street is about as close as I’ll get to that.  This seems like a lot of steps, but it’s actually a really easy paint project.  Definitely something you could do in a day or two, tops.
Behr Marquee Halloween Sign and Interior Paint Products

What are you dying to do with BEHR paints?


This post is brought to you by BEHR. Color that’s True to Hue. If you feel it, you can find it. Visit True to Hue. Behr sponsored this blog post. The opinions, photos and text are all mine, honest.

October 3, 2013 by Krista

DIY Witch’s Potion Bottles

These fun and easy Potion Bottles are the perfect addition to your DIY Halloween Decor! It’s the perfect spooky decor project to upcycle all your empty bottles and there are even printable potion bottle labels for you to download that will make this Halloween craft even easier! Bring out all the spooks and step up your Halloween Witch Decor with a great set of DIY potion bottles for all your witchy decorating.

Make Your Own Potion Bottles


Materials:
– Various bottles and containers (I will go through the ones I used in just a bit)
– Matte brown spray paint
– Sandpaper
– Potion Labels
– Glue gun & glue sticks
– Coffee grounds
– Shallow pans/baking sheets & a small pot
– Oven & Stove
 
Directions
THE BOTTLES:
– Wash your containers and bottles.  Scrape all the labels and goo off.  I washed mine in the dishwasher and then soaked the bottles that still had labels or glue on them in hot water for about 20 minutes.  The hot water soak will loosen the glue on the labels.  Peel off the glue and labels.  I had a few that were particularly stubborn (those Swedes know how to attach a label!  One of the bottles I used was from IKEA…) and I used a Goo-Gone-soaked paper towel on them to get them clean.
– Use the spray paint and paint your bottles.  I did this with the majority of my bottles, but there were three glass bottles I left.  I’ll go over that process in a moment.  I started off with the idea to do a mod podge stain on them, but it was taking FOREVER to get the shade I wanted.  So, I canned that idea and just settled on the spray paint.  If you want a lighter finish on the bottles, stand back a little further than usual when you paint them.  That way, you’ll just “dust” them, instead of a full-on layer of paint.  I was painting these on my kitchen island one stormy day and didn’t have a lot of space to play with so they ended up a little darker than I had first planned on making them.  Make sure you paint the lids too.  Let dry thoroughly.
– Lightly sand the bottles to give them an aged appearance.  Be careful not to sand off too much paint.  This bottle was an old vitamin bottle, so I didn’t paint it.  But, you can get the idea of the texturing you’re after.
DIY Witch's Potion Bottles
 
 
For the glass bottles, I wanted to age them and started off sanding them with sand paper. I’m an impatient crafter and after about five minutes of practically immeasurable progress I ditched the sandpaper and grabbed my bottle of glass etching cream from the cupboard.  It worked fabulously.  The hardest part was trying to apply the paste randomly.  Dang OCD tendencies.  Let bottles and cream stand 5-10 minutes… or until you remember you’re in the middle of a project.  Rinse and wipe dry with a paper towel.  Don’t forget to paint the lids for these bottles.
 
DIY Witch's Potion Bottles
 
DIY Witch's Potion Bottles
 
THE LABELS:
– Print off the DIY Witch’s Potion Bottles labels or make your own.  I used a laser printer to keep the ink from smearing.  I didn’t try it with an inkjet, so I don’t know how smeared they’d end up.  It might look like great aging, I really don’t know.  Also I printed mine on card stock.  Worked like a charm, none of them ripped.
– Preheat the oven to 200F (90C).
– On the stove heat about two (2) cups of water with a quarter (1/4) cup of coffee grounds.  I hate the smell of coffee, so this was the worst part for me.  Heat to warm, but not so warm you can’t touch it.  I had my hands in this up to my palms.
– Okay, now decide if you want to cut your labels apart before you stain them or after.  I did it after.  But, you might get some neater staining on the edges if you cut them apart before.  In a shallow pan, lay down your sheets of (or the cut apart) labels and use a small cup to pour the coffee over the paper.  Push the paper down against the pan to help it soak up the liquid.  Let stand 3-5 minutes or so.  The longer it stands the darker the labels will be.  Drain excess coffee back into the pot.
DIY Witch's Potion Bottles
 
 
–  Put the labels and the baking tray in the oven for 5-10 minutes.  If you cut the labels apart before you stained them, it’ll be closer to five.  If you didn’t cut them apart, it’ll be closer to 10.  When the paper is dry enough you can handle it without it tearing, take the tray out of the oven and carefully pick up the paper.  Holding the paper so that it is hanging over the pan, use a paper towel and gently dab it off.  This will remove any coffee grounds and extra liquid.  Hang to dry if possible.  (You can leave the paper in the oven longer and it will dry out faster.  Keep an eye out though.  Paper is flammable…)
DIY Witch's Potion Bottles
 
 
DIY Witch's Potion Bottles
 
 
– Once your labels are dry, cut them apart if you haven’t already, and use the glue gun to attach them to the bottles.  I found that gluing in stages worked the best.  And get as close to the edges as you can with the glue.  I started in the middle and put glue on that, then stuck it to the bottle.  Then I’d glue each end one at a time.
 
– Then I took sandpaper and lightly sanded the labels to age them.  Don’t go too crazy.  You’ll rip your stain off or tear the paper.  Lightly, my friends, is key.
 
Once the labels are on the jars, you can fill them.  Most of mine are actually empty.  Easier to store that way.  And less hazardous if my boys decide they need to play “potions” while I’m hiding in, er… uhm, using… the bathroom.
 
DIY Witch Potion Bottles
 
If you’re interested, below is a list of the bottles and jars I used in my DIY Witch’s Potion Bottles, as well as a list of filler ideas.  The blank fillers were ones that have labels, but I don’t have actual filler ideas.  Sorry.  Enjoy!  Happy Potion-Making!


  • « Previous Page
  • 1
  • 2

I'm Krista. Ringleader here on While He Was Napping, wife to my handsome Mr. Right & momma to my THREE energetic boys, Big J (9), Little J (6) & Little N (4). We FINALLY added a beautiful little girl to our family last December.

I’m knee-deep in Tonka trucks & Thomas trains. I survive our crazy days with Vanilla Coke, Sonic slushies, sweet snuggles and little giggles. When I tuck them in tight & kiss them good night, I get a little time to create & just be me.


It all happened
while (s)he was napping
Want More of My Story?

Privacy Policy

While He Was Napping respects your privacy and is committed to keeping any personal information collected on this website confidential. To find out what information we collect and how it is used or what options you have regarding your information, see our full privacy policy here. Creative Commons License The website found at whilehewasnapping.com and all subdomainsauthored and published by Krista is licensed under a Creative Commons Attribution-NonCommercial-NoDerivs 3.0 Unported License.

Pretty Chic Theme By: Pretty Darn Cute Design