While He Was Napping

momma gets stuff done

  • Home
  • About
  • Archive
  • Do It Yourself
    • Crafts
      • No Sew
      • Painting
      • Paper Crafts
      • Repurpose Projects
      • Vinyl
      • Washi Tape
      • Kid’s Crafts
      • Fonts
    • Sewing
    • Decorate
      • Home Decor
      • Holiday Decor
    • Celebrate
      • DIY Gifts
      • DIY Your Party
  • Recipes
    • Beverages
    • Appetizer
      • Bread
      • Other Appetizers
    • Snacks
    • Main Dish
      • Meat
        • Chicken
        • Beef
        • Pork
        • Seafood
      • Vegetarian
      • Slow Cooker
      • 30 Minute Meals
    • Dips & Sauces
    • Salads
    • Pasta
    • Soup
    • Dessert
      • Cookies
      • Brownies
      • Cupcakes and Cake
      • Box Mix Recipes
      • Other Sweet Treats
    • Breakfast Food
      • Pancakes
      • Waffles
      • Muffins
      • Other Breakfast Food
  • Family
    • Babies
      • Pregnancy
      • Newborns
      • The 1st Year
    • Toddlers
    • Preschoolers
    • Kindergartners
    • 6-8 Year Olds
    • The Grown Ups
      • Date Night
      • Romantic Gifts
    • Self Care
  • For the Home
    • Cleaning
    • Organizing
    • Emergency Preparedness
  • Travel
    • Travel Tricks & Tips
    • Traveling with Kids
  • Tech & Gadgets
    • Must-Have Apps
    • Techy Home Appliances
    • Gadgets & Electronics
    • Blogging Tips
  • Printables
    • Posters
      • Quote Printables
      • Subway Art Printables
    • Printable Organizers
    • Printable Journals
    • Learning Printables & Worksheets
    • LDS Printables
  • Holidays
    • New Year’s
    • Valentine’s Day
    • St. Patrick’s Day
    • Easter
    • Cinco de Mayo
    • Mother’s Day
    • Father’s Day
    • 4th of July
    • Back to School
    • Halloween
    • Thanksgiving
    • Christmas
    • Holiday & Seasonal Printables

January 15, 2016 by Krista

Declutter Paper From These 9 Things for a More Peaceful Home

This post brought to you by Fellowes Brands. The content and opinions expressed below are that of While He Was Napping.

Did you make a new year’s resolution to declutter your home? Yeah, me too. I started in my bedroom… the black hole of our home. Or maybe that’s the garage…? In any case, it’s where things go to die. It’s the catch-all room. People are coming? Quick, throw all this in Mom and Dad’s room and shut the door! Which is really sad, right?! It’s definitely a bit of a hazard at best. So, we are on a mission to declutter this year. I’ve already completed one ‘declutter paper’ mission!

One of the first boxes I came across in my room was full of papers. We’ve moved this box three times, and I’m not sure it’s been unsealed since move number one. Like, why do I still have this at all, right?! When I started looking at them, I realized why I didn’t just pitch the whole box. Some of the papers are things I do need to keep – hey, that’s where the car title is! – and some of them need to be disposed of in more than just a simple trash can. That’s where my Fellowes 79Ci shredder came in so handy!

Declutter Paper From These 9 Things for a More Peaceful Home

I got to looking around my house and realized that we have a lot of paper clutter. With all the holiday cards we just received, Christmas and the explosion that comes with that, the end of year mail that companies like to send and things that Big J brought home from school, we had stacks of paper hanging around that didn’t really need to be there. So, I decided to clean out these 10 places one afternoon and I can’t believe the difference it’s made.

DECLUTTER PAPER FROM THESE 9 SPOTS FOR A MORE PEACEFUL HOME

  1. The mail collection. This was a HUGE offender. Since we’ve been on Winter Break, there were more people bringing the mail in everyday. And we were getting more mail the last few weeks too. I try to go through the mail when I bring it in and throw the junk in the trash. My husband and boys bring it in and set it all on the counter top. We had little mail piles all over the counters before I realized what was going on. This is a pretty easy place to start to declutter paper in your home.
  2. The junk drawer. I am the big offender here. I like lists. Lots and lots of lists. Shopping lists, to do lists, phone number lists, calendars, gift lists, food preparation lists, you get the idea, right? I’m terrible at taking my notes and just sticking them in the drawer to sort through later. So, I went through them and recycled the irrelevant ones. The ones that still had worth went into a small basket in my drawer so I can actually find what I’m looking for until I can come up with a better filing system.
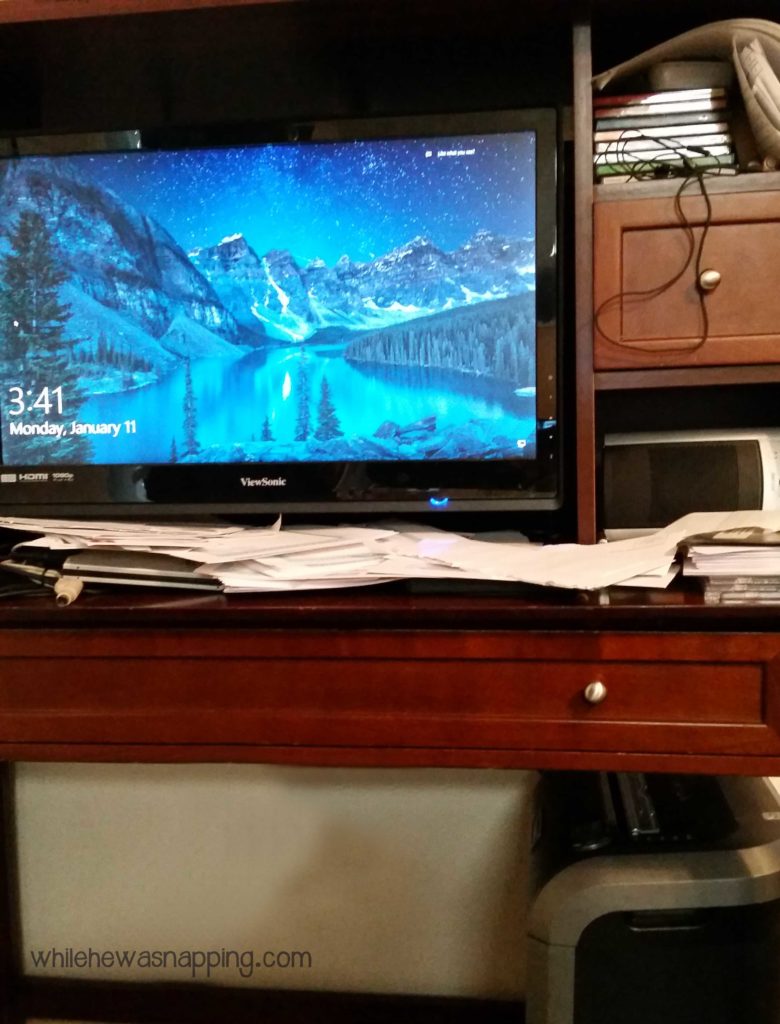
  3. The desk. Our desktop computer is in our dining room and is shared by the family, although Mr. Napping and I use it the most. We both are terrible at leaving papers on the desk. and it’s not a big desk to begin with so whether they are bills, misprints from the printers or doodles that the kids bring us, the paper clutters up the desk in a hurry. I filed the bills that needed to be kept, shredded the ones that were already taken care of and recycled the extra papers and envelopes. I put the misprints in our scrap paper collection and the kids will bring us more doodles on those some other time. The doodles spend a few days (or weeks) on our art board and then they are recycled or filed to save. It’s condition was not conducive to productivity at all! Declutter Paper From These 9 Things for a More Peaceful Home Messy Desk
  4. The laundry room. The offender here was all the tags from new clothes my family had received for Christmas. I had a small pile on the dryer that never made it into the trash. It took about three seconds to throw them out and my boys stopped knocking the little plastic pieces on the floor every time they walked passed the dryer.
  5. School papers. I never realized just how much paper I brought home from school, but if it’s anything like Big J brings home… my poor mama! And I’m dreading the day it gets multiplied by more than one boy in school. Usually I go through his backpack when he gets home and his Friday Folder as soon as he walks in the door. All through the course of Winter Break I kept finding more school papers though. I recycled the unimportant stuff and filed the things I wanted to keep in his school box.
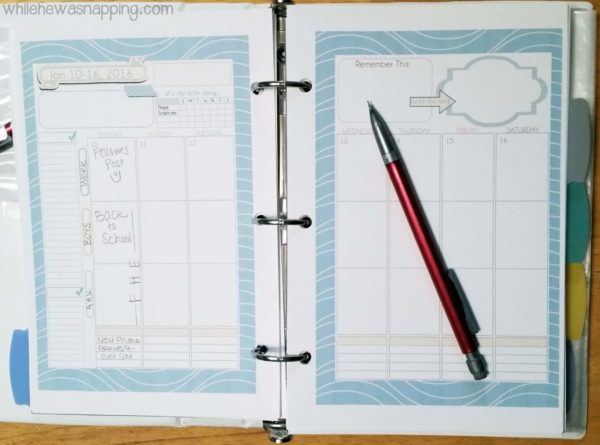
  6. My planner. I still use a paper planner. My husband balks at this, but I like the tangible aspect from holding the paper and physically writing things down. It helps me remember important dates and commitments better. But I had a lot of extras stuck in it too. So, I cleaned out notes, receipts, cards and invitations and my planner is much easier to carry around now. I can even see all the tabs now!Declutter Paper From These 9 Things for a More Peaceful Home Clutter free Planner
  7. My wallet. I don’t save receipts if I don’t have to, but for big purchases and expenses that I need record of, the receipts get stuck in my wallet. Christmas put more receipts in my wallet than usual and it was a bit of a mess. I filed the receipts I needed to keep and put all the Christmas gift receipts in a ziptop bag in my planner. All the others I got rid of.
  8. The car. All those receipts I don’t save… yeah, a lot of them are on the floor in my car. They start in the console with the plan to take them in and get rid of them. But, somewhere between leaving the store and getting everything and everyone inside it ends up on the floor of the car. My kids leave their papers in the car too. It’s awesome how much better cups fit in the cup holders when wads of paper aren’t stuffed in them.
  9. Diaper bag/purse. If you don’t have a diaper bag, I’m mildly jealous. Sure I like being prepared for whatever might arise when we’re out, but it’s just one more place to collect clutter too. And the latter seems to happen more often than not. Our new rule is that no papers go in the diaper bag… we’ll see how long we can stick to that! No diaper bag? Apply it to your purse.Declutter Paper From These 9 Things for a More Peaceful Home

When it’s time to declutter paper, a good shredder is a must-have to ensure your information remains safe. I absolutely love my Fellowes 79Ci shredder! It is great for anyone balancing busy schedules and seeking time-saving solutions. The design is sleek and the power is amazing. It’s got a Patented 100% Jam Proof System that eliminates paper jams and powers through tough jobs and it’s heavy-duty cross-cut blades can handle up to 16 sheets of paper per pass in addition to staples, paper clips, credit cards, junk mail and CDs. Such a time saver when you can feed handfuls through at a time! And with an extended 20 minute run time for increased productivity you don’t have to worry if you’ll ever finally shred the whole pile of papers you have just waiting for disposal. You’ll be able to declutter paper and so much more!

My favorite feature of the Fellowes 79Ci shredder is the patented SafeSense® Technology which automatically stops shredding when hands touch the paper opening. It’s such a sense of peace to not have that concern hanging over my head with all my little ones around. I also really love the SilentShred™ Technology that offers ultra-quiet shredder performance. We can still have a conversation while the junk mail and paid bills are shredded. While we usually keep our shredder off and unplugged, the Energy Savings System feature maximizes shredder energy efficiency 100% of the time – both in use and out of use.

Keeping the Paper Clutter Down with Fellowes 79Ci Shredder 16 pages credit cards cds

You can find The Fellowes 79Ci Shredder at Amazon and Office Superstores with a suggested retail price of $239.99. Are you on a mission to declutter paper from your home? You won’t regret using the Fellowes 79Ci Shredder to help protect sensitive information on my declutter paper mission!

Visit Sponsors Site

October 29, 2015 by Krista

Controlling the Paper Clutter

This post brought to you by Fellowes Brands. The content and opinions expressed below are that of While He Was Napping.

I don’t know about you, but my house seems like it gets it hit by a bomb… or two… around this time of year. The kids bring home even more papers from school, stores are sending out sale papers, companies are doing their end-of-year policy updates, and we’re approaching a major election year so there’s all kinds of political mailers coming in as well. That’s a lot of paper coming through my front door.

We haven’t always been awesome at filing the mail when it comes through the door. It, often times, gets dropped somewhere on the kitchen counter. As if it isn’t hard enough to keep the kitchen counters clean… and, I hate to admit it, but I do have a box of old papers in my bedroom that is full of mail from our countertops. Clearly, I still have some improving to do in getting rid of paper clutter in our home, but I have been doing a lot better with this new system. Ready to cut down on your paper clutter? Here’s the how:

1. Start now with all the new papers that come in your home. Once you get in the habit of getting rid of the stuff coming in, you can add a step or two here and there to get rid of the stuff already there. It’s so much easier to get rid of stuff a step at a time, rather than a big purge. Now, if you have the time for a big purge, then by all means. But, shy of burning my house down and just starting all over, I don’t have time to get rid of every single paper in one sitting. Besides, I’d much rather play with my cute boys than go through tedious piles of paperwork.

When papers get brought into your house, go through them immediately. Take five minutes and just get it done.

2. I have two paper trays on my counter. Hey, it’s better than a stack of (unopened) mail! One for “things that need attention”, like bills, insurance things, a wedding announcement, coupons – if it has an expiration date or deadline. And one for “things to file”, like report cards, most DMV papers and other documentation, school papers or projects my kids bring home that I want to keep – if it is going to be kept long-term.

Once a week, I clear out the trays. I deal with the stuff that needs attending and then file the things that are being kept where they belong. My filing boxes are a whole ‘nother story! The paper trays actually work really well for me. If having them in the kitchen doesn’t appeal to you, put them somewhere else. Maybe putting them in your office or something would work better for you. If so, I’m totally jealous you have an office!

Keeping the Paper Clutter Down with Fellowes 79Ci Shredder

3. Now, think of all that stuff you got rid of. Feels good to not have it cluttering your home, right? Some paperwork shouldn’t just be thrown out though. Even outdated paperwork can have sensitive information on it. That’s where a good shredder comes into play.

I have been using a Fellowes 79Ci shredder and I just love the sleek design and advanced technology. The SilentShred™ Technology lets me work on getting rid of our paper clutter during nap time without fear of waking the babies. Its patented 100% Jam Proof System is fantastic and has completely lived up to the promise in all the shredding I’ve done with it so far. The heavy-duty cross-cut blades can handle up to 16 pages at a time and you don’t have to take out staples or paper clips either, which is such a time saver.

Another thing that I love is the extended 20 minute run time. I can get everything shredded all in one sitting and I don’t have to wait for the shredder to cool down. There’s also a cool little Energy Savings System feature that maximizes efficiency 100% of the time, both when you are actively using the shredder or when it’s in standby. If we ever get our bedroom office center set up like we want to, I will move this shredder in there and leave it on all the time. For now, it’s in our dining room and I unplug it after I use it, simply because I don’t want my kids to shred things! Which brings me to my absolute favorite feature: the patented SafeSense® Technology that automatically stops shredding when hands touch the paper opening so I don’t have to worry about little fingers. Obviously, you should still be cautious and not allow children to use the shredder but that safety feature allows me to feel confident in leaving it in our easily-accessible dining room.

4. Now that you’re getting into the routine of getting rid of the paper before it piles up, what do you do about the already piled paper? Well, you have to go through it. But, here’s my trick to do it quickly: sort it out by type of paper.

So, you have a pile of old mail: 3 pages from your insurance company, 2 medical bills, 3 utility bills, 2 credit card bills, some advertising pieces and a postcard from Grandpa and Grandma on vacation.

First, pitch that advertising in the trash! Anything that is addressed to … ” or current resident” doesn’t need to take up your space. Make an exception for coupons, if that’s your thing, but that’s about all the exceptions I can think of.

Second, separate the mail into the categories listed above: insurance documents, medical, utility, credit card and personal.

You can stop there for now if you need to or keep going.

Third, choose a pile and open up the main page. Depending on how much time I have, I try to start with the biggest pile. Get the worst done first. If it’s a bill that had already been paid, shred it. Your bank will have documentation of the payment and most companies have the option to look up your account online, including payment history. You don’t need the statement. If it had not been paid, it goes to the “needs attention” paper tray to be dealt with.

If the paper is something medical, legal or otherwise needs to be kept, put it in the “to be filled” tray.

If the paper is personal, decide whether you need to keep it or not. Something like a postcard from Dad or Grandpa and Grandma is something I will hang on the fridge for a while (like until they get back – not like months or years), share with my boys and then throw out. If it’s too sentimental, consider taking a photo of it and then discarding. You’ll have the photo to look back at later if you really want to. If you do keep it, file it away so it has a place. Don’t let it clutter.

Keep working your way through the piles, one at a time. I find I usually add to my piles before I ever get them all gone through completely. I still find the occasional box of papers that need to be sorted, but it’s getting better.

Mostly, I LOVE that my kitchen counters aren’t covered in old mail! I love knowing or personal information is safely destroyed with the Fellowes 79Ci shredder so I don’t have to worry. The 79Ci is available at Amazon and Office Superstores with a suggested retail price of $239.99. I love that I can use the shredder while my children are napping or when they are awake, I don’t have to plan getting rid of clutter papers that come into my home, I can just do it. This means I have more time to spend with my kids, doing festive holiday activities and that my house doesn’t look like a bomb went off. At least, not a paper bomb. We’re still working on a toy factory explosion problem. But that’s a whole different problem.

Visit Sponsors Site

August 25, 2015 by Krista

DIY Dry Erase Organizer Printables – Calendar, Menu Planner, Shopping List

Do you ever wish you were more organized? I sure do. Sometimes I have to be content with organizing the big things and that’s where this Organizer Printables set – that you can make reusable with dry or wet erase markers – is going to come in handy!

We are working on our third week of school here and the routine is finally starting to iron out a bit. But, it wasn’t always smooth sailing.

I need a good system. And, with any good system, comes some great organizers.

One thing I want in my organizers is that I can re-use them. I don’t want to waste that much paper and re-using the organizers lets me develop a system that works for me through trial and error.

I couldn’t find exactly the organizer printables I was looking for, so I made some.  And, it’s super easy to make them reusable with this easy Dry Erase Organizer Printables Set and tutorial! Ready? Let’s do this!

DIY DRY ERASE ORGANIZER PRINTABLES

Materials:

– Thermal Laminator (This is the one I use)
– Thermal Pouches Letter Size (these are my preferred pouches)
– Printable Organizer Set (free download!)
– Dry Erase or Wet Erase Markers (I like these wet erase ones – the writing lasts better)
– Pen or Fine Tip Sharpie

DIY Dry Erase Organizers with Scotch™ Laminating products


Directions:

– Download and print out the Organizer Printables Pack.  Click the link, download and save the file to your computer and then print out the pages.  You can use them all or just pick and choose which pages you think will work best for you because I want these to be helpful for you.  The pages are formatted to 8.5×11″ and the file is in PDF format.


DIY Dry Erase Organizers with Scotch™ Laminating products Printable Organizer Pack


– Turn on your Thermal Laminator and let it warm up completely.  The little ready light will turn blue when you’re ready to go.  Make sure the laminator is ready before you try to use it; you’ll get the best results that way.

– While the laminator warms up, put each organizer printables page into a thermal pouch.  Pull the two layers of the pouch apart – one side of the pouch is sealed.  Lay the page on one side of the pouch and fold the pouch back over.

DIY Dry Erase Organizers with Scotch™ Laminating products The Laminating Pouch

– When the laminator is ready and your page is positioned in the pouch, line up the pouch on the paper tray of the laminator.  In complete honesty: I loved everything about this laminator, except the paper tray.  It has a fabulous fold up design, but because of that it is not very sturdy.  I never had the tray collapse or anything, but it was pretty flimsy.  But the cord wrapped away into the bottom of the machine and that almost made up for the unimpressive paper tray.  And it had zero effect on the outcome of the pages.

DIY Dry Erase Organizers with Scotch™ Laminating products The Laminating Pouch

– Gently slide the page into the machine until it starts to pull it through. Let go and the machine will pull it through.

– When the page completely comes out the other side, lay it down on a flat surface until it cools to prevent any curling or weird wrinkles.

Get your own DIY Dry Erase Organizers Printable Pack and stay organized!


– Use the dry or wet erase markers to fill out the organizer printables.  I prefer the wet erase markers because they don’t wipe off as easily and my kids think it’s hilarious to wipe off my planners.  The wet erase markers give me a slightly better chance of keeping all my info intact.

Get your own DIY Dry Erase Organizers Printable Pack and stay organized!


– Use your DIY Dry Erase Organizer Printables.  I don’t actually keep all the organizers on my fridge, but I wanted to show them to you all at once.  The menu planner and shopping list are my absolute favorite; the calendar and weekly planner pages are close seconds.

Get your own DIY Dry Erase Organizers Printable Pack and stay organized!


TIPS FOR USING YOUR ORGANIZER PRINTABLES

There are some pages that you may want to keep the information on and not have them be reusable.  The important dates or important people pages, for example.  I keep the important dates page next to our calendar to help keep me inline and not forget anything.

Use the important people pages as it fits your needs best.  I have one page that has a list of important phone numbers on it. We keep it in a special drawer. I filled it out and then laminated it.  It is not reusable because the info on here doesn’t change.  My boys know where it is and know, if they have an emergency and there is not an adult that can help, that page will give them phone numbers to call.  I also keep one that IS reusable as a baby-sitter reference, because I haven’t designed a baby-sitter reference page since my family is usually our sitter.

Get your own DIY Dry Erase Organizers Printable Pack and stay organized!


February 26, 2014 by Krista

What’s in Daddy’s Hospital Bag?

While He Was Napping Welcome Banner

Hey, fellow momma! I’m so glad you stopped by today! Are you wondering what you’ll need to have in Daddy’s Hospital Bag? Look no further, I’ve got you covered!

First, CONGRATULATIONS! New babies are THE BEST and I am so happy for you! Motherhood is absolutely amazing; this is going to be the best roller coaster ride of your life!

There is a lot to prepare for during pregnancy. As much as it can stink, it’s a good thing pregnancy lasts nine months! You need that time to do all the prep work! I know it can be overwhelming. I’ve been there!

But, I’m going to help you! We’ll check at least one of those many things to do off your list.

You’ll be prepared when the day comes, whether it’s today, tomorrow or in a few weeks.

You’ll be confident that you have what you need when you head to the hospital to welcome your little one into your life.

Today, let’s take a closer look at the hospital bag. That’s what brought you here, after all. There are lots of lists of things for mom and baby to take to the hospital

But what about DADDY?

9 Must-Haves for Daddy's Hospital Bag

Do you want the best hospital stay possible? That’s exactly what you’ll get by following this list.


http://whilehewasnapping.com/wp-content/uploads/2014/02/Daddys-Hospital-Bag1.jpg

My biggest mistake happened with my second baby. And that’s why this list is different than the other packing lists out there. This list is made from experience! From BAD experience. 

There was a secret that no one told me when I went to have my second baby and it could’ve saved me. Do you want to know this secret? You don’t have to learn the hard way, because I’m going to tell you the secret. Ready?

Not all hospitals are created equally.

Obviously, hospitals have different layouts and available facilities, but the differences go deeper. Between our first and second babies, we moved to a new state… and a new hospital. Our second hospital was less… accommodating than our first. In fact, these small differences made us miserable while we were there.

If you have never delivered at the hospital you will be delivering your baby at this time, take a hospital tour! Find out what is provided and what you’ll need to provide yourself.

We were so under-prepared and we were the ones that suffered. There were things I regretted not having, but my poor husband got the short stick on that hospital stay. So, help Daddy out and pack him a bag too!

No, you can’t pack up a nice bed for daddy to sleep in, but there are some things you can take that would make daddy’s stay at the hospital a little more comfy.
Which means, Daddy can help YOU.
When a new baby is born, Mommy gets most of the focus – and rightfully so – but don’t let Daddy be miserable either. A new baby is a big change in his life too. Be prepared and you can all enjoy this beginning of your new adventure!

I’ve done all the work for you and even given you links to each product. The links in this post will take you to Amazon, where you can easily purchase these items and have them delivered right to your doorstep. No end-of-pregnancy waddling around the store for you! Just sit on the couch, eat chocolate truffles and wait for the mail to be delivered! I will get a small portion of any purchase you decide to make, but it in no way affects your cost. These links are one way I help support this site. Thanks! Here’s the list!

http://whilehewasnapping.com/wp-content/uploads/2014/02/Daddys-Hospital-Bag1.jpg

DADDY’S HOSPITAL BAG MUST-HAVE #1:

Pillow.  Daddy should have a decent pillow, even if it’s just a travel size one.  He’ll probably be trying to catch his zzz’s whenever he can, just like you.  Skip the super flat or too-poofy hospital pillows and get him a pillow filled to his liking. Besides, if he has a good pillow, he’s less likely to snore and keep you up. Hospital rooms can echo… the pillow is worth it. This travel pillow is great because it’s small, but effective and if it gets ruined or left behind it’s not a big loss.

DADDY’S HOSPITAL BAG MUST-HAVE #2:

Snacks.  We’re talking man snacks here.  Things like:

  • Jerky
  • cheese
  • breads or even simple sandwiches
  • hearty granola bars or protein bars
  • nuts and pretzels
  • dried fruit
  • crackers and canned tuna
  • fruit leather
  • fruits and veggies cut up with hummus dip
  • bagels or muffins

Taking your own snacks will save you money and Daddy won’t have to hunt down vending machines or the cafeteria. He (and you!) can get into his stash any time his little heart desires, whether the cafeteria is open or not. We usually take a small soft-sided lunch bag for things that need to be kept cool with an ice pack or two wrapped in aluminium foil. By the time the ice melts, the food is gone.

Make sure there are some low-aroma snacks Daddy can munch on while you’re in labor. You probably won’t be allowed to eat and labor makes my oversensitive nose go into overdrive! Any kind of food smells make me nauseous. But I always raid his snacks after I’ve had a baby. Child birth is a lot of hard work and I’m always famished afterward! Want a quick and easy way to get those snacks? This snack basket will come right to your door and it doubles great as a “New Daddy” gift!

DADDY’S HOSPITAL BAG MUST-HAVE #3:

Extra shirts.  No one wants to wear “the badge of fatherhood” all day.  Take a couple extra shirts for daddy. He will probably end up wearing some kind of bodily secretion by the end of the day. It’s a great time to get him a fun “Dad” shirt and he’ll appreciate not smelling like curdled breast milk or formula… or worse. You can click any image below to see that specific shirt. These shirts are fun and Daddy can wear them long after you leave the hospital.


http://whilehewasnapping.com/wp-content/uploads/2014/02/Daddys-Hospital-Bag1.jpg

DADDY’S HOSPITAL BAG MUST-HAVE #4:

Sweats, athletic shorts or other PJ’s. Nurses, lab technicians and a whole slew of people will come and go from your room at all hours of the day and night. Unless Dad plans to spend 24/7 in his clothes, he’ll want something comfy to sleep in, but also something he feels sufficiently covered up while wearing. Your body will be on display to just about every medical professional that comes into your room, but Daddy will probably prefer a little more privacy. These options are great, can be used after your hospital stay, would go great in a “New Dad” gift basket and will come right to your doorstep! You can click each image for more details. If you get Daddy in that first one, be sure to take photos. 😉

DADDY’S HOSPITAL BAG MUST-HAVE #5:

Towel.  My epidurals tend to take longer than most people’s to wear off and I was numb for HOURS after they took it out. Because I was still a little numb, my husband was not about to let me stand up by myself in a slippery shower.

The towels our first hospital did provide were not great and almost too small to thoroughly dry off and our second hospital only provided one, which we’d used to mop up a spilled pitcher of water. These towels are nice and big though!

I’m just gonna be blunt here and suggest a dark color to help hide stains. You can use this towel for the next few weeks until you stop bleeding. Whether you toss it after that or hang on to it for your next childbirth adventure is up to you.

DADDY’S HOSPITAL BAG MUST-HAVE #6:

Swim trunks.  These are to wear in the shower if Daddy isn’t keen on the possibility of doctors or nurses catching him in his birthday suit. We didn’t bother and just jumped in the shower in our typical attire – or lack thereof – but my husband was in the military and not a stranger to public showers. If Daddy is a little more conservative and worried about modesty, swim trunks might help ease the discomfort and allow him to help you more. These basic trunks are great and not a big loss if you need to throw them out afterward.


DADDY’S HOSPITAL BAG MUST-HAVE #7:

Laptop, tablet or other things to do. While I wouldn’t want my husband anywhere but the delivery room while I deliver, I don’t really want him to smother me either.

I am a silent sufferer and prefer to be left alone than have my hair stroked or shoulders rubbed. I want him there, but not in my face. If you want Daddy right there, breathing through the contractions with you, then have him do that. But, if you’d rather be left alone to deal with your stuff, giving Daddy a little distraction can be good for everyone. Something kind of mindless that can be dropped at a moments notice, should the need arise, is perfect. A gift card for some new apps might be fun too.

Google Play Store

DADDY’S HOSPITAL BAG MUST-HAVE #8:

The phone numbers list.  It’s pretty easy to get word out about Baby’s birth with all the social media options these days.  Even my grandma is on Facebook. Heck, both of my grandmas are, and my grandpa! But, some people deserve an actual phone call or picture message at least. Make sure all those extra special people (and the ones not on social media – like my dad) are included on the list so no one gets forgotten or missed.


You can get the one below when you sign up for The ULTIMATE Hospital Packing List.

 The Ultimate Hospital Packing List Cover

DADDY’S HOSPITAL BAG MUST-HAVE #9:

Any other checklists or special instructions you want Daddy to know.  Discuss certain medical procedures and complications with your birth partner beforehand and in what ways you would like to handle them.  Heaven forbid you hemorrhage or something; but, there is the chance you won’t be able to make decisions for yourself at some point during the childbirth process. Having someone else aware of your wants and wishes can help in difficult situations where life-altering decisions have to be made right now.


Of course, it’s not a bad idea to ask Daddy if there’s anything else he wants to take… After all, it is Daddy’s Hospital Bag. The Boy Scouts knew what they were doing when they chose the motto “Be Prepared!” If you are, it will make your first few days with baby more enjoyable for your entire family.

DADDY’S BAG SHOPPING LIST

  • Pillow
  • Man snacks
  • Extra shirts
  • Night wear
  • Towel
  • Swim trunks
  • Tablet or laptop
  • Gift card for new apps
  • Contact list
  • Other special instructions concerning your labor and delivery

Click on any of the pictures in image below to see more details.

Image Map


Congratulations again on your little bundle of joy! Now, go pack those bags!

Feeling confident about what you’re packing for you and baby? Take a look at the things I wish I had packed the first two times I had a baby! You might be surprised by what WASN’T provided the second time.


Click the next button to find out if YOUR bags are REALLY ready! 
Arrow BackArrow Next

  • « Previous Page
  • 1
  • 2
  • 3

I'm Krista. Ringleader here on While He Was Napping, wife to my handsome Mr. Right & momma to my THREE energetic boys, Big J (9), Little J (6) & Little N (4). We FINALLY added a beautiful little girl to our family last December.

I’m knee-deep in Tonka trucks & Thomas trains. I survive our crazy days with Vanilla Coke, Sonic slushies, sweet snuggles and little giggles. When I tuck them in tight & kiss them good night, I get a little time to create & just be me.


It all happened
while (s)he was napping
Want More of My Story?

Privacy Policy

While He Was Napping respects your privacy and is committed to keeping any personal information collected on this website confidential. To find out what information we collect and how it is used or what options you have regarding your information, see our full privacy policy here. Creative Commons License The website found at whilehewasnapping.com and all subdomainsauthored and published by Krista is licensed under a Creative Commons Attribution-NonCommercial-NoDerivs 3.0 Unported License.

Pretty Chic Theme By: Pretty Darn Cute Design