While He Was Napping

momma gets stuff done

  • Home
  • About
  • Archive
  • Do It Yourself
    • Crafts
      • No Sew
      • Painting
      • Paper Crafts
      • Repurpose Projects
      • Vinyl
      • Washi Tape
      • Kid’s Crafts
      • Fonts
    • Sewing
    • Decorate
      • Home Decor
      • Holiday Decor
    • Celebrate
      • DIY Gifts
      • DIY Your Party
  • Recipes
    • Beverages
    • Appetizer
      • Bread
      • Other Appetizers
    • Snacks
    • Main Dish
      • Meat
        • Chicken
        • Beef
        • Pork
        • Seafood
      • Vegetarian
      • Slow Cooker
      • 30 Minute Meals
    • Dips & Sauces
    • Salads
    • Pasta
    • Soup
    • Dessert
      • Cookies
      • Brownies
      • Cupcakes and Cake
      • Box Mix Recipes
      • Other Sweet Treats
    • Breakfast Food
      • Pancakes
      • Waffles
      • Muffins
      • Other Breakfast Food
  • Family
    • Babies
      • Pregnancy
      • Newborns
      • The 1st Year
    • Toddlers
    • Preschoolers
    • Kindergartners
    • 6-8 Year Olds
    • The Grown Ups
      • Date Night
      • Romantic Gifts
    • Self Care
  • For the Home
    • Cleaning
    • Organizing
    • Emergency Preparedness
  • Travel
    • Travel Tricks & Tips
    • Traveling with Kids
  • Tech & Gadgets
    • Must-Have Apps
    • Techy Home Appliances
    • Gadgets & Electronics
    • Blogging Tips
  • Printables
    • Posters
      • Quote Printables
      • Subway Art Printables
    • Printable Organizers
    • Printable Journals
    • Learning Printables & Worksheets
    • LDS Printables
  • Holidays
    • New Year’s
    • Valentine’s Day
    • St. Patrick’s Day
    • Easter
    • Cinco de Mayo
    • Mother’s Day
    • Father’s Day
    • 4th of July
    • Back to School
    • Halloween
    • Thanksgiving
    • Christmas
    • Holiday & Seasonal Printables

July 3, 2017 by Krista

DIY Rain Stick Noise Maker for kids

One of my favorite things about summer is summer rain storms. When I was in 4th grade, we studied the rain forest. As part of our study, we made rain sticks from 3-foot cardboard tubes. I kept that thing for a decade; I loved it.

TP Roll Rain Stick Noise Maker

TOILET PAPER TUBE OR BEST MOM EVER?

When I told my boys we were going to use toilet paper tubes to create noise makers, they were a bit skeptical. But, as we talked about it and Ii gave them more details you’d have thought I told them they had free reign in a candy store. They went crazy! It’s nice to score cool mom points on easy stuff like this. These noise maker rain sticks are great for parties, dress up boxes, celebrations, and they make a fun learning activity too! Ready to score some cool mom points of your own?

MATERIALS:

  • Empty toilet paper tubes
  • 1 3/8″ finish nails
  • Pencil
  • Cardstock
  • Hot glue gun and glue stick
  • Scissors
  • Colored duct tape or cardstock
  • Push pin
  • Filler material (we used both rice and dried beans. But other ideas include small beads, dried peas, and small pebbles. We experimented with the different sounds different fillers would make.)

TP Roll Rain Stick Noise Makers Materials

DIRECTIONS:

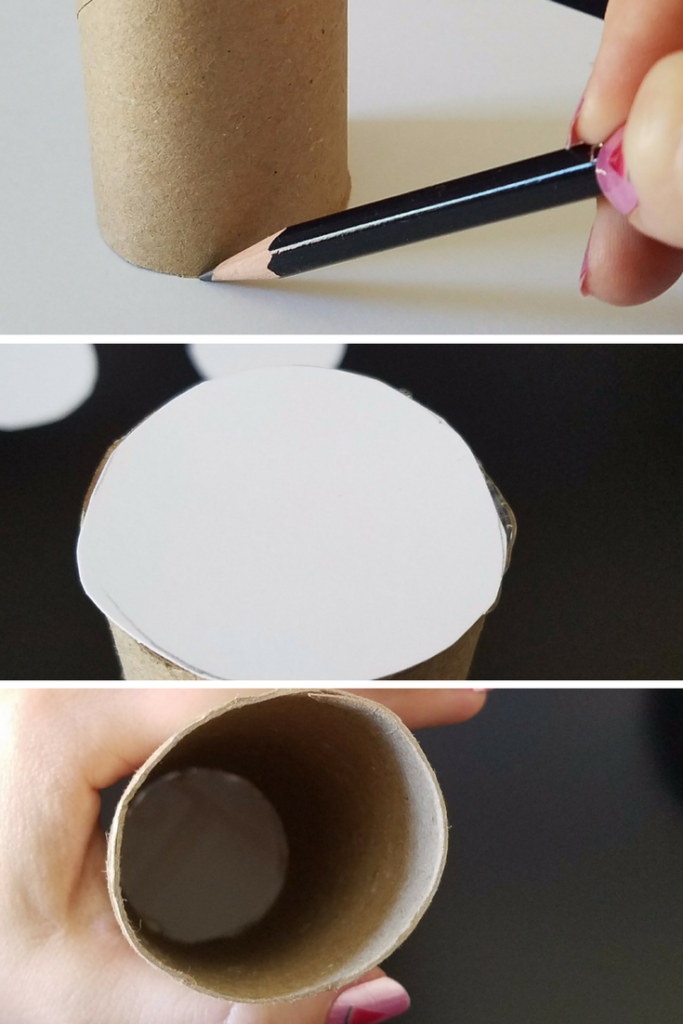
  1. Use the pencil and trace around the end of the toilet paper tube to make 2 circles that will cap the ends of the tube.
  2. Cut the circles out with the scissors.
  3. Hot glue one circle to one end of the tube. TP Roll Rain Stick Noise Makers Step 1
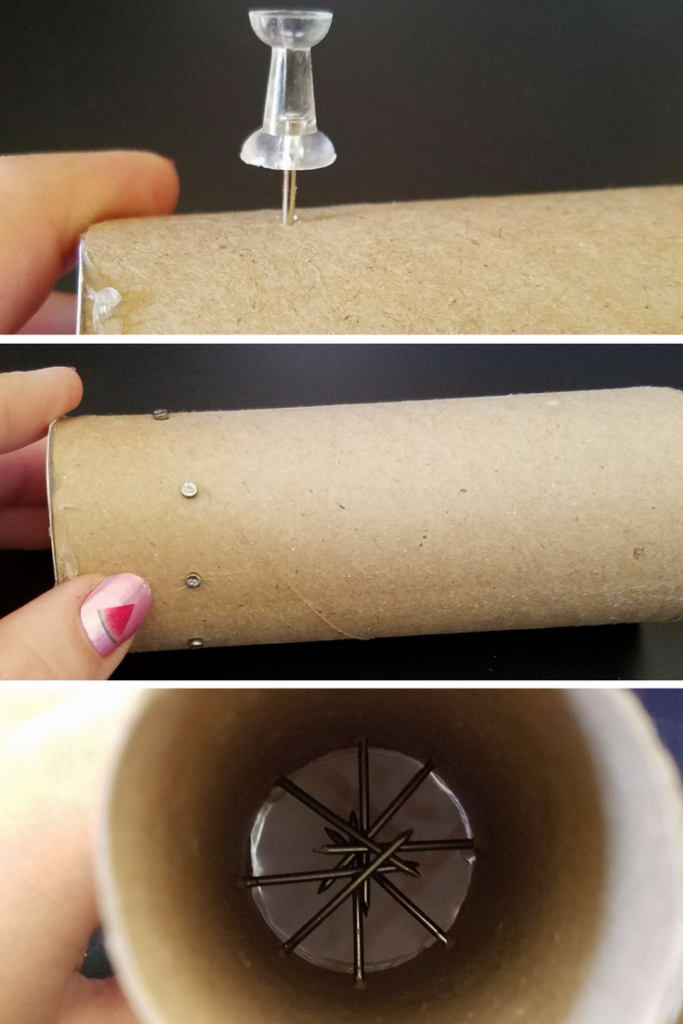
  4. Use the push pin to poke holes in the side of the toilet paper tube in 3 or 4 layers.
  5. Poke a finish nail into each push pin hole. TP Roll Rain Stick Noise Makers Step 2
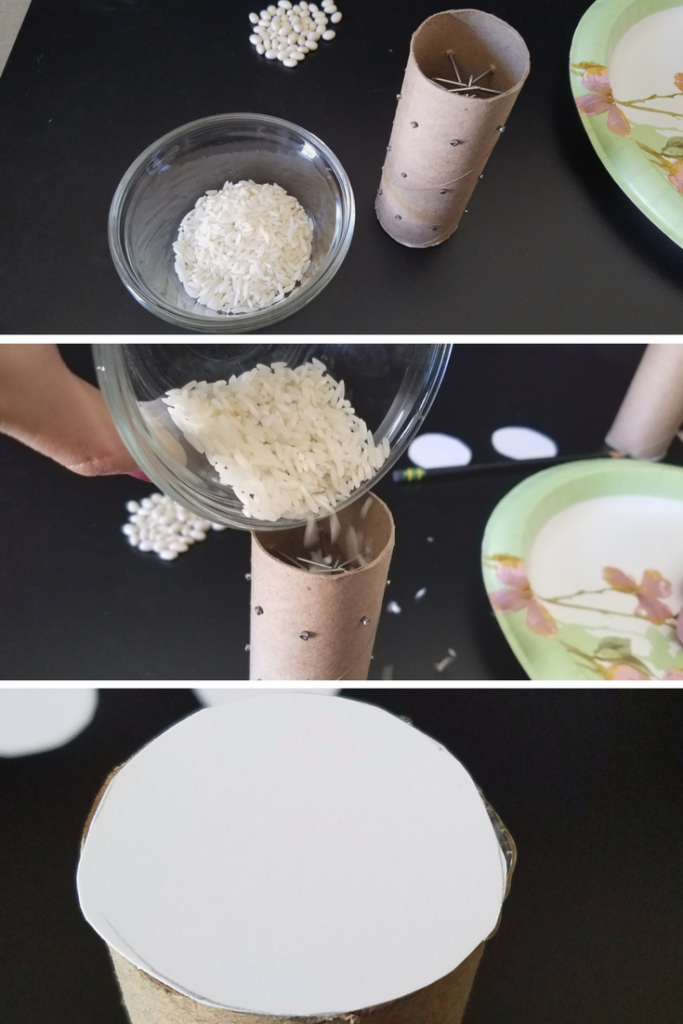
  6. Put 1/8 – 1/4 cup of your chosen filler material in the tube. You can experiment with how much filler to use by placing your hand over the open end and turning the tube upside down to hear what it will sound like.
  7. Hot glue the other cardstock circle over the open end of the tube. TP Roll Rain Stick Noise Maker Step 4
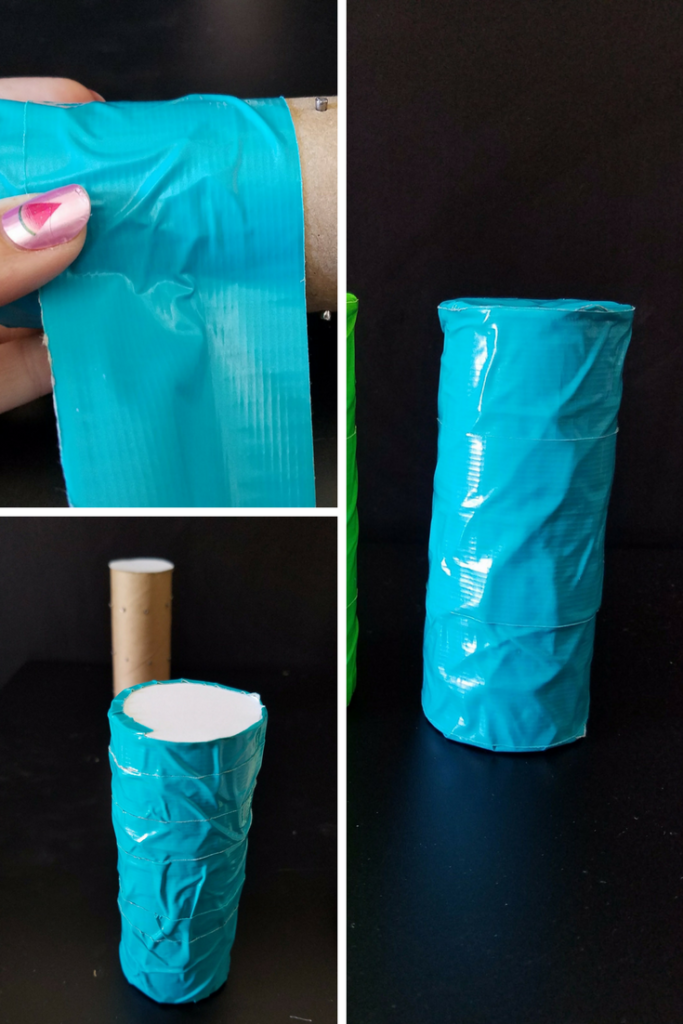
  8. Cover the tube with colored duct tape or cardstock. You can decorate with markers, stickers, or adhesive foam if desired. TP Roll Rain Stick Noise Makers Step 5


CREATE A TON OF FUN WITH YOUR NOISE MAKER

Use your rain sticks to create your own rain storm. Or use your rain sticks as maracas. Add them to your dress up stash. Whatever you decide to do with your noise maker rain sticks, just have fun.

April 15, 2016 by Krista

DIY Cell Phone Charging Station

I’m so glad you’re here! Have you ever needed to charge your cell phone somewhere than you normally do? Just wait until you see the Cell Phone Charging Station we’re going to make today!

But first, I have a couple questions for you…

  • Do you reuse what you can?
  • Do you like to recycle?
  • Is it something you are teaching your kids to do?

We do recycle. But, we don’t spend a lot of time doing it. We have a recycle bin under our kitchen counter that collects tin and aluminium cans, glass and plastic containers. Every two weeks, we sort it into the recycle baskets and set it out with the trash. Mr. Napping takes our cardboard to work and recycles it there, since we can’t do that from our residence at this point. We spend less than 20 minutes a week in our recycling efforts, but we are still reducing waste that would otherwise end up in the landfill.

I also re-use empty containers and things around our home. Old spice bottles makes great maracas. Empty toilet paper tubes are fun to make into play binoculars, race cars and rain sticks. Empty, clean tin cans are great for organizing pens, pencils, crayons and other art supplies. Reusing these items are just as much for the sake of fun, and recycling is just a bonus!

Care to Recycle Phone Charging Station Repurpose

There’s lots of things you can repurpose and reuse. And what you can’t reuse, you might be able to recycle. Most recycling is done in the kitchen. Have you ever thought about recycling in the bathroom?

WHERE DO YOU RECYCLE?

A 2016 consumer survey on in-home recycling habits, conducted in partnership with Johnson & Johnson Consumer Inc., shows that 34% of regular recyclers admit that it never even occurred to them to recycle in the bathroom! They found one of the main reasons people don’t recycle personal care products in the bathroom is a lack of tools and resources; only one in five recyclers have a recycling bin in their bathroom. We don’t! Do you?

Here’s a couple recycling pointers you might not know:

  • #1 and #2 plastics are the most widely accepted plastics in curbside and town recycling programs
  • #5 plastic bottle collection is increasing, but it’s still not generally accepted in curbside and town programs
  • Plastic tubes and plastic films are not accepted
  • Plastic caps can be left in place
  • Pumps need to be removed and discarded in the trash
  • Rinsing the bottles before recycling is appreciated

Care to Recycle Phone Charging Station Repurpose Recyclables

Johnson & Johnson Consumer Inc. have created the Care To Recycle® program to encourage recycling of personal care product packaging and as a gentle reminder to extend your recycling habits outside your normal areas. Care To Recycle® wants to help parents extend recycling habits outside the kitchen and into the bathroom. We can involve our children in the fun and ease of recycling and reusing.

Here’s a fun, quick and easy little project that will help you reuse and recycle things you use in the bathroom.

RECYCLED DIY CELL PHONE CHARGING STATION

Care to Recycle Repurpose Empty Bottle into Phone Charging Station

Materials:
– Empty plastic bottle large enough to hold your phone. I used an Aveeno lotion bottle. The stress relief lotion is amazing (because as a mom of three boys, I have stress. Lots and lots of it). The bottle is a great size for reusing. If you don’t want to reuse it, it is recyclable.
– Rubbing Alcohol and Cotton Balls
– Permanent Marker
– Scissors, Razor Blade and Craft Knife. You can get by with just one, but I ended up using all three of them.
– Washi Tape

Care to Recycle Phone Charging Station Repurpose Materials

Directions:
– Start by washing out your empty bottle. Get out all the gunk and goop. Keep rinsing…. Almost there. Great, it’s goop-free now.

Here’s a video of the next five steps. Watch me do this project in less than a minute and a half. Or read through the directions below. If you get confused, come back and watch the video.

– Remove the label. The lotion bottle I used just had a sticker label. It took a little coaxing on one corner – we’re talking like maybe 30 seconds tops – but the label came up relatively easy. If you can’t get it off or don’t want to deal with it, you’ll be covering it up in a few minutes. Taking the label off just gives you a cleaner, less textured surface to deal with when you’re covering your bottle.
– Use the rubbing alcohol to clean off any sticky residue left behind by the label.
– Take the permanent marker and draw the basic shape of the area you want to cut out. You will need enough space to put your phone into and take it out of the container. I opted to turn the bottle upside down and thread the USB charging cord up inside the bottle opening. If the majority of the cord is inside the bottle, hopefully it won’t get pulled on, played with or caught on anything and damaged. You could leave the bottle upright and just drop the cord in the bottom too.
– Then I thought It might be nice to be able to hang the charging station on the plug and keep it all together that way. I cut a hole in the back of the bottle large enough to put my plug through.
– You can go back over any stray permanent marker lines and clean them off your charging station with rubbing alcohol. Wax on, wax off and you’ve got yourself a clean bottle again.
– Now, it’s time to get fancy. I didn’t want just a boring charging station hanging around, so I used some washi tape and stuck it to the bottle. I only did the front, but you could do the whole thing if you wanted. I like washi tape because it’s easy to use, it’s simple to make adjustments if you make a mistake and it’s easy to remove if you ever decide you don’t want it anymore. You can still recycle the bottle that way.


That’s it. Your cell phone charging station is ready to use! What I really love about this is that there are so many possibilities! And, I turned the cut out part of the bottle into a sink spout extender in our bathroom so Little N can wash his hands without needing to be held! Double score!

Care to Recycle Phone Charging Station Repurpose Water Spout Extention

Do you have any great repurposing hacks? Leave a comment and tell me about it!


I was selected for this opportunity as a member of Clever Girls and the content and opinions expressed here are all my own.

April 2, 2016 by Krista

30 Minute DIY Musical Gift Box

WELCOME!!

Hey, I’m glad you’re here today! I’ve got a fun project for you and I can’t wait to share it! Have you ever wished there was a little more personal, fun way to gift a gift card? Well, what if I told you you can turn a musical card into a gift box that plays music when you open it? And it’s really pretty simple to do. Ready to give a gift card that won’t soon be forgotten? Let’s go!

Hallmark Song Card DIY Musical Explosion Boxes turn a card into a gift box

Do you like to give gift cards or cash for gifting occasions? Let’s face it, everyone likes to get a gift card or cash. No one opens a birthday card and thinks “oh, I hope there’s NOT money inside! That would be terrible!”

But gift cards and cash have a bad reputation of being thoughtless gifts. Wait, is there such a thing? It’s far from thoughtless, but there’s no denying that a gift card or cash can be less personal.

If you want to up your gift card or cash giving game and put that personal touch right back into your gift, I’ll show you how. You’ll need a musical greeting card for the best results, but you can definitely cut out the musical part and just use a regular card too.


Hallmark Song Card DIY Musical Explosion Box


Do you have someone in your life that is particularly hard to buy gifts for? Maybe more than one someone? I have two. My husband and my dad.

These are the guys that if they want something, they go out and get it. If they can’t afford it, I sure can’t either. Truly, the best gift for them is a gift card that they can use when the whim strikes.

But, gift cards can feel impersonal. No one wants their gift recipient to feel like their gift says, “Here’s something I picked up on my way here, HAPPY BIRTHDAY!” So, I worked to find a better way to give those hard-to-gift-to people in my life what they want and let them know that the gift really is from my heart.


DIY MUSICAL EXPLOSION BOX

Hallmark Song Card DIY Musical Gift Box


Materials Needed to Create your own DIY Musical Explosion Box:

– Two 12″ x 12″ pieces of scrap book paper –  card stock will make a sturdier box, I used card stock for the bottom and regular paper for the top.
– Musical card 
– Ruler
– Pencil
– Pen cap or something with a blunt edge you can use to score your paper – it’ll make the folding easier
– Glue stick – a hot glue gun and glue sticks will work even better.
– Clear tape
– Scissors
– Craft knife – like an X-acto


Directions to Create your own DIY Musical Explosion Box:

Want a sneak peek at the whole project, check out how easy it is to make your own Musical Gift Box!

1. Take the first piece of your 12″ x 12″ paper (the card stock piece, if you’re using only one piece of card stock) and measure 3 inches in on all four sides with the ruler. You’ll want the outside of your box to be face down on the table. Mark three inches and then use the ruler to draw straight lines to form a grid-like pattern. This means the bottom of your box will be 6″ x 6″ and the sides will be 3 inches tall.

Hallmark Song Card DIY Musical Explosion Box Measure Box Bottom

2. Use the pen cap or whatever blunt edge object you are using to score the paper on the lines you just drew. Fold on your score lines. Curl the corners into the box. Don’t cut or tape them though. These will help push your box open when you take the lid off and make the music play. Put the bottom of the box aside.

3. Take your musical card and unseal the inside of the card to reveal the music speaker and electronic board. Cut the plastic switch from where it is attached to the front of the card. Cut the front flap off of the card.

Hallmark Song Card DIY Musical Explosion Box Open Song Card

4. Cut the speaker and electronic board out of the song card. Be careful not to cut the wires. If you need to move the speaker closer to the electronic board, you can just pop it off the card back and then tape if back down. As long as you don’t damage the wires, it should still work.

5. Tape the little plastic piece you cut from the front of the card to the side of your card stock box with the clear tape. Use the craft knife to cut the tape along the edges of plastic piece. You’ll have to play with the placement of the speaker and electronic board to get it right. You want the plastic switch to interrupt the contact on the board when the box is closed, but to open the contact when the box pops open. Check out the step-by-step video for more direction on that.

Hallmark Song Card DIY Musical Explosion Box Secure Electrical Components

6. Set the bottom of the box aside and take your last piece of 12″ x 12″ paper and measure and mark 2 and 7/8 inches in on each side. Create a grid-like pattern on the page with your measurements. It’s just like you did on the first piece, minus an eighth of an inch. This will help your lid fit on your bottom box piece better.

7. Score and fold on the measurements. This time fold the corners out and use the glue stick or a small dot of hot glue to secure the triangular flaps. Folding them out will keep anything from getting caught on the inside when you’re trying to get everything inside the box. Do this will all four sides.

8. Use the inside and front of the song card to decorate the top and inside of your box. You can use another piece of 6″ x 6″ scrapbook paper to cover the speaker and electronic board or use the inside of the card to cover it. Just make sure you don’t tape or glue anything over the plastic piece that needs to move when the box opens so the music will play.

Hallmark Song Card DIY Musical Explosion Box

9. Find a fun way to attach your gift card so it isn’t sliding around loose inside the box. You can make a little spring for it to bounce on, or stick it on one of the flaps. Or use the gift card as your switch that makes the music play when it’s removed. Check out the video for more info on that.

Hallmark Song Card DIY Musical Explosion Boxes Secure Gift Card

10. Fold up the bottom of the box and stick a finger in each of the curled corners to hold it in place and slide the lid on top. Wrap it up and give it to your unsuspecting victim, er, recipient.

11. Bask in your awesomeness and know you’ll be giving the perfect gift!

Hallmark Song Card DIY Musical Explosion Boxes

The art of card giving is NOT dead! We live in this time of instant gratification. With all the digital technology, we don’t often have to wait long to send and receive communication with friends and family, even when we are separated by hundreds or thousands of miles. But snail mail is still going strong. Send a song card to create a memorable moment.

My kids (and myself!) love to get birthday cards in the mail. It’s a great way to let the special people in your life know that you were thinking about them, that you love them. A song card can help you express yourself with music. And, sometimes, music can speak louder than words.


 Let’s do this project together!

Gather your materials and then watch this video for step-by-step directions
on creating your own DIY Musical Explosion Gift Box!

December 14, 2015 by Krista

Cork Reindeer Ornament

I have been wanting to make this cork reindeer ornament since I made my cork jewelry organizer. Yeah, almost three years ago… But, I made the cork jewelry organizer in February. After Christmas. So, I saved it. And saved it. Annnnnnd saved it. But no more! I have put those extra corks to great use and turned them into some fabulous Christmas ornaments! This would be great for little bit older kids – there was a little too much hot glue for my not-so-careful kiddos. But it was super cathartic for me… so there’s that.

CORK REINDEER ORNAMENT

Cork Reindeer Ornament


Materials:
– cork
– googly eyes
– small black or red pom pom
– 2 brown pipe cleaners
– paper clip and wire cutters
– glue gun and glue sticks

Cork Reindeer Ornament Materials

Directions:
– Hot glue the eyes in the middle of the cork, close together.Cork Reindeer Ornament glue on eyes
– Hot glue the pom pom on the end of the cork for the nose.
Cork Reindeer Ornament glue on nose
– Shape the pipe cleaners into antlers and hot glue them to the sides of the cork.
Cork Reindeer Ornament make antlers out of pipe cleaners

Cork Reindeer Ornament glue antlers to cork
– Shove the end of the paper clip into the top of the cork. Leave about an inch of space after the paper clip comes out of the cork. Use the wire cutters to carefully bend the paper clip into a small eye hook.  Secure with a bit of hot glue to keep it in place if desired.
Cork Reindeer Ornament paper clip in top of cork

Cork Reindeer Ornament cut paper clip about an inch from the cork

Cork Reindeer Ornament use round nose pliers to make an eye hook
– Attach a hook to the paper clip loop and hang it on your tree.

Cork Reindeer Ornament Trio

These went together so quickly that I ended up with three of them… so now we have three cork reindeer ornaments. Maybe I’ll slap years and names on the backs of those babies and give them to my boys as gifts. But seriously – so EASY! I would have (should have!) made them with the 8-11 year old girls I used to have Activity Days with a couple years ago. They would have loved these reindeer ornaments!

Cork Reindeer Ornament Rudolph Ornament

October 3, 2013 by Krista

DIY Witch’s Potion Bottles

These fun and easy Potion Bottles are the perfect addition to your DIY Halloween Decor! It’s the perfect spooky decor project to upcycle all your empty bottles and there are even printable potion bottle labels for you to download that will make this Halloween craft even easier! Bring out all the spooks and step up your Halloween Witch Decor with a great set of DIY potion bottles for all your witchy decorating.

Make Your Own Potion Bottles


Materials:
– Various bottles and containers (I will go through the ones I used in just a bit)
– Matte brown spray paint
– Sandpaper
– Potion Labels
– Glue gun & glue sticks
– Coffee grounds
– Shallow pans/baking sheets & a small pot
– Oven & Stove
 
Directions
THE BOTTLES:
– Wash your containers and bottles.  Scrape all the labels and goo off.  I washed mine in the dishwasher and then soaked the bottles that still had labels or glue on them in hot water for about 20 minutes.  The hot water soak will loosen the glue on the labels.  Peel off the glue and labels.  I had a few that were particularly stubborn (those Swedes know how to attach a label!  One of the bottles I used was from IKEA…) and I used a Goo-Gone-soaked paper towel on them to get them clean.
– Use the spray paint and paint your bottles.  I did this with the majority of my bottles, but there were three glass bottles I left.  I’ll go over that process in a moment.  I started off with the idea to do a mod podge stain on them, but it was taking FOREVER to get the shade I wanted.  So, I canned that idea and just settled on the spray paint.  If you want a lighter finish on the bottles, stand back a little further than usual when you paint them.  That way, you’ll just “dust” them, instead of a full-on layer of paint.  I was painting these on my kitchen island one stormy day and didn’t have a lot of space to play with so they ended up a little darker than I had first planned on making them.  Make sure you paint the lids too.  Let dry thoroughly.
– Lightly sand the bottles to give them an aged appearance.  Be careful not to sand off too much paint.  This bottle was an old vitamin bottle, so I didn’t paint it.  But, you can get the idea of the texturing you’re after.
DIY Witch's Potion Bottles
 
 
For the glass bottles, I wanted to age them and started off sanding them with sand paper. I’m an impatient crafter and after about five minutes of practically immeasurable progress I ditched the sandpaper and grabbed my bottle of glass etching cream from the cupboard.  It worked fabulously.  The hardest part was trying to apply the paste randomly.  Dang OCD tendencies.  Let bottles and cream stand 5-10 minutes… or until you remember you’re in the middle of a project.  Rinse and wipe dry with a paper towel.  Don’t forget to paint the lids for these bottles.
 
DIY Witch's Potion Bottles
 
DIY Witch's Potion Bottles
 
THE LABELS:
– Print off the DIY Witch’s Potion Bottles labels or make your own.  I used a laser printer to keep the ink from smearing.  I didn’t try it with an inkjet, so I don’t know how smeared they’d end up.  It might look like great aging, I really don’t know.  Also I printed mine on card stock.  Worked like a charm, none of them ripped.
– Preheat the oven to 200F (90C).
– On the stove heat about two (2) cups of water with a quarter (1/4) cup of coffee grounds.  I hate the smell of coffee, so this was the worst part for me.  Heat to warm, but not so warm you can’t touch it.  I had my hands in this up to my palms.
– Okay, now decide if you want to cut your labels apart before you stain them or after.  I did it after.  But, you might get some neater staining on the edges if you cut them apart before.  In a shallow pan, lay down your sheets of (or the cut apart) labels and use a small cup to pour the coffee over the paper.  Push the paper down against the pan to help it soak up the liquid.  Let stand 3-5 minutes or so.  The longer it stands the darker the labels will be.  Drain excess coffee back into the pot.
DIY Witch's Potion Bottles
 
 
–  Put the labels and the baking tray in the oven for 5-10 minutes.  If you cut the labels apart before you stained them, it’ll be closer to five.  If you didn’t cut them apart, it’ll be closer to 10.  When the paper is dry enough you can handle it without it tearing, take the tray out of the oven and carefully pick up the paper.  Holding the paper so that it is hanging over the pan, use a paper towel and gently dab it off.  This will remove any coffee grounds and extra liquid.  Hang to dry if possible.  (You can leave the paper in the oven longer and it will dry out faster.  Keep an eye out though.  Paper is flammable…)
DIY Witch's Potion Bottles
 
 
DIY Witch's Potion Bottles
 
 
– Once your labels are dry, cut them apart if you haven’t already, and use the glue gun to attach them to the bottles.  I found that gluing in stages worked the best.  And get as close to the edges as you can with the glue.  I started in the middle and put glue on that, then stuck it to the bottle.  Then I’d glue each end one at a time.
 
– Then I took sandpaper and lightly sanded the labels to age them.  Don’t go too crazy.  You’ll rip your stain off or tear the paper.  Lightly, my friends, is key.
 
Once the labels are on the jars, you can fill them.  Most of mine are actually empty.  Easier to store that way.  And less hazardous if my boys decide they need to play “potions” while I’m hiding in, er… uhm, using… the bathroom.
 
DIY Witch Potion Bottles
 
If you’re interested, below is a list of the bottles and jars I used in my DIY Witch’s Potion Bottles, as well as a list of filler ideas.  The blank fillers were ones that have labels, but I don’t have actual filler ideas.  Sorry.  Enjoy!  Happy Potion-Making!


I'm Krista. Ringleader here on While He Was Napping, wife to my handsome Mr. Right & momma to my THREE energetic boys, Big J (9), Little J (6) & Little N (4). We FINALLY added a beautiful little girl to our family last December.

I’m knee-deep in Tonka trucks & Thomas trains. I survive our crazy days with Vanilla Coke, Sonic slushies, sweet snuggles and little giggles. When I tuck them in tight & kiss them good night, I get a little time to create & just be me.


It all happened
while (s)he was napping
Want More of My Story?

Privacy Policy

While He Was Napping respects your privacy and is committed to keeping any personal information collected on this website confidential. To find out what information we collect and how it is used or what options you have regarding your information, see our full privacy policy here. Creative Commons License The website found at whilehewasnapping.com and all subdomainsauthored and published by Krista is licensed under a Creative Commons Attribution-NonCommercial-NoDerivs 3.0 Unported License.

Pretty Chic Theme By: Pretty Darn Cute Design