While He Was Napping

momma gets stuff done

  • Home
  • About
  • Archive
  • Do It Yourself
    • Crafts
      • No Sew
      • Painting
      • Paper Crafts
      • Repurpose Projects
      • Vinyl
      • Washi Tape
      • Kid’s Crafts
      • Fonts
    • Sewing
    • Decorate
      • Home Decor
      • Holiday Decor
    • Celebrate
      • DIY Gifts
      • DIY Your Party
  • Recipes
    • Beverages
    • Appetizer
      • Bread
      • Other Appetizers
    • Snacks
    • Main Dish
      • Meat
        • Chicken
        • Beef
        • Pork
        • Seafood
      • Vegetarian
      • Slow Cooker
      • 30 Minute Meals
    • Dips & Sauces
    • Salads
    • Pasta
    • Soup
    • Dessert
      • Cookies
      • Brownies
      • Cupcakes and Cake
      • Box Mix Recipes
      • Other Sweet Treats
    • Breakfast Food
      • Pancakes
      • Waffles
      • Muffins
      • Other Breakfast Food
  • Family
    • Babies
      • Pregnancy
      • Newborns
      • The 1st Year
    • Toddlers
    • Preschoolers
    • Kindergartners
    • 6-8 Year Olds
    • The Grown Ups
      • Date Night
      • Romantic Gifts
    • Self Care
  • For the Home
    • Cleaning
    • Organizing
    • Emergency Preparedness
  • Travel
    • Travel Tricks & Tips
    • Traveling with Kids
  • Tech & Gadgets
    • Must-Have Apps
    • Techy Home Appliances
    • Gadgets & Electronics
    • Blogging Tips
  • Printables
    • Posters
      • Quote Printables
      • Subway Art Printables
    • Printable Organizers
    • Printable Journals
    • Learning Printables & Worksheets
    • LDS Printables
  • Holidays
    • New Year’s
    • Valentine’s Day
    • St. Patrick’s Day
    • Easter
    • Cinco de Mayo
    • Mother’s Day
    • Father’s Day
    • 4th of July
    • Back to School
    • Halloween
    • Thanksgiving
    • Christmas
    • Holiday & Seasonal Printables

Archives for January 2013

January 15, 2013 by Krista

DIY Watercolors

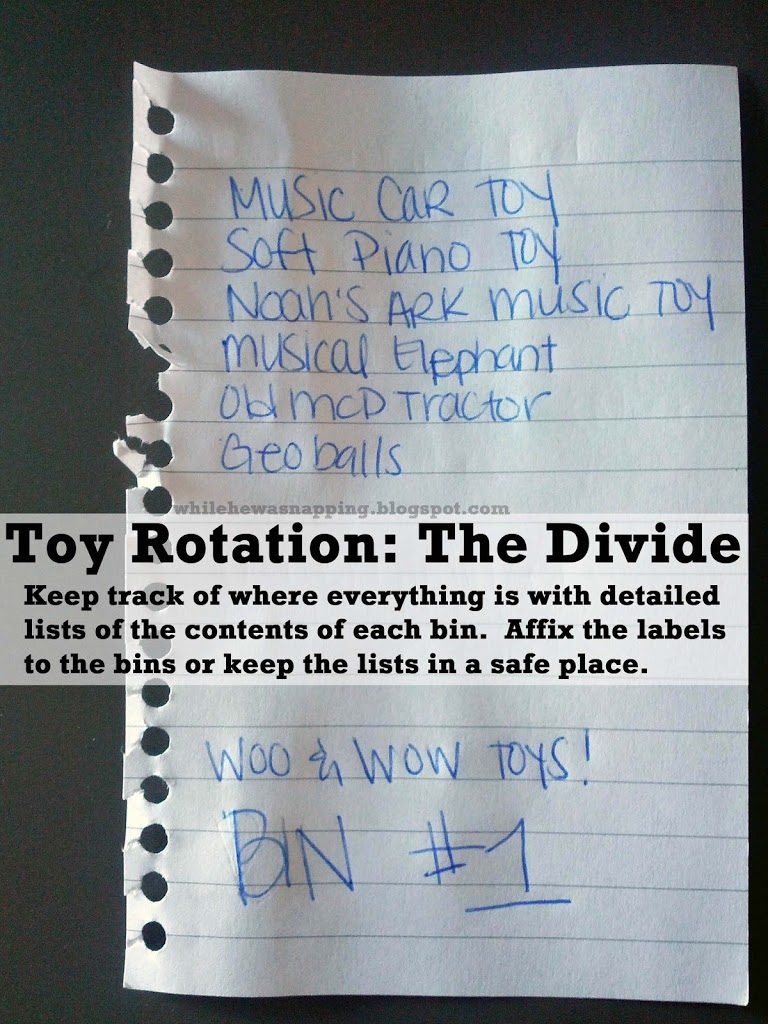
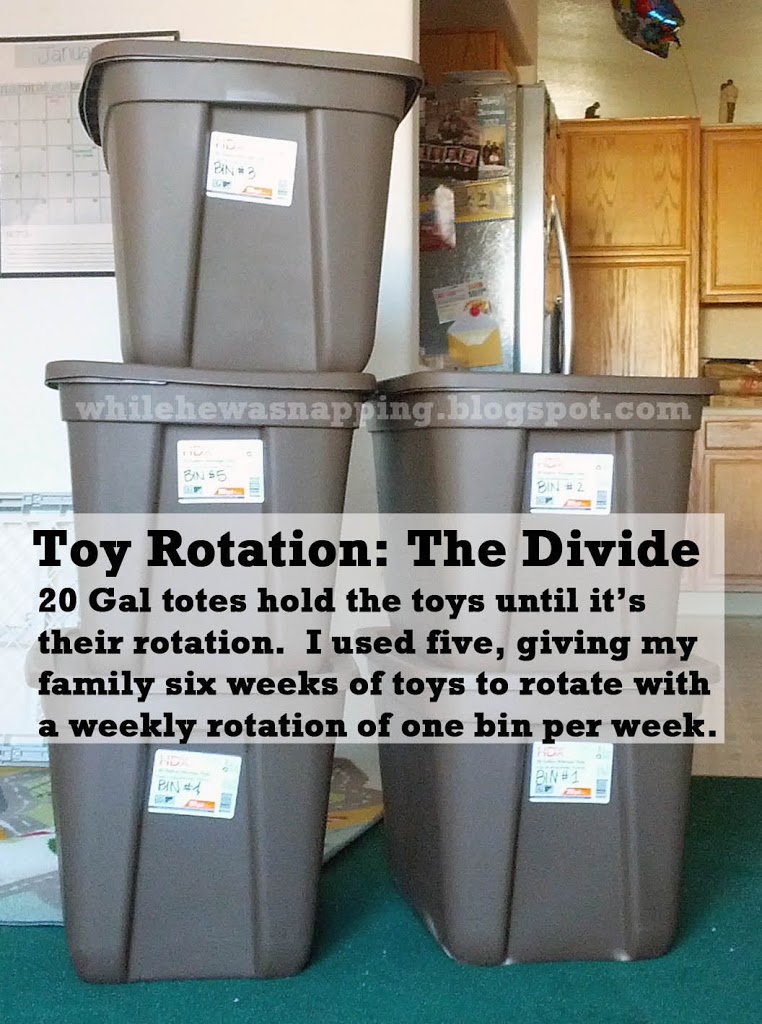
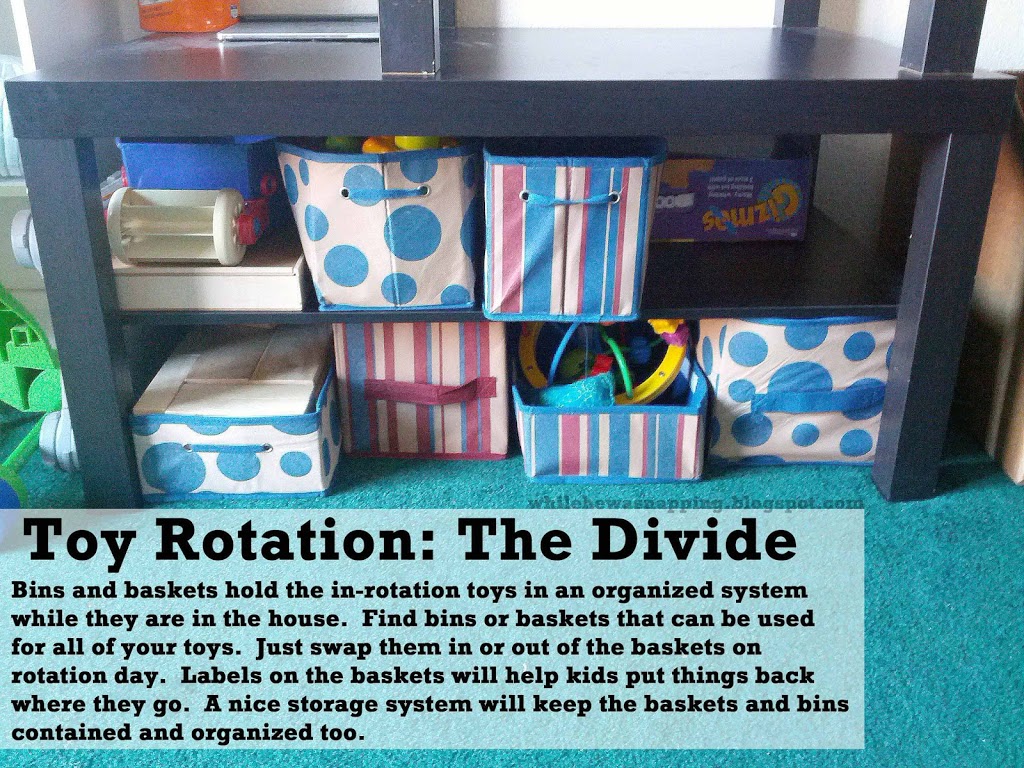
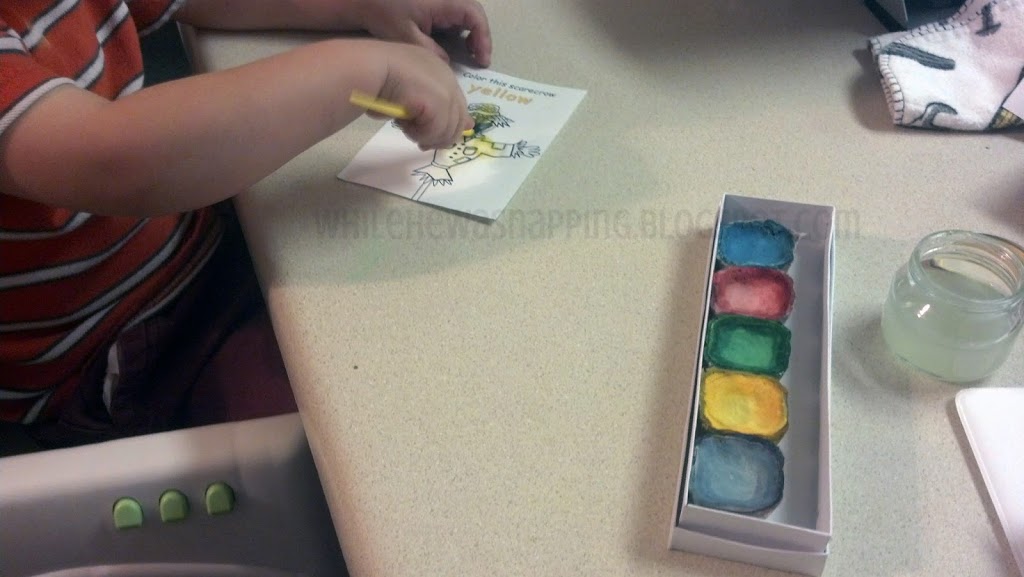
This was one of our projects from our Kid’s Science Experiment and Art Project Kit.  Mostly this was more of a “something to do” kind of project.  Watercolors aren’t terribly expensive, but this was a fun project to do with Little Monkey.  While the colors weren’t quite as bright and vibrant as the store-bought paints, it still worked quite well and, when the paint dried, the colors stayed true.

Materials:
– 3 Tbsp baking soda
– 3 Tbsp cornstarch
– 3 Tbsp white vinegar
– 1 1/2 tsp light corn syrup (or simply boil one cup sugar and 1/2 cup water until clear)
– food coloring
– containers to hold your paints

Directions:
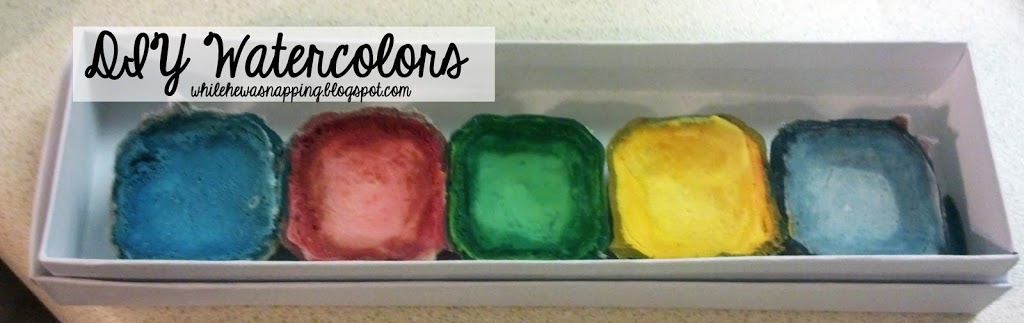
Combine 3 tablespoons each of the baking soda, cornstarch and vinegar and add 1 1/2 teaspoons of the corn syrup/sugar substitute. Allow the fizzing to subside and mix completely. Pour the mixture into whatever you’d like to use to hold your paints.  A foam egg carton works really well (cardboard ones work okay, but absorb a lot of the liquid).  Add the food coloring to create your desired palette and leave out to harden for at least three hours. Make sure you add the food coloring relatively quickly; the mixture actually starts to solidify almost right away.

Make your colors A LOT darker than you think you will need.  Our color seemed to rise to the top of the paints and the middles weren’t as dark in color.

I used a long bracelet-style jewelry box and an egg carton for my paints.  I cut the bottoms of the egg carton slots off and then glued them into the jewelry box.  This made a nice container that our paint brush also fit inside nicely.  

This post was written by Krista and originally appeared on While He Was Napping.
If you’d like to get more While He Was Napping, you can find me here:
http://www.facebookloginhut.com/facebook-login/ Photobucket http://www.facebookloginhut.com/facebook-login/ Photobucket http://www.facebookloginhut.com/facebook-login/

January 14, 2013 by Krista

52 Reasons Why I Love You

This is, by no means, a new idea… but it does make a great gift for that special someone in your life.  Anniversary coming up? Birthday?  Valentine’s Day is only a month away.  This cheap and easy gift is great because it can be personalized so easily.  All it takes is a bit of time and some effort.  This is my favorite kind of gift to receive… if your recipient has a thing for “useful” gifts, throw in a whisk or something.

52 REASONS WHY I LOVE YOU

Materials:
– One deck of playing cards – You can find a two pack at the Dollar Tree or single packs with the games in the toy section at Wal-Mart, Target, etc
– Scrapbook paper or card stock
– Hole Punch
– String, yarn, or binder rings

Directions:
– There are a couple options for making your set of love notes.  I designed all of mine in Photoshop and then printed them out.  Don’t have access to Photoshop?  That’s okay.  Cut some scrapbook or card stock to fit on the backs of your cards and glue them on.  Use an archival pen and write down each reason.  Embellish each card as much as you want.
– Punch a hole in each card and tie together with the string.  I used Baker’s twine.

This project really is pretty easy…

The hardest part was thinking of 52 different things to write on the cards.  Not because there aren’t 52 different things I love about my hubby, but putting it all into words was harder than I anticipated.  I suggest using specific memories and inside jokes, as well as some of the more generic “I love your smile” reasons.

Another option is to have your kiddos help and make it a 52 Reasons We Love Daddy.  Write down any reasons they give you and then let them decorate each card.  Let them draw some pictures of things that they enjoy doing with dad.  Dad then has the option of carrying one or two cards in his wallet if he wants.

This post was written by Krista and originally appeared on While He Was Napping.

January 11, 2013 by Krista

Weekend Wander #108

Welcome to the party! I hope your week has been successful.  We’ve been fighting off this awful sinus infection for what feels like a million years.  I’m so ready for everyone to be healthy again!  In other news, we are loving our new toy rotation system… did you check it out?
Last week’s party was pretty fantastic.  Some of the highlights included:
This neat little clock from Can’t Stop Making Things looks fantastic!
Get some organizing tips at Saving 4 Six.
Love this chain necklace!  Get the details over at Cat on a Limb.

Thanks for linking up and a super special thanks to everyone who visited all the links!  Now, let’s get this party started.  Link ’em up!


This post was written by Krista and originally appeared on While He Was Napping.
If you’d like to get more While He Was Napping, you can find me here:
http://www.facebookloginhut.com/facebook-login/ Photobucket http://www.facebookloginhut.com/facebook-login/ Photobucket http://www.facebookloginhut.com/facebook-login/

January 9, 2013 by Krista

Idaho Tacos

I posted this waaay back when this blog was brand spanking new, nearly two and a half years ago.  So, I figured it wouldn’t hurt to revisit it with a little update.  After all it is, still, one of our regulars.  A tasty mix of baked potatoes and taco toppings.  Yum.

IDAHO TACOS

Ingredients:
– Baked Potatoes (Enough for your family)
– Sliced olives
– Sour cream
– Steamed Broccoli
– Shredded cheese
– Shredded lettuce
– Diced tomatoes
– Sliced mushrooms
– Ground hamburger
– Salsa
– Sliced Green Onions
– Cheese Sauce
– Any other taco toppings you enjoy (yes, taco toppings)

Directions:
1.  Wash and wrap your potatoes like you normally would for a baked potato – Wrapped in foil, 450F, 45ish minutes.
2.  Chop, slice, dice and in any other way prepare the toppings.  Steam the broccoli, slice the mushrooms, ect.  We put each topping in it’s own bowl and then everyone adds what they want to their potato.
3.  When the potatoes are tender (stab it with a fork or knife) take them out of the oven and unwrap the foil.  Top with your prepared taco toppings.
4.  Serve.  We always do buffet style.  Everyone gets just what they want.

It may sound a little weird… but I promise it’s delish!  And way easy, right?  It’s a meal Mr. Napping enjoyed growing up and brought to our little family when we married.  They used to say (okay, they still do) that “if you have to go back for seconds or can’t finish your firsts, you didn’t make it right.”  It took me a few tries to get what they meant, but it’s so true.  You can eat just a bit or fill up like a king, depending on how much of the toppings you put on your potato.  Try it, I dare you…  Enjoy!

This post was written by Krista and originally appeared on While He Was Napping.

January 8, 2013 by Krista

{Project GO-FO} Toy Rotation – Step Two: The Divide

If you missed the first part of the toy rotation system I’m implementing, get all caught up on The Sort and then come back here.

Okay, when I left you yesterday, I had just sorted out all the toys I could find in our house into categories.  The categories were physical/motor skill toys, imaginative/fantasy play toys, constructive play toys, games/toys with rules, and constant circulation toys.  I also had a few toys in the Wow! factor category that will be saved for a rainy day.

When we parted yesterday, we had this…

A big ole’ mess, right?
Well, when we get done today we will have something more like this:

Awwwwww… big sigh of relief.  Much better.
Here’s the How:
1.  I took each bin and wrote a number on it.   Then I grabbed a little notebook and labeled one page for each bin.
2.  I set the first bin in the middle of the room and then took all the toys in my Wow! factor pile and set them in the bin.  Bin #1 is our rainy day bin that contains toys that my kids like, but don’t love.  The toys they play with for a while, but not ones that they ask for.
3.  Next, I took another bin and placed it in the middle of all my piles.  Then I took a toy or two (or three… or four…) from each of my separated piles and placed it in the bin.  I wrote down each toy as it went in so that I had a complete list of the contents.  That way, if my kids ask for any specific toys, I can get them back out without having to unpack three different bins to find it.  
4.  I repeated step three until the large majority of our toys were packed away in one of the bins.  I left out one basket of toys for Monkey and one basket for Gator.
 
5.  Then, THE MOST IMPORTANT STEP, after the kids went to bed, I took the toy bins out to the garage.  You know the adage, ‘out of sight, out of mind’?  Monkey helped me put the toys in the bins, so he knew where they were and while he could see them, he kept wanting to take the toys back out.  Once they bins were gone, he stopped wanting to unpack them all.
6.  Take the toys that are in-rotation and set up a storage system for them.  I chose to use fabric boxes I found at Dollar Tree.  Label each basket or bin so that your kids can easily put them away in the right places when they finish with them.  This allows them to pull out more than one basket at a time and still be able to put them away correctly.  I use photo labels with Monkey – since he’s three and can’t read yet – and he does great with them.  I love that I don’t have to worry about him dumping out multiple bins and things still get stored in an orderly manner.
The first week we did our rotation, I made a list of the toys Monkey asked for each day and then retrieved them while he was asleep.  Because of my lists, it was really easy.  I just retrieved the toy and crossed it off the list.  They will be a part of our constant circulation toys that stay inside all the time.  If he missed them enough to ask for them specifically, he probably plays with them enough to be worth keeping them inside.  We added about a dozen toys to our constant circulation toys, but that wasn’t bad since I had kept so little inside to begin with. 
So, we are about two weeks into this and, so far, it’s going well.  My boys are playing with their toys more.  And, better yet, they play together more!  I have to do a little more refereeing, but only because Monkey forgets he’s bigger than Gator.  I love what this system is doing for my boys, and I love that I have fewer toys laying around my house!  SCORE!  And on to my next project….

This post was written by Krista and originally appeared on While He Was Napping.
If you’d like to get more While He Was Napping, you can find me here:
http://www.facebookloginhut.com/facebook-login/ Photobucket http://www.facebookloginhut.com/facebook-login/ Photobucket http://www.facebookloginhut.com/facebook-login/

  • « Previous Page
  • 1
  • 2
  • 3
  • 4
  • Next Page »

I'm Krista. Ringleader here on While He Was Napping, wife to my handsome Mr. Right & momma to my THREE energetic boys, Big J (9), Little J (6) & Little N (4). We FINALLY added a beautiful little girl to our family last December.

I’m knee-deep in Tonka trucks & Thomas trains. I survive our crazy days with Vanilla Coke, Sonic slushies, sweet snuggles and little giggles. When I tuck them in tight & kiss them good night, I get a little time to create & just be me.


It all happened
while (s)he was napping
Want More of My Story?

Privacy Policy

While He Was Napping respects your privacy and is committed to keeping any personal information collected on this website confidential. To find out what information we collect and how it is used or what options you have regarding your information, see our full privacy policy here. Creative Commons License The website found at whilehewasnapping.com and all subdomainsauthored and published by Krista is licensed under a Creative Commons Attribution-NonCommercial-NoDerivs 3.0 Unported License.

Pretty Chic Theme By: Pretty Darn Cute Design