While He Was Napping

momma gets stuff done

  • Home
  • About
  • Archive
  • Do It Yourself
    • Crafts
      • No Sew
      • Painting
      • Paper Crafts
      • Repurpose Projects
      • Vinyl
      • Washi Tape
      • Kid’s Crafts
      • Fonts
    • Sewing
    • Decorate
      • Home Decor
      • Holiday Decor
    • Celebrate
      • DIY Gifts
      • DIY Your Party
  • Recipes
    • Beverages
    • Appetizer
      • Bread
      • Other Appetizers
    • Snacks
    • Main Dish
      • Meat
        • Chicken
        • Beef
        • Pork
        • Seafood
      • Vegetarian
      • Slow Cooker
      • 30 Minute Meals
    • Dips & Sauces
    • Salads
    • Pasta
    • Soup
    • Dessert
      • Cookies
      • Brownies
      • Cupcakes and Cake
      • Box Mix Recipes
      • Other Sweet Treats
    • Breakfast Food
      • Pancakes
      • Waffles
      • Muffins
      • Other Breakfast Food
  • Family
    • Babies
      • Pregnancy
      • Newborns
      • The 1st Year
    • Toddlers
    • Preschoolers
    • Kindergartners
    • 6-8 Year Olds
    • The Grown Ups
      • Date Night
      • Romantic Gifts
    • Self Care
  • For the Home
    • Cleaning
    • Organizing
    • Emergency Preparedness
  • Travel
    • Travel Tricks & Tips
    • Traveling with Kids
  • Tech & Gadgets
    • Must-Have Apps
    • Techy Home Appliances
    • Gadgets & Electronics
    • Blogging Tips
  • Printables
    • Posters
      • Quote Printables
      • Subway Art Printables
    • Printable Organizers
    • Printable Journals
    • Learning Printables & Worksheets
    • LDS Printables
  • Holidays
    • New Year’s
    • Valentine’s Day
    • St. Patrick’s Day
    • Easter
    • Cinco de Mayo
    • Mother’s Day
    • Father’s Day
    • 4th of July
    • Back to School
    • Halloween
    • Thanksgiving
    • Christmas
    • Holiday & Seasonal Printables

January 28, 2013 by Krista

Printable Date Night Jar

So, last week I showed you what I made for Mr Napping for our 5th wedding anniversary in two weeks.  Don’t worry, he doesn’t read my blog so he’ll still be surprised.  You should check that out if you’re looking for a gift for your someone special… Valentine’s Day is coming up (wink, wink).

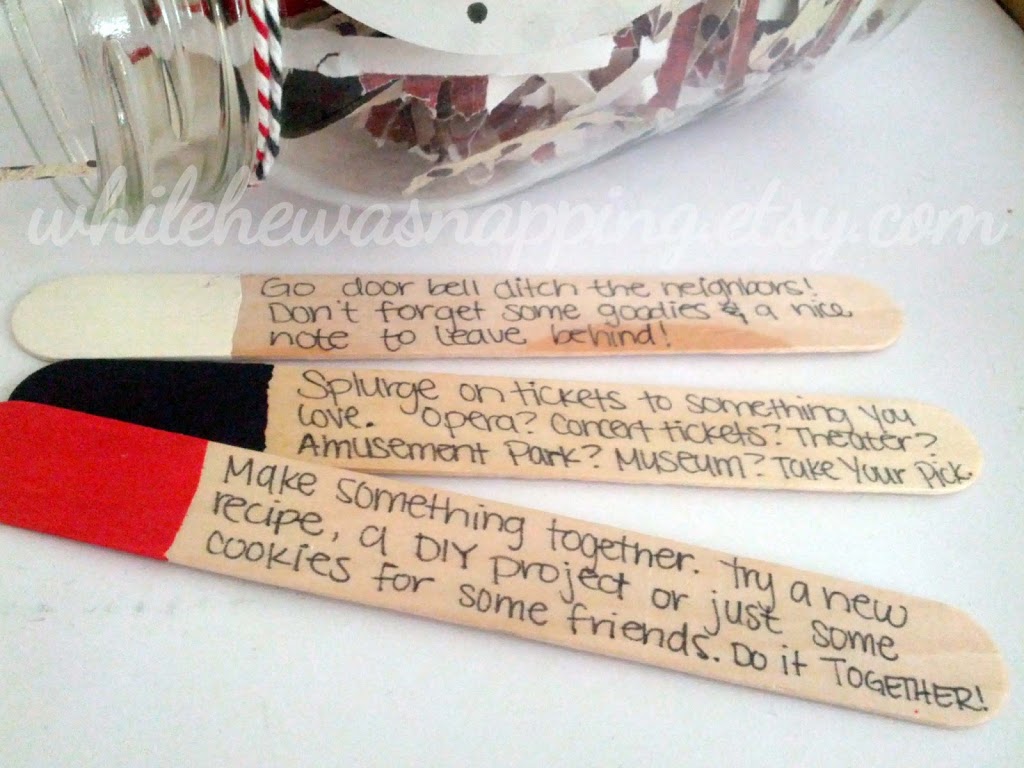
If you’re looking for something a little less time consuming – because painting 52 little wood sticks was just that – you’ll love what I have for you today.  I’ve been out of the printable scene for a while and I think this is a great little freebie to jump back in with.  You’ll be able to make a gift for your someone special for practically FREE!

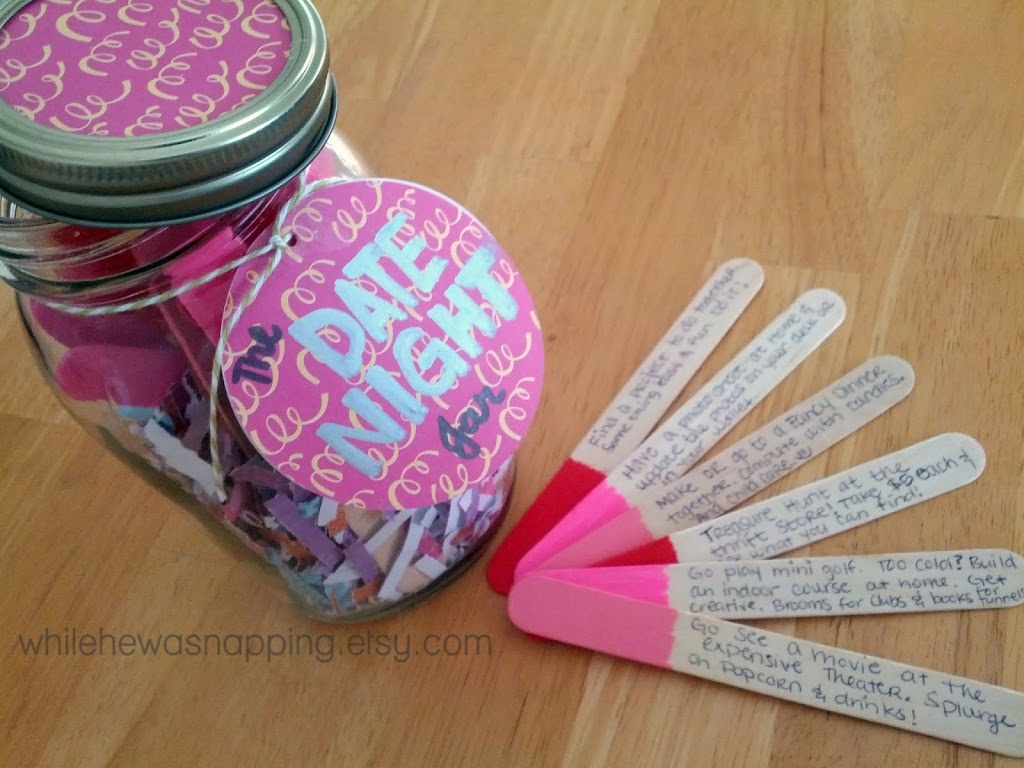
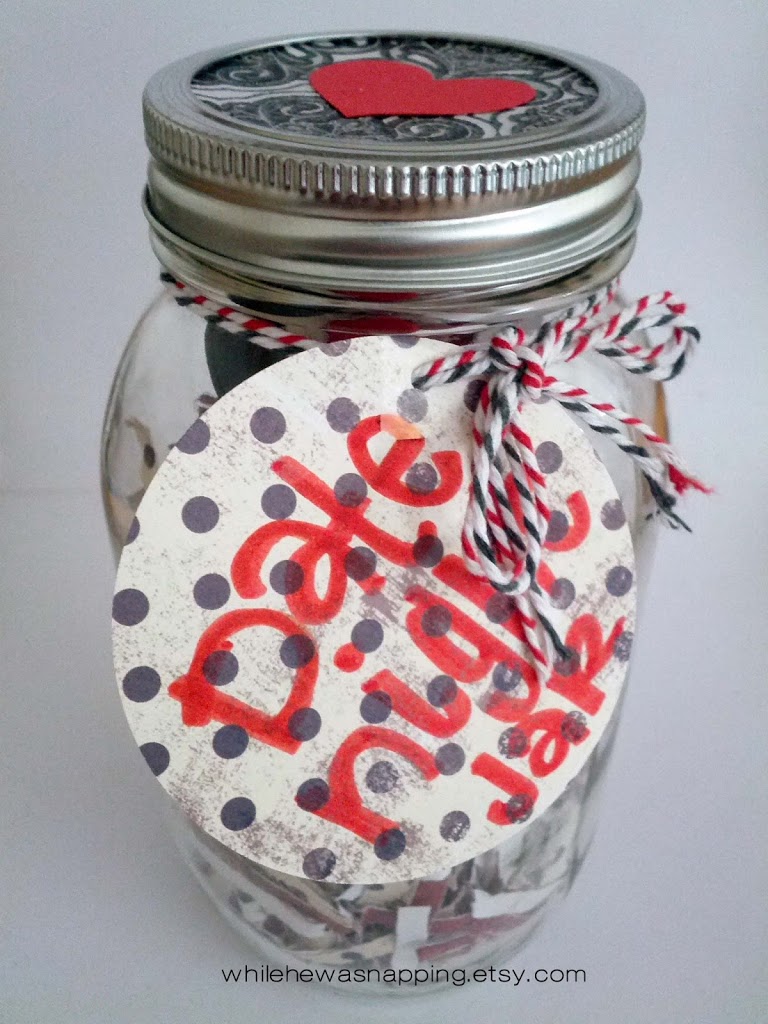
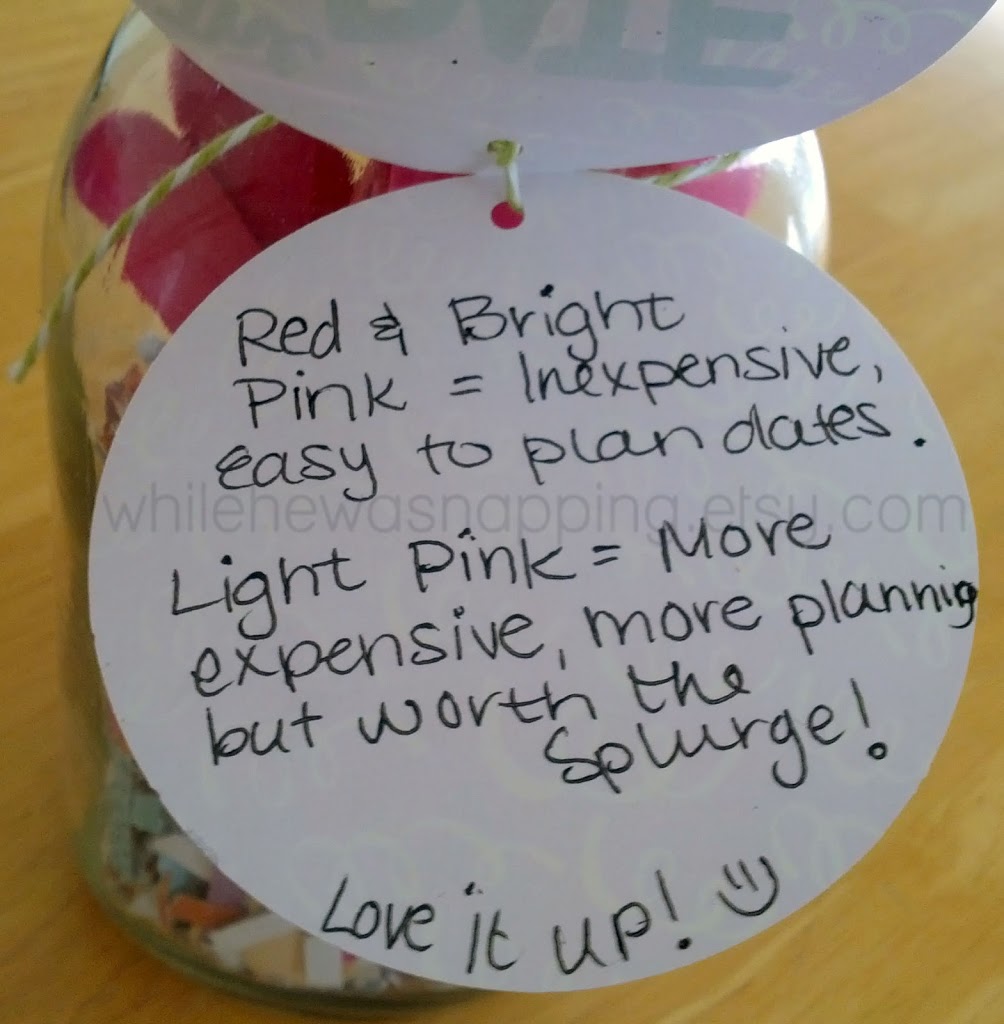
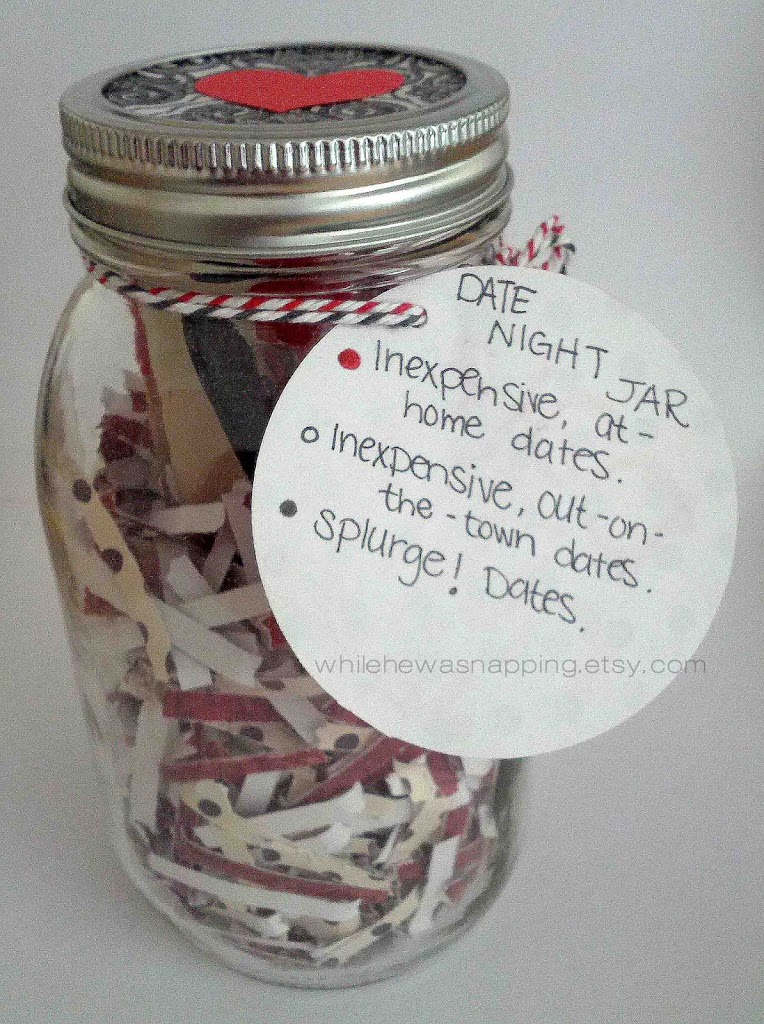
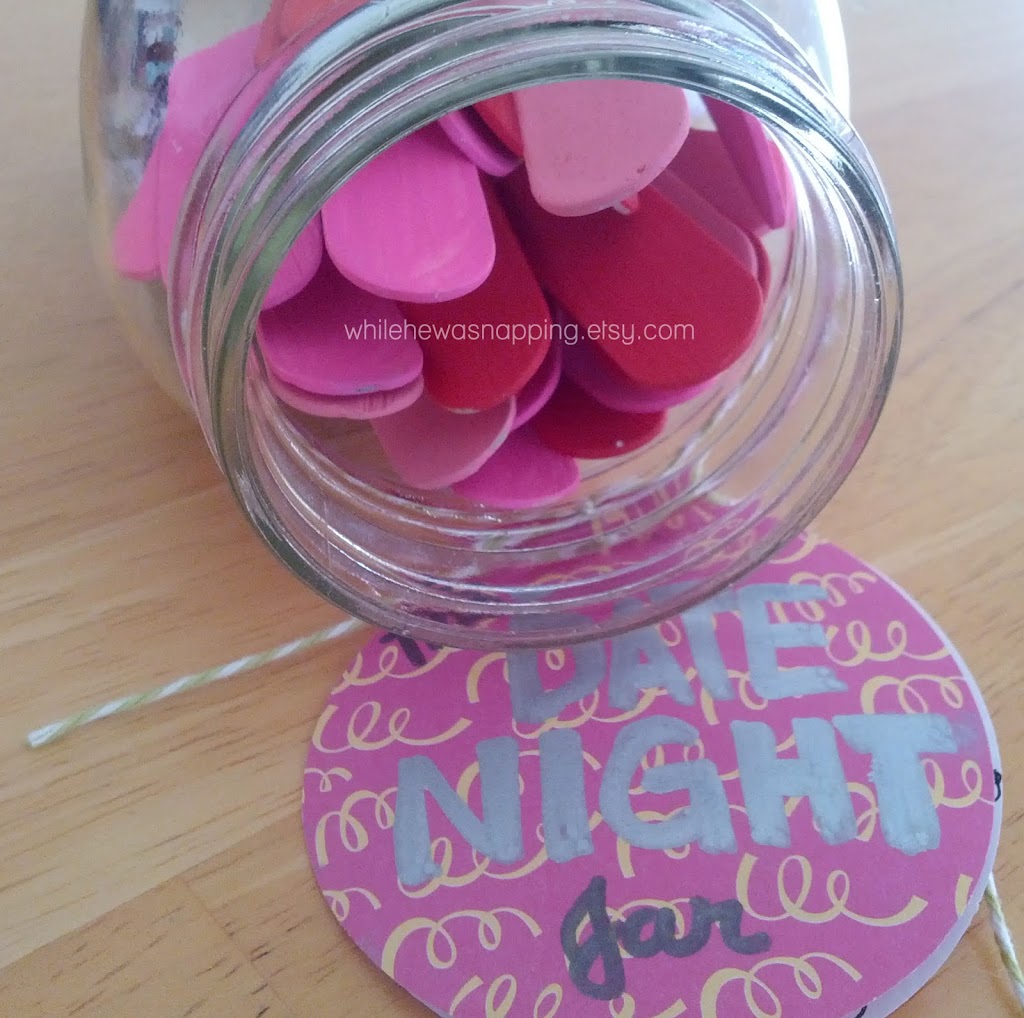
PRINTABLE DATE NIGHT JAR

Printable-Date-Night-Jar

Materials:

– Jar
– Free PDF of the Jar Label and Date Ideas.
– Glue or tape
– Baker’s Twine or other string (optional)
– Spray paint or scrapbook paper (optional)

Directions:
1.  Gather your jar and print off your printed PDF (just click the link above).  I recommend printing these off on card stock for a sturdier hold up.  You could use a Mason jar, a peanut butter jar you’ve cleaned out, or an old spaghetti sauce jar you’ve washed.
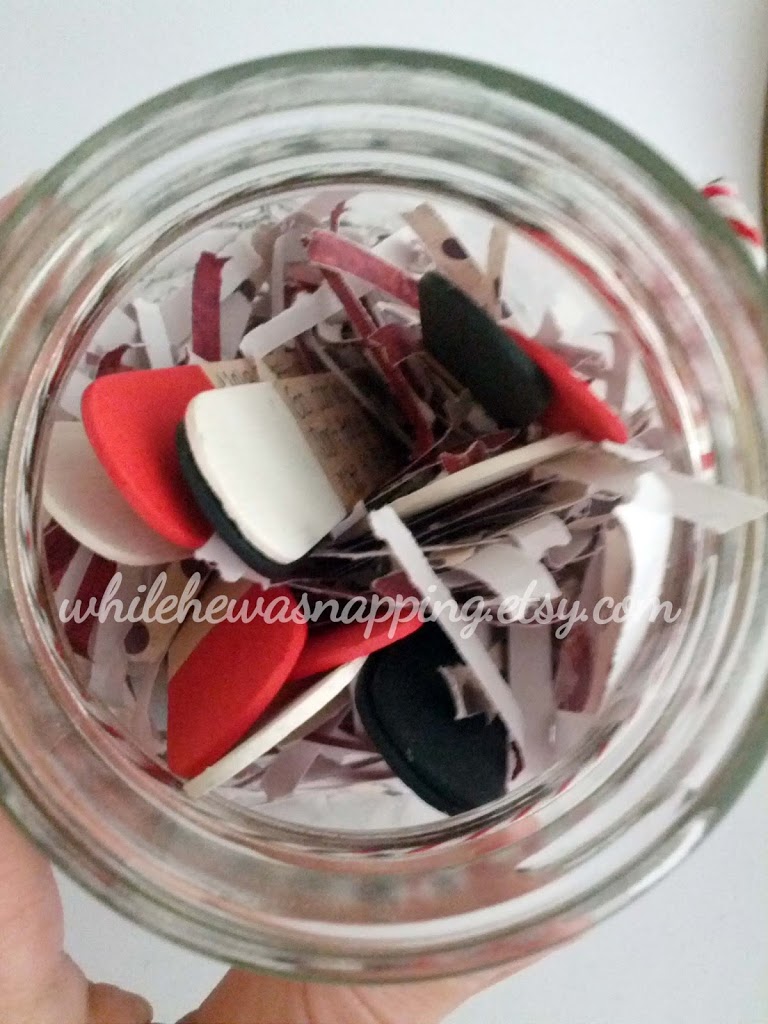
2.  Cut apart the dates and the jar label with scissors or a paper cutter.
3.  Fold the strips of paper and drop them in the jar.  I found that folding them in fourths worked the best.  They stuck together when I folded them in half and it was hard to pull out just one slip of paper.
4.  You may want to spray paint the lid of your jar or cover it with scrapbook paper.
5.  Tie your Baker’s twine around the jar and affix the label to your jar with tape or glue.  You could even use clear contact paper for a more waterproof label.

Grab a free copy of this file, without watermarks, from HERE.

This file is for PERSONAL USE ONLY.  If you want to share the file with others, please give them this web page address and they can download their own copies.  No portion or alterations of this file may be sold or claimed as your own.  I reserve all rights.  I like to share, but let’s all play nice.  Please and thanks.

If you’re interested in different date ideas or more ideas for a larger kit, you can purchase 32 more date night strips from my While He Was Napping Etsy Shop.  Files are instant download, so you’ll have them in your hot little hands (or on your hot little hard drive, as the case may be) as soon as your payment is processed!

Happy Dating!

This post was written by Krista and originally appeared on While He Was Napping.

January 25, 2013 by Krista

Weekend Wander #110

Welcome, Party Peeps.  I hope your week was fantastic.  We got to spend Monday with Mr. Napping and my parents took us to the local Fun Center.  Little Monkey was in heaven riding the Indy cars with Dad and Grandpa.  Side note: he called them Indian cars first.  Hehe.  And Tuesday we found out what gender baby my brother and sister-in-law are expecting in June.  But more on that this next week…

Here’s a couple of shout outs from last week:

If you’d like to pin any of these fabulous ideas, please pin from the original source, thanks!

Mr Napping would be all over this Slow Cooker Parmesan Chicken that Whitney shares at Five Minutes for Mommy.  I’ll have to add it to our menu planning. 

Get Your Valentine inspiration a-going with this awesome Valentine’s mantle Bethany from Sweet Bee Buzzings has put together.  Click over and check out how awesome this looks with the lights off!

Carrie from Saving4Six shared this amazing closet organization… I wish she’d come do my closets…
If you missed it this year, mark January 19th on your calendars next year.  National Popcorn Day!  Lori has an awesome caramel popcorn recipe she’s shared and I don’t think I’ll wait til next year to try it.
For even more Valentine inspiration, grab one of these cute Valentine printables that Tracy shared over on Made From Pinterest.

Featured?  Grab a button…

<a href=”http://whilehewasnapping.blogspot.com”> <img src=”http://whilehewasnapping.com/wp-content/uploads/2013/06/WHWNWWFeatureButton.png” >

I also have a request………. If you link up, would you mind listing my link party in your post or on your sidebar or a link party page.  I’d like to get the word out and see if we can increase the number of link-ups.
Photobucket

<a href=”http://whilehewasnapping.blogspot.com”> <img src=”http://i769.photobucket.com/albums/xx332/WhileHeWasNapping/WHWNWeekendWanderButton.png” >


And thanks to everyone who voted in the poll last week.  The majority consensus among those who voted was to keep Weekend Wander going.  So, unless the link-up number decreases, I guess that’s what we will do.

Ok, enough yammering… Link ’em!

This post was written by Krista and originally appeared on While He Was Napping.
If you’d like to get more While He Was Napping, you can find me here:
http://www.facebookloginhut.com/facebook-login/ Photobucket http://www.facebookloginhut.com/facebook-login/ Photobucket http://www.facebookloginhut.com/facebook-login/

January 23, 2013 by Krista

Date Night Jar

With Valentine’s Day coming up, you might be on the look out for a romantic gift for that someone special… yeah?  Well, my fifth anniversary of wedded bliss to my amazing husband is coming up early next month and tradition dictates we exchange gifts made of wood.  I asked my husband if there was anything he wanted and mentioned that the fifth anniversary gift theme is wood.  He just snickered and made a dirty comment.  Not a single mention of anything he wanted.  Men.  =)

Well, I am a big believer in Date Night.  At least a couple times a month.  You get so caught up in being Mommy, Daddy, Provider, Nurturer, Housekeeper, Nurse and all the other roles and responsibilities you have to fill that sometimes you forget to be Sweetheart and Lover too.  Or is that just me?

I genuinely enjoy spending time with my husband and, while I love being “Mommy”, sometimes I need to just be “Honey”.  So…. it’s Date Night to the rescue.  But Date Night won’t happen if you don’t make it happen.  And sometimes it’s hard to come up with new ideas, or ideas at all, of things to do.  And that’s where the Date Night Jar comes into play.  Basically, the idea is to have all your date ideas already thought up.  All you have to do is pick one and then do it!

DATE NIGHT JAR

Date Night Jar

Materials:
– Jar
– Fat Craft Sticks
– Ultra Fine-tip Permanent Marker
– Scrapbook Paper
– Markers, Stamps or Stickers
– Paint (I used acrylics)
– Baker’s Twine or other string

Directions:
1.  Begin by painting the ends of your craft sticks.  I decided to plan a whole year’s worth of dates, 52 to be exact.  I knew that we have a budget and that our dates need to not be a cause for breaking the bank.  I also knew that every once in a while, you do need a special splurge.  And I knew there were going to be dates where we couldn’t pawn off, er I mean… leave the kids.  I wanted to plan for all of those occasions.  So I decided to paint my sticks three different colors.  One for at-home dates, one for inexpensive dates out and one color for our splurge dates.  I planned on one splurge date a month (12) and then split the other dates equally (20 each).  It worked out quite nicely.

(Disclaimer: the photos are actually of two different date night jars.  The red and pink one is one I made my cousin and the red, white and black photos are of an Etsy order I received.  That’s why there are so many different colors.)

Date Night Jar

2.  While the paint on my craft sticks was drying, I started gathering date ideas.  Everything I could think of that Mr Napping and I enjoy doing together, things we want to try, places we want to visit, ect.  This was absolutely the HARDEST pat of the whole project.
3.  I made my date night jar from a quart mason jar.  I used a 2.5 inch circle punch and punched out a piece of scrapbook paper and used that in the top of my jar to hide the ugly gold seal.  You could also paint the ring if you wanted to with a quick light coat or two of spray paint.

4.  I punched another 2.5 inch circle and then used a 1/8 inch punch to make a hole to string my Baker’s twine through.  This is my label that I tied around the neck of my bottle.  It also has the key on it.  “Key” as in the code breaker for the different colored sticks.

5.  Then came the daunting task of writing down all 52 dates.  Actually, it wasn’t that bad.  I just worked on it while watching TV after my kids were asleep.  Because guess what kids like to put in their mouths…?  Uhm, yeah, sticks.  And if they are painted and have ink on them, all the better, right?!

6.  Then, I put all the sticks in the jar, tied it up all cutesy and got it gift-giving ready.  I made my first jar for my cousin and her hubby for Christmas.  I’ve made a couple as Etsy orders…  P.S. You can also purchase your own Date Night Jar from my Etsy shop.  I’ll do all the work and you get to have all the fun.

This gift will keep on giving all year long as Mr Napping and I enjoy it together.  It also fills the 5th year wood tradition with the craft sticks, so I feel all super accomplished about that.  Go, me!
 Date Night Jar
Next week, I will have a printable version available… so check back for that.  =)

This post was written by Krista and originally appeared on While He Was Napping.

January 22, 2013 by Krista

Story Stones

I first heard of story stones over on Paint on the Ceiling (sounds like my house…).  I loved the idea and that it encourages using your imagination and sequencing in the form of story telling.  We love stories at our house.  Whether it’s reading books or just making them up.  When I found story stones, I knew this would be a perfect addition to our story times.
Materials:
– Stones
– Acrylic Paint
– Permanent Markers
– Fine Tip Paint Pens
– Clear Spray Paint
Directions:
– Gather your stones.  You can use ones you gather from your yard, walks, the park, ect.  I had a couple packs of river stones from  the Dollar Tree I’d picked up for a different project I never did (I hope I’m not the only one that does that…) and used them for our story stones.  If you use stones you gather, wash them well and let them dry completely.
– Decide what you want on your stones and get to painting.  We have a dump truck, firetruck, fish, house, grass, cow, car, ice cream cone, sunshine, fire, hot air balloon, Mom, Dad, girl, boy, bed, spaceship, and boat to name a few.  Whatever you want.  We have more transportation and bug themed rocks than someone with all girls may have.  My little ones tend to gravitate toward those subjects more and it’s easier to get them to tell more in-depth stories if they are subjects they know more about.  It doesn’t matter if your paintings are great.  As long as your kids can tell what the pictures are, you are good to go.  I’m definitely no artist and we still have a blast.
– Let your stones dry thoroughly.  Coat with 2-3 thin layers of clear spray paint to help keep the images from chipping or peeling.  Let dry.
– We keep ours in a muslin bag.  It’s easy to clean up and keeps everything corralled. Because the rocks were clean to begin with, there’s no worry about dirt.  If you washed yours well, you shouldn’t have any issues either.

This post was written by Krista and originally appeared on While He Was Napping.

January 21, 2013 by Krista

{Project GO-FO} DIY Dry Erase Menu Planner

I am currently in the process of redesigning our menu planning system.  But… it’s taking me a little while to get it done.  Between sick kids, Monkey’s insistence that he doesn’t need to nap and being sick myself, my free time (not to mention my ambition) is a little harder to find than usual.

I will let you in on all that goodness when I get it finished.  In the meantime, this is how I plan our menus now.

DRY ERASE VINYL MENU PLANNER

I like to plan our menu two weeks at a time.  It’s manageable, flexible and the fresh produce doesn’t go bad before I can use it.  Even if I have to do some menu rearranging later.  And I’m not at the grocery store for hours and hours.  I struggle with planning more than just a main dish… and I struggle even more with making more than that.  So, I write down the main dish in one color (purple this week) and the side dish/dessert in another color (orange).  This has worked really well for us since about July.

Materials:
– Large Magnet.  I used an old car magnet my husband got a bunch of back when he was in the military.  You could use smaller bar magnets or those magnets you get with ads on them if you don’t have a large magnet at your disposal.
– Permanent marker.
– Dry Erase Vinyl.  I actually just used some basic glossy white vinyl I had on hand, but the markers tend to stain it a little.  Not bad, but there’s a slight tint to the magnet now.
– Ruler

Directions:
– Cut your vinyl to your desired size.  I made mine 4.25″ (inches) tall and 15.75″ long.  Each square is 2.25″ wide and 1.875″ tall.  The days of the week blocks are 2.25″ wide and 0.5″ tall.

– Place your vinyl on your magnet.  Cut the magnet to the edges of the vinyl.  If you are using smaller magnets, use a sheet of paper (or two if you use standard letter size paper) to back your vinyl.  Attach the magnets to the sheet of paper.
–  Take your permanent marker and your ruler.  Mark out your boxes and use your ruler to draw straight(ish) lines.
– Use the marker to write out the days of the week in the correct boxes.

Obviously, my lines aren’t perfectly straight.  It’s still functional and really doesn’t look quite as bad as the photo.  Apparently, that angle is a bit unflattering on my crooked, squiggly lines.  Sorry.  Another tip: Let the permanent marker dry and really set for a few days.  I found my dry erase markers would sometimes pull the permanent marker off at first.  It wasn’t a big deal to go back over it with the permanent marker, but I haven’t had any problems now that it’s good and set on the vinyl.  
Because I used just regular vinyl, there are slight stains on it and if I leave the marker on for very long (like two weeks) it isn’t as easy to erase.  I just spritz it down with a little water or vinegar and it’s good to go again.  I didn’t use dry erase vinyl because I didn’t have any on hand and didn’t want to order two feet of it (to fit my nearly 16″ length).
I also made a long strip for our grocery list.  I simply snap a photo on my phone before I run to the store and I’ve got my list.  Or I can send Mr Napping a photo and he’s got the list too.  There’s also a To-Do List.  It was a life saver over the holidays when I had gifts to make, goodies to bake and my house to clean.  I’m a list girl and this was great.  I could erase something when I got it done and easily add anything that I’d missed the first (or second) time around.
I’ve seen similar menu board ideas with a picture frame and using dry erase on the glass, but I like that this set are all magnets and stick on my fridge where I can easily see them every time I’m in and out of the fridge… and with my kids, that’s like a batrillion times a day.  It’s a good reminder for me that I need to think about dinner before 5pm!

This post was written by Krista and originally appeared on While He Was Napping.
If you’d like to get more While He Was Napping, you can find me here:
http://www.facebookloginhut.com/facebook-login/ Photobucket http://www.facebookloginhut.com/facebook-login/ Photobucket http://www.facebookloginhut.com/facebook-login/

  • « Previous Page
  • 1
  • …
  • 107
  • 108
  • 109
  • 110
  • 111
  • …
  • 231
  • Next Page »

I'm Krista. Ringleader here on While He Was Napping, wife to my handsome Mr. Right & momma to my THREE energetic boys, Big J (9), Little J (6) & Little N (4). We FINALLY added a beautiful little girl to our family last December.

I’m knee-deep in Tonka trucks & Thomas trains. I survive our crazy days with Vanilla Coke, Sonic slushies, sweet snuggles and little giggles. When I tuck them in tight & kiss them good night, I get a little time to create & just be me.


It all happened
while (s)he was napping
Want More of My Story?

Privacy Policy

While He Was Napping respects your privacy and is committed to keeping any personal information collected on this website confidential. To find out what information we collect and how it is used or what options you have regarding your information, see our full privacy policy here. Creative Commons License The website found at whilehewasnapping.com and all subdomainsauthored and published by Krista is licensed under a Creative Commons Attribution-NonCommercial-NoDerivs 3.0 Unported License.

Pretty Chic Theme By: Pretty Darn Cute Design