While He Was Napping

momma gets stuff done

  • Home
  • About
  • Archive
  • Do It Yourself
    • Crafts
      • No Sew
      • Painting
      • Paper Crafts
      • Repurpose Projects
      • Vinyl
      • Washi Tape
      • Kid’s Crafts
      • Fonts
    • Sewing
    • Decorate
      • Home Decor
      • Holiday Decor
    • Celebrate
      • DIY Gifts
      • DIY Your Party
  • Recipes
    • Beverages
    • Appetizer
      • Bread
      • Other Appetizers
    • Snacks
    • Main Dish
      • Meat
        • Chicken
        • Beef
        • Pork
        • Seafood
      • Vegetarian
      • Slow Cooker
      • 30 Minute Meals
    • Dips & Sauces
    • Salads
    • Pasta
    • Soup
    • Dessert
      • Cookies
      • Brownies
      • Cupcakes and Cake
      • Box Mix Recipes
      • Other Sweet Treats
    • Breakfast Food
      • Pancakes
      • Waffles
      • Muffins
      • Other Breakfast Food
  • Family
    • Babies
      • Pregnancy
      • Newborns
      • The 1st Year
    • Toddlers
    • Preschoolers
    • Kindergartners
    • 6-8 Year Olds
    • The Grown Ups
      • Date Night
      • Romantic Gifts
    • Self Care
  • For the Home
    • Cleaning
    • Organizing
    • Emergency Preparedness
  • Travel
    • Travel Tricks & Tips
    • Traveling with Kids
  • Tech & Gadgets
    • Must-Have Apps
    • Techy Home Appliances
    • Gadgets & Electronics
    • Blogging Tips
  • Printables
    • Posters
      • Quote Printables
      • Subway Art Printables
    • Printable Organizers
    • Printable Journals
    • Learning Printables & Worksheets
    • LDS Printables
  • Holidays
    • New Year’s
    • Valentine’s Day
    • St. Patrick’s Day
    • Easter
    • Cinco de Mayo
    • Mother’s Day
    • Father’s Day
    • 4th of July
    • Back to School
    • Halloween
    • Thanksgiving
    • Christmas
    • Holiday & Seasonal Printables

August 4, 2010 by Krista

Tasty Tuesday: Delicious Cake

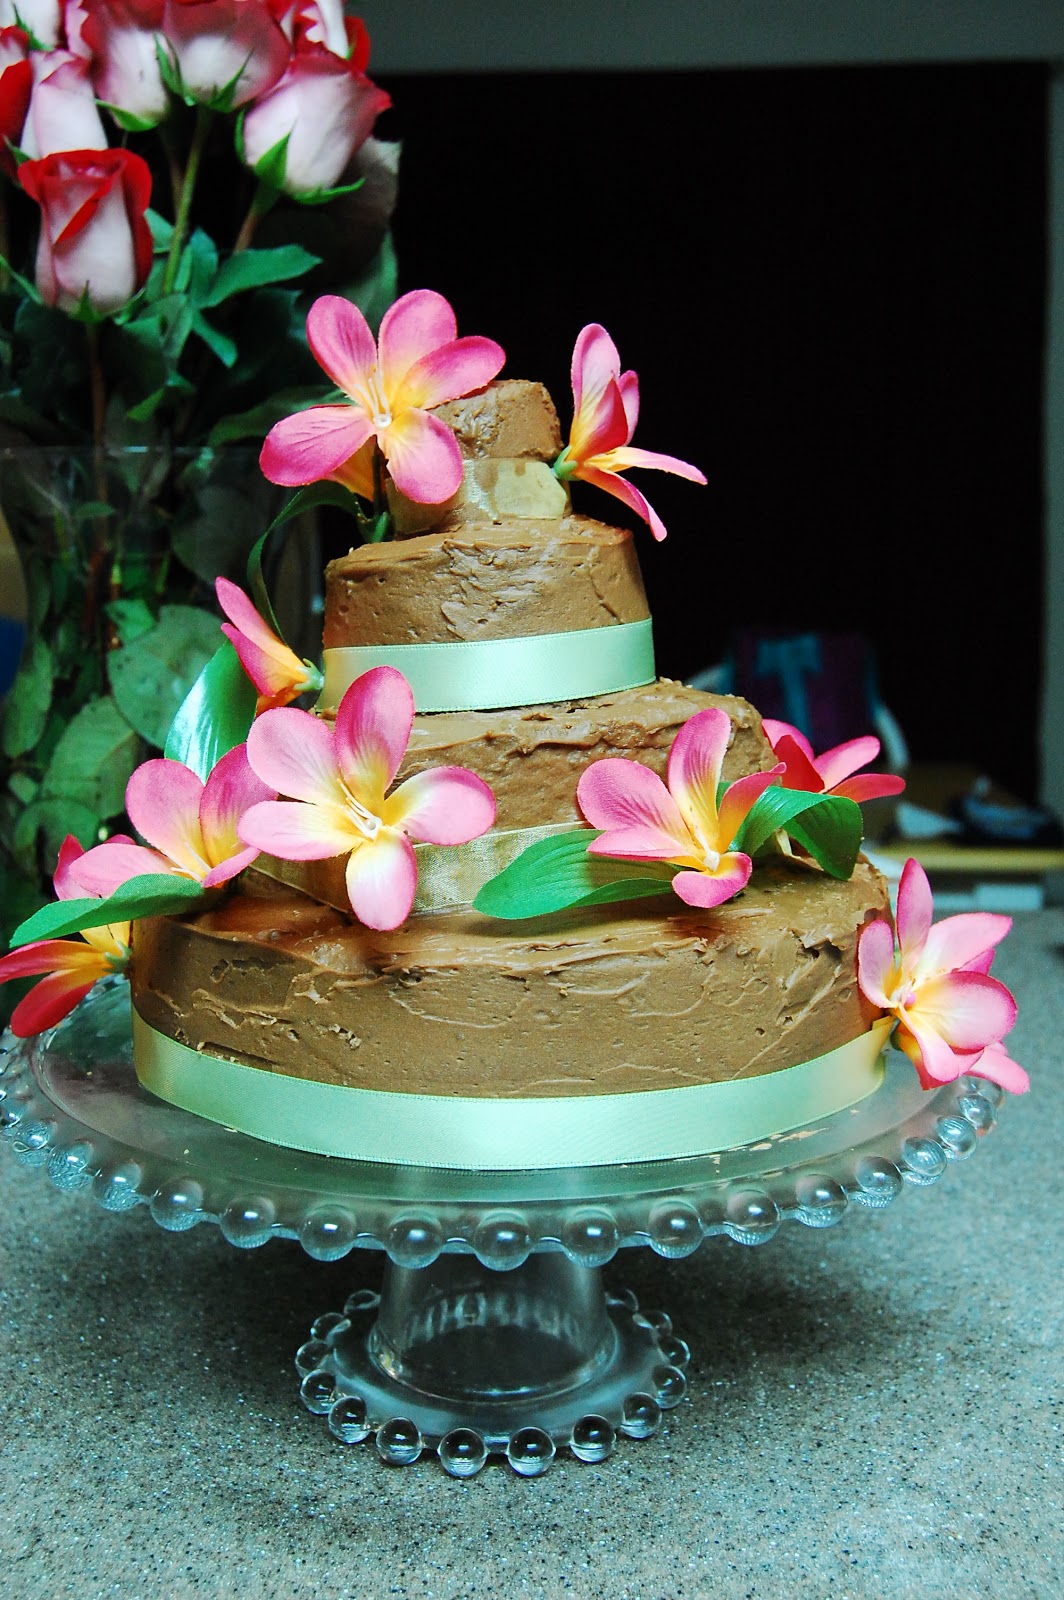
I enjoy baking.  Like, if I actually enjoyed everything I made in the kitchen, we’d all be 500 lbs.  Not a good thing for my one year old…  So, on birthdays, I tend to go all out.  I even make my own cake, because I enjoy it.  I have a go-to cake recipe.  It’s amazing.  I love that it’s not super sweet, so by the time you put the frosting and any icing on, you’re not experiencing sugar overload.  It’s perfect.

SIMPLE, DELICIOUS CAKE

07/02/09

1 c white sugar
2 eggs
1 1/2 c white flour
3/4 c milk
1/2 butter
2 tsp vanilla extract
1 3/4 tsp baking powder
6 tbs cocoa (optional)

Grease a 9×9″ pan. Preheat the oven to 350F.

Cream sugar and butter. Beat in eggs. Add vanilla. Combine flour and baking powder, add to creamed mixture. Mix well. Stir in milk until batter is smooth. Pour into pan.

Bake 30-40 mins. Cake is done when it springs back to the touch.

**You can also add 1 tsp of any flavor extract (lemon, orange, coconut, banana, ect) for different flavors. I made both a vanilla version of the cake (by omitting the cocoa) and a chocolate version.  The top and bottom layers were chocolate and the middle vanilla.  Both were delish! Enjoy!

July 23, 2010 by Krista

Fanciful Friday: Vinyl Flower Garden

I LOVE this vinyl flower garden. It’s my favorite vinyl project I’ve done. And it’s completely mine. I designed all the flower heads and stems and everything. It’s so rewarding to see the finished project and to be so thrilled with it. I’m in LOVE. I put this up in our half bath, but it would look adorable in the kitchen too. I had a hard time deciding where to put it, but I already had a super cute quote up in the kitchen and was afraid I’d over do it.

This item is available through my Etsy shop.  Message me to set up a listing.  Check it out!

July 22, 2010 by Krista

Thoughtful Thursday: Love Tickets

A quick and easy way to keep the romance alive! Give the love of your life some lovin’ to redeem at a later date. If you need to adjust the tickets, feel free to do so. Photoshop or even paint will do the trick. Or make your own with the ticket template I found HERE. Scroll down just over half way and follow the instructions that accompany the template. All of these tickets here are original creations (with the exception of the ticket template) and may not be used or sold for profit. Thanks and enjoy!

Go enjoy a romantic evening… how many tickets can you use in one night?

July 9, 2010 by Krista

Fanciful Friday: Word Frames

A friend of mine did this on the main wall of their apartment and I fell in love!  I had to do it.  She got her frames at DI and Goodwill and found some larger ones.  She then went and had her vinyl cut at a store in the mall.  I don’t remember how much she paid for it, but I remember it was more than I wanted to pay for mine.
So, originally I did mine out of tracing paper and card stock.  I printed out the letters on the computer in a font I liked, and then taped the tracing paper and the paper I printed on.  I then used an exacto knife and cut the letters out.  I used a ruler to ensure straight, more professional looking edges.
I then cut my card stock to fit my frames.  I used StudioTac (it’s a graphic designer’s amazing friend and sold at art stores, it is kinda expensive though) to stick the tracing paper on the card stock.  StudioTac is a whole bunch of little sticky dots, so you could see it though the tracing paper.  I liked that it gave my letters some texture.  It also ensures that all your corners are adhered and stay that way.
Then I put the card stock in the frames and hung them on the wall.  It stayed like until I got my Cricut and some vinyl…

Then, I decided to update the look a little (and I saw my friend’s again and fell in love all over).  I cut out the letters BACKWARDS on vinyl with my Cricut.  I cleaned the glass well.  And then stuck the letters on the glass.  I cut them out backwards because I didn’t want the letters on the outside of the glass.  I wanted them in between the glass and the wall.  I glued the glass to the very edge of the frame with Tacky Glue (you could use gorilla glue if you’re worried about the strength of the hold, but I haven’t had any problems with them).  I left the backing off the frame so you could see the wall.  And then I added the knotted ribbon to the small frame.  Then I hung them back where they were. Perfection.
                                                                                                                                  

July 2, 2010 by Krista

Fanciful Friday: Beautiful Wreaths

Here are two wreaths I made.  I have one hanging in our living room and just love how it helps brighten up the room a little.  I love the way they turned out.  They are so colorful and happy!  It’s so warm here and sometimes flowers have a hard time not getting scorched.  I still get my flower fix and I don’t have to worry about too little water and too much sun  Enjoy! 

The best thing about these wreaths:  They are all Dollar Store items!  Well, except the ribbon and the beads, both of which I already had on hand.


The wreath that has flowers all the way around it has a floral styrofoam ring base.  The flowers I cut off the bunch with wire cutters, leaving about 1 1/2 inch stems on each flower.  I just used hot glue to attach the flowers to the ring  I poked each steam into the styrofoam, pulled it back out and then squeezed hot glue into the hole and reinserted the flower stem.  Work your way around the entire ring.
I thought about hanging it with a ribbon, but I didn’t want to detract attention from the flowers so I just cut a notch in the back of the ring at the point where it stuck out the most.  It was perfect and sat on the nail just right.

The reed wreath I used the same technique as with the foam, except I stuck the stems between the reeds and hot glued them there.  For the ribbons, I hot glued the ends behind the flower heads and then just wrapped them around the top of the reed and secured them with hot glue behind a flower head on the other side.

For the ribbon flower, I took the end of a roll of ribbon and hot glued it to the wreath then I looped the ribbon to make the petal.  Put a small dab of hot glue at the spot on the ribbon where it crosses back over the end of the ribbon to secure it to the wreath.  Continue with the same process until you have enough petals to make your flower.  I just hot glued the beads to the ribbon to cover the ends and all the hot glue.  I did make an effort to put the sides with holes not facing up.

  • « Previous Page
  • 1
  • …
  • 229
  • 230
  • 231

I'm Krista. Ringleader here on While He Was Napping, wife to my handsome Mr. Right & momma to my THREE energetic boys, Big J (9), Little J (6) & Little N (4). We FINALLY added a beautiful little girl to our family last December.

I’m knee-deep in Tonka trucks & Thomas trains. I survive our crazy days with Vanilla Coke, Sonic slushies, sweet snuggles and little giggles. When I tuck them in tight & kiss them good night, I get a little time to create & just be me.


It all happened
while (s)he was napping
Want More of My Story?

Privacy Policy

While He Was Napping respects your privacy and is committed to keeping any personal information collected on this website confidential. To find out what information we collect and how it is used or what options you have regarding your information, see our full privacy policy here. Creative Commons License The website found at whilehewasnapping.com and all subdomainsauthored and published by Krista is licensed under a Creative Commons Attribution-NonCommercial-NoDerivs 3.0 Unported License.

Pretty Chic Theme By: Pretty Darn Cute Design