While He Was Napping

momma gets stuff done

  • Home
  • About
  • Archive
  • Do It Yourself
    • Crafts
      • No Sew
      • Painting
      • Paper Crafts
      • Repurpose Projects
      • Vinyl
      • Washi Tape
      • Kid’s Crafts
      • Fonts
    • Sewing
    • Decorate
      • Home Decor
      • Holiday Decor
    • Celebrate
      • DIY Gifts
      • DIY Your Party
  • Recipes
    • Beverages
    • Appetizer
      • Bread
      • Other Appetizers
    • Snacks
    • Main Dish
      • Meat
        • Chicken
        • Beef
        • Pork
        • Seafood
      • Vegetarian
      • Slow Cooker
      • 30 Minute Meals
    • Dips & Sauces
    • Salads
    • Pasta
    • Soup
    • Dessert
      • Cookies
      • Brownies
      • Cupcakes and Cake
      • Box Mix Recipes
      • Other Sweet Treats
    • Breakfast Food
      • Pancakes
      • Waffles
      • Muffins
      • Other Breakfast Food
  • Family
    • Babies
      • Pregnancy
      • Newborns
      • The 1st Year
    • Toddlers
    • Preschoolers
    • Kindergartners
    • 6-8 Year Olds
    • The Grown Ups
      • Date Night
      • Romantic Gifts
    • Self Care
  • For the Home
    • Cleaning
    • Organizing
    • Emergency Preparedness
  • Travel
    • Travel Tricks & Tips
    • Traveling with Kids
  • Tech & Gadgets
    • Must-Have Apps
    • Techy Home Appliances
    • Gadgets & Electronics
    • Blogging Tips
  • Printables
    • Posters
      • Quote Printables
      • Subway Art Printables
    • Printable Organizers
    • Printable Journals
    • Learning Printables & Worksheets
    • LDS Printables
  • Holidays
    • New Year’s
    • Valentine’s Day
    • St. Patrick’s Day
    • Easter
    • Cinco de Mayo
    • Mother’s Day
    • Father’s Day
    • 4th of July
    • Back to School
    • Halloween
    • Thanksgiving
    • Christmas
    • Holiday & Seasonal Printables

July 4, 2011 by Krista

Guest Post: Fabric Flower Headband by Kensington Cottage

Today Melissa from Kensington Cottage is here.  And she is going to show you how to make some awesome summer time accessories for your gorgeous tresses.  So, here’s Melissa:

Hello! I am Melissa from Kensington Cottage. This is my first guest post, I am so excited! A big thanks to Krista for having me over! For those of you who don’t know me, I am a stay at home mom of 1 (so far) who loves crafting, and junking. I love to spend my weekends going to yard sales and especially to auctions finding all kinds of vintage goodies for next to nothing! I also love to sew, especially for my daughter. My daughter, who I call Little Monkey, loves fancy hair things, which got me started making fabric flowers clips, and now headbands. I recently opened an Etsy store, where I sell fabric flowers, as well as vintage items.  I hope you wills top in and take a peek! Today’s tutorial will be a fabric flower elastic headband. They are very easy to make, and can be as simple or fancy as you want them to be. So, lets get started.

You will need:
Fabric (I prefer to use different types of fabric so you have different textures)
Felt to match your fabric
Sewing machine OR Needle and thread
Scissors
Hot glue gun and glue
1/4-1/2 inch elastic or ready made elastic headband
Optional: pearls, rhinestones, beads, ribbon embelleshments

First, you will want to choose the style of flower you want. There is no wrong style. If you need ideas you can go here or here or here for a complete list of flower tutorials. I chose to use a folded flower like this for the center.

Next, I decided I wanted mine to be a bit whimsical, and airy looking, so I made some flowers out of a sparkly netting. To do this, cut a piece of netting that is one inch wide and about 24 inches long. You will then want to use a gathering stitch, either on your sewing machine or by hand. You want the longest stitch on your machine, if you are doing it by hand, you want your stitches to be about a 1/4 inch long. When you are done, simply pull one string and forced the fabric away from where you are pulling the string. It should look like this.

Next, you want to put a little hot glue along where your thread is, working in 1 inch increments. Be very careful, the glue is very hot, and it will burn you!! You want to roll the netting in on itself until you have a “flower” that looks something like this.

Now, you will want to cut a piece of felt about 4-6 inches long and 3-4 inches wide. This will be the base of your headband. You will attach all the flowers to this, so make sure it is big enough. Place your large flower in the center, or off center if you prefer, there is no wrong way. Then we will start filling in with smaller flowers. Just play with the placement till you like what you see.  Here is what we have now.

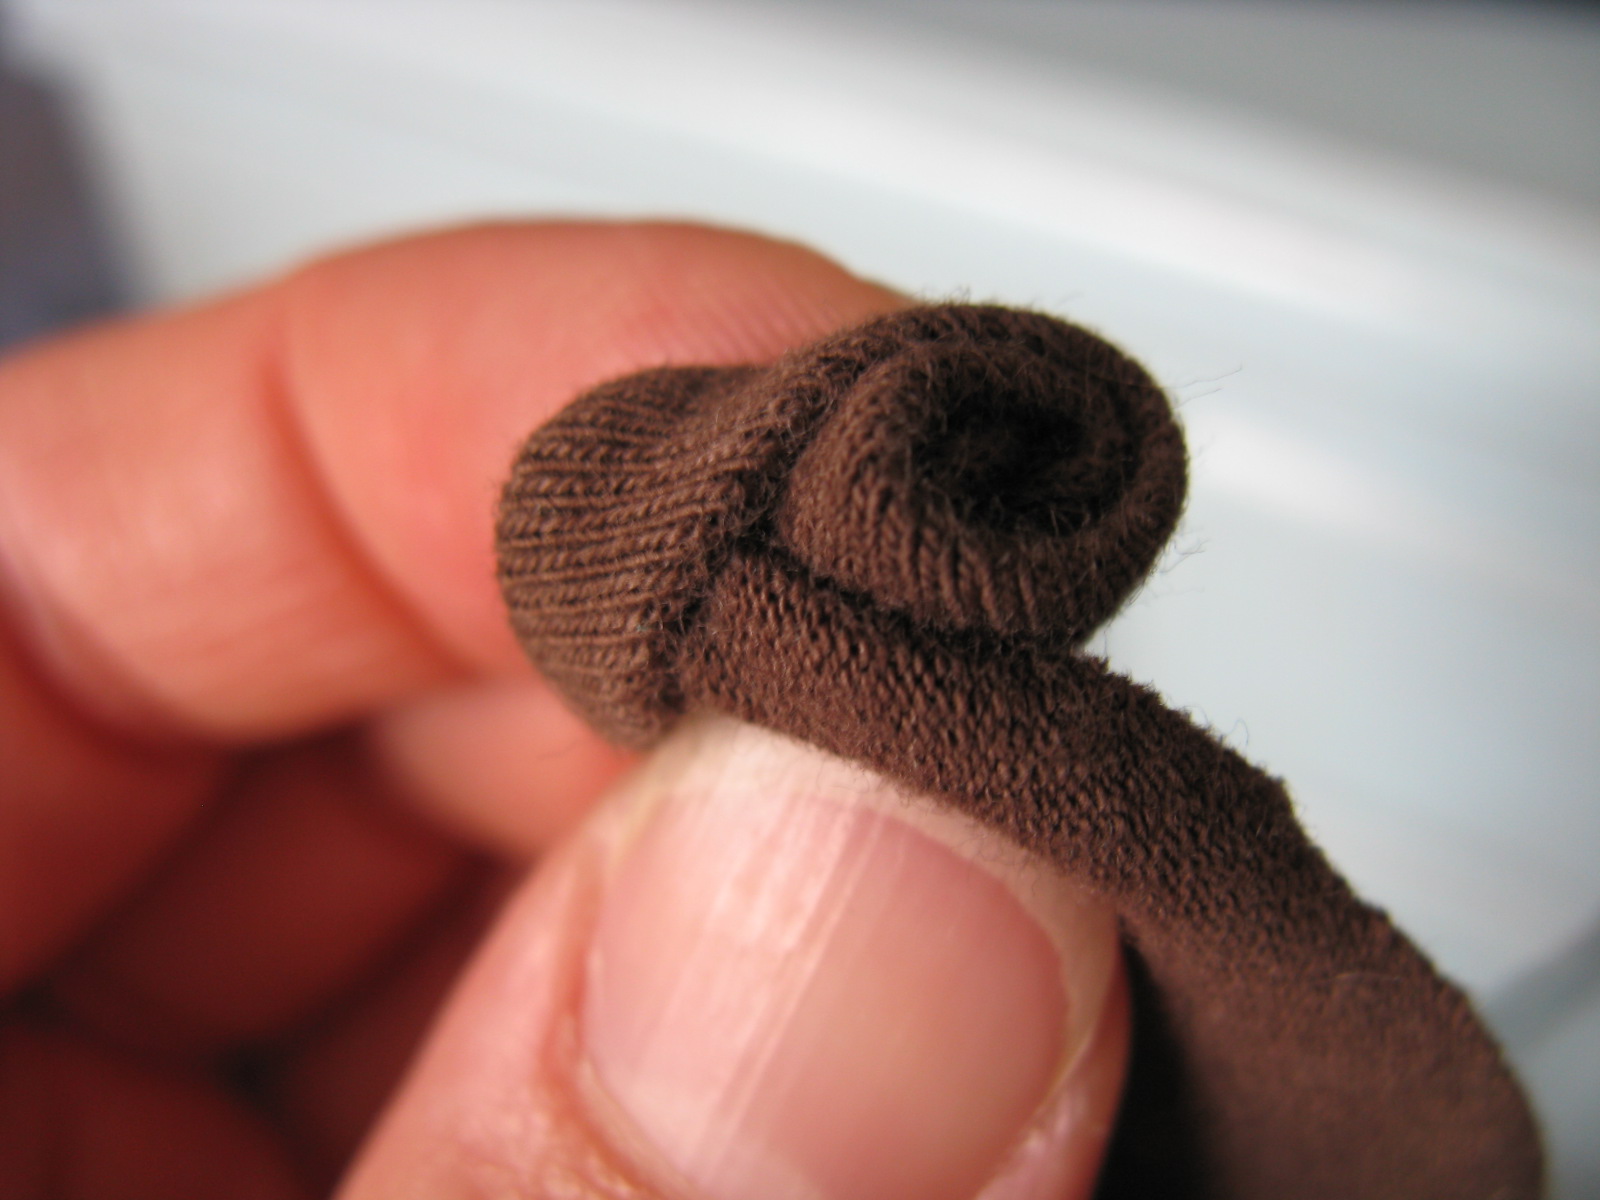
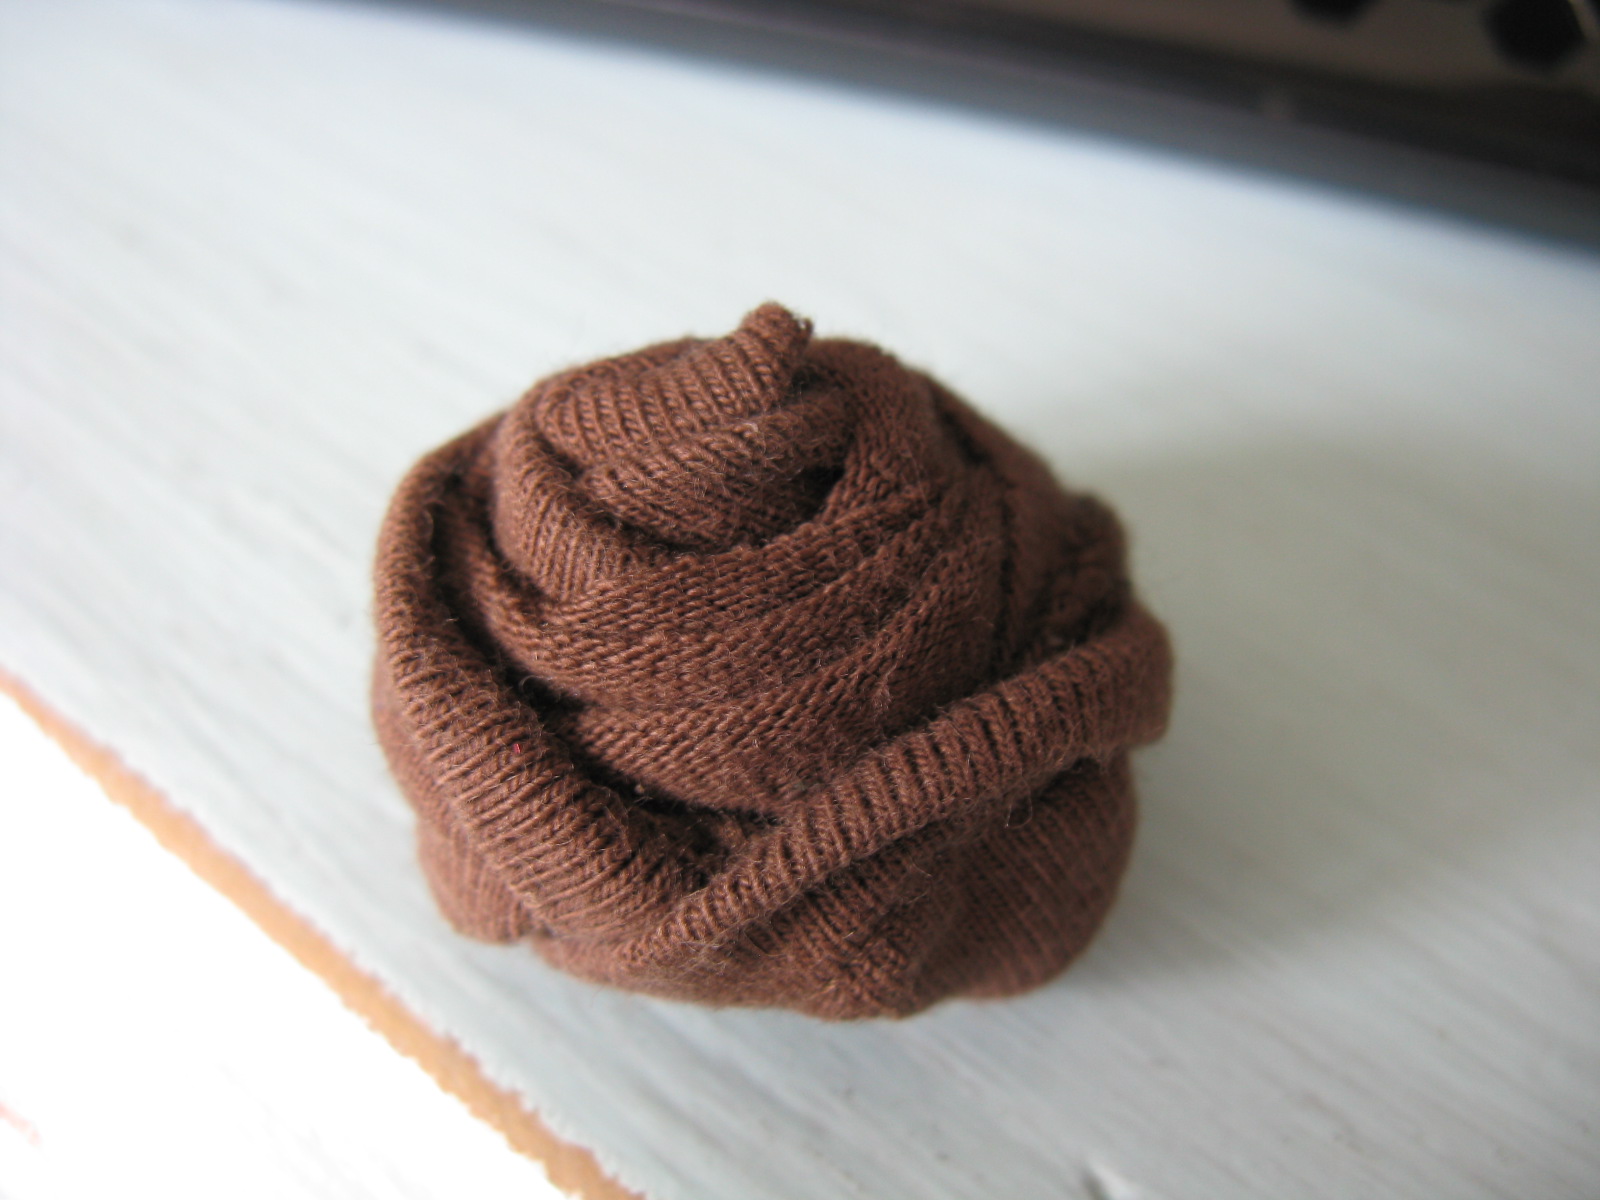
I want a little contrast, so I am going to add some dark brown “rose buds” next. To do this I used an old knit skirt, and cut a 1 inch strip about 18-24 inches long. Start by running a bead of glue along about a 1/2 inch of fabric. Roll the fabric so you have a nice tight center. Then you are going to give the fabric a twist. Like this,

Then add a dot of glue and press the fabric to it.

You will then make another twist, followed by another dot of glue. Continue this until the rose bud gets to the size you want. It should look like this when it is finished.

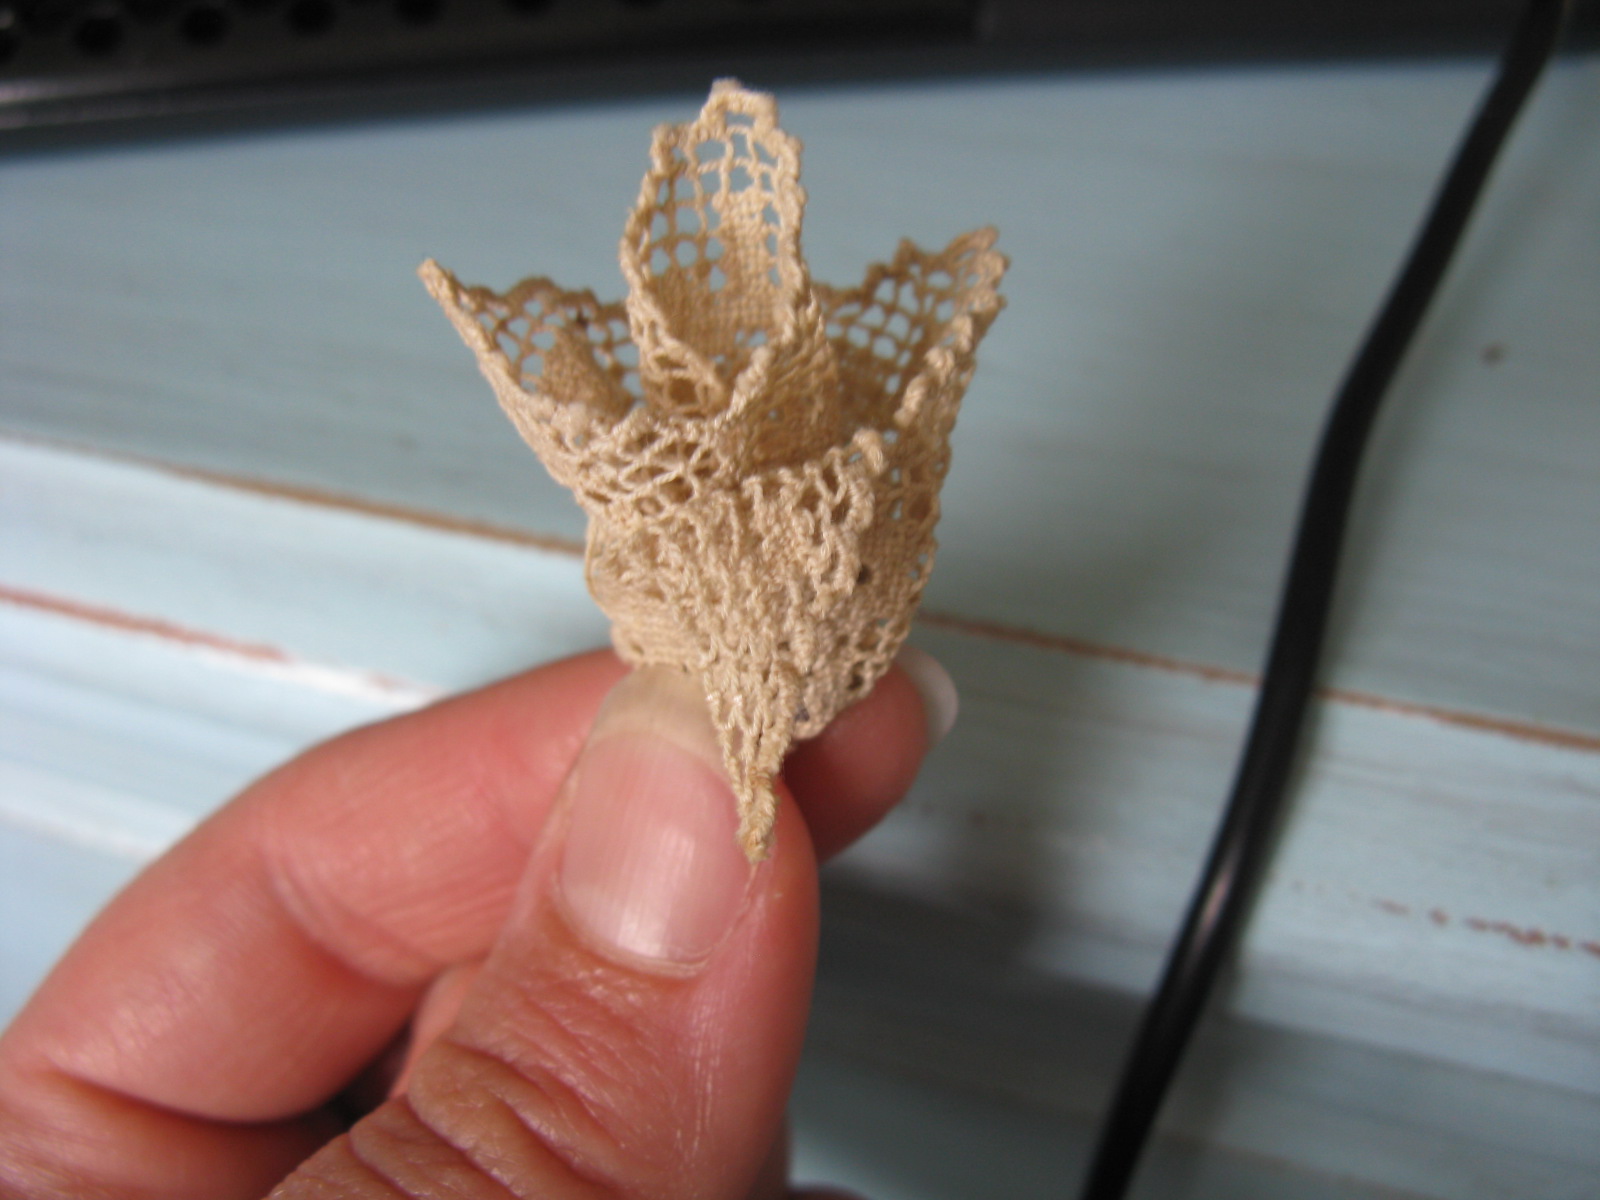
I have a love of all things vintage and antique, so when I spotted a stash of antique lace a month ago, I had to have it. I decided that they would make great flowers, and I was right! So now I am going to use some lace to make a flower. Its very simple, its easiest to use the same method as we did for the netting flowers, however, you may want to loosely gather the lace, depending on the thickness and style, it might look better, you’ll just have to play with it.

NOTE: When working with lace, particularly lace that is crocheted or woven, you will want to use Fray Check on any cut ends to keep them from unraveling. You can find this at your local fabric or craft store. It is also great for holes in clothing! Here is what my lace flower looks like.

My last flower is a satin flower with burnt edges. You can find the tutorial here.

So, now I have it all laid out the way I want it, it looks like this.

Once you have your flowers placed where you want them, its time to glue them down to the large piece of felt. Now you can add any embellishments you want. I love pearls, since they give these a vintage feel, but you can use what you want, just experiment with it till you like it.
Next you want to trim all the excess felt away from your flowers. The back should look like this.

Now you need your elastic, or ready made elastic headband. If you are doing your own, it is very simple. Measure the head of the person who will wear this headband, cut the elastic about a 1/2 inch smaller, unless they like the elastic tight. Next you will need a sewing machine, use a zig zag stitch and bring the two pieces of elastic together like this.

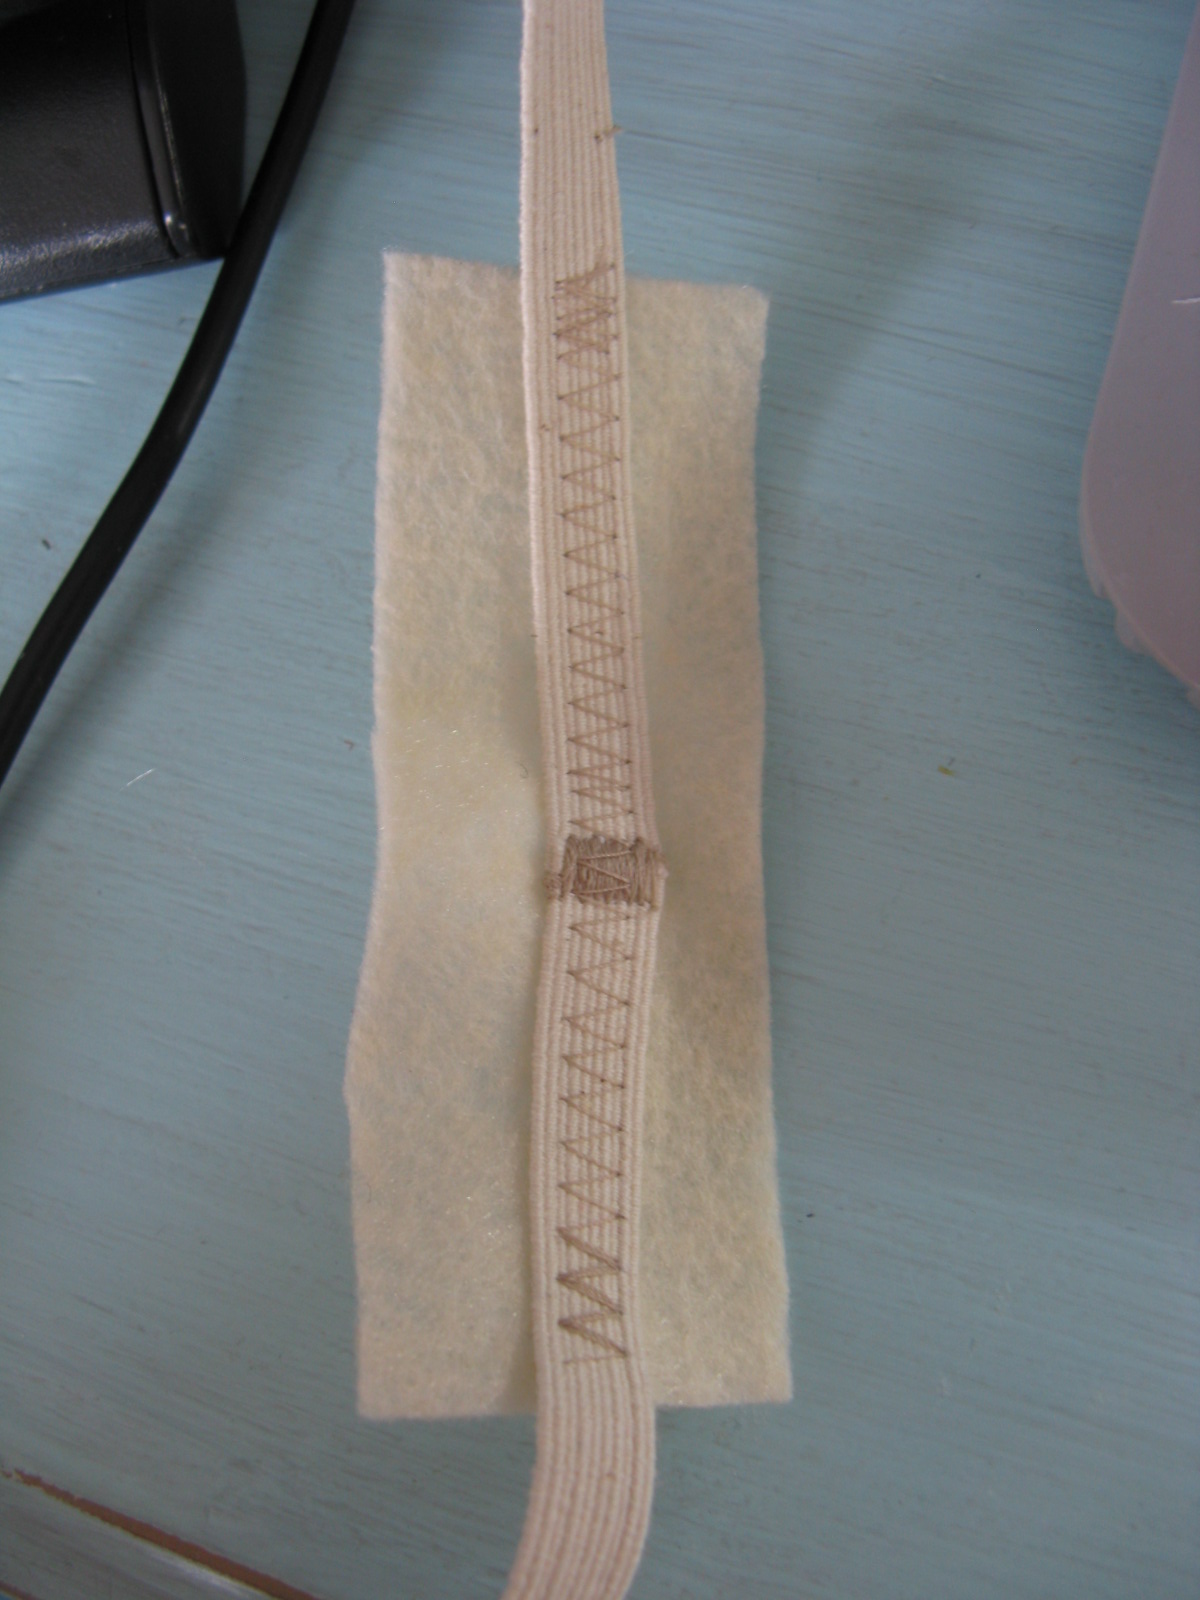
Then stitch across the two, you will want to adjust your stitch length to its widest setting, when you get to the bottom, back stitch to the top, repeat this twice. This will keep the elastic together and won’t come apart.

Now you want to cut a piece of felt, the same color as your backing, about an 1 1/2 inch wide and using a zig zag stitch you want to sew your elastic to that felt piece, this can be done with a sewing machine, or by hand.

Now, run a bead of glue down each side of the felt, not touching the elastic, then attach to the felt on the back of your flowers.

Now you are done! Here is the finished product.

Here are a couple of other types you can do.

Now, if you are not interested in making your own, you can buy the one we made today, as well as a couple of others in my Etsy Store!  I hope you enjoy making these as much as I do! Lets give Krista a big Thank You for letting me join you today!

Melissa

_____________________________________________________

Thanks, Melissa!  What a great tutorial!  Make sure you head over and check out all the other cool stuff at Kensington Cottage!

July 3, 2011 by Krista

Say It On The Wall Winner

The turn out for this giveaway was pretty sad.  But, that just upped the odds for those of you who did enter.  I know I missed the announcement date I said I would announce by… but it was a busy week and I failed to calculate our reunion into the giveaway when I scheduled it.  I’m sorry.  But, I’m here to announce the winner of the $25 giveaway to Say It On The Wall.  And the winner is…

My Photo 
Congratulations!  I’ve sent you an email.  You have 48 hours to claim your prize or another winner will be chosen.  Thanks, everyone, for entering!

July 2, 2011 by Krista

Weekend Wander #37

Sorry this is late going up… but I’m on vacation.  So, no features this week.  Just link it up.  And due to the holiday, this linky will be open until 11:59pm on Tuesday, July 5th,  Have a wonderful holiday weekend!  Be safe!

No commercial sites, please.

July 1, 2011 by Krista

Guest Post: Stuffed Mushrooms by cleverlyinspired

I have a delicious treat for you today.  Actually Tracie at cleverlyinspired has a tasty treat for you… so, I’ll let her take over:

So happy to be here today on While He Was Napping!!! Thanks for having me Krista!

My name is Tracie and I am the author of cleverlyinspired. You will find all sorts of projects, recipes and crafts. I hope you can stop over!!

On Sunday’s I tend to pull everything out of the fridge that need to be “use it or loose it” . It is all an experiment….sometimes it works…others, not so much. This Sunday it was the mushrooms…

So I chopped them all up….

Sauteed in a dash of olive oil. Add in pinches of salt, pepper, red pepper and parsley and garlic powder. Mushrooms tend to absorb alot of the flavor they are given….so add the heat as you like it. We added a touch of cayenne….hence the name Firecracker mushrooms…they had a kick!

Place the mixture in some phyllo cups….if you don’t have them you could probably use baguette toasted…whatever you have really šŸ™‚ Shred some cheese…I had Gouda which is like swiss sort of.

Bake until cheese is melty and bubbly šŸ™‚ About 9 minutes…so yumm!!!

Photobucket

Oh, drool.  I’m definitely going to have to make me some of those.  How yummy!  Thank you for sharing this. Mmmmm.  Ok, go check out Tracie’s other awesome recipes!  

June 30, 2011 by Krista

Guest Post: Strawberry Syrup by Dew This

Today, Delina from Dew This is here.  She has a fantastic, make you drool, perfect for summer recipe.  Berries are some of my absolute favorite things about summer.  So, here’s Delina:
Hi! I am Delina from Dew This. I like to dabble in a bit of everything from sewing to scrapbooking and backing to home decorating! I am excited to be guest posting today and I have something everyone needs for the summer!
Homemade Strawberry Syrup!!
I found this recipe last year, whipped up a batch when strawberries came on sale (as they are starting to do again!!) and then canned it so it would last through the winter! Well, you can just make your own little or big batch and keep in the refrigerator for some yummy ice cream sundaes or pancake/waffle breakfasts, or any thing else you want! I hope you enjoy it!
Strawberry Syrup
Ingredients:
8 cups strawberries (about 3 1/2 lbs.)
7 cups sugar
1/4 cup lemon juice

Directions:
1. If you are going to can your syrup, make sure you get your lids, rings, and jars ready in their boiling water before you start to make the juice:)
2. Wash and cut strawberries into fourths.
3. Puree the strawberries in a food processor (I found myself a little tiny one at Wal-Mart a few years ago for $3. Best thing I ever bought)!
4. Mix strawberries and lemon juice together in saucepan over medium heat. Add sugar and bring to boil for 1 minute.
5. Remove from heat and scrape off any foam that may have acquired on top.
6. Ladle into your hot jars.
7. Wipe rim, put lid on and screw on rings until JUST finger tight. Replace in boiling water.
8. Make sure jars are covered with boiling water. Place lid on top of pot and let boil for 15 min. Remove jars from water bath and let cool for 24 hours. Check lids to make sure sealed. And you are done!!
This yields about 64 oz. of syrup

Have fun canning!!

How yummy does that look!?  Oh my, I’m drooling a little.  Thank you so much for coming to visit today, Delina.  Double thanks for the recipe!  
  • « Previous Page
  • 1
  • …
  • 165
  • 166
  • 167
  • 168
  • 169
  • …
  • 231
  • Next Page »

I'm Krista. Ringleader here on While He Was Napping, wife to my handsome Mr. Right & momma to my THREE energetic boys, Big J (9), Little J (6) & Little N (4). We FINALLY added a beautiful little girl to our family last December.

I’m knee-deep in Tonka trucks & Thomas trains. I survive our crazy days with Vanilla Coke, Sonic slushies, sweet snuggles and little giggles. When I tuck them in tight & kiss them good night, I get a little time to create & just be me.


It all happened
while (s)he was napping
Want More of My Story?

Privacy Policy

While He Was Napping respects your privacy and is committed to keeping any personal information collected on this website confidential. To find out what information we collect and how it is used or what options you have regarding your information, see our full privacy policy here. Creative Commons License The website found at whilehewasnapping.com and all subdomainsauthored and published by Krista is licensed under a Creative Commons Attribution-NonCommercial-NoDerivs 3.0 Unported License.

Pretty Chic Theme By: Pretty Darn Cute Design