While He Was Napping

momma gets stuff done

  • Home
  • About
  • Archive
  • Do It Yourself
    • Crafts
      • No Sew
      • Painting
      • Paper Crafts
      • Repurpose Projects
      • Vinyl
      • Washi Tape
      • Kid’s Crafts
      • Fonts
    • Sewing
    • Decorate
      • Home Decor
      • Holiday Decor
    • Celebrate
      • DIY Gifts
      • DIY Your Party
  • Recipes
    • Beverages
    • Appetizer
      • Bread
      • Other Appetizers
    • Snacks
    • Main Dish
      • Meat
        • Chicken
        • Beef
        • Pork
        • Seafood
      • Vegetarian
      • Slow Cooker
      • 30 Minute Meals
    • Dips & Sauces
    • Salads
    • Pasta
    • Soup
    • Dessert
      • Cookies
      • Brownies
      • Cupcakes and Cake
      • Box Mix Recipes
      • Other Sweet Treats
    • Breakfast Food
      • Pancakes
      • Waffles
      • Muffins
      • Other Breakfast Food
  • Family
    • Babies
      • Pregnancy
      • Newborns
      • The 1st Year
    • Toddlers
    • Preschoolers
    • Kindergartners
    • 6-8 Year Olds
    • The Grown Ups
      • Date Night
      • Romantic Gifts
    • Self Care
  • For the Home
    • Cleaning
    • Organizing
    • Emergency Preparedness
  • Travel
    • Travel Tricks & Tips
    • Traveling with Kids
  • Tech & Gadgets
    • Must-Have Apps
    • Techy Home Appliances
    • Gadgets & Electronics
    • Blogging Tips
  • Printables
    • Posters
      • Quote Printables
      • Subway Art Printables
    • Printable Organizers
    • Printable Journals
    • Learning Printables & Worksheets
    • LDS Printables
  • Holidays
    • New Year’s
    • Valentine’s Day
    • St. Patrick’s Day
    • Easter
    • Cinco de Mayo
    • Mother’s Day
    • Father’s Day
    • 4th of July
    • Back to School
    • Halloween
    • Thanksgiving
    • Christmas
    • Holiday & Seasonal Printables

May 23, 2011 by Krista

Blogging: Watermarking Your Photos

Unfortunately, this has become a necessity.  For the most part, people are good and honest.  But they do, and can, make mistakes.  And then there are people who just don’t care.  Whatever the case may be, it’s important to protect your images.  This is easy to do with a watermark.  There are a couple ways to do this, all just as good as the last.

You can use Paint on your Windows PC.  Open your image and use the text tool to insert a watermark.  This is probably the least user friendly method.  It will work though.  And I recommend it on images that have white backgrounds only, as your watermark will have a white background.

Or use Photoshop.  If you open a new file with a ‘transparent’ background and then save it as a .png file, you can use this watermark over and over.  Easy and reusable… if you have access to Photoshop.  However, Photoshop isn’t on all my computers (like my laptop, where I compose most of my posts) so it’s kind of a pain to watermark my images on the desktop and then insert them to my post on my laptop (where Windows Live Writer is installed).

If you use Windows Live Writer, you can add watermarks to your images as you compose your post.  This is primarily how I watermark my images.  There aren’t a ton of options with this watermark tool, such as limited placement of the watermark and limited sizing, but you can use any font on your computer.  You can download Windows Live Writer for XP HERE.  Windows Live Writer downloads for Vista and Windows 7 can be found HERE.

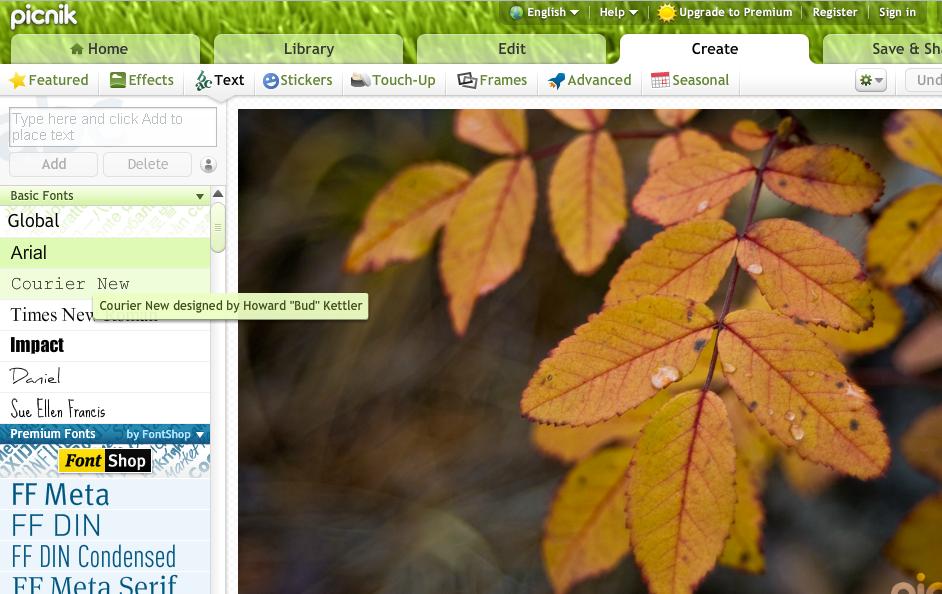
You can also upload your photos to picnik.com.  This is now built into Blogger.  After you upload your photo, click on the “Create” tab and then the “Text” option beneath that.  There are several fonts to choose from, even more if you purchase a premium membership.  You can drag and drop the text anywhere you want.  You can resize them.  And it won’t take any space on your hard drive, like software does.  This is what Picnik looks like… and no, that’s not my photo.

~Krista

May 20, 2011 by Krista

Weekend Wander #31

Welcome, welcome!  Now, assuming Blogger doesn’t keel over and die again, let’s party!  Real quick, here’s a few great links from last week that you should really check out.

How adorable is this dress!?  Ahh!  Too cute.  Blooms and Bugs will show you how to make one.
Lauren at My Wonderfully Made shares these awesome Anthropologie Knock Offs!  ADORABLE!
And the Belle of the Ball…  Kelly at Make It Sparkly Mama! with her tute on DIY blended coffee!
Grab your featured button, girls!  Awesome stuff!  Thanks to everyone who linked up!  Now… Let’s get this party started!  Link up whatever you want and link as many times as you want, as long as it follows the two rules:  Family Friendly Links only!  And no commercial sites, please.  And… GO!  

May 18, 2011 by Krista

Six Pack for Two

Hey Everyone!  I’m guest posting today over at The 2010’s Housewife.

She saw my Daddy’s Six Pack post and asked if I would want to make one with a sweetheart’s theme.  I’d had the thought of doing that and Tracy’s request gave me an excuse to get right on that.  So, if you want a fun date night kit that’s easy to put together, check out Tracy’s blog at The 2010’s Housewife for the tutorial.


Krista

May 17, 2011 by Krista

Sun-Kissed Goddess

It’s finally being consistently warm here.  (Ha, at least it was when I wrote this up…)  YaHOO!  Away go the sweaters, boots, scarves, gloves and hats!  Out come the capris, tee-shirts, flip flops and sunless tanner!  Yes, sunless tanner.  Let me explain…

One of my very favorite things about summer is the sunshine and being able to play outside.  I love camping, hiking (like nature trail hiking, not like climbing 1000 feet in elevation kind of hiking), and playing in the river, lake, ocean, ect.  But that’s A LOT of time in the sun.  I love the sun, but too much of a good thing… you know the rest.  Skin cancer… definitely not a good thing.

However, I also don’t particularly love being the reason people are blinded at the beach.  Let me tell you, I am the whitest white girl out there.  At least from my hips down – I am like sun-repellant, reflective surface white.  The concept of snow blindness… so bright it hurts to have the sun bounce off of it into your eyes… can be applied to my legs.  I don’t seem to have an issue getting a tan above my hips, though.  Weird, I know.

So… in order to balance out my skin tone a little, and save the sight of beach-goers everywhere, I use sunless tanner on my legs.  Why?  Besides the reasons mentioned above, it’s easy, it’s safer than laying in the sun for hours and hours (who has that kind of time anyway?!?) and it only take a few minutes a day.

Tanned skin is something most everyone wants.  Someone, somewhere decided that dark skin is beautiful, which is awesome is you are naturally dark-skinned.  All skin tones are beautiful, but I can relate to “not having the tan I wish I did.”  Just walk the seasonal aisles at any retail store like Target or even the grocery store.  There are cartfuls of products dedicated to tanning.

Sunless tanning is easy and quick.  Never tried it?  Well, here’s the how:
1)  You will need a sunless tanner.  Products come in a variety of forms: lotions and sprays are the most common.  Brands are innumerable.  It is available almost anywhere.  It’s not the cheapest stuff, but one bottle will probably last most (if not all) of the season.  Disclaimer: Sunless tanners have a distinct scent.  The scent isn’t noticeable after the tanner dries, but some products do a better job of masking it than others.  If that’s a concern, smell the product before you purchase it.  I personally use lotion, as it’s a little cheaper.  The spray is a little more convenient for spots like the back of your legs.

2)  Getting your tan is the hardest part.  DON’T RUSH IT!  This is easiest to do nude.  Or in your undies if nude is too much for you.  It’s best to start with a clean canvas… like after you get out of the shower.  Also, you will get better results if you shave the day before.  Apply your tanner and let it dry for 10-15 minutes.  Anything the tanner gets on will be stained, thus why nude is the safest bet.  After it’s good and dry you’re free to get dressed.  I do my tanner right after I get out of the shower.  By the time I’ve brushed through my hair, brushed my teeth, and possibly applied make-up I’m dry and don’t have to worry about staining my clothes. 

When applying, use thin coats of your tanner and let it dry completely between coats.  Only do one, or maybe two, coats to start with then wait 4-6 hours for your skin to darken before you do any more.  Sometimes it can take a day or two to reach the shade you want.  WARNING:  The thicker you apply the tanner, the higher your chance of looking orange!  Go light and let your tan develop before you add more.  And then STOP!  Don’t keep adding, three or four coats should be the max!  Did you see the Friends episode where Ross gets a spray tan?  STOP.  Again, too much of a good thing…

3)  If you used a lotion, make sure you WASH your hands afterwards!  Otherwise your palms will be stained… I’ve had this happen before, it’s soo not hot.  Another solution:  wear rubber gloves when applying tanner.  Afterward, lay them out to dry and you can use them again.  If you’re hands do get stained… lie and say you were making pots out of clay and the clay it stained your hands.  People will believe you.  Promise.  Unless they actually make pottery.  =]

Other things you should know include:  You will have to reapply tanner every few days to maintain your tan.  In between, use a good moisturizer.  Sunless tanners are very drying, so make sure you keep your skin hydrated.  Hydrated skin will hold the color longer.  Drinking water will also help.  Shaving and bathing will exfoliate some of your tan, which is why reapplication is necessary.

Happy tanning!


Krista

Do you use sunless tanner?  Any helpful hints or tips?


May 17, 2011 by Krista

Graduation Subway Art Printable & Card

Update: You can find the 2013 version in my Etsy Shop.
 For the 2012 version, visit this post.

My little sister just went to Prom this last weekend…  awww.  Good times, right?!  Eh, not so much.  I went to my Junior Prom and decided I never needed to go back to Prom ever again.  It wasn’t a horrible experience or anything, it didn’t scar me for the rest of my life, but it isn’t a night I look back on and think, “That was a great night!”
Now… Graduation day… that was a great day!  I was so ready to get out of high school… and college.  =]  Some days I miss school… and then Finals roll around and I don’t miss it so much.  So, for those of you prepping for, trying to survive or celebrating your survival of Finals… this is dedicated to you.
 http://www.4shared.com/photo/tNcLrOS7/Grad_Subway.html

http://www.4shared.com/photo/EQrvcS43/Grad_Card.html

  For those of you giving to grads this year… check out this card.  It could save you $1.99 at the local card aisle in your store of choice.  Download, print and sign.  TA-DA!  Envelop and money for your grad not included.  =]
Follow the links to be taken to their 4shared download pages.  Enjoy!

Krista

  • « Previous Page
  • 1
  • …
  • 173
  • 174
  • 175
  • 176
  • 177
  • …
  • 231
  • Next Page »

I'm Krista. Ringleader here on While He Was Napping, wife to my handsome Mr. Right & momma to my THREE energetic boys, Big J (9), Little J (6) & Little N (4). We FINALLY added a beautiful little girl to our family last December.

I’m knee-deep in Tonka trucks & Thomas trains. I survive our crazy days with Vanilla Coke, Sonic slushies, sweet snuggles and little giggles. When I tuck them in tight & kiss them good night, I get a little time to create & just be me.


It all happened
while (s)he was napping
Want More of My Story?

Privacy Policy

While He Was Napping respects your privacy and is committed to keeping any personal information collected on this website confidential. To find out what information we collect and how it is used or what options you have regarding your information, see our full privacy policy here. Creative Commons License The website found at whilehewasnapping.com and all subdomainsauthored and published by Krista is licensed under a Creative Commons Attribution-NonCommercial-NoDerivs 3.0 Unported License.

Pretty Chic Theme By: Pretty Darn Cute Design