While He Was Napping

momma gets stuff done

  • Home
  • About
  • Archive
  • Do It Yourself
    • Crafts
      • No Sew
      • Painting
      • Paper Crafts
      • Repurpose Projects
      • Vinyl
      • Washi Tape
      • Kid’s Crafts
      • Fonts
    • Sewing
    • Decorate
      • Home Decor
      • Holiday Decor
    • Celebrate
      • DIY Gifts
      • DIY Your Party
  • Recipes
    • Beverages
    • Appetizer
      • Bread
      • Other Appetizers
    • Snacks
    • Main Dish
      • Meat
        • Chicken
        • Beef
        • Pork
        • Seafood
      • Vegetarian
      • Slow Cooker
      • 30 Minute Meals
    • Dips & Sauces
    • Salads
    • Pasta
    • Soup
    • Dessert
      • Cookies
      • Brownies
      • Cupcakes and Cake
      • Box Mix Recipes
      • Other Sweet Treats
    • Breakfast Food
      • Pancakes
      • Waffles
      • Muffins
      • Other Breakfast Food
  • Family
    • Babies
      • Pregnancy
      • Newborns
      • The 1st Year
    • Toddlers
    • Preschoolers
    • Kindergartners
    • 6-8 Year Olds
    • The Grown Ups
      • Date Night
      • Romantic Gifts
    • Self Care
  • For the Home
    • Cleaning
    • Organizing
    • Emergency Preparedness
  • Travel
    • Travel Tricks & Tips
    • Traveling with Kids
  • Tech & Gadgets
    • Must-Have Apps
    • Techy Home Appliances
    • Gadgets & Electronics
    • Blogging Tips
  • Printables
    • Posters
      • Quote Printables
      • Subway Art Printables
    • Printable Organizers
    • Printable Journals
    • Learning Printables & Worksheets
    • LDS Printables
  • Holidays
    • New Year’s
    • Valentine’s Day
    • St. Patrick’s Day
    • Easter
    • Cinco de Mayo
    • Mother’s Day
    • Father’s Day
    • 4th of July
    • Back to School
    • Halloween
    • Thanksgiving
    • Christmas
    • Holiday & Seasonal Printables

November 21, 2013 by Krista

{Pneumatic Addict Furniture} DIY Headboard Bench

Today, we’ve got another contributor here to share some awesome ideas with you.  Elisha from Pneumatic Addict Furniture will show you that power tools aren’t just for boys!  She’s got a super cute project for you… take it away, Elisha!

______________________________________
Hi Everyone! I’m Elisha from Pneumatic Addict Furniture. Krista is letting me drop by today to share some wood-working tips.
This is me officially jumping on the band wagon. I am gearing up for the Vintage Charm Holiday Boutique and I had a request for a headboard bench. When I happened upon this complete, solid-wood, twin bed (rails not in photo) at a garage sale for $10, I knew it was time for me to make a bench.

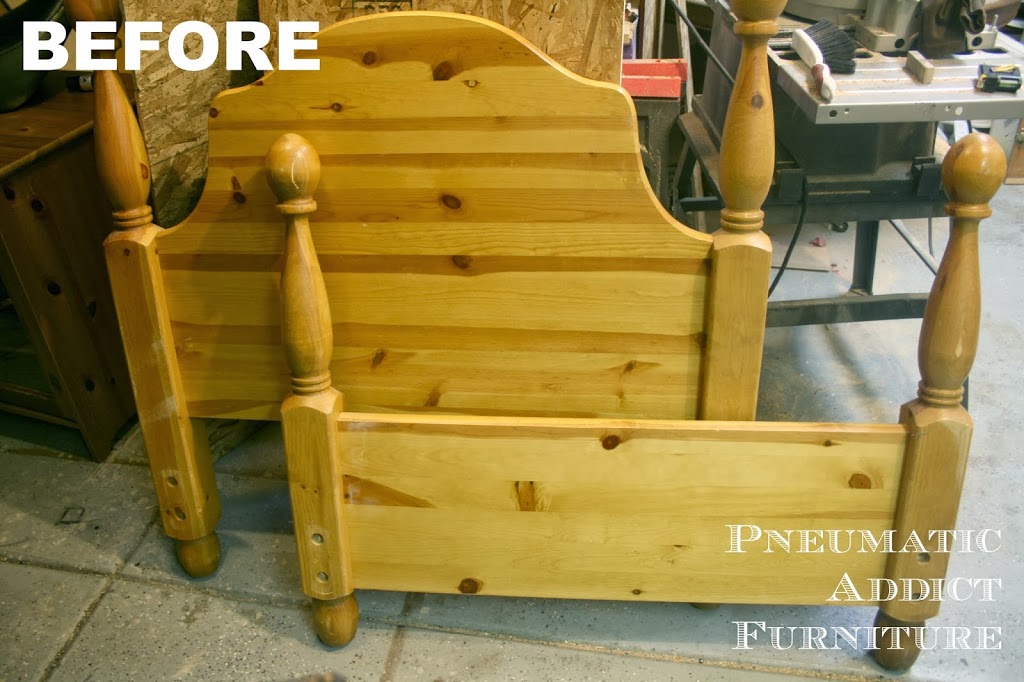
Depending on the bed you start with, you may or may not need to fill holes, remove hardware, etc. This bed was assembled with large lag bolts inside even larger holes. I could have left them alone, but that’s not how I do things.

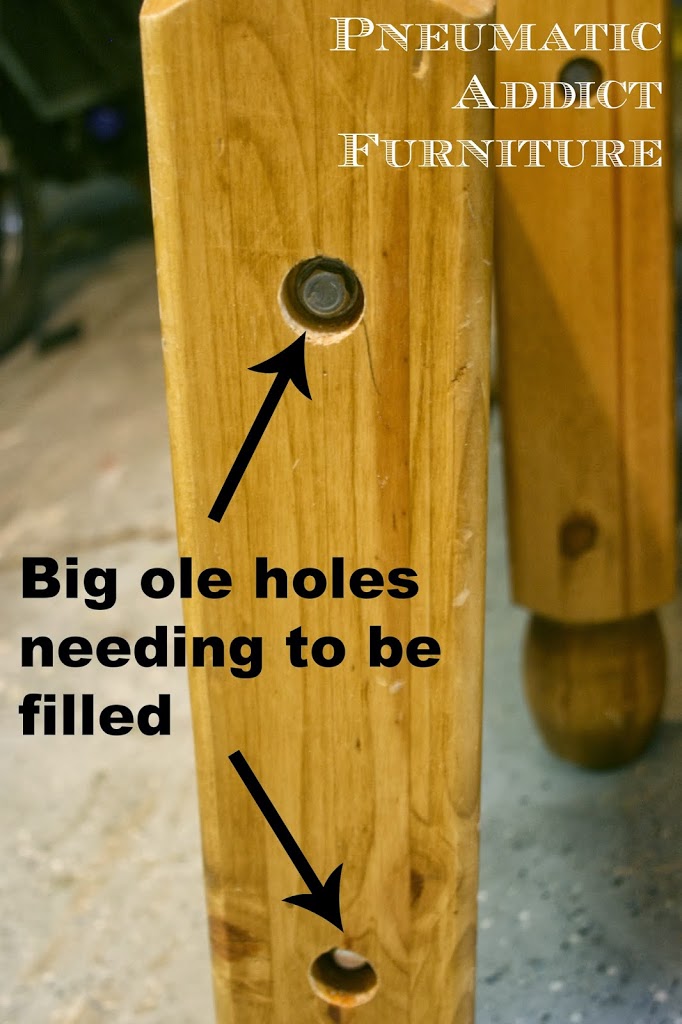
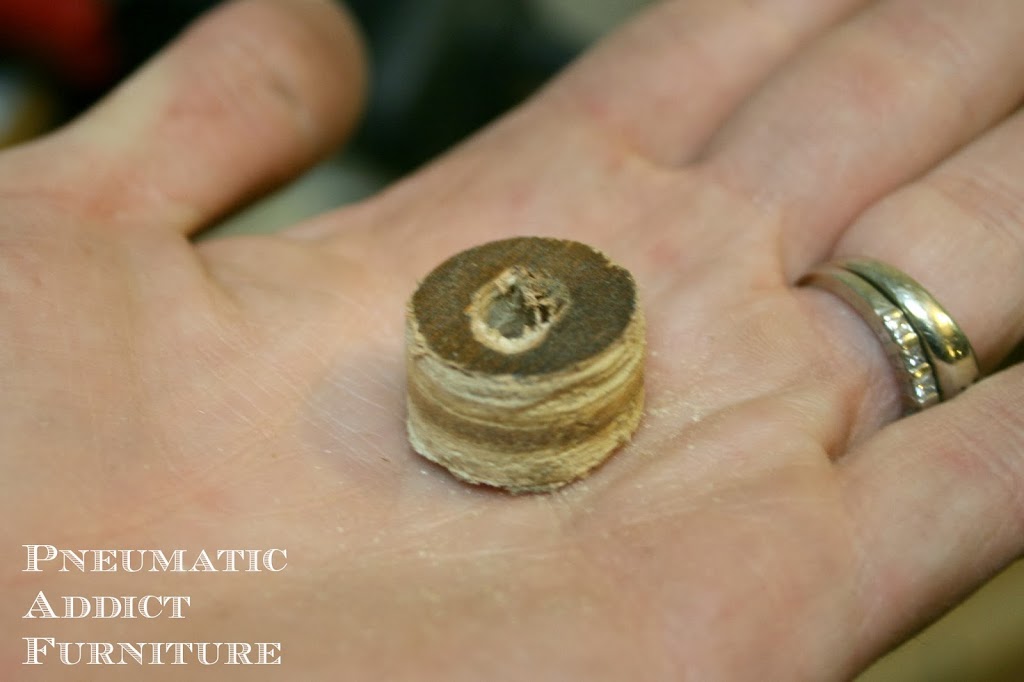
You can buy pre-made hole plugs, but it was 9 pm when I started this project. Plus, plugs this size are hard to find in the store. Its easy to DIY some yourself. I busted out my husband’s “hole hog” set and cut 16 plugs from a piece of scrap plywood.

Once they were glued in place, I filled any empty space with Bondo. After letting it dry over night, it was easy to sand the excess smooth. I knew I was planning on painting this bench, so the Bondo would be covered. Had I planned on staining it, I would have chosen stainable wood filler instead.

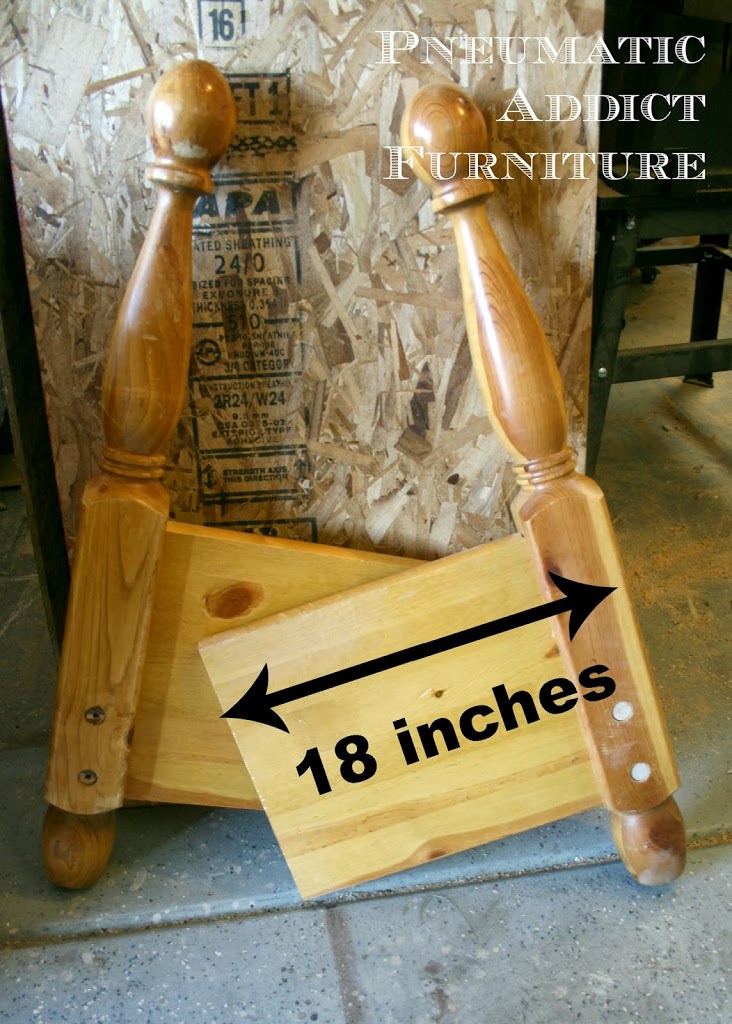
With the holes filled, it was time to butcher the footboard. This is one of those areas I haven’t heard talked about much in regards to building a bench. How wide should I cut each side? Had I simply cut this footboard in two, it would have been around 21 inches deep. Not terrible if you had pillows, but deeper than a typical chair. I decided a slightly shallower bench would look better and cut the footboard into 2, 18 inch wide pieces, using a circular saw.

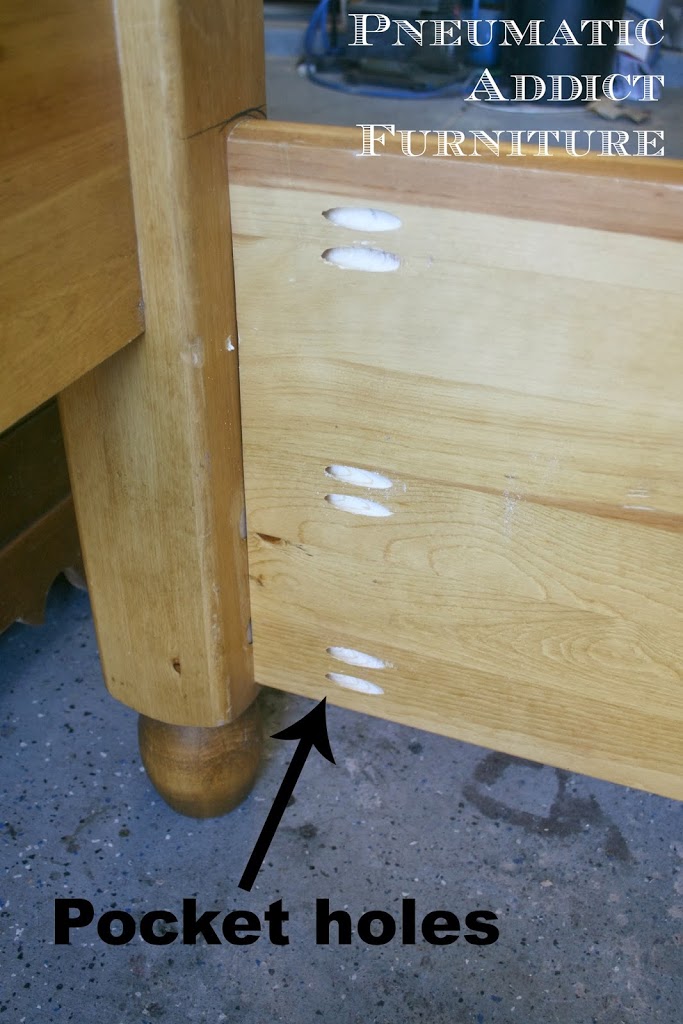
Then, using a pocket hole jig, I created 6 pocket holes on the inside of the cut edge. At this point, its nice to have a “helper” to hold the footboard in place. If not, try to prop it up with blocks, clamps, etc. I made sure the side was square with the back leg and joined the two with 3 inch wood screws and wood glue.

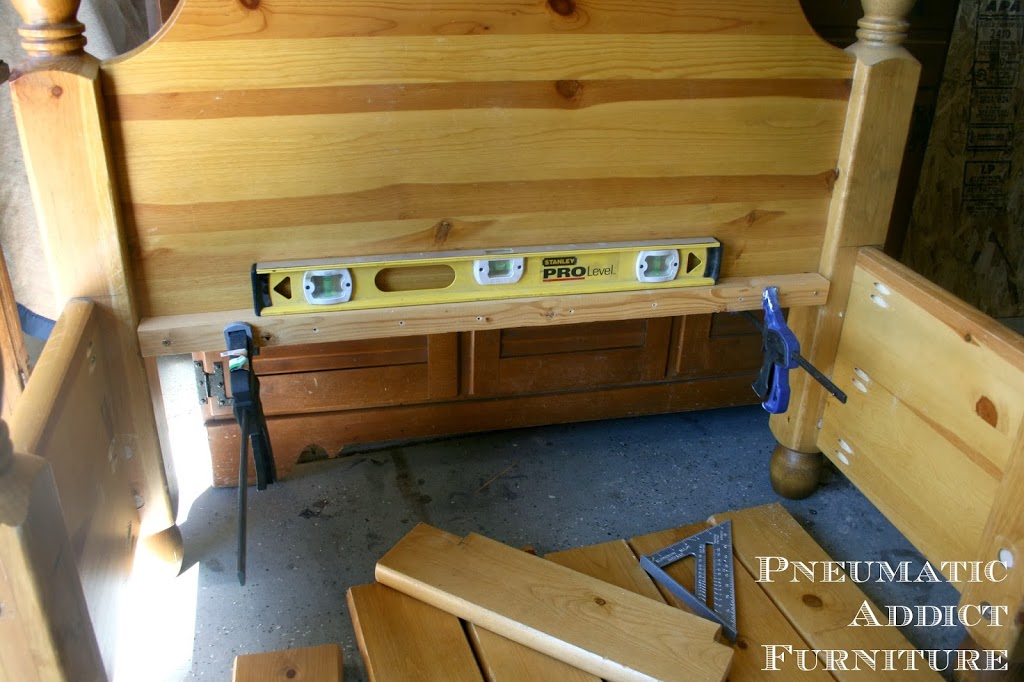
Next, I needed rails to attach my seat to. The plan was to use the original side rails to make the slats. Standard seat height is approximately 18 inches high. Knowing that the slats were 1 1/2 inches thick, I attached a scrap piece of 2 x 2 lumber at 16 1/2 inches from the ground, using more glue, 3 inch wood screws and making sure it was level

For the front rail, I found a scrap piece of 2 x 6 lumber and cut it the same length as the headboard’s width, minus the legs. You don’t have to use something so beefy, but I wanted to match the thickness of the the original wood. I drilled 4 pocket holes on each end of the rail. Making sure to flip the pocket holes to the inside where they won’t be seen, I joined the rail with the two front legs, using glue and 3 inch wood screws.

What’s up with the bungee cords? Well, this too would be a nice time to have a helper, pulling the front legs close together while you attach the rail. If no such helper exists, just use a strong bungee or tie down to bring them in.

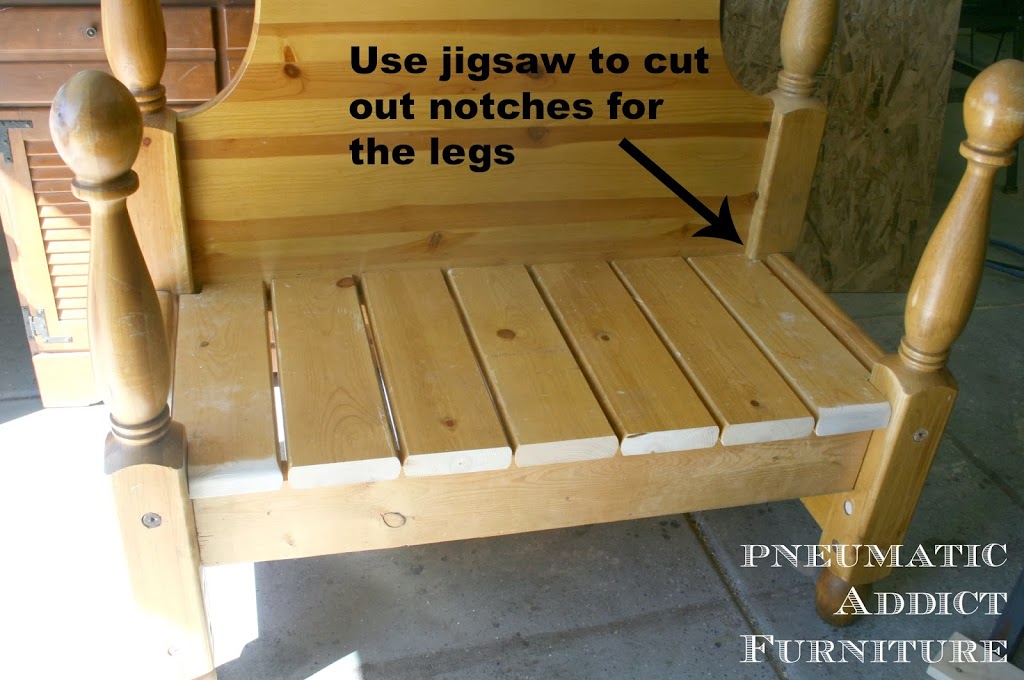
Time to add the slats. I used the original side rails that came with the bed for donor wood, but you could buy new wood. Measure how many you will need to fill up the width and cut them to length. Measuring from the headboard, my slats were 17 inches long. In order to run them the full width of the bench, I had to notch the corners of the outside slats. That involved using my arch nemesis, the jigsaw.

*Keep in mind, if you plan on using this bench outside, you will need to leave spaces between the slats for drainage.

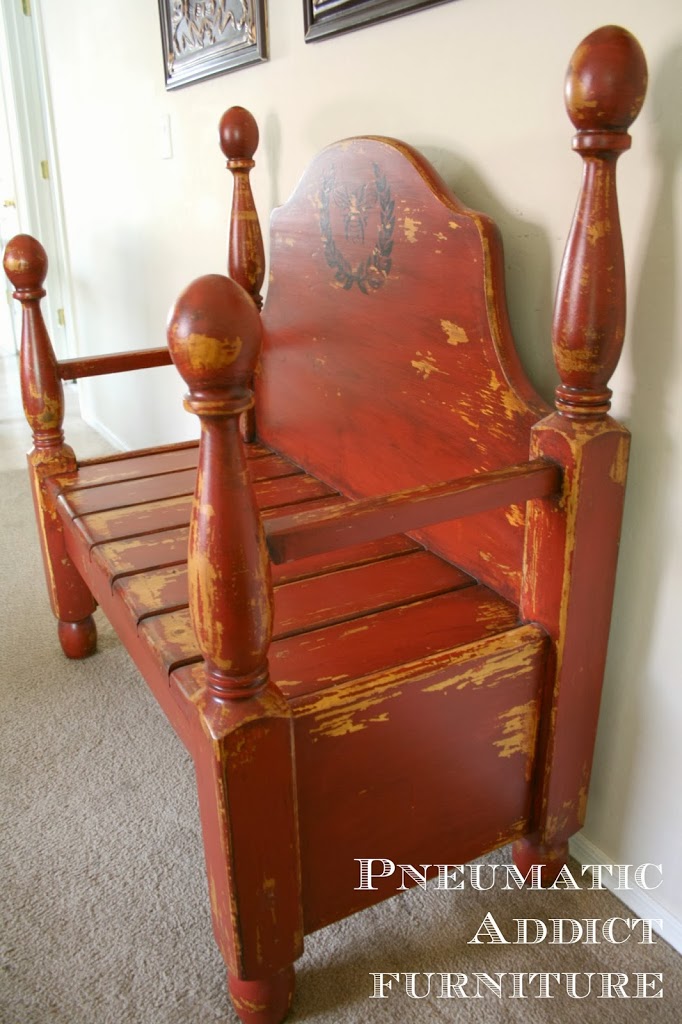
At this point, I could have called the bench done. I’ve seen benches like this, but I thought it was missing something to truly make it a bench and not just a Frankenstein bed…. Armrests!

I sat on the bench, bent my arm, and marked the height on the back post. Then, I dug up some leftover pieces of 2 x 2 lumber, and cut them to fit between the posts. The front was a bit more challenging because it was curved at that point. I think that’s why so many ladies chose not to add armrests. They are scared of the curved posts. To account for the curve, you can do what I did and shape a groove using an electric sander. It wasn’t too difficult, at it doesn’t have to be perfect. As long as you have the general shape, Bondo or wood filler will make up the difference.

I attached them using, once again, pocket holes, glue and screws.

At that point, the construction was done! Time to make it pretty.
Without sanding or priming, I brushed on two coats of Salem Red milk paint. Once dry, I painted a bee and laurel wreath I designed using PicMonkey, in the center of the arch. I originally tried the old fashioned pencil transfer trick, but had little success and ended up free handing a good portion of it.

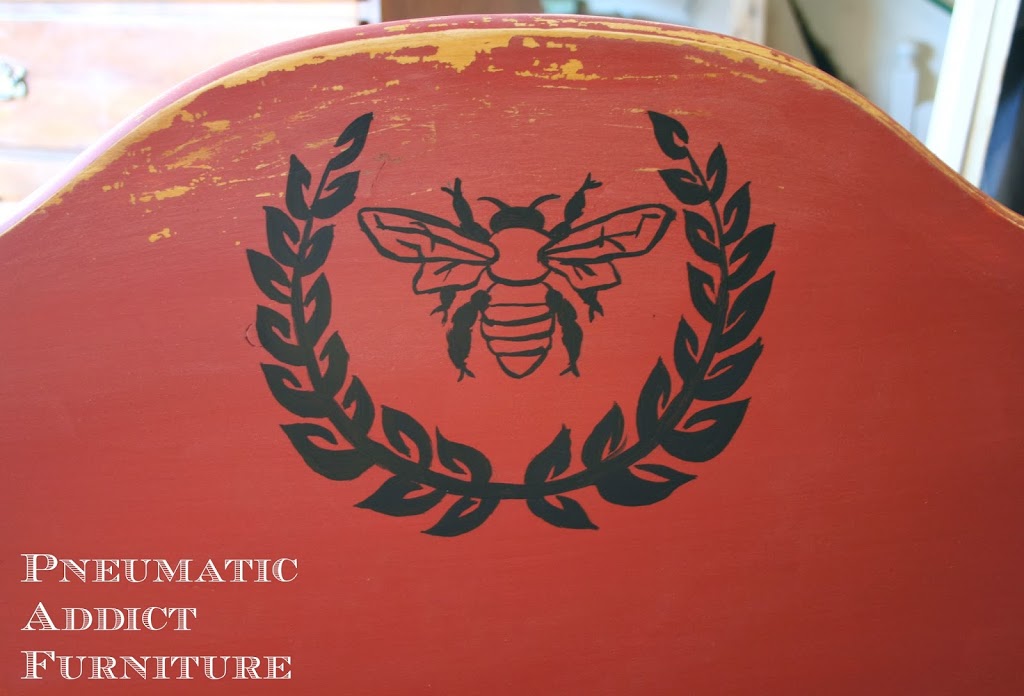
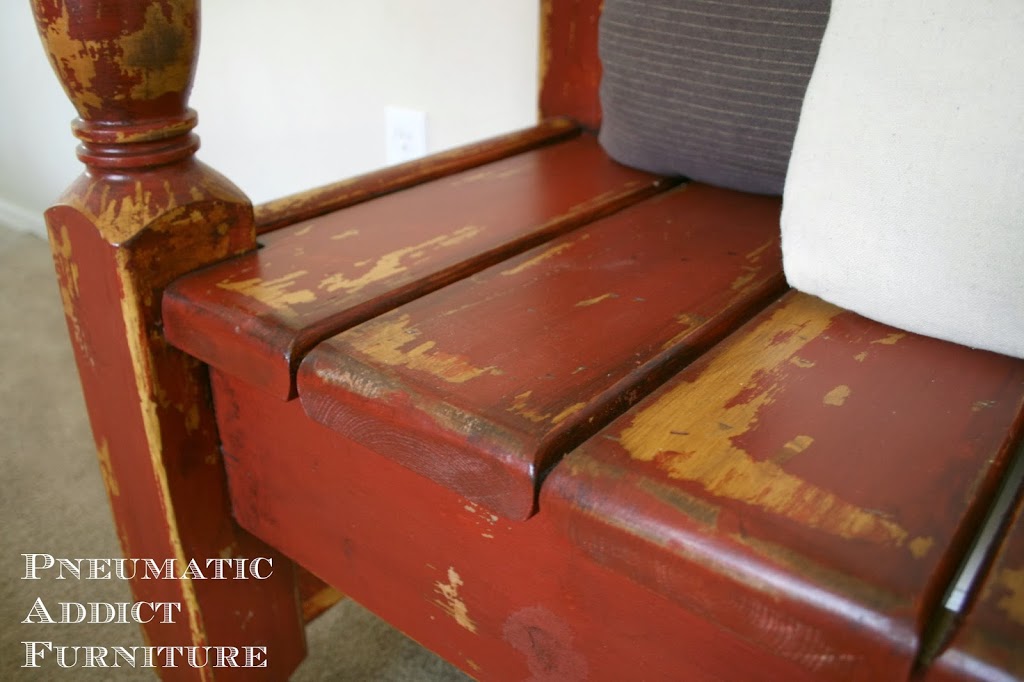
The milk paint chipped all by itself (just like I wanted), but the bee design took a scraper and some sand paper to distress. I then glazed the entire thing with a custom mixed, dark brown glaze and to finish it off, I sealed it with 3 coats of spar urethane in satin.

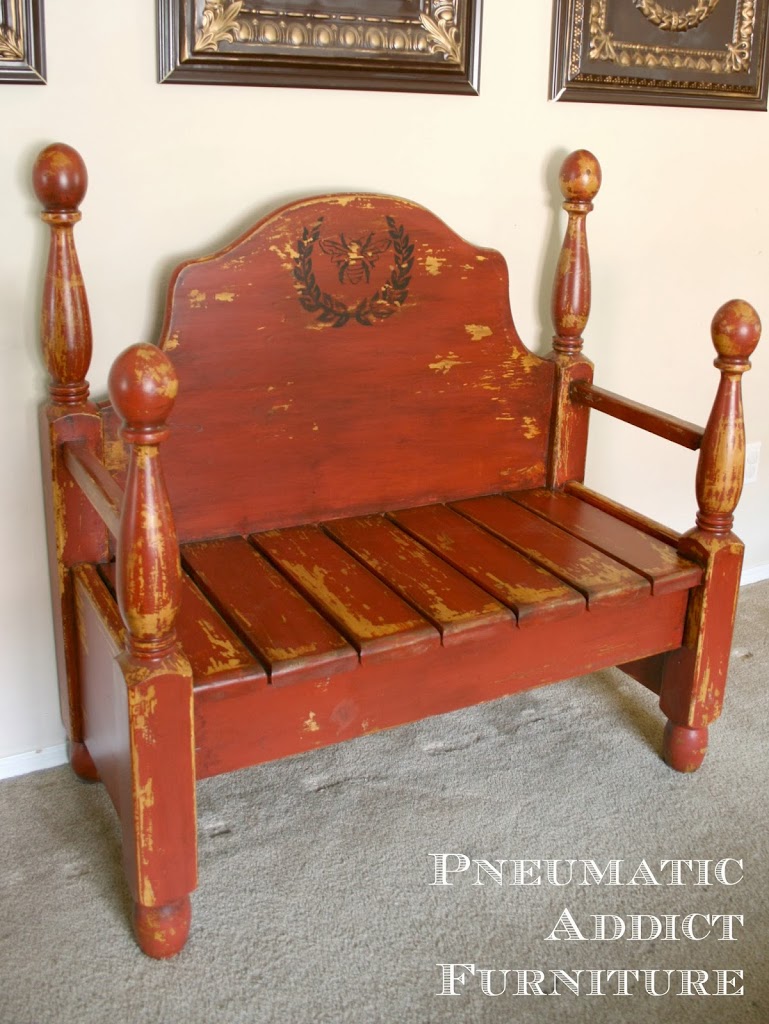
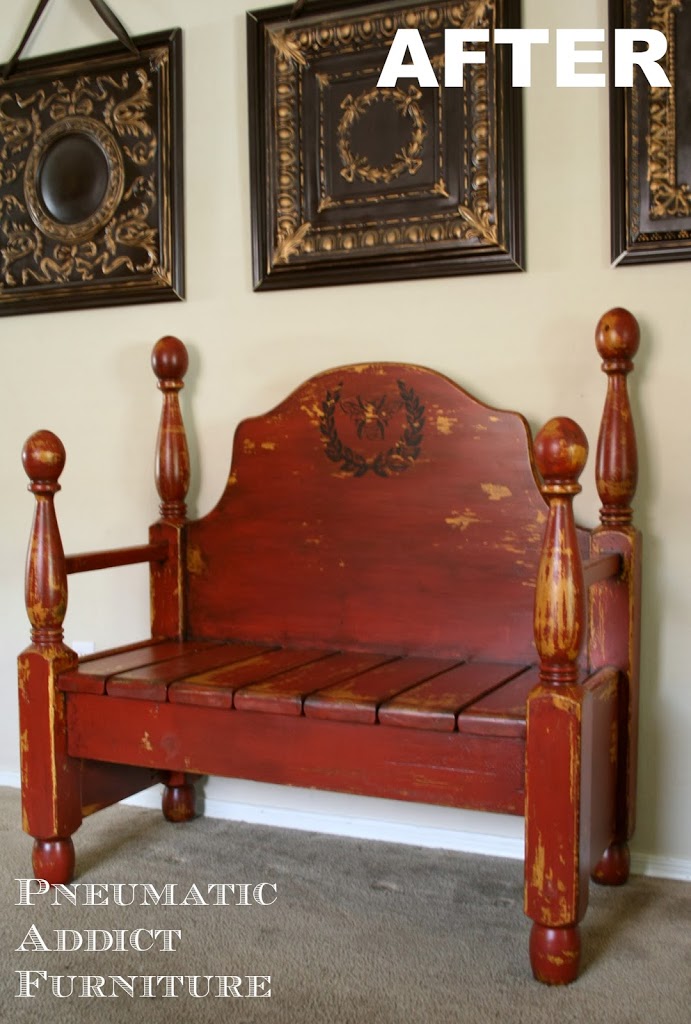
Here’s the final product!

I’m so glad I added the armrests. Not only does it look better, it is so much more comfortable to sit in.

Gotta love milk paint and its chippyness!

Spar urethane is an extremely durable, water-resistant finish. I chose to seal the bench with it so it could be used indoors or out.
Well, she soon will be packed up to take to the boutique with me. What do you think? Are you ready to try a headboard bench?

______________________________
That’s just adorable!  I love it.  Makes me want to go hit up the thrift stores and find an old headboard.  And only $10?!  What a score!  Maybe after this baby gets here, I’ll get ambitious enough for this… My to-do list is plenty long at this point!  Thanks so much for sharing, Elisha!  Go check out more of Elisha’s awesomeness at Pneumatic Addict!

This post was written by Krista and originally appeared on While He Was Napping.


November 20, 2013 by Krista

Turkey Place Cards #turkeytablescapes

This post is sponsored by Jo-Ann Fabric and Craft Stores.  I was provided supplies and a gift card for incidental purchases in order to create the projects mentioned within.  All content is 100% original and all opinions are 100% mine and truthful.

Last, but not least, in this tablescape trio for kiddo is the place card.  These are super simple and take about five minutes to put together.  Get directions for the no-sew place mats and the turkey napkin rings to complete your kid table this Thanksgiving.

TURKEY PLACE CARDS
Materials:
– Scrapbook Paper (card stock thickness)
– Pipe Cleaners/Chenile Stems (I was looking for the dark ones, but these fun striped ones worked great!)
– Googly Eyes
– Orange Foam Scraps (from the napkin rings)
– Glue gun and glue sticks
Directions:
– Cut your scrapbook paper into 4×6 inch rectangles.  Fold in half to create a tent.
– Start with an orange pipe cleaner and make this shape: 
Size is personal preference, but you want it to fit on your place card.  I used about a third of each pipe cleaner on one turkey.
– Take a yellow pipe cleaner and make this shape:
– Twist the two pipe cleaners together and arrange until you’re happy with the shape.  Secure with a little hot glue if you’re worried about them.
– Cut a small triangle out of the orange foam.  Glue over the twist in the pipe cleaners.
– Glue two googly eyes on above the foam beak.
– Glue the turkey to the card.

That’s it.  So easy, right?  And look at how cute they are?!  Adorable.  Of course you can embellish the card as much as you’d like.  I wanted to keep the turkey the focal point so I kept it simple.

So, here’s the whole table:

KIDS THANKSGIVING TABLE
Yep, plastic dishes and all…  that’s how we roll.  No stinking way am I going to give my kids anything that might make a bigger mess than the food on their plates already will.

And, out of curiosity, I set it up with a little more grown-up feel to it…
Definitely not a formal table like most tablescapes… but I like it.  The quote frame adds a little more of an “adult-feel” to the whole table.  That would be an easy way to keep the table informal, yet still decorated.  I posted that tutorial last Thursday if you’re interested.
So there you have it.  My #turkeytablescape.
 
You can use this coupon to save some moolah on your own Thanksgiving projects (or any projects!) until the end of the month.  Need some inspiration?  Check out the Craft Catalog and the Celebrate the Season site for lots of great project ideas.

This post was written by Krista and originally appeared on While He Was Napping.


November 20, 2013 by Krista

{Our Thrive Life} Make Ahead Thanksgiving Mashed Potatoes

Julie from Our Thrive Life is back and has a great recipe to share for Thanksgiving. So, let’s get right to this!

__________________________________________________

Thanksgiving is less than two weeks away! I know, right?! Where has the year gone? I absolutely love the holiday season. Especially the yummy, delicious not-good-for-my-diet foods that seem to abound. I won’t lie – this recipe is not easy on the calories which is why it’s perfect for this time of year. Save it as a special occasion recipe. When I was sharing the ingredient list with my husband he gasped and said ‘Well, of course it’s so good’. It’s true you can’t go wrong when combining this much calorie-rich goodness. And the best part? You can make it ahead. Yep a day or two ahead! The potatoes! Awesome, huh? One less thing on your big Turkey Day to-do list which means more time with family.

Make Ahead Thanksgiving Mashed Potatoes

8-10 large russet potatoes
3/4 cube (6T) unsalted butter, softened
3/4 cup freshly grated parmesan
8 oz cream cheese
1 cup sour cream
1/3 cup chopped fresh chives
salt and pepper to taste

Directions:
Cook potatoes in lightly salted water until tender. Add 1/2 potatoes, 1/2 butter, 1/2 Parmesan, 1/2 cream cheese, 1/2 sour cream to mixer and whip until light and fluffy. (Don’t over do it…don’t want gummy potatoes!) Repeat with remaining ingredients. Salt and pepper to taste.

Grease crock pot and sprinkle with extra Parmesan cheese around the sides and bottom. Pour in potatoes. Dot with butter (I do very minimal) and sprinkle with Parmesan.

Store in the fridge up to 48 hours.
Heat in crock pot on low for 2-3 hours, ready just in time for Thanksgiving dinner.

Credit for this delicious recipe goes to my friend Jenn over at The Essential Homemaker. We’re friends (and family) in real life. She is fabulous at just about everything and has so many great recipes and tricks for in the kitchen. She is my go-to girl and maybe can be yours too! Be sure to check out her blog and show her some love.

________________________________________
How awesome and easy is that?  I love that it’s a make ahead and then set it and forget it kind of deal.  Perfect for keeping the stress and confusion of all that cooking prep down!  Thanks Julie!  Find more Julie here:


This post was written by Krista and originally appeared on While He Was Napping.


November 19, 2013 by Krista

Turkey Napkin Rings #turkeytablescapes

This post is sponsored by Jo-Ann Fabric and Craft Stores.  I was provided supplies and a gift card for incidental purchases in order to create the projects mentioned within.  All content is 100% original and all opinions are 100% mine and truthful.

Alright, continuing from yesterday… Turkey Napkin Rings.  This is actually a project you could get your older kids to help with…  Got kids old enough to use a glue gun?  Put ’em to work!  (Find yesterday’s no-sew place mats HERE).

TURKEY NAPKIN RING

Materials:

– Foam sheets in red, yellow, orange, tan and brown
– Googly eyes
– Glue Gun and glue sticks
– Scissors

Directions:
– Cut a rectangle that measures 5.5×3 inches from the brown foam sheet

– Cut two feather shapes from each of the other four colors.  I free-handed one feather and then used it as a template for the rest of my feathers.

– Cut a triangle shape for the beak from the orange foam.
– Cut a gobbler shape from the red foam.  I’m sure this has some correct term and I probably had to learn it once upon a time, but I don’t know what it is now.
– Cut feet shapes from the orange foam.  (side note: I ended up having to score the back of the legs to get them to pop out.  If you intend to use these standing up, you’ll need to do the same so the legs don’t push the turkey over).

– Glue the short sides of the brown rectangle together to make a cylinder shape.
– Glue the feathers on the back of the brown cylinder.  I worked from the outsides in.
– Glue the feet to the front of one of the open ends of the cylinder.
– Glue on the googly eyes, beak and gobbler.
– Fold napkin and insert into one end of the cylinder.  Pull it through and rearrange so it’s pretty.

You can use this coupon to save some moolah on your own Thanksgiving projects (or any projects!) until the end of the month.  Need some inspiration?  Check out the Craft Catalog and the Celebrate the Season site for lots of great project ideas.

This post was written by Krista and originally appeared on While He Was Napping.


November 18, 2013 by Krista

Thanksgiving No-Sew Place Mats #turkeytablescapes

This post is sponsored by Jo-Ann Fabric and Craft Stores.  I was provided supplies and a gift card for incidental purchases in order to create the projects mentioned within.  All content is 100% original and all opinions are 100% mine and truthful.

So, I will be the first to admit I wasn’t super excited when I got the keywords for this month’s Celebrate the Season post with Jo-Ann: Turkey Tablescapes And here’s why: the last Thanksgiving I was home for was my freshman year in college.  I stayed home while the rest of my family went on our annual trip to my grandma’s because I was working retail.  At my grandma’s house there are usually 35+ people there, so we’re super classy and use paper plates, plastic cups and silverware and plastic tablecloths.  Who wants to be doing 3 hours of dishes anyway?!

During the year, we’re lucky if we eat at the table in our house.  The poor design has the dining room behind the kitchen wall and it’s just more effort to set and clear the table each night than we usually put into it.  We usually dine at the island in our kitchen, and not in the formal dining room.  So decorating the table is almost laughable in our house.  Admittedly, it’s kind of my craft table.  In desperation of a great tablescape, I went to Pinterest and wound up with overwhelming frustration.  Tablescapes are sooooo very not my thing.  I’m the cheap, quick and kid-friendly kind of crafty.  There’s no way I can pull off a gorgeous tablescape like the ones I saw on Pinterest.  So, I decided to do a kid’s table tablescape so I didn’t feel so very out of place.

There are three crafts on this tablescape: no-sew place mats, turkey napkin rings and turkey name cards.  All are easy and quick.  I’ll do the place mats today and the other two in the next couple days, so as not to overwhelm you and keep this post from being so long your fingers fall off from scrolling.

THANKSGIVING NO-SEW PLACE MATS
DIY No-Sew Placemats at Kid's Thanksgiving Table
Materials:
– Two fat quarters in coordinating fabrics
– Glue gun and glue sticks
– Iron
Directions:
– Iron your fat quarters and cut them in half.
DIY No-Sew Placemats at Kid's Thanksgiving Table
 – Place two halves right side together.
DIY No-Sew Placemats at Kid's Thanksgiving Table
– Slowly glue the edges together.  Press them firmly until the glue is mostly dry.  A thick line of glue will stick better than a thin one.  It will also take longer to dry, giving you more time to get the fabric pressed together.  Leave a few inches to turn your no-sew place mat right side out.
DIY No-Sew Placemats at Kid's Thanksgiving Table

– Turn the place mat right side out. Press with a hot iron. You glue will melt again, so don’t leave the iron too long or it will seep through the fabric and get on your iron. Just enough to press them. Let your no-sew place mats cool.

DIY No-Sew Placemats at Kid's Thanksgiving Table

That’s it.  Simple and easy peasy.  I’m thinking I’ll try to find something to do with them, since we won’t be using them as actual place mats at our house (Ha.)  A car caddy for Big J maybe?  He loves the green fabric…

You can use this coupon to save some moolah on your own Thanksgiving projects (or any projects!) until the end of the month.  Need some inspiration?  Check out the Craft Catalog and the Celebrate the Season site for lots of great project ideas.

Here’s a sneak peek at the whole table…  Come back tomorrow and Wednesday for the other tutorials.

DIY No-Sew Placemats at Kid's Thanksgiving Table

This post was written by Krista and originally appeared on While He Was Napping.
 

  • « Previous Page
  • 1
  • …
  • 77
  • 78
  • 79
  • 80
  • 81
  • …
  • 231
  • Next Page »

I'm Krista. Ringleader here on While He Was Napping, wife to my handsome Mr. Right & momma to my THREE energetic boys, Big J (9), Little J (6) & Little N (4). We FINALLY added a beautiful little girl to our family last December.

I’m knee-deep in Tonka trucks & Thomas trains. I survive our crazy days with Vanilla Coke, Sonic slushies, sweet snuggles and little giggles. When I tuck them in tight & kiss them good night, I get a little time to create & just be me.


It all happened
while (s)he was napping
Want More of My Story?

Privacy Policy

While He Was Napping respects your privacy and is committed to keeping any personal information collected on this website confidential. To find out what information we collect and how it is used or what options you have regarding your information, see our full privacy policy here. Creative Commons License The website found at whilehewasnapping.com and all subdomainsauthored and published by Krista is licensed under a Creative Commons Attribution-NonCommercial-NoDerivs 3.0 Unported License.

Pretty Chic Theme By: Pretty Darn Cute Design