While He Was Napping

momma gets stuff done

  • Home
  • About
  • Archive
  • Do It Yourself
    • Crafts
      • No Sew
      • Painting
      • Paper Crafts
      • Repurpose Projects
      • Vinyl
      • Washi Tape
      • Kid’s Crafts
      • Fonts
    • Sewing
    • Decorate
      • Home Decor
      • Holiday Decor
    • Celebrate
      • DIY Gifts
      • DIY Your Party
  • Recipes
    • Beverages
    • Appetizer
      • Bread
      • Other Appetizers
    • Snacks
    • Main Dish
      • Meat
        • Chicken
        • Beef
        • Pork
        • Seafood
      • Vegetarian
      • Slow Cooker
      • 30 Minute Meals
    • Dips & Sauces
    • Salads
    • Pasta
    • Soup
    • Dessert
      • Cookies
      • Brownies
      • Cupcakes and Cake
      • Box Mix Recipes
      • Other Sweet Treats
    • Breakfast Food
      • Pancakes
      • Waffles
      • Muffins
      • Other Breakfast Food
  • Family
    • Babies
      • Pregnancy
      • Newborns
      • The 1st Year
    • Toddlers
    • Preschoolers
    • Kindergartners
    • 6-8 Year Olds
    • The Grown Ups
      • Date Night
      • Romantic Gifts
    • Self Care
  • For the Home
    • Cleaning
    • Organizing
    • Emergency Preparedness
  • Travel
    • Travel Tricks & Tips
    • Traveling with Kids
  • Tech & Gadgets
    • Must-Have Apps
    • Techy Home Appliances
    • Gadgets & Electronics
    • Blogging Tips
  • Printables
    • Posters
      • Quote Printables
      • Subway Art Printables
    • Printable Organizers
    • Printable Journals
    • Learning Printables & Worksheets
    • LDS Printables
  • Holidays
    • New Year’s
    • Valentine’s Day
    • St. Patrick’s Day
    • Easter
    • Cinco de Mayo
    • Mother’s Day
    • Father’s Day
    • 4th of July
    • Back to School
    • Halloween
    • Thanksgiving
    • Christmas
    • Holiday & Seasonal Printables

July 24, 2013 by Krista

{Kids on the Road} Activities for Toddlers

Hey there and welcome! I’m glad you stopped by today! Are you heading out on the open road and taking your toddlers with you? Brave soul. Only kidding. Mostly.

Actually, traveling with kids is totally doable! The key is to be prepared!

Our summers are usually full of road trips. While it’s definitely easier to travel sans children, I wouldn’t want it any other way. It’s great family time. We have even been known to spend weeks on the road at a time.

Once such time when I had two little ones, we were getting ready to spend two weeks traveling. The longest we’d gone with kids. I was really nervous about keeping our rambunctious, energetic boys happy in the car for that long.

I spent A LOT of time getting together activities for them to do.  My husband said to me at one point, “I am only going to say this once.  I think you are waaaaay over-preparing as far as entertainment for the boys.”

I just kinda rolled my eyes because I knew that my wonderful husband would do what daddy-drivers do with fussy babies trapped in car seats.  He’d get frustrated, try to distract them only to be screamed at more loudly.  Then he’d get upset that they were yelling. He’d yell, trying to be heard over their racket, then he’d stuff earbuds in his ears and totally drown them out with an audio book or something.

And I’d be stuck with screaming banshees in the backseat.

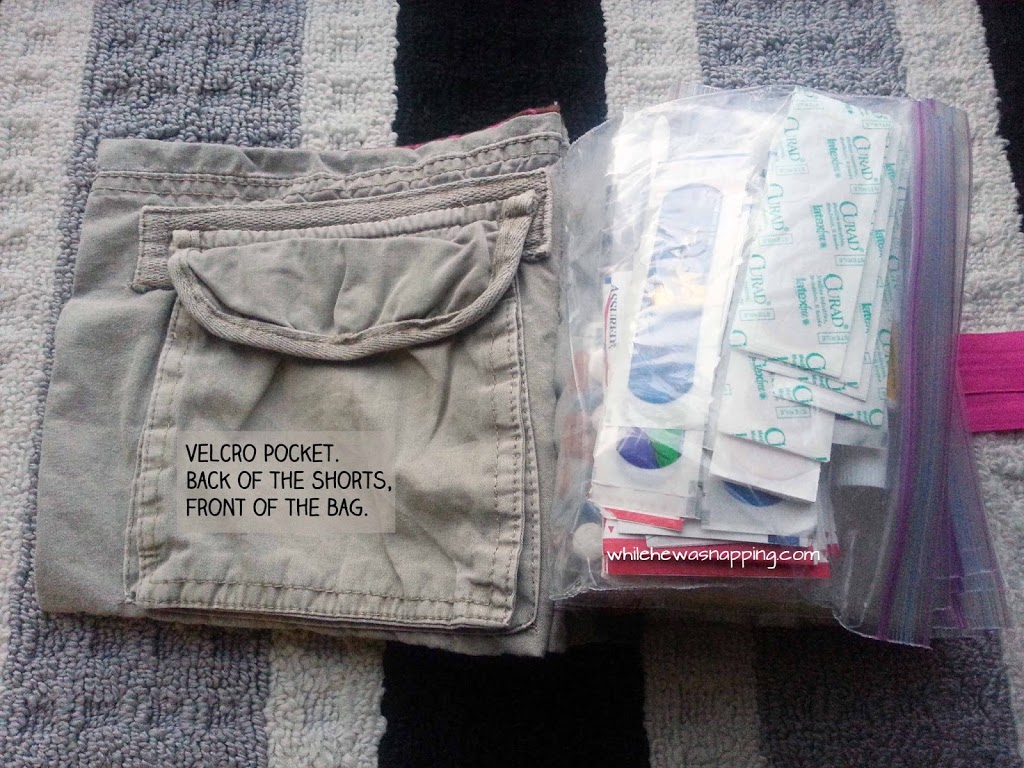
I will admit that I was very over-prepared.  But most of our problem was location, location, location!  The bag was on the floor in between the boys.  In their car seats, neither kid could reach the bag on the floor and it was too far back for me to reach it.  So… on our next 2,000+ mile trip, we stuck the food box and activity bag closer to momma.  Lesson learned.

 Car-activities-for-toddlers


Ready for the best road trip ever?! Click next to find out what we think is a MUST-HAVE for rest stops! It keeps the kids close and out of all the “puddles”!
Arrow Next

Pages: 1 2 3 4

July 23, 2013 by Krista

{Kids on the Road} The Everything Pouch Road Trip Bag

Find more {Kids on the Road} posts HERE.
Today’s {Kids on the Road} is an easy little project.  That was a total lifesaver.  I found the idea on DIY Home Sweet Home (along with a ton of other great ideas, you should definitely check it out!).  Jamie called it the “essentials holder.”  I called it the “Everything Bag” or the “road trip bag”.  I took the idea and modified it a bit.  Some scrap fabric, a bit of ribbon, some zippy bags and about 30 mins was all it took.  You ready for this?!
THE EVERYTHING POUCH
ROAD TRIP BAG
The-Everything-Road-Trip-Travel-Bag-Pouch1

Materials:
– Old shorts/pants
– Scrap fabric ( approximately 6″ tall and 14″ wide.  Measure your zip bags to be sure they will fit.)
– Ribbon
– Zip top bags
– Thread and Sewing Machine
– Scissors/Rotary Cutter

Directions:
– Cut the scrap fabric to fit around your zip top bags (approximately 6″x14″).  Be sure to allow for seam allowance and approximately 3/4″ of an inch to sew the baggies in place.  Just a basic rectangle.

– Cut the shorts/pants to the same size as the scrap fabric.  You can use another piece of scrap fabric instead of the shorts, but I liked the idea of having the pockets on the inside.

The Everything Bag

– Place the right sides of the fabrics together and straight-stitch three of the sides together.  Press the seams and flip the fabric right side out. (Sorry for the lack of photos… apparently I was in “project mode” and forgot to get pictures of this part).

– Cut a length of ribbon approximately 18-24″ and place it inside the open seam.  Fold the seam and straight stitch it shut, sealing the ribbon inside.  For a road trip bag that will stay together a little better, make two ties by cutting two lengths of ribbon and placing each approximately an inch and a half from the ends of the pouch.

The Everything Bag


–  Decide how many baggies you want to include in your road trip bag and count them out.  Lay them out with all the zippy sides together.  I ended up having to pin the bags to the pouch to keep them from sliding so badly while I stitched them to the road trip bag.  I used sandwich -sized bags.

Ziploc-Bag-Holder

– Fold the pouch over on the bags, closing them inside and sew a straight seam up the outside of the pouch.  It will make a little tab on the outside of the bag.

Road-Trip-Bag

– Sew a long (I did about 6″) strip of Velcro on one side of the ribbon.  My ribbon was long enough that it wrapped back on  itself, even when the road trip bag is full, so both of my Velcro pieces are on the ribbon.  I would suggest filling your bag before you attach your other piece of Velcro so you know just how much space inside the pouch you’ll need.  This placement will make it easier to replace the Velcro/ribbon if the time ever comes.  I’ll just have to un-stitch a small portion of the side seam, replace and stitch it back up – rather than worrying about any picking of my actual fabric.

I would also suggest putting the “hook” side facing toward the road trip bag (but actually located on the ribbon) and the “loop” side facing out from the road trip bag.  This way, you won’t get scratched by any exposed Velcro, because it will be the softer loop side and not the scratchy hook side.

Everything Bag

That’s it.  You’re finished!  Now just fill up those baggies and stash the good stuff away for when you need it.  It is such a convenience to have all those little “needs” all in one place, easy to get to and even easier to find.  And pick up is a cinch.

DIY-Road-Trip-Pouch

Need some ideas of what to fill those baggies with?  Here’s the goodies I stashed in mine:
– bandaids, first aid ointment and alcohol wipes
– toothpicks and flossers (stray popcorn kernels are one of my biggest pet peeves!)
– tylenol, ibuprofen, and excedrin – make sure you have dosing directions and amounts on all medications in case you need the information later.
– antacids
– chapstick, Tic Tacs, rubber band and a few bobby pins
– nail file, nail clippers, safety pins and safety scissors
– small box of matches and a butane lighter
– extra batteries for devices commonly used
– super glue
– small bottle of lotion, hand sanitizer, and anti-itch cream
– feminine hygiene needs
– Q-tips and a small pair of surgical scissors
– extra empty zip bags
– a cold compress and small fabric bandage (Ace bandage – I unrolled it and folded it so it would fit better)
– a small screwdriver and bit set
– an eyeglass repair kit
– pen, pencil and paper

Hopefully, you wouldn’t need to use all of these items on a single vacation, but it is extremely nice knowing: one, you have them if you need them.  Two, you know where they are.  Three, it’s compact enough to be packable, but not so small it gets lost.  If we got lost somewhere and needed to abandon our vehicle, this is one thing I would take with me and I wouldn’t even complain about having to carry it.


Thanks again, Jamie, for the inspiration!  Check out Jamie’s original project at DIY Home Sweet Home.

This post was written by Krista and originally appeared on While He Was Napping.

July 22, 2013 by Krista

Contributor Opportunities

Man, these last few weeks have been whirlwind!  And the wind isn’t done yet!  So, I am looking for some contributors that can help out around here.  So, let’s get right down to the nitty gritty:

– I am looking for 3-5 contributors that can each contribute a post once or twice a month.  The numbers aren’t concrete, so if you’re awesome (and you know you are), fill out the form below.  I might have a few extra spots.  Also let me know if you’re interested in guest posting.
– Each post should be original content, not republished from somewhere else.
– Content should fit the While He Was Napping blog
– Each post should be submitted 1 week in advance of the publish date, in order to allow me time to get it set to go.  You may then re-publish the post on your site a week after it’s published on While He Was Napping.
– All posts should include at least one photo (bigger photos are better) and be at least 350 words long, unless you can clearly explain the project in fewer words.  “Pin”able photos are highly encouraged.
– You don’t need to be a professional photographer, but your photos should be clear, crisp, well-lit and visually-appealing.
– Contributors can expect to begin a regular posting schedule in September.  More details will follow if you’re chosen as a contributor.  You can choose a three, six or twelve month contributorship if a position is offered to you, based on what fits into your life.

You you get out of the deal:
Unfortunately, I am not Mr. Moneybags… and I can’t afford to pay the big bucks!  However, you will be compensated by the following:
– You will be featured in the sidebar under the heading “Contributors” with a link to your blog and the Contributor Bio page.
– On the Contributor Bio page, you will be spotlighted with a short introduction.  You will also receive links to your social media pages.
–  You will also receive a 200×200 ad space on my side bar for the length of your contributorship.  You can advertise for your blog, Etsy shop or other (family-appropriate) venue.
–  I will link up your projects to the list of link parties listed on my sidebar.  I can’t 100% pinky swear that I will link up to every single party, but I will pinky promise to link you up to at least 5-7 parties a week, more if I can possibly accomplish it.  My hope is that by cutting back on some of my posting requirements, I can spend a little more time on the advertising part of blogging.  You scratch my back, and I’ll scratch yours.
– There will be other special things along the way, but I don’t have the next year planned out yet, so some of them will just have to be a surprise!

Why contribute to While He Was Napping?

I am not a big blog, by any means (I think I’d go crazy if I had any more to do on my own right now), but I am an established blog.  I have been regularly posting since 2010 and have developed a small following that I would love to introduce to some more creative talent.  Here’s some numbers for you mathematicians out there:
– I currently have 1, 800+ Facebook fans
– I am approachin 5,000 Pinterest Followers
– Over 2,000 are subscribed to my RSS feeds
– There are nearly 300 Followers on Bloglovin’
I am also expanding my Twitter followers, Instagram Followers, and my Google+ Followers.

While He Was Napping receives:
– Approximately 2,000 page views a day
– Approximately 50,000-65,000 page views a month (months with multiple holidays, during the traditional school year tend to receive more traffic – people are less busy then and have more time to spend on the web)
– There have been over 1,666,000 page views in the life of this blog.

If you’re interested, please fill out the form below.  Thanks!

This post was written by Krista and originally appeared on While He Was Napping.
Never miss a thing:
http://www.facebookloginhut.com/facebook-login/ Photobucket http://www.facebookloginhut.com/facebook-login/ Photobucket http://www.facebookloginhut.com/facebook-login/

Join the newsletter for exclusive content and giveaways!

July 22, 2013 by Krista

{Kids on the Road} Snack Ideas

Have you checked out the previous {Kids on the Road} posts?  You can find info on Planning Your Trip, What to Pack, and How to Pack it in the previous posts.


Welcome to another installment of {Kids on the Road}.  Today is snack day.  One of the most important things for us to have in the car is food!  And not just junk food.  If you saw the What to Pack post, you know I mentioned our family’s “hanger” – hungry anger (not that thing people hang clothes on) – problems.  Junk food just gives everyone headaches and that brief sugar rush.  I’m not sure which is worse: my kids bouncing off the walls while strapped in their car seats or the sugar crash and whiny tantrums that follow.  So, we tend to steer clear of candy and the like, especially in the car.  So, here is what goes in our typical Food Box:

1.  Crackers.  Many, many kinds of crackers.  Peanut butter, cheese, goldfish, Triscuit, Wheat Thins, Club and Ritz are a few of our faves.   Bite-size pieces are the best, as it minimizes crumbs and mess, but they can be a little more spendy.  For some reason, it seems to be harder to get the same thing in your mouth multiple times, but a one-time straight shot is usually more successful.  Sometimes a little convenience is worth the money.

2.  Veggie Slices/Dices.  Carrots, fresh green beans, sliced bell peppers, broccoli pieces, cucumber sticks, grape/cherry tomatoes. avocado slices (stored in a small snapware container with a pickle fork), celery sicks with peanut butter and pickles are big hits at our house.  I would much rather my kids eat this stuff.  They are happier and fuller for longer.

Source

3.  Fruit slices.  Apples, grapes, bananas, peaches, mangoes, apricots, oranges, and just about any kind of berry make our family’s top faves list.  Firmer fruit, like apples and oranges, can be stored in zip top baggies.  I usually store our softer fruits in small snapware containers.  If you want to avoid the hassle of keeping track of your plastic storage, you can find cheap containers at the Dollar Tree.  If they come home, great.  If not, no big deal.  Or you find that empty, sealed, super moldy container that was lost on your trip… just pitch it.  No sweat.

Source

4.  Cheese slices and string cheese.  We LOVE cheese.  LOVE.  So, we will buy 2-3 bricks of different kinds of cheese and slice it up before our trip.  (Brie is my favorite!)  We can then snack on it with the crackers or alone.  Of course, my kids love string cheese and we usually take some of that too.  There are also individually wrapped cheese slices available for purchase in lots of stores.  Not the fake cheese, the real stuff.  That’s an option as well (and there’s less prep time involved).

Source

5.  Water.  We take a case a water on just about every trip we go on.  Warm water is better than thirsting to death… or that’s what I tell myself.  Ick.  It’s incredibly convenient to not have to remember to grab water every time we go and do something though… beach, park, swimming, or anywhere else.

Source via Amazon

6.  Beef  Jerky.  Both my kids and Mr Napping love beef jerky.  We ration it out a little at a time to the boys.  I will often take the jerky beforehand and cut it into small pieces that my boys can handle without it being a choking hazard.  Be sure to store it in an air-tight container.

7.  Dry Cereal.  My kids, specifically Monkey, will eat dry cereal all day.  In fact, that’s usually how he eats cereal, even at home.  We choose varieties low in sugar and somewhat healthy like Cheerios, Chex, Kix, Life, and Frosted Mini Wheats.  Occasionally, something like Fruit Loops or Corn Pops shows up in our box… but I have no idea how that happens.

Source

8.  Granola bars.  I like to have snacks that are a little more substantial when we are traveling and miss a meal or what something besides fast food.  Granola bars work well and my boys can feed themselves.  You can find low-calorie varieties if you prefer.

9.  Fruit Cups and Applesauce Cups/Pouches.  We love applesauce.  Monkey can eat a whole bottle by himself in less than a week.  Applesauce pouches are incredibly easy and convenient and even Gator can (sorta) feed himself.  He’s still mastering the whole “don’t squeeze it” concept, but he usually does pretty well.  My boys also love fruit cups, but this requires a little more help.  These are good for quick pit stops.

Source via Amazon

Target has a system where you can fill your own pouches.  I really like these; however, the whole system is kinda spendy.  Mr Napping rigged up a little contraption for us using one of the pouch lids and a pastry bag.  The pouches screw onto the pastry bag and make it easier to squeeze the pureed fruit and veggies into the pouch.

Source via Target.com

10.  Treats.  Sitting in the car, strapped in a car seat for hours on end is incredibly monotonous.  Offer a little reward or incentive for good behavior.  Some of our favorites include: Pringles, Cheetos, Pirate Booty, fruit snacks, fruit leather, and the occasional fun size candy bar.

I use a large-ish cardboard box (usually a diaper or wipe box, we tend to have those around pretty much all the time) to store everything in. It sits on the floor within reach, is easily contained and it’s easy to take inside when we stop.  Cold items are stored in a (or some) small, soft-sided coolers on top of the box.  This works for us… for now.  Someday the boys will be in charge of their own snacks; I can’t wait to stop being the food police on road trips.

More of the {Kids on the Road} Series:
 Planning Your Trip
What to Pack
How to Pack

This post was written by Krista and originally appeared on While He Was Napping.
Never miss a thing:
http://www.facebookloginhut.com/facebook-login/ Photobucket http://www.facebookloginhut.com/facebook-login/ Photobucket http://www.facebookloginhut.com/facebook-login/

Join the newsletter for exclusive content and giveaways!  Next edition goes out Friday

July 19, 2013 by Krista

Weekend Wander #132

Welcome to another party!  We’ve been back from our mega trip for nearly a week and my house still looks like it was hit by a tornado.  Like you would run in horror if you stopped by.  And poor Gator boy has been the worst kind of sick since Saturday.  So, how was your week?

From last week, my faves:
Book list at My Life’s A Treasure
Stone Memory Souvenirs at Art Club Blog
Super Easy Maxi Dress at Toronto Mama
Free Summer Activities at The Jenny Evolution
Thanks everyone!  There were some more, lots more actually, really good links but I am running short on time today, so you get four features.  Congrats ladies, grab a button from HERE if you want one.

Okay, you know the drill. Annnnd…. GO!


This post was written by Krista and originally appeared on While He Was Napping.
Never miss a thing:
http://www.facebookloginhut.com/facebook-login/ Photobucket http://www.facebookloginhut.com/facebook-login/ Photobucket http://www.facebookloginhut.com/facebook-login/

The next edition of the newsletter goes out tomorrow (Friday)!  Sign up in the side bar under “WHWN Newsletter”  Be the first to know about opportunities and more.  Plus, get exclusive content and giveaways!

  • « Previous Page
  • 1
  • …
  • 90
  • 91
  • 92
  • 93
  • 94
  • …
  • 231
  • Next Page »

I'm Krista. Ringleader here on While He Was Napping, wife to my handsome Mr. Right & momma to my THREE energetic boys, Big J (9), Little J (6) & Little N (4). We FINALLY added a beautiful little girl to our family last December.

I’m knee-deep in Tonka trucks & Thomas trains. I survive our crazy days with Vanilla Coke, Sonic slushies, sweet snuggles and little giggles. When I tuck them in tight & kiss them good night, I get a little time to create & just be me.


It all happened
while (s)he was napping
Want More of My Story?

Privacy Policy

While He Was Napping respects your privacy and is committed to keeping any personal information collected on this website confidential. To find out what information we collect and how it is used or what options you have regarding your information, see our full privacy policy here. Creative Commons License The website found at whilehewasnapping.com and all subdomainsauthored and published by Krista is licensed under a Creative Commons Attribution-NonCommercial-NoDerivs 3.0 Unported License.

Pretty Chic Theme By: Pretty Darn Cute Design