While He Was Napping

momma gets stuff done

  • Home
  • About
  • Archive
  • Do It Yourself
    • Crafts
      • No Sew
      • Painting
      • Paper Crafts
      • Repurpose Projects
      • Vinyl
      • Washi Tape
      • Kid’s Crafts
      • Fonts
    • Sewing
    • Decorate
      • Home Decor
      • Holiday Decor
    • Celebrate
      • DIY Gifts
      • DIY Your Party
  • Recipes
    • Beverages
    • Appetizer
      • Bread
      • Other Appetizers
    • Snacks
    • Main Dish
      • Meat
        • Chicken
        • Beef
        • Pork
        • Seafood
      • Vegetarian
      • Slow Cooker
      • 30 Minute Meals
    • Dips & Sauces
    • Salads
    • Pasta
    • Soup
    • Dessert
      • Cookies
      • Brownies
      • Cupcakes and Cake
      • Box Mix Recipes
      • Other Sweet Treats
    • Breakfast Food
      • Pancakes
      • Waffles
      • Muffins
      • Other Breakfast Food
  • Family
    • Babies
      • Pregnancy
      • Newborns
      • The 1st Year
    • Toddlers
    • Preschoolers
    • Kindergartners
    • 6-8 Year Olds
    • The Grown Ups
      • Date Night
      • Romantic Gifts
    • Self Care
  • For the Home
    • Cleaning
    • Organizing
    • Emergency Preparedness
  • Travel
    • Travel Tricks & Tips
    • Traveling with Kids
  • Tech & Gadgets
    • Must-Have Apps
    • Techy Home Appliances
    • Gadgets & Electronics
    • Blogging Tips
  • Printables
    • Posters
      • Quote Printables
      • Subway Art Printables
    • Printable Organizers
    • Printable Journals
    • Learning Printables & Worksheets
    • LDS Printables
  • Holidays
    • New Year’s
    • Valentine’s Day
    • St. Patrick’s Day
    • Easter
    • Cinco de Mayo
    • Mother’s Day
    • Father’s Day
    • 4th of July
    • Back to School
    • Halloween
    • Thanksgiving
    • Christmas
    • Holiday & Seasonal Printables

May 20, 2013 by Krista

DIY Faux Chalkboard Signs

This post is sponsored by Jo-Ann Fabric and Craft.  I was provided a gift card to purchase supplies and for my time.  All content expressed herein is originally mine and 100% honest and truthful.

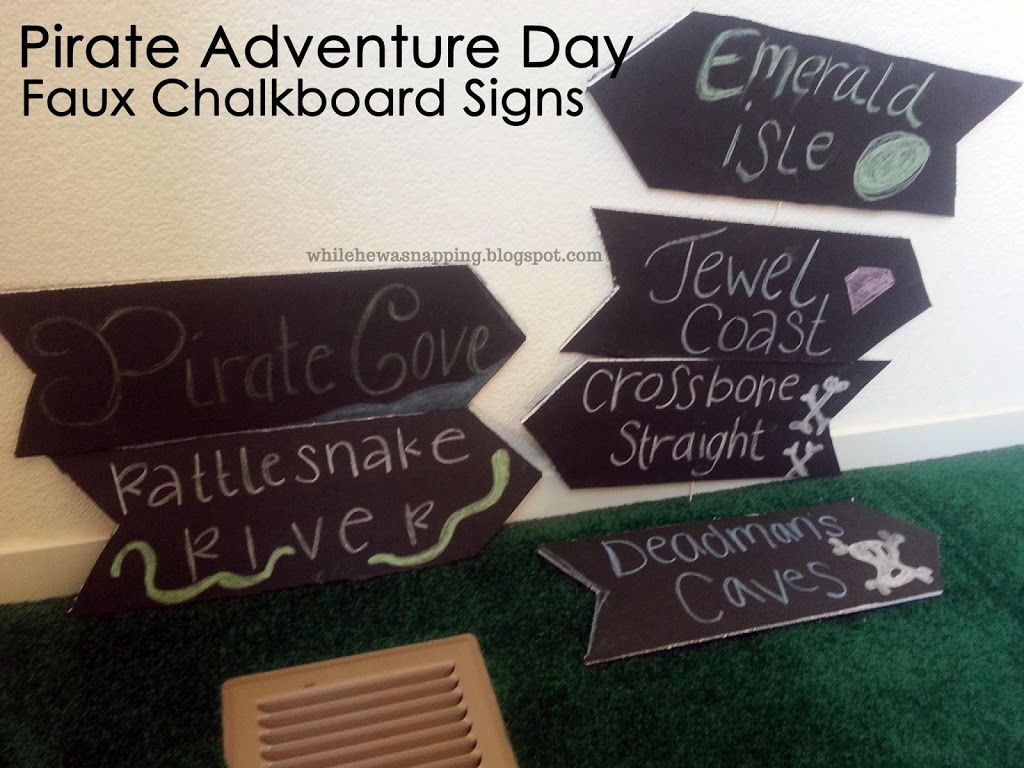
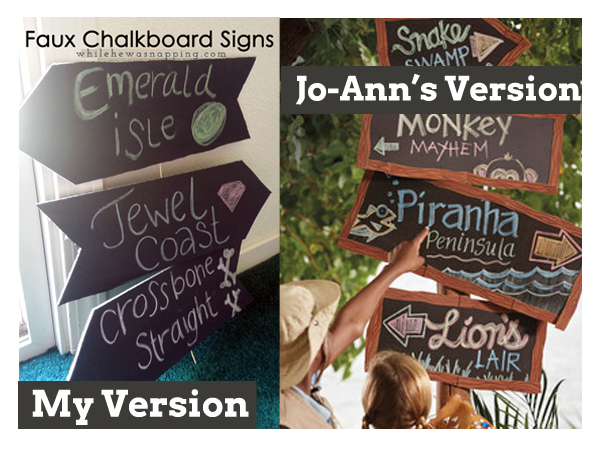
This little project went along with our Pirate Adventure Day and our Treasure Map project.  It was another project idea from Jo-Ann’s Cape Discovery collection.  I love the versatility of these Chalkboard Signs!  You can adapt them to almost any adventure day or party theme.  They are super easy and fun to make.  They took less than an hour and my boys played with them for about three days after our Adventure Day… and that’s only because they were sword fighting and broke them.  Boys.

FAUX CHALKBOARD SIGNS


Materials:
– Black Foamcore Board (my local Jo-Ann store was out of this, but I found some at Dollar Tree.  I’ve also seen it at Wal-Mart and Target in the office supplies section)
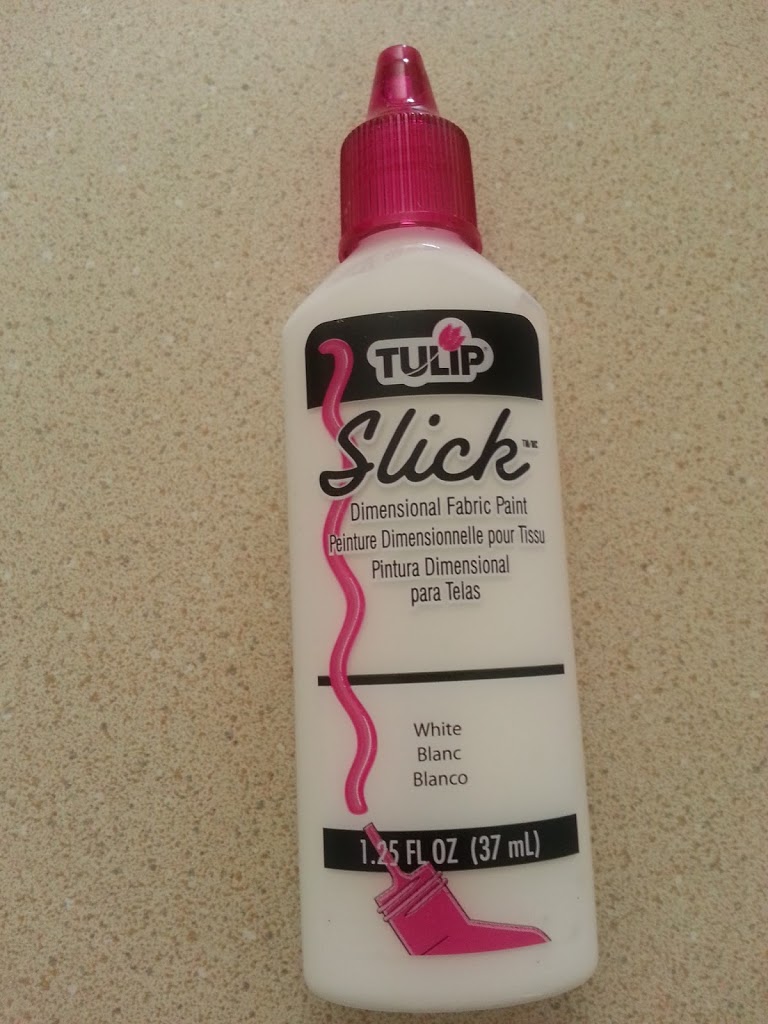
– Sidewalk Chalk
– Clear Spray Paint
– Razor blade
– Wooden Skewers

Directions:
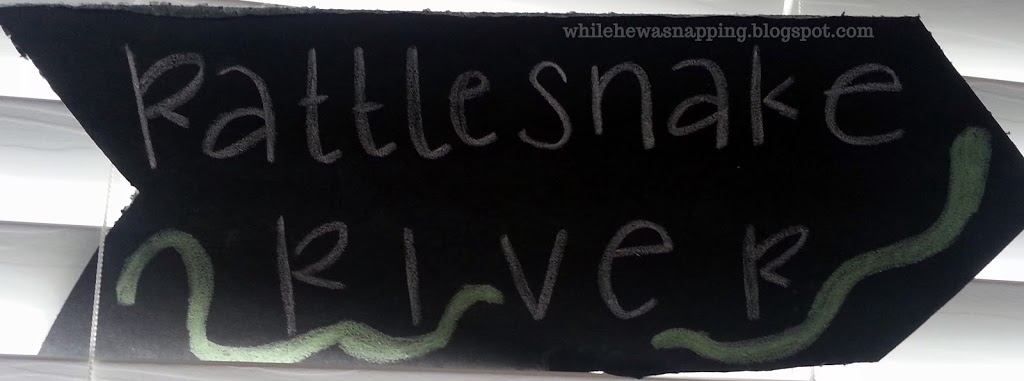
– Decide on the shape you’d like you signs to be and trace it lightly with the chalk or a pencil onto the foam board.  I went with a stretched pendant shape, while the Jo-Ann signs are rectangular.
– Use the razor blade to cut your signs out.  Be careful and don’t cut yourself!
– Use the sidewalk chalk to write on your signs.  If you mess up, you can use a lightly damp cloth to clean it up, but don’t do this too often.  You’ll make your signs soggy!  If it hadn’t been 1:30 in the morning, I would have embellished the signs a little more.
–  Spray a thin layer of clear spray paint over your signs to seal the chalk in so it won’t smudge.  Notice the “Pirate Cove ” sign in the photo above.  That’s what a smudged sign looks like.  I wanted to try it out and see if it made it more pirate-y, but ended up liking the bright and bold effect better.  I left it so you could see the difference.
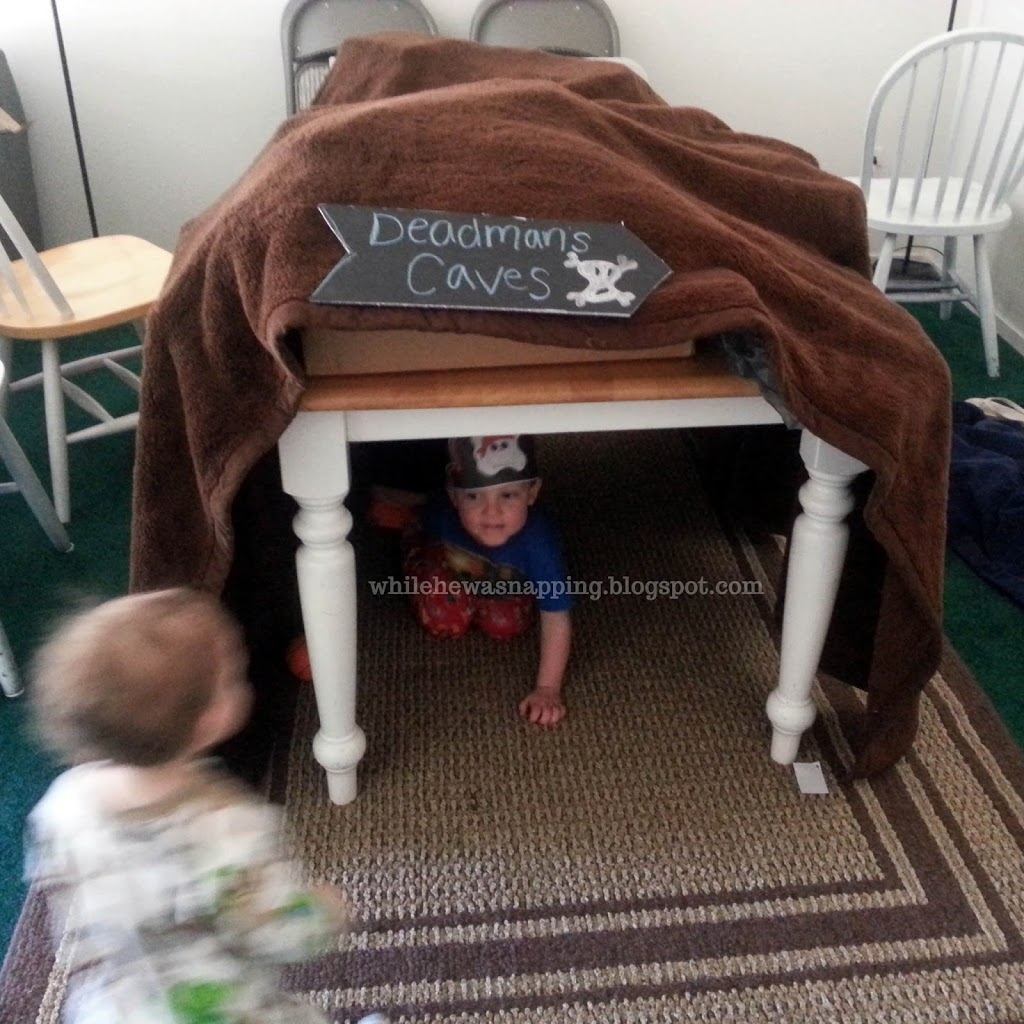
–  I then cut my wooden skewers in half and shoved them into the top of one sign and the bottom of another sign to create the stacked sign post look after we had used them during our Adventure Day.  Now Monkey has a little souvenir from the day.

I didn’t put the foam borders around my signs because, well, I forgot to get it at the store.  Mommy brain moment.  I thought they turned out okay though.  Below is a side by side comparison of my signs and Jo-Ann’s version of the signs.  You can find Jo-Ann’s directions HERE.  I love that you could line the boarders of these with lace and ribbons and go all girly and frilly with this project too.  Wedding signs?


Find more fun summer crafts for you kids at Jo-Ann’s Cape Discovery.  Also become a Jo-Ann’s Preferred Customer and receive a 20% off coupon!

This post was written by Krista and originally appeared on While He Was Napping.

May 17, 2013 by Krista

Weekend Wander #123

Welcome to another party.  It’s been quite a week here.  Mother’s Day was… a little disappointing, honestly.  But I won’t bore with my woebegone tales.  We have been enjoying the aquarium Mr Napping and the boys got for me though – just as risky as flowers, but much more entertaining.  It’s actually a combo mother’s/father’s day gift, who knew glass tanks and resin-casted tree stumps were so dang expensive?  It’s been fun and, so far, nobody’s died.  Success!  Mr Napping and I made a trip over the mountain to GG’s house (my grandma – the boys’ Great Grandma) to get a play fort out of their back yard so we can put it in our backyard.  Luckily, my family is awesome and they kinda shuffled the boy around while we were gone.  Scored a break for mama, yahoo!  And a great big thank you to all the babysitters!

On the bloggy front, I’ve got a project that will turn out oh, so cool, but it’s taking a lot more time (and WORK!) than I’d first figured.  I started it a couple weeks ago and got a little overwhelmed.  Then my in-laws came and stayed in our craft/guest room, soo there was no crafting that week.  And now I’m getting antsy to get it done.  I did finish up a skirt upcycle that I started before the in-laws visited though.  Watch for that next week…  I also bit the bullet and got my very own custom domain name… so now I’m a .com!  Fun stuff.  Oh, and have you joined the newsletter?  The first issue goes out next week and you’re not gonna wanna miss it.  Sign up in the sidebar.

Features:
I love peanut butter cookies!
I must try this recipe @ Growing in Grace.
Chunky peanut butter, why didn’t I think of that?!

Crazy Good Cookie Bars @ Posed Perfection
If they’re crazy good, it’s a must try!  These look a lot like
a blonde brownie recipe my mom used to make.  YUM.
But SOO much easier.  Added to my to-do list.
Little Monkey loves places to stash his goodies and treasures.
The Treasure Box @ Powerful Mothering would be perfect!
We will be putting this on our list of summer activities.
We love to read at our house.
This collection of books @ The Jenny Evolution is fabulous.
It includes many of our favorites, along with a few we will have to check out!

 Featured? Take one of these and show it off!

<a href=”http://whilehewasnapping.blogspot.com”> <img src=”http://whilehewasnapping.com/wp-content/uploads/2013/06/WHWNWWFeatureButton.png” >

Thank you to everyone who linked last week.  What a fun collection!  By changing the opening day, we actually double the number of links!  Yahoo!  It was so hard to choose just a few features from the awesome collection.
I can’t wait to see what you’ve been up to… you know what to do!  Link em up!
And grab a button or post a link back so others will come and party too, pretty please!

Photobucket

<a href=”http://whilehewasnapping.blogspot.com”> <img src=”http://i769.photobucket.com/albums/xx332/WhileHeWasNapping/WHWNWeekendWanderButton.png” >


This post was written by Krista and originally appeared on While He Was Napping.
If you’d like to get more While He Was Napping, you can find me here:
http://www.facebookloginhut.com/facebook-login/ Photobucket http://www.facebookloginhut.com/facebook-login/ Photobucket http://www.facebookloginhut.com/facebook-login/

Join the newsletter for exclusive content and giveaways!

May 15, 2013 by Krista

Pirate Adventure Day

This idea came to me after looking at Jo-Ann’s new Cape Discovery crafts they have put out encouraging families to spend time crafting and exploring together this summer.  I was asked if I wanted to recreate one of the projects and share it.  After looking at them all, I was torn between THREE projects!  I ended up doing two of them (tutorials to come) and the boys and I had a Pirate Adventure Day.  It was a BLAST!  We all had so much fun – well, maybe not Gator, since he napped through half of it.  But my 3.5 year old Monkey thought it was “the best day ever!”

PIRATE ADVENTURE DAY
Pirate-Adventure-Day

 
Here is the basic rundown of our adventure day.  Actually it was only about a two-hour activity, not all day.  I cut down some of my activities to fit my kids’ attention spans.  You could expand or condense it as your kids allow.
Set up:
– First I made our treasure map.  I did most of this while Monkey was at preschool since I wanted it to be a surprise.  It’s pretty self-explanatory.  I used brown shipping paper from Dollar Tree and crayola markers.  The hardest part was deciding what to name all the landmarks.  Guess I need to spend more time watching Jake and the Neverland Pirates or something.  Not to worry, Google quickly came to my rescue.  The full tutorial on that is coming.
– Then I constructed the Faux Chalkboard Signs using black foam board and sidewalk chalk.  Click the link for the full tutorial.
– I then prepped a few pages from the Pirate Pre-K packs at Over the Big Moon.  Who says adventure can’t be educational?!  I also got the pirate hat from 2 Teaching Mommies.  I cut the pieces out, but left them un-assembled, so Monkey could do that.
– If I had thought it out more and it hadn’t been 1am… I would have then set up Deadman’s Cave by throwing a blanket over the dining table and set up the Obstacle Course at Rattlesnake River.  But I ended up doing that during snack time on Smuggler’s Isle.  More work for me during Adventure Day, but it worked out just fine.
– We use pony beads as a reward system for good behavior and call them “treasures”.  So I took about 25 of the beads and buried them in our small, makeshift sandbox in the backyard for the treasure hunt.
– I took a 1/4″ slice of mozzarella cheese and cut it to look like a “Jolly Roger” (skull and cross bones).  Then I cut the slice and cut it into strips for easier eating.
–  I cut swords out of and old cardboard box, because what’s a pirate without his sword?
Adventure Time!
–  First I fed my kids breakfast because they are ornery and whiny when they are hungry.  Not the kind of adventure I was looking for.  Then I pulled out the treasure map!  That was a big deal.  I let Monkey study it for a few minutes while I set up our pirate ship in his bedroom.
pirate-treasure-map
I stuck the mop and broom, handle side down in between his bed frame and his mattress.  Then I took a some of my fabric and draped it across the two to make a sail.  I’d forgotten about a wheel for driving the ship, so we improvised with a colander.  Encourage that imagination, right?
Pirate-Ship
–  After the ship was set up, I came back and helped Monkey construct his pirate hat.  He loved it!  Then we got on the ship and charted our coarse.  First… Deadman’s Cave.
–  At Deadman’s Cave we had story time by glow stick.  We have a touch and feel Pirate book and I’d planned to read that, but Monkey wanted to tell stories instead of read them.  So that’s what we did.
deadman-s-cave-storytime
Pirate-Snack–  Then it was back to the ship and on to Smuggler’s Isle for snack time!  Upon landing on Smuggler’s Isle, I ushered the boys to the breakfast bar and fed them goldfish crackers, the Jolly Roger cheese and mandarin orange “slugs”.
– After snack time – and putting Gator to bed – we had to make our way to the other end of the island.  Only there was an obstacle course at Rattlesnake River.  This was Monkey’s very favorite part of the whole adventure day.  And why not?  I let him climb on the furniture and “walk the plank”.  Why wouldn’t that be his favorite part, right?


–  After we finished the obstacle course we “found” our boat on the other side of the island.  We took the boat to Treasure Island and made our way to Emerald Isle and Jewel Coast where we found “X” marks the spot and we dug for buried treasure.  I let Monkey keep all the treasures he found and that was a fun surprise for him (he gets to cash them in for treats, toys or outings).

Digging-for-Pirate-Treasure

If you need a day activity for your kids, an adventure day is a great way to get them playing and keep them entertained without any screens!  It gets you playing with your kids and creates some fun memories.  I know we’ll be having more adventure days this summer.  It takes a little bit of planning, but it was totally worth it.  My boys LOVED it!

Any ideas for a themed adventure day you’d like to try?


This post was written by Krista and originally appeared on While He Was Napping.
If you’d like to get more While He Was Napping, you can find me here:
http://www.facebookloginhut.com/facebook-login/ Photobucket http://www.facebookloginhut.com/facebook-login/ Photobucket http://www.facebookloginhut.com/facebook-login/

May 14, 2013 by Krista

Pizza Pretzels

Who doesn’t love a good soft pretzel?  Yeah, like the ones at the mall.  Yum, am I right?!  We love them and, lucky for me, I married a guy who loves to bake bread.  I know you’re all jealous.  So, my hubby has adapted our favorite Soft Pretzel recipe into Pizza Pretzels.  These combine the delicious soft pretzel with pizza toppings!  Yummy!

PIZZA PRETZELS
Pizza-Pretzels


Ingredients:

1 Tbsp Yeast
1/8 Cup Warm Water
1 1/3 Cups Warm Water
1/3 Cup Brown Sugar
3 3/4 Cups Flour
1 Tsp. Salt
1/8 Cup Italian Seasoning
2/3 Cup Pepperoni, sliced and diced real small
Powered Parmesan Cheese
Shredded Cheddar or Mozzarella Cheese

Directions:
Dissolve yeast in 1/8 cup warm water. Add all remaining ingredients except the Parmesan cheese and the shredded cheese and beat until smooth. Kneed by hand until smooth, if needed.  We usually just throw the stuff in the KitchenAid.  You could use a bread maker on the dough cycle too… makes for a lot less arm work.  Optional: Let dough rise in an ungreased bowl, uncovered, for 1 hour.  Divide into 12 pieces and shape into pretzels.  We don’t usually bother.

Bring to a rolling boil:
1 Quart Water
3 Tbsp. Baking Soda
3 Tsp. Sugar

Drop pretzel into boiling mixture for about 15 to 20 seconds on each side, Place on cookie sheet. Sprinkle with Parmesan cheese and shredded cheese.  Bake at 400° for 10 to 15 minutes, until golden brown.  Watch the bottoms… they over-cook first.

These are great snacks, appetizers and we’ve even done them as our main course before.  They freeze phenomenally.  Bake and then seal in zippy bags and place in freezer.  Re-warm them in the microwave or the oven.  These keep for at least six months (we’ve never had them last longer than that).

This post was written by Krista and originally appeared on While He Was Napping.
 

May 13, 2013 by Krista

Puffy Paint Cell Phone Case Update

A while back I used washi tape to update my less-than-perfect cell phone case.  It’s one of my most popular posts right now – which is great, I’m glad so many people like it.  However, I tried a few other methods to update the case before I settled on the washi tape and this Puffy Paint Cell Phone Case Update one is worth a share too.

My second favorite method I tried was the puffy paint.  I was using a TPU case and it worked fantastically.  In fact, I almost went with this method, but the washi just looked a little cleaner in the end.  If you’ve got a semi-steady hand and like to doodle, this may be the perfect way to add a little personal touch to your phone.  It’s quick and easy to do a puffy paint cell phone case update and it’ll cost you pennies… each time you change it.  It was so addicting, I probably spent a couple bucks on all my paint, but it was totally fun and so worth it.

PUFFY PAINT CELL PHONE CASE UPDATE

Puffy Paint Cell Phone Case

Materials:
– TPU Cell Phone Case
– “Puffy Paint” or dimensional fabric paint.  The photo below is the paint I used, but I’m sure any brand would work. 
Directions:
– It’s really as easy as it looks.  Draw your designs or doodles right on the back of the phone case.  Don’t use too much paint.  It will make the back of the case uneven and more likely to peel off.  Just enough paint to make a solid line.
– Let dry completely.  I’d suggest at least a couple hours of drying time, but overnight would be best.  The drier the paint the less likely you’ll have peeling problems.
Puffy Paint Cell Phone Case
– Snap the case onto your phone and go.
– Want to change the design?  Simply peel the paint off the case and start over.  There were a couple spots I had to use my finger nail and scrape the paint off, but no big deal.
Puffy Paint Cell Phone Case

**Notes:
– Part of the issue I had with this case straight from the packaging was that it was so slick!  I felt like I was going to send it flying across the counter every time I bumped it.  The paint took the slick away and made it grippy enough that I didn’t have this issue any more.
– If you keep your phone in your pocket or purse, use as little paint as you possibly can.  It’ll adhere and stay stuck to the case better.
– It really was a snap to change the designs.  I only had one case and I did multiple designs on it.
– I didn’t leave the paint for very long… like a day or two max.  I simply had too much fun changing the designs.  I don’t know if the paint will stain over time or not… So, use at your own risk.  If you hate the case already though, you don’t have much to lose, right?
– This method lends more of a playful tone to your phone case, rather than a serious or sophisticated one.  If that’s not your style, try the Washi Tape update.  You can choose a tape that suits your style.
Now get out there and do your own puffy paint cell phone case update!


This post was written by Krista and originally appeared on While He Was Napping.

  • « Previous Page
  • 1
  • …
  • 97
  • 98
  • 99
  • 100
  • 101
  • …
  • 231
  • Next Page »

I'm Krista. Ringleader here on While He Was Napping, wife to my handsome Mr. Right & momma to my THREE energetic boys, Big J (9), Little J (6) & Little N (4). We FINALLY added a beautiful little girl to our family last December.

I’m knee-deep in Tonka trucks & Thomas trains. I survive our crazy days with Vanilla Coke, Sonic slushies, sweet snuggles and little giggles. When I tuck them in tight & kiss them good night, I get a little time to create & just be me.


It all happened
while (s)he was napping
Want More of My Story?

Privacy Policy

While He Was Napping respects your privacy and is committed to keeping any personal information collected on this website confidential. To find out what information we collect and how it is used or what options you have regarding your information, see our full privacy policy here. Creative Commons License The website found at whilehewasnapping.com and all subdomainsauthored and published by Krista is licensed under a Creative Commons Attribution-NonCommercial-NoDerivs 3.0 Unported License.

Pretty Chic Theme By: Pretty Darn Cute Design