While He Was Napping

momma gets stuff done

  • Home
  • About
  • Archive
  • Do It Yourself
    • Crafts
      • No Sew
      • Painting
      • Paper Crafts
      • Repurpose Projects
      • Vinyl
      • Washi Tape
      • Kid’s Crafts
      • Fonts
    • Sewing
    • Decorate
      • Home Decor
      • Holiday Decor
    • Celebrate
      • DIY Gifts
      • DIY Your Party
  • Recipes
    • Beverages
    • Appetizer
      • Bread
      • Other Appetizers
    • Snacks
    • Main Dish
      • Meat
        • Chicken
        • Beef
        • Pork
        • Seafood
      • Vegetarian
      • Slow Cooker
      • 30 Minute Meals
    • Dips & Sauces
    • Salads
    • Pasta
    • Soup
    • Dessert
      • Cookies
      • Brownies
      • Cupcakes and Cake
      • Box Mix Recipes
      • Other Sweet Treats
    • Breakfast Food
      • Pancakes
      • Waffles
      • Muffins
      • Other Breakfast Food
  • Family
    • Babies
      • Pregnancy
      • Newborns
      • The 1st Year
    • Toddlers
    • Preschoolers
    • Kindergartners
    • 6-8 Year Olds
    • The Grown Ups
      • Date Night
      • Romantic Gifts
    • Self Care
  • For the Home
    • Cleaning
    • Organizing
    • Emergency Preparedness
  • Travel
    • Travel Tricks & Tips
    • Traveling with Kids
  • Tech & Gadgets
    • Must-Have Apps
    • Techy Home Appliances
    • Gadgets & Electronics
    • Blogging Tips
  • Printables
    • Posters
      • Quote Printables
      • Subway Art Printables
    • Printable Organizers
    • Printable Journals
    • Learning Printables & Worksheets
    • LDS Printables
  • Holidays
    • New Year’s
    • Valentine’s Day
    • St. Patrick’s Day
    • Easter
    • Cinco de Mayo
    • Mother’s Day
    • Father’s Day
    • 4th of July
    • Back to School
    • Halloween
    • Thanksgiving
    • Christmas
    • Holiday & Seasonal Printables

October 5, 2016 by Krista

Printable Halloween Planner 

“How did this happen?” I thought as I stared back and forth between the two invitations. Yep, just as I had feared. I had committed to two different Halloween parties, in two different locations, on the same night, at the same time. Clearly, the holiday excitement had gotten the best of me and my organizational skills had taken a steep nose dive. If only I’d had this Halloween Planner.

Organize your October with this Halloween Planner! Pin

LET THE HALLOWEEN PLANNER HELP YOU AVOID MY MISTAKE

Don’t let the holidays get the best of you. Put in a little bit of planning and a little bit of time and you’ll have the best Halloween ever. You won’t double book yourself, you won’t miss any costume details, you won’t forget to do any of your fun Halloween traditions. This Halloween Planner will help keep your October organized.

I looked back and forth between the invitations, trying to decide how to fix my faux pas. We’d committed to bring something to both parties and I didn’t want to leave any one unprepared. Could we go to both parties? The idea of putting my family through all that running around did not appeal to me. If only I’d been more organized and planned it out better…


HOW WILL THE HALLOWEEN PLANNER KEEP YOU ORGANIZED? 

  • Use the Event Tracker and calendar to keep all your commitments and events within a glance. No double bookings!
  • Plan all the costume details for the whole family so everyone looks their very best.
  • Make a bucket list together so you don’t forget any traditions or so you can make some new ones.
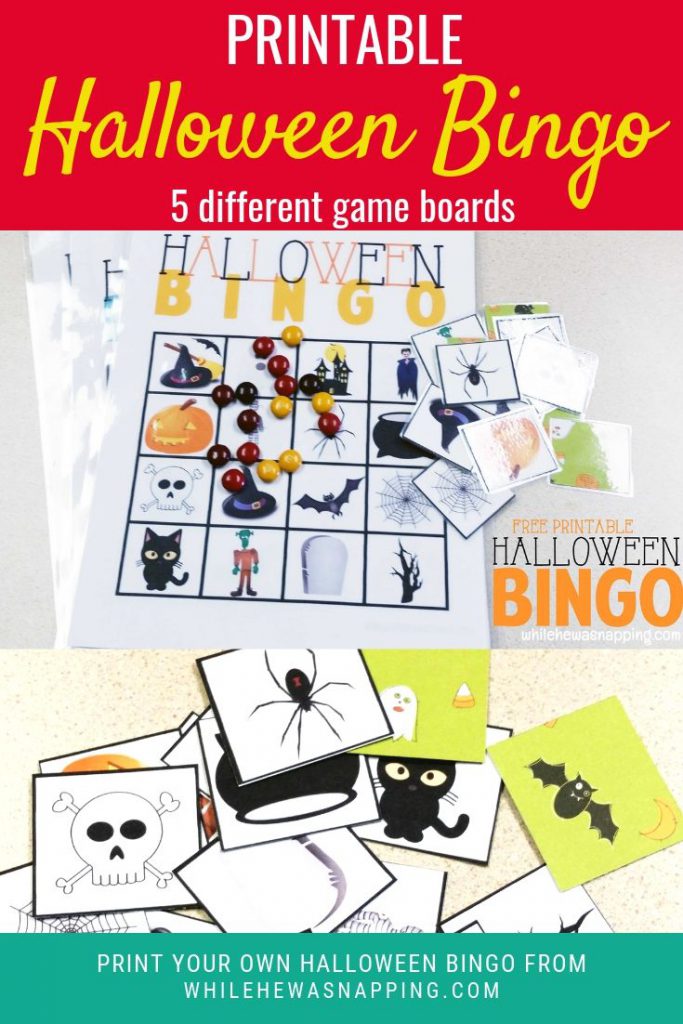
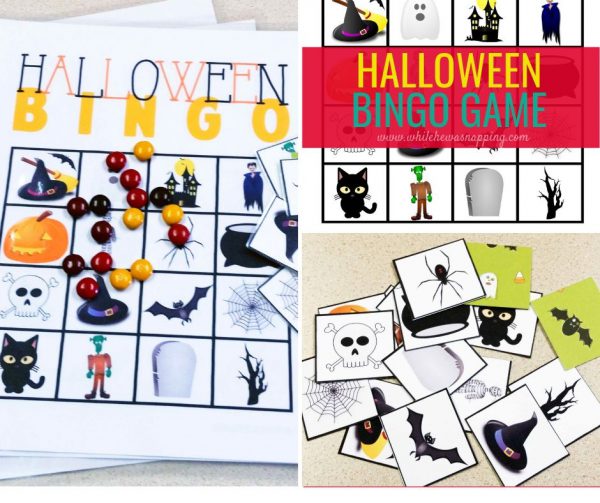
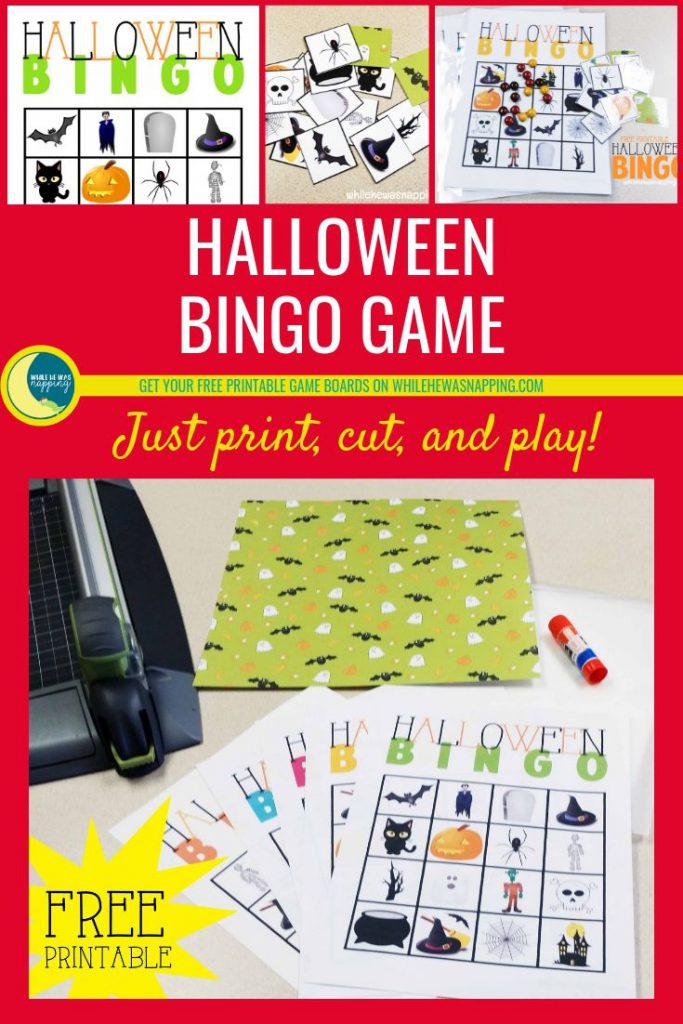
  • Plan the perfect Halloween party! With 5 pages of party planning organizers, it’ll be so easy to keep track of all the details.

I called up my brother and had to tell him that we’d try to make their party, but that I’d double booked us. I arranged to drop off our food contribution that afternoon and apologized again. We spent most of the evening at the other party, but we did make a stop by my brother’s before we called it a night. And now I double, triple and quadruple check that we aren’t double booked during the holidays! And I use a planner to keep track of all those details.

halloween planner costume designer decor planner

halloween planner bucket list event tracker

halloween planner party guests calendar

halloween-planner-party-menu-music

halloween-planner-decor-entertainment

GET YOUR OWN HALLOWEEN PLANNER AND TAKE CONTROL OF YOUR HOLIDAY.

This 11-page planner is yours. I want you to have it so you don’t experience the same scheduling mishap I did. I’ll even send it right to your inbox.

organize-your-october-with-this-free-11-page-halloween-planner

Print your planner at home, on regular 8.5″x11″ printer paper. Print copies of the pages you really want. And enjoy October while it’s here. Before you know it, we’ll be eating turkey and stuffing around the family table.

Happy Halloween!


Don’t forget to add your favorite Halloween activities to your plans. Get more ideas with this Halloween Bucket List! Or check out this one to find some fun activities the kids will love to do!

October 27, 2015 by Krista

Directional Halloween Sign with BEHR® Marquee Paint

I want to thank Behr for sponsoring this post. I was provided with compensation for products used and my time to share this project. All content is original and honest, pinky promise!

Growing up, my family didn’t celebrate Halloween much.  I remember trick-or-treating maybe a handful of times and we attended a few carnivals and Halloween parties.  But, my mom doesn’t like Halloween.  And I get that.  Well, I kinda get that.  The gore and guts, no thanks.  No thanks at all.  I like the cutesy, fun part of Halloween.  And decorating with the cutesy, fun side of Halloween makes me happy.  It’s the kick off to the holiday season!  So I put together a fun Halloween project that turned out fabulously, thanks to BEHR® MARQUEE® Interior Paint & Primer!

DIRECTIONAL HALLOWEEN SIGN

Behr Marquee Halloween Directional Sign


MATERIALS

– 8 ft long 1″x6″ pine board
– 6 ft long 1″x4″ pine board
– Pencil
– Square box or other square to use as a template to make your arrows
– Tape measure
– Jig saw and saw blades
– Belt Sander and/or Sandpaper
– BEHR MARQUEE paint samples in:

  • Torch Red
  • Birthstone
  • Green Dynasty
  • Lamplit
  • Teal Motif
    Behr Marquee Halloween Sign Interior Paint Products

– BEHR PREMIUM PLUS ULTRA® Interior Paint & Primer In One in Black (I would’ve gotten this in MARQUEE as well, but the hardware store couldn’t mix the color I needed with MARQUEE.  The PREMIUM PLUS ULTRA was a great paint too.)
– Paint brushes or foam rollers (I used rollers and foam brushes)
– Newspaper or other covering to protect your work surface
– 1 1/4″ screws
– 3/32″ drill bit
– drill and screwdriver
– black vinyl
– craft cutter or craft knife
– masking tape or transfer tape
– blunt object to press down vinyl
– Polyurethane to seal boards


DIRECTIONS

MARKING THE BOARDS FOR THE HALLOWEEN SIGN

– Use the square box or other square to create arrows on the board.  Line up the point of your box in the middle of the board.  Mark the point of the box to create the point of the arrow.
Behr Marquee Halloween Sign Mark Board for Cutting
– Decide how long you want your arrows to be.  I made mine all different lengths: 12 inches, 16 inches, 18 inches, 20 inches, and 24 inches.  There was a little left over at the end of my board.  Measure and mark all your arrows with the box and the pencil.
Behr Marquee Halloween Sign Mark Board for Cutting Arrows

CUTTING THE BOARDS FOR THE HALLOWEEN SIGN

– Use the jig saw to cut the boards apart.  I let Mr. Napping do this part for me, as I hadn’t ever used the jig saw before and we were on a time limit; he was leaving on a work trip.  I didn’t want to end up missing fingers because of a lack of experience and familiarity.  Be sure to brace the board while you cut.
Behr Marquee Halloween Sign Cut the Board Arrows
– After you have all your arrows cut out, sand the wood until it’s smooth.  We used a belt sander for the majority of the sanding and then I did some touch up with sandpaper before I put on a coat of paint.  Don’t skip the sanding, your paint will turn out so much better if you take the time to prep your boards.
Behr Marquee Halloween Sign Sand the Boards


PAINTING THE BOARDS FOR THE HALLOWEEN SIGN

– Paint each board one of the five colors of the MARQUEE colors.  That’s right, no primer! The MARQUEE collection of paint has a One-Coat coverage guarantee over previously coated surfaces when tinted to any of the 372 colors in the MARQUEE Interior One-Coat Color Collection and applied to previously painted surfaces.  I was very impressed with the coverage even though the boards were not previously coated.  And not having to wait for a primer to dry was fabulous. My least favorite part about painting projects is all the waiting time between coats of paint.  The MARQUEE paint covered my project well and dried fast, which made me a happy momma because it meant I didn’t have a paint project on my kitchen counter for a week before it was completed.  There is also exterior paint available in the MARQUEE line which has some great weather-resistant properties.  If you’re new to painting, Behr has some great directions on how to correctly choose supplies, prepare and prime before you paint.

Behr Marquee Halloween Sign Paint the arrows

– Let the paint dry for a minimum of two hours.  Sand lightly with fine grit sand paper.  This mostly just removes any weird brush strokes or paint puddles that may have gathered and dried during that first coat so your next coat doesn’t just add to the weirdness.
Behr Marquee Halloween Sign Single Coat of Paint
– Paint another coat of paint on each board.  Let dry a minimum of two hours.
– Paint the 6-foot pine board with the black paint.  Let dry and set aside for now.
Behr Marquee Halloween Sign Paint Support Board


APPLYING THE VINYL FOR THE HALLOWEEN SIGN

– Cut out of black vinyl any text and graphics you want to use on your signs with a craft cutter or a craft knife.  I used my craft cutter for my signs.  You can find the links to the jpg files I used to cut from here: TEXT and GRAPHICS.  The files are formatted to 12×12 inches, as that is what fit my cutter.  You can alter the images as you need to fit the dimensions you have available.
Behr Marquee Road Signs Images Behr Marquee Road Signs Text
– Weed out all the negative space from your vinyl and discard it.  I prefer to use masking tape to transfer vinyl, rather than transfer tape.  To do so, place a layer of tape over the image either from top to bottom or bottom to top until it’s covered with tape.  I find it easier to get the vinyl to stick when I’m only pulling off a small layer of tape at a time – and masking tape is usually less sticky than transfer tape, so there’s never any gooey residue left behind.  Use whatever you prefer to transfer vinyl for this part.
– Place the vinyl on the board you choose and begin removing the masking tape a layer at a time.  If the vinyl pulls back up, replace the tape and rub firmly with a blunt object (the handle of a butter knife or scissor handles work well).  Then, pull the tape up again.  It works best if you pull the tape back at a 180-degree angle.
– When the tape is removed from the vinyl, rub the vinyl down firmly with the blunt object.
– Repeat the vinyl transfer process with each board.
Behr Marquee Halloween Sign Applying Vinyl with Masking Tape

SEALING THE BOARDS FOR THE HALLOWEEN SIGN

– Apply a thin layer of Polyurethane to each board.  I intend to use this sign indoors and only applied a single coat to the face of the board.  I didn’t seal the edges or the back.  Let dry thoroughly, overnight if possible.  Polyurethane can be a great sealant and protector once it’s dry, but it can bubble if it gets too hot, is applied too quickly or if items are placed on it before it completely dries.  So, let it dry really well.
Behr Marquee Halloween Sign Seal the boards

Behr Marquee Halloween Sign Let Sealant Dry Thoroughly


ASSEMBLING THE SIGN FOR THE HALLOWEEN SIGN

– On the BACK of the black board , lay out the arrows and arrange them however you like.  Mark the placement with your pencil.
Behr Marquee Halloween Sign Layout Sign
– Turn the black board over and drill pilot holes with the drill bit.  You can drill all the way through the black board.  I decided to do two screws in each board so that the boards won’t twist or spin.
Behr Marquee Halloween Sign Mark Board to Attach Arrows
– Once you have the pilot holes drilled, you can position the boards underneath the black board and sink the screws through the black board into the arrow boards.  By working from the back of the sign, your screws will be hidden.  The boards are also thick enough you won’t need to worry about the screws poking through the front of the arrows.
Behr Marquee Halloween Sign Screw Sign Together

Behr Marquee Halloween Sign Attach Arrows to Board

DISPLAYING THE HALLOWEEN SIGN

– This sign will be used at a Halloween party and I’m simply going to set the sign up against a wall in an infrequently trafficked area.  It’s large enough to see, but hopefully it won’t get played with too much.  Because all I really need to complete my day would be my three boys running around with pointy sticks screwed to a really long stick.  It’s like the ultimate sword.  Call the Emergency Room and alert them now.  My younger sister has also asked to borrow the ultimate sword, I mean sign, for decor for a Halloween party she is co-chairing for the all the college kids at church.
Behr Marquee Halloween Directional Sign and Halloween Decor


So, there you have it.  A fun and cutesy Halloween sign.  No guts or gore here.  Skeleton Street is about as close as I’ll get to that.  This seems like a lot of steps, but it’s actually a really easy paint project.  Definitely something you could do in a day or two, tops.
Behr Marquee Halloween Sign and Interior Paint Products

What are you dying to do with BEHR paints?


This post is brought to you by BEHR. Color that’s True to Hue. If you feel it, you can find it. Visit True to Hue. Behr sponsored this blog post. The opinions, photos and text are all mine, honest.

October 13, 2015 by Krista

BOO It Forward with the Game Night BOO Kit

This shop has been compensated by Collective Bias, Inc. and its advertiser. All opinions are mine alone. #BOOItForward #CollectiveBias

I’ve mentioned before that when I was growing up, we didn’t do much celebrating of Halloween. My mom doesn’t particularly like the holiday and so it was minimally recognized. One thing we did get to do, though, was BOO’ing our friends. I have three siblings and each of us would get to choose a family to BOO. Some years, we would go all out and make fun Halloween cookies and treats to share and some years it was a little more simple. But, it wasn’t really about what was in the goody baskets, it was putting them together as a family. And, of course, delivering them was the best part!

This is a tradition I wanted to share with my family now. We made three kits to share with some friends. I wanted something simple and easy. Life is busy and I just didn’t have hours to spend baking Halloween goodies. Lucky for me, MARS/Wrigley has an amazing BOO it Forward campaign going on and putting together our BOO kits was super simple.

SUPER SIMPLE PRINTABLE GAME NIGHT BOO KIT

BOO it Forward Printable Game Night BOO Kit


Materials:
– BOO It Forward Printable Card for each kit
– MARS Mixed Minis Chocolate Candy Assortment (52 oz)
– MARS Chocolate Mix Fun Size Candy Assortment
– Sunkist® 8oz cans in 6pk
– Pin the Face on the Jack-O-Lantern Printable Game for each kit
– Halloween Bingo Printable Game for each kit
– Bowl or other container for each kit

PUT TOGETHER YOUR BOO IT FORWARD KITS

Directions:
– We grabbed some of our favorite goodies at Walmart: some Sunkist® soda and an assortment of delicious MARS chocolates. I also grabbed a couple of big bowls that were on clearance to stash all our loot in.

BOO it Forward InStore
– I decided we should probably put in something else and it was Big J who thought of including the Halloween games we’ve been playing around here the last couple weeks. So, I made up a few more of the Pin the Face on the Jack-O-Lantern game and some more of the Halloween Bingo game I shared yesterday. We put them in ziptop baggies to keep them together.

Halloween Bingo Printable Free Game

Build a Jack-O-Lantern Printable Pin A Face on the Jack-O-Lantern
– I put the minis on the bottom of the bowl.

BOO it Forward Printable Game Night BOO Kit Minis
– Then, I tucked the games at the back, just under the mini candy bars.

BOO it Forward Printable Game Night BOO Kit Jack-O-Lantern Game

BOO it Forward Printable Game Night BOO Kit Halloween Bingo Game
– Next, I stuck in two of the soda cans on each side of the bowl.

BOO it Forward Printable Game Night BOO Kit Soda Cans
– I took the BOO It Forward printable card, folded it in half and taped it together with some fun Halloween washi tape. This will let your friends know how they can pass on the fun Halloween cheer. Cut the directions off the We’ve Been BOO’d poster and put that in with the card. Your friends can then hang the poster in their window so others will know that they have already been BOO’d once.

BOO it Forward Printable Game Night BOO Kit BOO Card
– Then, I put in the last can of soda and filled in the spaces with the fun size candy.

BOO it Forward Printable Game Night BOO Kit Soda

BOO it Forward Printable Game Night BOO Kit Fun Size Candy

We loaded the kiddos up in the car and delivered our three baskets. Mr. Napping and the two oldest boys left the goody baskets on the doorsteps while Baby N and I stayed in the car. And just like their momma, they thought the best part was the delivery! Who could you BOO to share the Halloween spirit? Check out more awesome BOO kit ideas and get out there and share some goodies!

BOO it Forward Game Night BOO Kit


You can save $1.00 on TWO (2) 2L or 6pk 8oz cans of any flavor Sunkist® Soda, 7UP®, Canada Dry®, A&W®, Squirt®, or Sun Drop® by using this coupon when you purchase items for your BOO Kits! And how would you like a $1000 eGift Card to Walmart? Well, here’s your chance! Check out the widget below:
#booitforwardsweepstakes

October 12, 2015 by Krista

Halloween Bingo Printable Game

Bingo is always a favorite kid game! Add some spook to your game with this Printable Halloween Bingo Game. There are 5 different Halloween Bingo board layouts to make the game a little more exciting and difficult for older kids. Halloween Bingo is the perfect Halloween game for parties, class rooms and laid back afternoons with the kids. Print, cut and play today!

HALLOWEEN BINGO PRINTABLE GAME

Bingo is always a favorite kid game! Add some spook to your game with this Printable Halloween Bingo Game. There are 5 different Halloween Bingo board layouts to make the game a little more exciting and difficult for older kids. Halloween Bingo is the perfect Halloween game for parties, class rooms and laid back afternoons with the kids.

Affiliate Link Disclaimer


HALLOWEEN BINGO MATERIALS:

– Halloween Bingo Boards Click HERE to Download
– Board Markers – I let my kids use candy pieces a couple times and they were in heaven!
– Scissors
– Laminator and laminating pouches – optional
– Halloween-themed scrapbook paper – optional
– Glue stick – optional

Halloween Bingo Printable


HALLOWEEN BINGO DIRECTIONS:

DOWNLOAD AND PRINT THE GAME BOARDS

1. Print the Halloween bingo game boards from the link above. It’s a single PDF file, so there’s only one file to download. Save it to your computer then open the file. There are five different game board layouts. You will need one extra board than you have players, as you’ll use one board to create the draw pile pieces. Print off the number of game boards you need, plus one extra.

CREATING THE DRAW PILE PIECES

2. If you are going to use scrapbook paper to line the back of your Halloween Bingo draw pile pieces, use the glue stick to glue the extra game board and the scrapbook paper together. Place the papers back to back and glue.

Halloween Bingo Printable Draw Pile Supplies
3. Cut apart the squares on the extra board you printed. If you’re not going to laminate your boards, you are now ready to play. I chose to laminate the boards for one reason: so my kids could use dry erase markers to mark off their boards and I didn’t have to supply candy or other markers every time they wanted to play. It’s a bonus that the boards are a little more protected too.

Halloween Bingo Printable Draw Pile Cards Ready to Laminate

Halloween Bingo 5 Game Board Printables

LAMINATE FOR DURABILITY

4. Turn on your laminator and let it warm up (I use and love an older version of this laminator). Place each board inside a laminating pouch, centering it in the pouch. Place the draw pile pieces, one at a time and not touching, inside a laminating pouch. Be sure there is enough space between each piece for the pouch to seal and stay sealed once you cut the pieces apart.

Halloween Bingo Printable Draw Pile Laminating Pouch
5. Run the pages through the laminator, one at a time. Let cool to the touch.

Halloween Bingo Printable Laminate
6. Cut the draw pile pieces apart.

Halloween Bingo Printable Free Game


READY, SET, PLAY THE HALLOWEEN BINGO WAY!

That’s it! You’re now ready to play Halloween Bingo! It’s the perfect activity for a Halloween party, in the class room or just a fun game for a laid back afternoon with the kids.

My 18 month old had a great time drawing a card and matching it to the boards. Of course, he liked the version with candy better, but I can’t blame the boy there? He definitely got my sweet tooth.

Halloween Bingo Game For Kids

October 8, 2015 by Krista

Build a Jack-O-Lantern Printable

While He Was Napping Welcome Banner

Hey there! I’m thrilled you’re here today! Are up to your eyeballs in Halloween spirit yet?

Today, I have a fun Jack-O-Lantern printable for you. I have been trying to take more teaching moments with Little J. He doesn’t have nearly the itching desire to learn like Big J seems to and it’s been harder to take educational moments with him and it’s been frustrating.  Not to mention, I have an 18-month old who’s daily mission seems to search-and-destroy. I think he’s succeeding. Ah, well, we need to get rid of stuff before Christmas gets here anyway, right?

BUILD A JACK-O-LANTERN PRINTABLE

Build a Jack-O-Lantern Printable

Next Page Button

Pages: 1 2
  • « Previous Page
  • 1
  • 2
  • 3
  • Next Page »

I'm Krista. Ringleader here on While He Was Napping, wife to my handsome Mr. Right & momma to my THREE energetic boys, Big J (9), Little J (6) & Little N (4). We FINALLY added a beautiful little girl to our family last December.

I’m knee-deep in Tonka trucks & Thomas trains. I survive our crazy days with Vanilla Coke, Sonic slushies, sweet snuggles and little giggles. When I tuck them in tight & kiss them good night, I get a little time to create & just be me.


It all happened
while (s)he was napping
Want More of My Story?

Privacy Policy

While He Was Napping respects your privacy and is committed to keeping any personal information collected on this website confidential. To find out what information we collect and how it is used or what options you have regarding your information, see our full privacy policy here. Creative Commons License The website found at whilehewasnapping.com and all subdomainsauthored and published by Krista is licensed under a Creative Commons Attribution-NonCommercial-NoDerivs 3.0 Unported License.

Pretty Chic Theme By: Pretty Darn Cute Design