Welcome, welcome to the party. Real quick, features from last week:
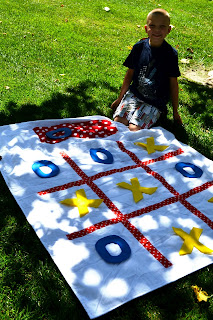
Archives for July 2011
Traveling With Toddlers
I love to travel. I hate traveling with toddlers. I don’t mind sitting in a car for eight hours reading magazines, listening to audio books, snoozing and jamming out to awesome road trip tunes. Unfortunately, I can’t plug in a glue gun though. But everything changes when Little Monkey is in the backseat. Well, not the glue gun… still can’t plug one of those in… Instead of being eight hours of magazines, audio books and road trip tunes, I get to spend eight hours trying to convince my two year old that it’s ok to wear a seat belt, we will eventually get out and we are all “stuck” in the car. Not my idea of fun.
I’ve been gathering ideas and supplies for an upcoming road trip. We’ve actually got two road trips planned. One approximately 700 miles in length, one way. And the other, a month later, 2500 miles in length. That’s a lot of car seat time. Enough to suck the sanity from my life. So, I’ve been searching high and low and racking my brain for things to take and do to keep Little Monkey, and my sanity, from whining and crying the entire 3900 miles. I went through my To-Do List, my snips, snails and puppy dog tails pinterest board and my 101 Things to do with Toddler’s book. Here’s what I came up with:
1) First and foremost, a shallow 9×13” baking sheet. This is a great size for Little Monkey to hold on his lap. It’s small enough that he isn’t struggling with it, but big enough to provide a decent surface area to play on. It sits nicely on his car seat, yet is compact and easy to store when he doesn’t need it. It slips right behind my seat for easy access. More than one kiddo in the backseat? The baking trays stack nicely for your convenience.
2) Colored pencils and color pages. I bought a cheap pack of colored pencils, cut them in half and sharpened both halves. This way the pencils fit in his little fist better and I have twice as many pencil at my disposal to hand out. And, unlike crayons, I don’t have to worry about it melting if he drops one. We also splurged on some Color Wonder pages. No mess is a must in the car.
3) Paper and stickers. With extra paper taped to the baking tray, it’s ok if Little Monkey spreads his creations across the whole surface. It’ll be easy to remove later with no sticker adhesive left behind.
4) Mini busy books. Similar to quiet books, but not totally quiet. I made mine out of felt, so there was no sewing involved. I’m on a time crunch, so no-sew was a must. Sorry, some of the pictures are sideways, I couldn’t get my computer to save them right side up… I apologize for any neck kinks…
5) Felt Play Mats. Little Monkey has one for his cars and a couple for his Fisher Price animals.
6) Pipe Cleaners. You can get them at the Dollar Tree. I twist them together and Little Monkey untwists them. The more complicated the contraption, the more time I have between having to find something else to entertain him with. Although too complicated and he gets frustrated, so I have to be careful.
7) Kid’s Music. Ok, these aren’t road trip tunes, but for the music loving kid, it’ll buy you some tearless minutes. Have a good old sing along. We like some of Raffi. It’s one of the few kid’s music artists that we can listen to for more than five minutes without getting a migraine.
8) Magnets. They stick right to the baking tray, as long as the tray isn’t aluminum. Little Monkey can play with his animal magnets, letter magnets, my homemade magnets and his Lightning McQueen magnets.
9) I Spy bags. I also used plastic water bottles filled with random items and rice. Hot glue or super glue the lids on. You can also fill your water bottle 2/3 full with water. Put some food coloring in it. Fill the rest the bottle with veggie oil or baby oil. You can put little items in the oil too. Just make sure you fasten the lids with glue or you will have a huge mess to clean up. Test them with several good, firm squeezes before handing them off to the kids.
10) The DVD player. We don’t actually have a DVD player. We use my laptop. It’s small and fits nicely between the seats. We have an external hard drive with Little Monkey’s favorites loaded and ready to go. This is usually our last resort though. You can only listen to Cars and Mickey Mouse Clubhouse for so long. Splurge on a couple new movies for your trip. Kids will sit still longer if it’s not something they have seen ten times before.
11) Mega-Blocks. Two or three pieces can keep my little one busy for a while. He loves to pull them apart and try to push them back together.
12) Mr. Potato Head. Little Monkey isn’t quite dexterous enough to do Potato Head all by himself yet, but it only takes a few seconds to pull all the pieces out and hand them back to him so he can start over with a new Picasso-style creation.
13) Masking tape. We often play with masking tape. I’ll give Little Monkey a piece and he goes to town. Masking tape is pretty easy to pull off almost any surface, so it’s virtually worry-free. Just make sure you do a masking tape sweep before you get out and leave the car, and it’s contents, to bake in the sun. Heated tape is absolutely stickier than stuff right off the roll.
14) Stories and books. My little one loves books. Small and easy to handle with pages that don’t easily tear are the best bets. Recently, we started telling stories like The Three Little Pigs and Goldilocks and the Three Bears. Little Monkey loves the Big Bad Wolf “huff and puff and blow the house in” part. And he says “chinny-chin-chin” really cute.
15) Picture books with family photos. You can find cheap photo albums at the Dollar Tree. Print off some of your favorite family photos and put them in the albums. If you are headed to a family reunion, get photos of extended family members and help your kids learn who they are (if they don’t already know).
16) Lacing beads and lacing cards. Little Monkey can’t lace them on his own yet, but he likes to play with them once they are laced and strung.
17) Black construction paper and chalk. It’s easy to clean up the dust with a wet wipe. Colored chalk gives variety, while the construction paper is a cool texture. Kids love it. Minimize hassle by handing out one piece of chalk at a time.
18) Muffin Tins. There are a lot of things you can do with muffin tins. Little Monkey’s favorite is water play, but that’s not gonna happen in the backseat! Pom pom balls are fun and separating the colors into separate cups is a good activity. You can sort all kinds of things: buttons, colored goldfish crackers, yo-gos, different flavored cheese cubes, foam shapes, colored craft sticks, colored clothes pins, ect.
19) Sensory Bottles. I have been wanting to make these forever and figured this was a good time to take the initiative to do it. I’ve been trying to keep them hidden from Little Monkey so that they are new and cool. Hopefully, he will think so.
20) Alphabet bank. Little Monkey is almost 2, so he definitely doesn’t know the ABC’s yet, but I made him a little bank from a formula can I saved and stashed away from the good, ole days and some canning lid seals. I printed the letters onto scrapbook paper and then traced the lids and cut them out. I purposely left it a little large so there would be some paper to cover the sharp edge (although it wasn’t that sharp. I tried to cut myself with them, to test for safety, and had no success. The things we do for our kids… oh, boy). I used LocTite spray adhesive to adhere them to the lids and then coated them with a thin layer of Modge Podge to try and shield them from Little Monkey’s destructive tendencies.
21) Puzzles. Choose ones that will fit on the baking tray. Little Monkey is into all things Cars right now, so this nine piece, inter-locking foam Lightning McQueen puzzle I found at the Dollar Tree is a big hit. It’s nice that the pieces can go anywhere too.
22) Nesting Blocks. Little Monkey isn’t so great at stacking the blocks tall, but he’s getting there. He does like to put them inside each other. And he learns about big, bigger and biggest.
23) Finger puppets. Little Monkey has just discovered the fun of putting things on his fingers. Olives? Absolutely. Bugles chips? Of course. Felt finger puppets? Yup. These were easy to make and I found the idea at 1000 Points of Creativity, whom I found while surfing one afternoon.
24) Small chalk board and chalk. It’s less wasteful than paper. It’s easy to clean up. And it’s cheap. I found this board at the Dollar Tree. It came with two sticks of white chalk and a foam eraser.
25) Cars and trucks. I really like the little Tonka Chuck and Friends trucks. They have big pieces, so if they do break, I don’t have to worry so much about Little Monkey choking on the pieces. But, they can be kinda pricey. I’ve found some knock off at the Dollar Tree a few times and I’ll grab some of them when I see them. Check the quality before you buy though. It is the Dollar Tree.
These ideas came from Mom’s Minivan:
– Tin foil sculpting. Give each of your kids a piece of tin foil and let them go wild. Who can make the coolest dinosaur? Flower? Hat?
– Surprise packages. Give your kiddo a surprise package every 25, 50, 75, or 100 miles. A toy, an activity book, a snack and juice box.
– Mini MagnaDoodle and Etch-A-Sketch. My Little Monkey loves his MagnaDoodle. It doesn’t always last long, but a few moments of peace are worth it.
Car-Friendly Snacks:
– Apple slices. Cut the skins off if your little one still has trouble with them. Slice them thin enough that your kids won’t choke on them. Dip them in Sprite, 7-up or lemon juice to keep them from turning brown.
– Cereal Mixes or Gerber Graduate Puffs, depending on age. The Puffs come in generic (and less expensive) brands and dissolve in your little ones’ mouth. Minimize the choking hazard? Yes, please. Little Monkey will inhale these, not literally, but you know… And when he has food in his mouth, no sound comes out… =]
– Trail Mix. It can be a little spendy, but I think it’s totally worth it. You can make your own and put all the stuff your kids (and you) like in it.
– String Cheese or cheese cubes. A small, soft sided cooler will keep these cold.
– Juice boxes. Even if your kiddo doesn’t use a juice box, it’s a lot easier to store these than a whole bottle of juice.
– Bite-size crackers. If the whole cracker will fit in your kids’ mouth all at once, you’ll minimize mess. And crackers come in lots of varieties, so if one kiddo doesn’t like cheese flavor get him peanut butter instead. Or graham crackers.
– Fruit cut into bite size pieces. Take a piece of tin foil that will fit on your tray. When you feed things like grapes that will make a little more of a mess, lay out the tin foil, wrap it around the tray and let your little one have at it. When they are finished, wipe the foil down with a wet wipe and fold it up for next time.
Some of these ideas I also ran into around the web, but I racked my brain long and hard before I started looking for help. My pinterest board was super helpful and Mom’s Minivan is a pretty good site for all things travel.
Good luck and safe travels!
Krista
You Nailed It!
I’m sure you’ve pulled out those pretty, little bottles a time or two this summer. Maybe you’ve been one of those lucky ladies at the salon with your feet being lotioned and massaged while you indulge in the latest fashion magazine. If so, good for you, you lucky duck! Are you one of those ladies that can choose a color in 30 seconds? Or do you take forever to choose one? I’m the latter category. So, how do you choose? Maybe some of these tips can help.
– Choose the color based on the occasion or event. Your polish color at work will be different than the polish you choose for a hot date, right? For a more formal setting, neutrals and muted colors are best. Clear polish is a great way to get a finished look.
If you’re headed out to a party, dare to go bold. Metallic colors make a bold statement and are relatively versatile. Keep in mind the jewelry you will be wearing and color your nails accordingly.
– Choose your color based on the tone of your skin. If you are fair skinned, lighter shades are the best bet. Dark ones tend to wash out your skin. Pink undertones and blue undertones are good choices. Berry is a great bold color.
If your skin has more olive undertones and is a bit darker, you’ll probably look fantastic in shades of russet and gold. These shades of nail polish really tend to play up olive skin.
If you have dark skin, you can get by with almost any rich, deep or vibrant shades of nail polish including vibrant reds and purples. You can generally get by with a bolder display of color than can the fair skinned person.
– Choose your color based on your lip color. One way to determine what shades of nail polish will work with your skin tone is to choose nail color based on the colors that flatter your lips. The colors that look good on your lips will probably also look good on your nails.
– Choose a color to coordinate with your clothes. If you wear a lot of brown shades of clothing, you’ll want to consider adding these shades of nail polish to your collection. Take inventory of what’s in your closet and keep your dominant clothing shades in mind when you choose nail color.
– Choose a color based on the season and the current trends. During the warmer months, you’ll want to go lighter with your nail polish color. Those pale, translucent pinks and pale lavenders may be appropriate. Also take into consideration the prevailing color trends in nail color. If purples are hot, this might be a good thing to know.
With unlimited choices and options of colors to wear on your fingers and toes, the possibilities are endless. Good luck and happy color picking!
Krista
The Secret to Bronzer
Have you discovered the joy and beauty or bronzer? Oh, I hope so. If not, you’ve come to the right place. Bronzer is amazing. It will give you the subtle summer glow, bring out the structure of your face and create a stunning contrast to your blush. If you use a bronzer with some shimmer, it will also help you look less tired because light will reflect off the shimmer which will make you appear more awake. So, how do you wear this masterpiece? Let me tell you.
1. The key to natural looking bronzer is a light, subtle application. Painting your entire face is not the way to go. It will look orange and often leaves a visible line at the jaw. Besides, a white neck and tan face… Eek! There are gel bronzers, loose powdered bronzers, pressed powdered bronzers and tinted moisturizers. I prefer pressed powder.
2. Use a full powder or bronzer brush and gently dab it against the powder a couple times. Shake the brush gently to knock any loose stuff off.
3. Sweep it upward on your cheekbones and then downward to your jaw line in one fluid motion. Blend it in with your fingertips.
3. Repeat step 2. Start your next brush stroke in the middle of your forehead and do one quick, light sweep to your temple. Go back to the middle of your forehead and do the same to the other side. This will help spread the bronzer evenly and keep one side of your face from being darker than the other. Blend with your fingertips.
4. Repeat step 2 again. Lightly brush the tip of your nose, jump over your lips, and brush your chin. Blend the powder on your nose and chin with the brush. If there are obvious lines, use your finger tips to blend.
5. You can also lightly brush your neck so it matches your face. Bronzer also makes a great natural eye shadow with just a touch of sparkle.
6. Apply blush to the apples of your cheeks. Lightly is the key here, too. Both bronzer and blush should appear natural.
Bask in the beauty of your bronzed goodness. Sigh.
Krista
Weekend Wander #39
Welcome to the party! These were some of my faves from last week:
- 1
- 2
- 3
- 4
- Next Page »