While He Was Napping

momma gets stuff done

  • Home
  • About
  • Archive
  • Do It Yourself
    • Crafts
      • No Sew
      • Painting
      • Paper Crafts
      • Repurpose Projects
      • Vinyl
      • Washi Tape
      • Kid’s Crafts
      • Fonts
    • Sewing
    • Decorate
      • Home Decor
      • Holiday Decor
    • Celebrate
      • DIY Gifts
      • DIY Your Party
  • Recipes
    • Beverages
    • Appetizer
      • Bread
      • Other Appetizers
    • Snacks
    • Main Dish
      • Meat
        • Chicken
        • Beef
        • Pork
        • Seafood
      • Vegetarian
      • Slow Cooker
      • 30 Minute Meals
    • Dips & Sauces
    • Salads
    • Pasta
    • Soup
    • Dessert
      • Cookies
      • Brownies
      • Cupcakes and Cake
      • Box Mix Recipes
      • Other Sweet Treats
    • Breakfast Food
      • Pancakes
      • Waffles
      • Muffins
      • Other Breakfast Food
  • Family
    • Babies
      • Pregnancy
      • Newborns
      • The 1st Year
    • Toddlers
    • Preschoolers
    • Kindergartners
    • 6-8 Year Olds
    • The Grown Ups
      • Date Night
      • Romantic Gifts
    • Self Care
  • For the Home
    • Cleaning
    • Organizing
    • Emergency Preparedness
  • Travel
    • Travel Tricks & Tips
    • Traveling with Kids
  • Tech & Gadgets
    • Must-Have Apps
    • Techy Home Appliances
    • Gadgets & Electronics
    • Blogging Tips
  • Printables
    • Posters
      • Quote Printables
      • Subway Art Printables
    • Printable Organizers
    • Printable Journals
    • Learning Printables & Worksheets
    • LDS Printables
  • Holidays
    • New Year’s
    • Valentine’s Day
    • St. Patrick’s Day
    • Easter
    • Cinco de Mayo
    • Mother’s Day
    • Father’s Day
    • 4th of July
    • Back to School
    • Halloween
    • Thanksgiving
    • Christmas
    • Holiday & Seasonal Printables

July 27, 2015 by Krista

Road Trip Snacks Kit

We love a good road trip. One of our goals is to squeeze every little bit we can out of summer, including all the road trips we can manage. But traveling with kids can be tricky if you’re not prepared. And great road trip snacks are a major factor of success.

I have put together a road trip snacks kit that is sure to save the day.  It’ll keep the whole car happy – and that means momma doesn’t have to spend the whole trip opening juice boxes and chucking bags of chips into the back seat.

ROAD TRIP SNACKS KIT

Road Trip Snack Kit Summer Fun Road Trip Snacks Baskets

PUTTING YOUR SNACK KITS TOGETHER

This part is the most crucial part. But that’s ok, it’s important but it’s also pretty easy. You’re just dividing up snacks for each person – yes, like you do every day – but, today it’s for the entire day… at one time. You got this! It’s a little more work, but it will be worth it. Ready?

Materials for your road trips snacks kit:

– small baskets that are easy to see inside – it will be easier to find what you are looking for if you can see it.
– snack friendly foods – I’ll get more in-depth in just a second.  It’ll be worth it, promise.
– small containers or ziptop bags – consider serving sizes when selecting these.

Directions to put together a road trip snacks kit:

– Purchase or make your snack-friendly foods and divide your road trip snacks into single serving sizes.  Not single serving in terms of nutrition facts, but how much you want to consume (or to be consumed) at a single time.

– Fill your small containers with your single-serving sized road trip snacks.  Consider the age of the kit’s owner as to how much you put in each container.  For example, I wouldn’t give my husband and my three-year-old the same sized snacks.  There would be a mutiny on my hands.

Road Trip Snack KitTwizzlers Summer Fun Road TripSnacks Kit

Road Trip Snack KitTwizzlers Summer Fun Snacks Labeled
– Store all road trip snacks inside the small baskets.  Each person gets their own basket.  Place the baskets within easy reach of each person’s seat.  If you will have to hand out snacks to the kids, make it so you can reach them.

Road Trip Snack Kit Twizzlers Summer Fun Road Trip Snacks Baskets
– Depending on the length of your trip, you can decide if you will refill the road trip snacks baskets at a certain time or not.  On our nearly-900 mile trip, I will be refilling the baskets about every 200 miles.  This will help my family pace themselves in their snacking and, hopefully, help avoid any carsick episodes from overeating.

ROAD TRIP SNACK IDEAS

DISCLAIMER: These are just ideas. Depending on the age and diets of your travel companions, you may want to adjust this list and consider choking hazards. Choose foods your family enjoys and focus on your specific snacking needs. The kit I created was for me and it doesn’t include all the items listed. I would make adjustments to my kit for both my kids and my husband. Do what is best for each member of your family. That’s why everyone gets their own kit.

– licorice
– candies
– chips
– pretzels
– trail mix
– fruit cups
– granola bars
– applesauce
– dried apple slices
– dried apricots
– dried bananas
– dried mangos
– crackers
– string cheese
– cheese cubes
– raw almonds
– raw pecans
– pistachios
– peanuts
– grapes
– apple slices
– cucumber slices
– grape tomatoes
– baby carrots
– celery sticks
– jicama slices
– mango cubes
– fruit snacks or leather
– Water

ROAD TRIP BINGO!

I also made a little game up for my kids.  Because 900 miles is a long way.  And they are on a Bingo kick right now.  This is super simple to put together and it might help pass a few miles with out the “are we there yet?” version of 20 questions.  There are two ways to play.  You can mark off the boxes as you see the item in each box along the road.  Or you can print an extra Bingo card and make little cards out of them that you draw and then each player can mark off the picture on their game board.

Materials:
– The Road Trip Bingo game boards.  There are three versions of the boards.  All the boards have the same pictures, but in different spots.  Make prints of the same game board to see who is being the most observant and race each other to Bingo!  Or print off all three boards and see who can get Bingo first the traditional way.
– Laminator and laminating sheets (or contact paper will work too)
– Scissors

Directions:
– Download the game boards.  You’ll have to click each link to download and save it to your computer.
Version 1          Version 2          Version 3          
– Print the game boards.  If you opt to make a set of cards to draw and play that way, I would suggest printing at least the extra game board on card stock so you can’t see through the paper.  I didn’t even think about it and just used regular paper – so my cards are see through.  Do as I say, not as I do.  It’ll save you some paper and ink.  And time when you have to print and laminate them again.

Road Trip Snack KitTwizzlers Summer Fun Bingo Print
– Laminate the boards.

Road Trip Snack KitTwizzlers Summer Fun Bingo laminate
– Cut the extra board apart on the black lines.

Road Trip Snack KitTwizzlers Summer Fun Bingo Cut out cards
– Lay out the squares on a laminating sheet.  Make sure there’s enough space between each card.  Laminate the cards and cut them apart.

Road Trip Snack KitTwizzlers Summer Fun Bingo laminate cut out
– I made a little pocket on the back of one of the game boards to hold the cards when they aren’t being played with.  I just took some duct tape and taped a ziptop bag onto the back of the board.  Totally optional and it doesn’t look real pretty, but it will help us keep from losing the pieces.

Road Trip Snack KitTwizzlers Summer Fun Bingo Pocket

That’s it!  Super easy.  You can use a dry erase marker or pencil to mark off the boxes as you play.  If you put the pocket on the back of one of the game boards, you could store the dry erase markers in there too.  Or just use pieces of your road trip snacks kit to mark off the boxes.  First one to “Bingo!” gets to eat their board markers!

HAPPY ROAD TRIPPING!

AND HAPPY ROAD TRIPS SNACKS!

July 24, 2015 by Krista

… Everyone else calls a Butterfly Chalkboard Printable

I’m over at Ask Anna again today with a fun chalkboard printable for you.  Some things have happened lately and it’s made me realize that what seems to be a major life event can turn out to be merely a bump in the road.  I have recently seen the various reactions people can give to news that can seem catastrophic.  The time, the worry, the stress and the fear.  And some times, it’s not warranted – it’s simply the mind thinking worst-case scenario.  I’ve also realized that way of dealing with unexpected bad news can be a coping mechanism for some.  “If I’m expecting the worst, I won’t be surprised or devastated later.  And if it doesn’t turn out that way, that’s great.”  But what a sad way to live, to spend all that time depressed and grieving.  Why mourn for something you haven’t, and might never, lose?  There are better ways to spend the time and energy, in my opinion.  This print is a reminder to me to carpe diem, seize the day and make it the very best you possibly can.  Every single day.


Everyone else calls a butterfly


Go grab this print over at Ask Anna.  It’s formatted to 8×10″ and, through the link on Anna’s site, you can get a full quality and watermark-free version.  Frame and hang it, make a card with it, shrink it down and put it in your wallet, whatever strikes your fancy – just enjoy!

GET THE BUTTERFLY CHALKBOARD PRINTABLE ON ASK ANNA

and embrace the glass half full, the rainbow in the rainstorm, the silver lining.  Life is too short to worry it away.

July 22, 2015 by Krista

DIY Cardboard Box Cars for an At-Home Movie Night

If you’ve ever been to a drive-in movie, you know how fun it can be. We love piling into the back of our van with all our favorite blankets and treats and enjoying a movie out in the summer air. But the drive in movies aren’t just fun in summer time, right?! You can skip the chilly night air and bring that fun right into your living room with a fun kid’s activity and art project: Making cardboard box cars! Then, let the kids sit in them while you watch a movie! Two fun family activities in one!

DIY CARDBOARD BOX CARS FOR AN AT HOME DRIVE-IN MOVIE NIGHT

Tyson Any'Tizers DIY Drive-In Cardboard Box Cars

DIY Cardboard Box Cars Materials:

– cardboard boxes your child can fit inside (1 for each car)
– box cutter
– spray paint
– packing tape
– construction paper
– hot glue gun and glue sticks
– scissors
– foam letter stickers
– chalk markers
– 3-inch circle punch
– aluminium foil
– black paper plates
– paper cup
– black wide (2 to 3 inches) grosgrain ribbon

Tyson Any'Tizers DIY Drive-In Cardboard Box Car Materials

DIY Cardboard Box Cars Directions:

PREPARE YOUR BOX

1. Start with some large, empty boxes. The boxes need to be big enough for your child to fit inside them semi-comfortably. Large diaper boxes are good.

2. Cut the flaps off the top of the box and a space wide enough to comfortably stand up through the bottom of the box.

Tyson Any'Tizers DIY Drive-In Cardboard Box Car Box Prep

3.  Use the flaps and packing tape to create any extra shape to the car you want.  I made a little dashboard in the green car and used small triangular pieces to help support the windshield in both cars.

4. Spray paint the boxes. My red box needed a primer, but the blue box did not.  Both boxes got four coats of paint, plus the red box got a layer of primer.  Let the paint dry thoroughly, preferably overnight.  Mine actually dried for a couple of days, but 4-6 hours should be sufficient.

Tyson Any'Tizers DIY Drive-In Cardboard Box Prep

** If you want to construct cars as a group activity, whether for a movie night, a kids’ party or some other event, you will want to have the above completed prior to your event.  You may want to do some of the following prior to the event as well, such as having things pre-cut.


CONSTRUCT YOUR CARS

5. Use paper plates and construction paper circles to create wheels for your car. Each wheel will need one plate and one circle. Use a glue stick to glue the construction paper circle to the center of the plate and use hot glue to secure the plate to the box. You will NOT want the plate to extend past the bottom of the box or it will get crushed when the box is placed on the floor.

Tyson Any'Tizers DIY Drive-In Cardboard Box Car Wheels

6. Use a small piece of one of the cardboard flap, cut to a rectangle, to make a rear view mirror. Cover the rectangle with construction paper and use a small piece of aluminium foil to make the reflective ‘mirror’ part. Hot glue the mirror to the windshield inside the car.  It won’t fall off, but it’s not super sturdy either. But, it’s hot glue, so no big deal.

Tyson Any'Tizers DIY Drive-In Cardboard Box Car Rear View Mirror & Steering Wheel

7.  Make a steering wheel with a black paper plate.  You can decorate it or not.  One of my boys chose to put a colored construction paper circle on his, the other decided not to.

In the green car, I secured the steering wheel to the dashboard I created with a small piece of cardboard taped onto the dashboard.  I then hot glued the steering wheel plate to the small cardboard.

In the blue car, I used a paper cup covered in black construction paper to make a steering column.  I then hot glued the steering wheel plate to the cup and the cup inside the box where the steering wheel is supposed to be (on the left, in our case).


GOTTA HAVE A SEAT BELT

8. Not only does a seat belt keep you safe, in this car, it holds it up! Create a seat belt with wide black grosgrain ribbon.  I poked small holes in opposite corners of the box.  If you’re standing at the back of the car, I put holes in the front right and the back left so it was like wearing a seat belt on the driver’s side of the car (in the US).

Put one end of the ribbon through one of the holes and tie a knot. Measure on the child how long the ribbon needs to be.  Length will depend on the length of the child’s torso and where they want the car to sit while they are playing.

Have them stand in the car and pull the ribbon up over their shoulder and to the back of the car. Big J wanted his car to sit lower than Little J did, so the best way to figure this out is to actually measure it with the child in the car.  Poke the other end through the hole at the back of the car and tie another knot. In the green car, we hid the front knot under the bumper.

DIY Cardboard Box Cars

9. If you want to create a bumper, use one of the flaps from the short side of the box and cut off a strip abour 3 inches wide.  Wrap it in aluminium foil and use hot glue to secure it to the car.


DON’T FORGET THE HEADLIGHTS!

10. Create headlights with circles of yellow construction paper.  Glue them on with a glue stick.  Yellow plastic cups would also be cute and super easy for this.  Create a windshield with a rectangle of light blue construction paper and glue it on.  I had to use hot glue for the windshield.  You could cut the windshield out, but I knew ours wouldn’t last that long if there were just small pieces of cardboard holding it all up, so I left it intact and used the construction paper instead.  They have no problems seeing over it.

Tyson Any'Tizers DIY Drive-In Cardboard Box Car Front


PERSONALIZE IT!

11. Create a license plate with construction paper.  We used foam letter stickers and Big J and I used a chalk marker to write the large letters on the green car.  Little J just did his own thing on this one.  Make it a fun one!

Tyson Any'Tizers DIY Drive-In Cardboard Box Car License Plate


READY, SET… DRIVE!

Now, your kiddos are ready for a great movie night!  We have a large screen and projector that we like to set up for movie nights at our house.  It was perfect for our at-home drive-in.  And best of all, we didn’t have to wait for it to get dark, which means the kids were still in bed at a decent hour.  Mom win!  But what’s a movie night without some awesome movie night snacks?!  Popcorn is the old standard and there are lots of ways to make just the way you like it.  But, it’s definitely not the only go-to movie snack in our house.

Tyson Any'Tizers DIY Drive-In DIY Cardboard Box Cars


MY TOP FOUR MOVIE SNACKS (besides popcorn)

SWEET AND SALTY COMBO

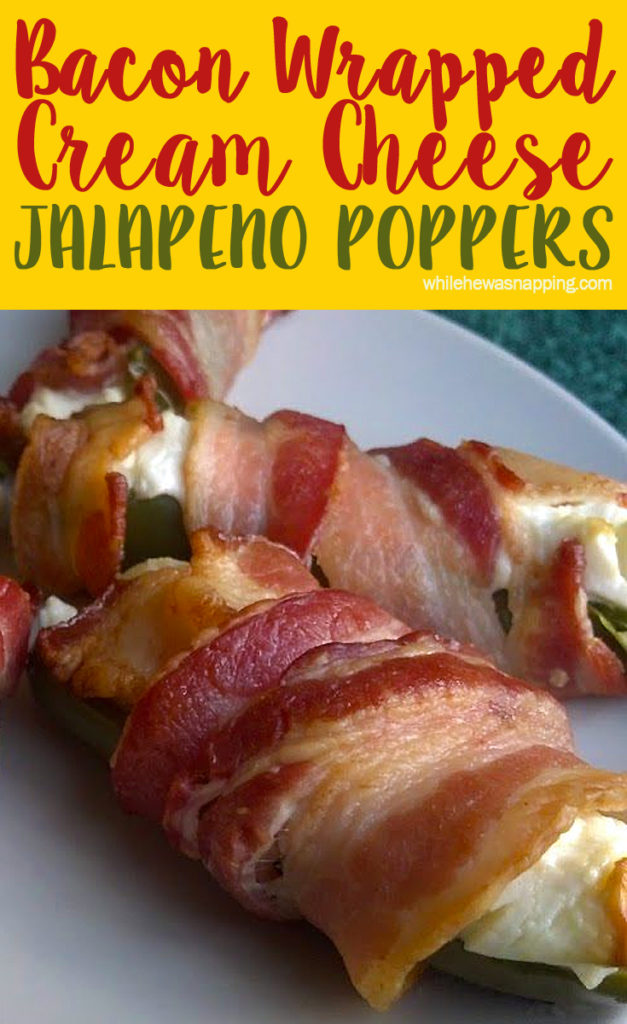
1. Bacon Jalapeno Poppers!  These things are like crack. Seriously, I can promise you won’t be able to eat just one. Or two. Or even three. These jalapeno poppers are so delicious. It takes a little bit of time to cut them, pull out the seeds and then wrap each one – BUT, it is SO, SO, SO worth it! The sweet cream cheese, the salty bacon, the mild heat of the jalapeno. Yum. YUM.

Bacon Cream Cheese Jalapeno Poppers.jpg


HEARTY AND CHEESY

2. Pizza Pretzels.  It’s a soft pretzel with pizza toppings: pepperoni, Italian herbs, Parmesan and Colby Jack cheese.  It’s probably a ton of calories and your entire carbohydrate allowance for the day… but it’s totally worth the splurge!

Pizza-Pretzels


FRESH AND SWEET SALSA

3. Mango Salsa and Tortilla Chips.  This is the perfect way to get a little sweet and salty going on.  It’s a fresh salsa made with delicious sweet mangoes, zippy onions, crunchy peppers and fresh cilantro.  Pair with tortilla chips.  Or eat it out of the bowl with a spoon.  I won’t tell.

Mango-Salsa


SATISFY THAT SWEET TOOTH

4. And, because I’m a chocoholic… Peanut Butter Cup Bars.  It’s all the goodness of peanut butter cups in an easy to make cookie bar-style little treat.  There’s just something about the peanut butter and chocolate combo that hits the spot for me.

Peanut-Butter-Cup-Bars1


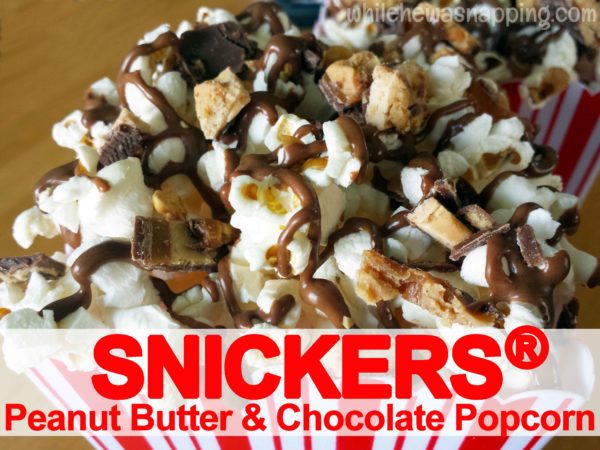
BONUS SNACK: If popcorn is just totally your jam… I got you. This Snickers Peanut Butter Chocolate Popcorn is AMAZING! Almost as addicting as those Jalapeno Poppers up there. But with chocolate. Try it. You’ll love it.

Snickers Peanut Butter Chocolate Popcorn

What are you waiting for?! Get your drive in movie on… at home!

July 20, 2015 by Krista

Shepherd’s Pie Tinfoil Dinner

We recently went to one of my dad’s family reunions.  We have one every year and have ever since I can remember.  We used to go to my great-grandpa’s farm and camp out on the property there, but over the past decade and a half we’ve begun exploring other areas around the western US.  It’s one of my favorite summer traditions.  But it can be hard to feed that many people over several days.  Our solution: each of my dad’s siblings and their immediate family members and then his parents and single siblings take a meal (usually we just do breakfast and dinner – BYO (bring your own) for lunches).  This year my family had a dinner meal assigned to us.  We came up with this Shepherd’s Pie Tinfoil dinner.

SHEPHERD’S PIE TINFOIL DINNER

Print This Recipe
Shepherd's Pie Tinfoil Dinner

Prep time:  15 mins

Cook time:  30 mins

Total time:  45 mins

Serves: 5 servings

An easy tinfoil dinner recipe that is perfect for camping or a quick meal at home.
Ingredients
  • 16 oz bag of frozen mixed vegetables
  • 16 oz shredded frozen hash browns
  • 10.5 oz can cream of mushroom soup (you can use a "cream of" substitute if you prefer)
  • 1 lb of ground beef
  • 2 cups shredded cheddar cheese
  • chopped green onions (if desired)
  • tinfoil
Instructions
  1. Thaw the hash browns so you aren't trying to mix in huge chunks of potatoes. Break up the frozen veggies in the package so they aren't in large chunks either.
  2. While the hash browns and veggies are thawing, cook up the ground beef in a frying pan on the stove. Medium heat until evenly browned, Add seasonings to taste and desire.
  3. Combine the hash browns, the frozen veggies, browned ground beef and the cream of mushroom soup in a large bowl and stir until evenly mixed.
  4. Put a single serving amount of veggie-potato-beef mix in the center of a square of tinfoil. How much you put in there will depend on how much you want to eat. I average about a cup to a cup and a half in each tinfoil square. Mr Napping likes closer to 2 cups in his.
  5. Wrap each tinfoil square up tightly and put it on coals or in the oven. Cook on coals for about 30 mins or in the oven for 20-30 minutes.
  6. Unwrap the foil packet and transfer contents to a plate, if desired.
  7. Sprinkle with cheese and green onions, and serve.
  8. It will be HOT! Be CAREFUL!
Notes
To cook in a crock pot, prepare the packets as directed and then put in the crock pot on low for 4-6 hours. Make dinner even easier!
3.2.2925

This recipe is tasty, easy and you can feed a large group with minimal additional prep work.  It’s awesome for camping.  Throw it all in a tinfoil pouch and into the coals.  And it’s a great quick and easy dinner at home.  It’s relatively inexpensive, which is a plus in a household of testosterone and hungry boys.

Shepherd's Pie Tinfoil Dinner Closeup

July 17, 2015 by Krista

Folding a Fitted Sheet into a Roll

It’s mid-morning on a warm summer day.  Your family has decided to brave the great outdoors in nothing but a tent.  Good, old-fashioned camping – none of this “glamping” stuff people rave about now.  The sky is partly cloudy and the temperatures are in the high 80’s.  The humidity also hovers in the high 80’s.  You’re sitting in the shade with a cool bottle of water you pulled out of your ice chest and you can feel a bead of sweat run down your back.  Your 1-year-old has begun to fuss and you know nap time is here.

You step inside the tent and have to look around to make sure the tent door wasn’t a secret passage way to the sauna at your favorite health spa… nope, it’s still just a tent.  Sweat beads up in your hair line and you realize pretty quickly that your little babe will not be sleeping in this heat and humidity.  What’s a momma to do?

Helping Baby Sleep Better on Vacation Disney Baby Outdoor Covered Pack&Play

If you saw my post about why you might want to consider taking your crib bedding with you next time you vacation with baby, you may have come across some ways to use a fitted crib sheet that you may not have previously thought of.  In fact, since putting that post together, I’ve come up with some more ways to use it and have decided that it’s worth carrying one around in our diaper bag as an everyday item.

But folding a fitted sheet every day is not my idea of fun.  I’ve decided to fold my fitted sheet into a roll for carrying around in the diaper bag.  It saves a little room, stays folded much better and isn’t any harder to fold than folding it flat.

Reach deep down into your note writing days from junior high and high school, because this is a modified version of one of those basic origami-folded notes you used to pass around with your friends.  After you do it a couple times, you’ll be a fitted sheet origami whiz and it will take about a minute to fold this roll.


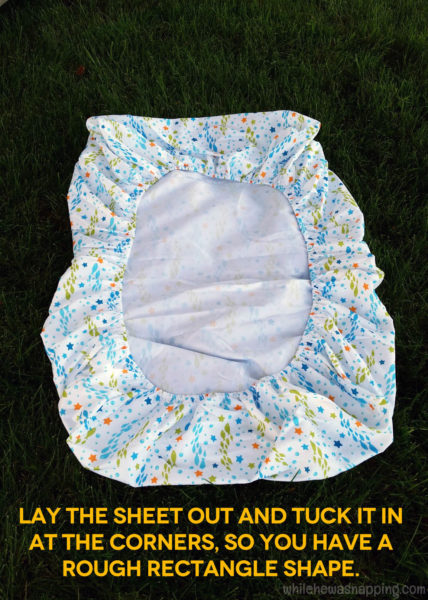
Pinch the corners at the top of the sheet.  Lay it down on the ground and, as best you can, fold the sheet in at the corners to create a rectangle shape.  The more you do this, the easier it will become.  I don’t need to lay the sheet out on the ground anymore.

how to roll a fitted sheet lay out


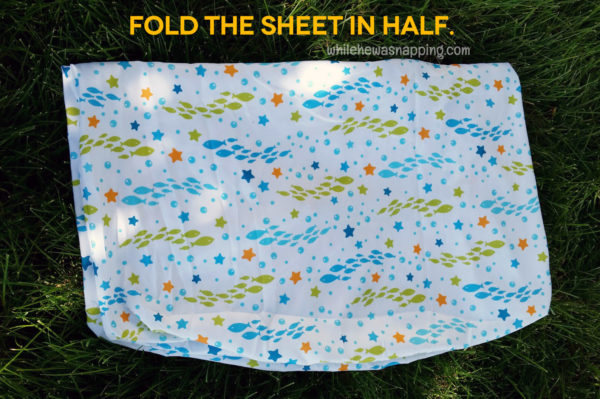
Fold the top down to the bottom of the sheet, so the sheet is folded in half.

how to roll a fitted sheet fold in half


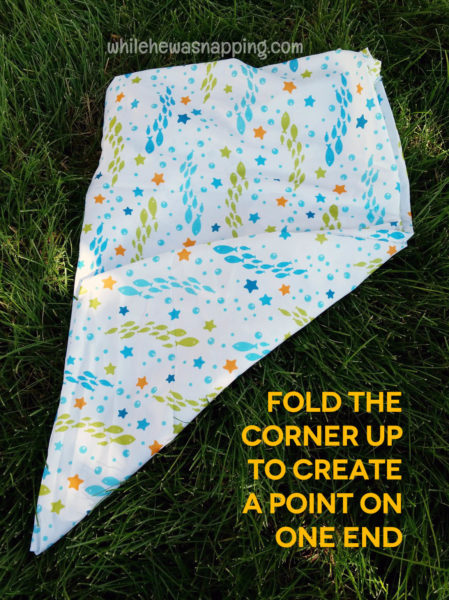
Rotate the sheet, so the folded edge is to your right.  Fold the bottom up to create a point.

how to roll a fitted sheet create a point


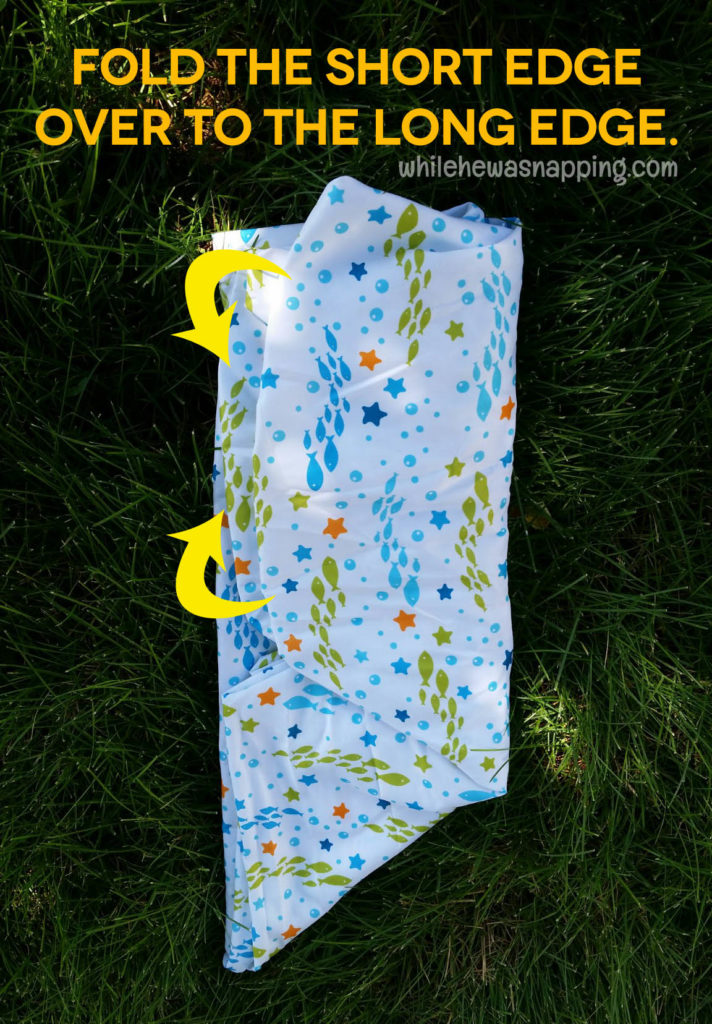
Fold the short edge of the sheet over to the long edge.

how to roll a fitted sheet short edge over


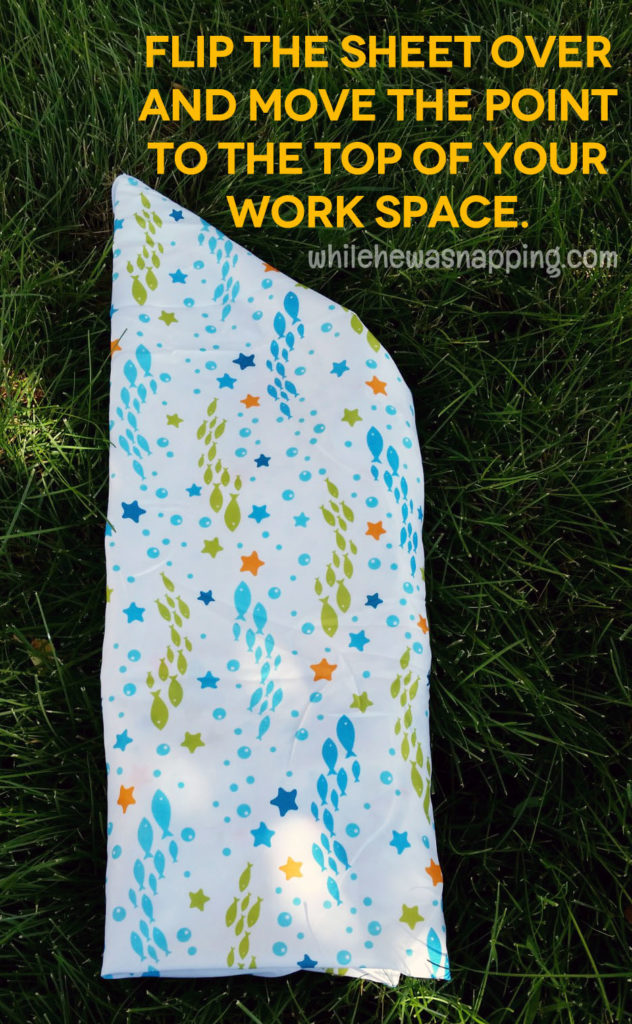
Here’s the tricky part… flip the whole thing over.  Don’t let the folds come out or your roll won’t hold together as well.  This gets easier the more you do it.  You’ll want the point on top now.

how to roll a fitted sheet flip the sheet over


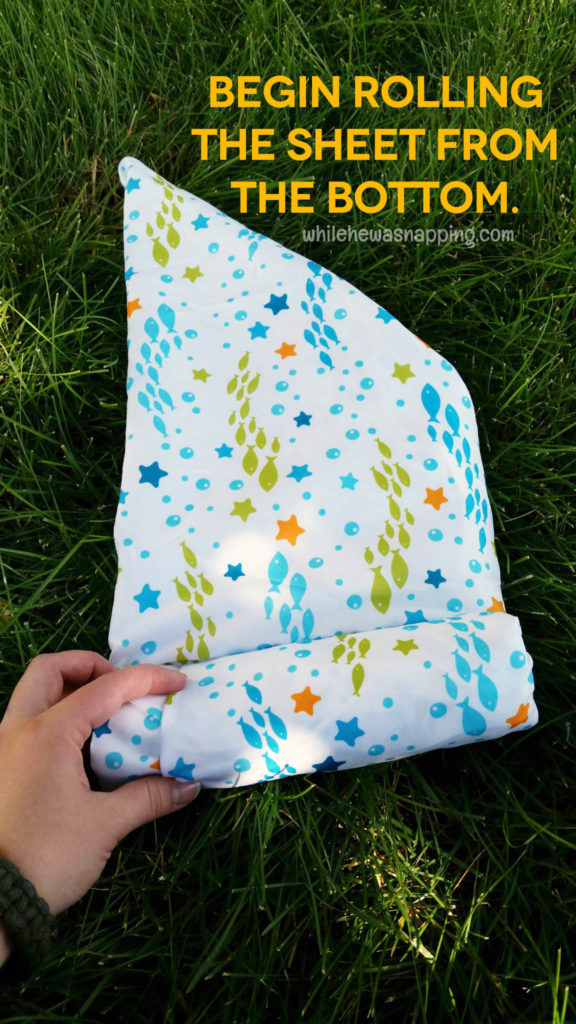
Start from the bottom and begin rolling the sheet.  The tighter you pull it, the smaller your roll will be.  You don’t want to roll it too tight, or you won’t have anywhere to tuck the end of your sheet into.

how to roll a fitted sheet roll the sheet


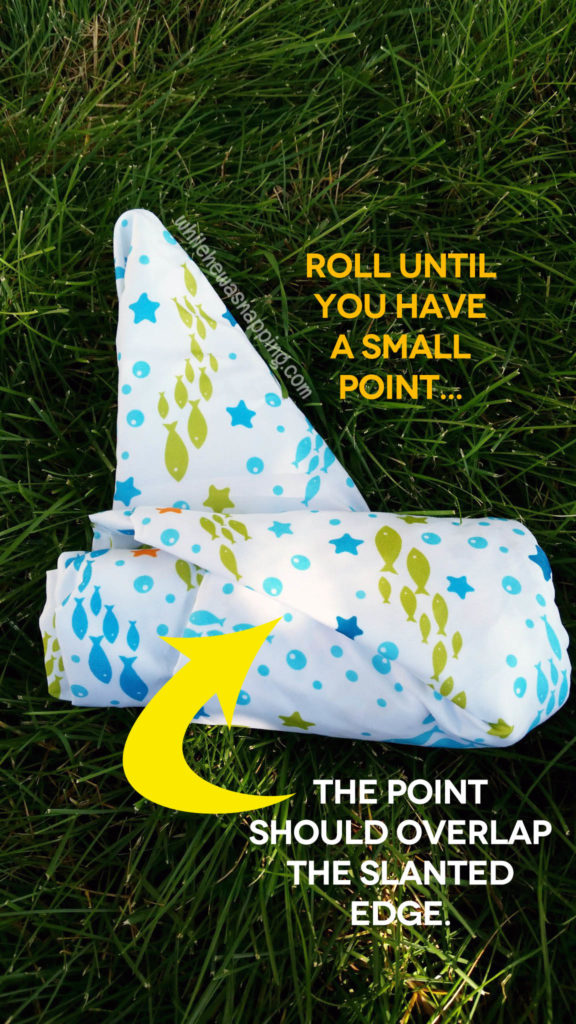
Roll the sheet until it comes to a small point.  The point should overlap the slanted edge of the sheet.

how to roll a fitted sheet small point


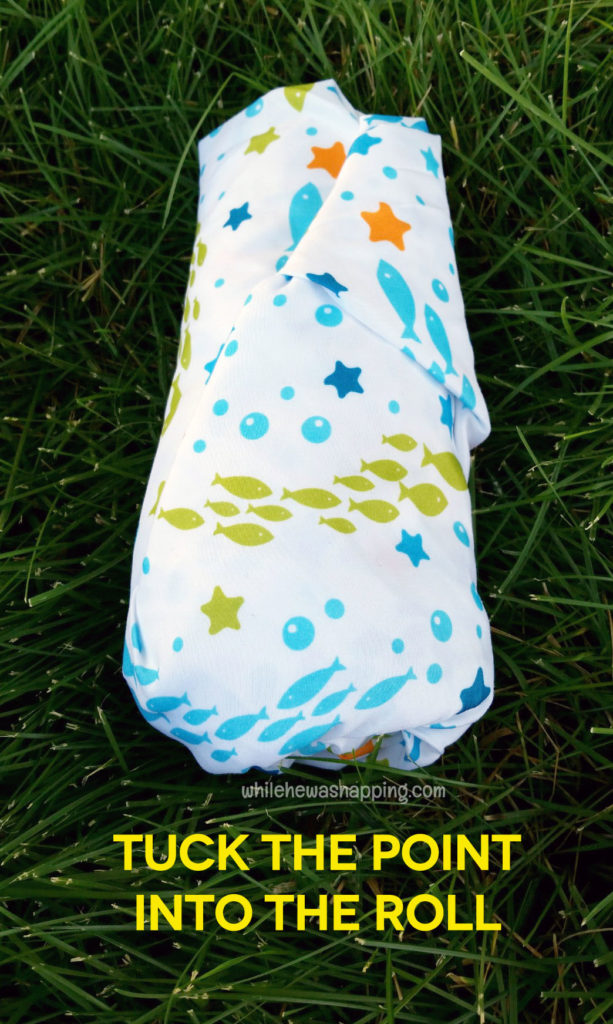
Tuck the point into the slanted edge.  You can tuck it all the way into the sheet or you can leave a little point sticking out to pull for a quick unroll.

how to roll a fitted sheet tuck the point


Ta-da!!  That’s it.  It’s really not difficult.  Promise.  And I have used our sheet so many times in the past week and a half.  There’s no changing table in the bathroom?  Left the baby’s blanket at home?  And it works awesome with the pack and play… check out that post for more ideas on that!

how to roll a fitted sheet final


  • « Previous Page
  • 1
  • …
  • 33
  • 34
  • 35
  • 36
  • 37
  • …
  • 231
  • Next Page »

I'm Krista. Ringleader here on While He Was Napping, wife to my handsome Mr. Right & momma to my THREE energetic boys, Big J (9), Little J (6) & Little N (4). We FINALLY added a beautiful little girl to our family last December.

I’m knee-deep in Tonka trucks & Thomas trains. I survive our crazy days with Vanilla Coke, Sonic slushies, sweet snuggles and little giggles. When I tuck them in tight & kiss them good night, I get a little time to create & just be me.


It all happened
while (s)he was napping
Want More of My Story?

Privacy Policy

While He Was Napping respects your privacy and is committed to keeping any personal information collected on this website confidential. To find out what information we collect and how it is used or what options you have regarding your information, see our full privacy policy here. Creative Commons License The website found at whilehewasnapping.com and all subdomainsauthored and published by Krista is licensed under a Creative Commons Attribution-NonCommercial-NoDerivs 3.0 Unported License.

Pretty Chic Theme By: Pretty Darn Cute Design