While He Was Napping

momma gets stuff done

  • Home
  • About
  • Archive
  • Do It Yourself
    • Crafts
      • No Sew
      • Painting
      • Paper Crafts
      • Repurpose Projects
      • Vinyl
      • Washi Tape
      • Kid’s Crafts
      • Fonts
    • Sewing
    • Decorate
      • Home Decor
      • Holiday Decor
    • Celebrate
      • DIY Gifts
      • DIY Your Party
  • Recipes
    • Beverages
    • Appetizer
      • Bread
      • Other Appetizers
    • Snacks
    • Main Dish
      • Meat
        • Chicken
        • Beef
        • Pork
        • Seafood
      • Vegetarian
      • Slow Cooker
      • 30 Minute Meals
    • Dips & Sauces
    • Salads
    • Pasta
    • Soup
    • Dessert
      • Cookies
      • Brownies
      • Cupcakes and Cake
      • Box Mix Recipes
      • Other Sweet Treats
    • Breakfast Food
      • Pancakes
      • Waffles
      • Muffins
      • Other Breakfast Food
  • Family
    • Babies
      • Pregnancy
      • Newborns
      • The 1st Year
    • Toddlers
    • Preschoolers
    • Kindergartners
    • 6-8 Year Olds
    • The Grown Ups
      • Date Night
      • Romantic Gifts
    • Self Care
  • For the Home
    • Cleaning
    • Organizing
    • Emergency Preparedness
  • Travel
    • Travel Tricks & Tips
    • Traveling with Kids
  • Tech & Gadgets
    • Must-Have Apps
    • Techy Home Appliances
    • Gadgets & Electronics
    • Blogging Tips
  • Printables
    • Posters
      • Quote Printables
      • Subway Art Printables
    • Printable Organizers
    • Printable Journals
    • Learning Printables & Worksheets
    • LDS Printables
  • Holidays
    • New Year’s
    • Valentine’s Day
    • St. Patrick’s Day
    • Easter
    • Cinco de Mayo
    • Mother’s Day
    • Father’s Day
    • 4th of July
    • Back to School
    • Halloween
    • Thanksgiving
    • Christmas
    • Holiday & Seasonal Printables

April 3, 2014 by Krista

{Mabey She Made It} Pillow Shams to Body Pillow Case

Lisa is back again today and has a pure genius idea to spruce up your bed!  I am always excited to see what Lisa sends each month.  She has some crazy amazing ideas and is a whiz with a sewing machine.  So, here she is:

___________________

Hi While He Was Napping readers! I’m Lisa Mabey, and I’m back to share another tutorial with you! I blog at Mabey She Made It about DIY projects, crafting, and sewing.

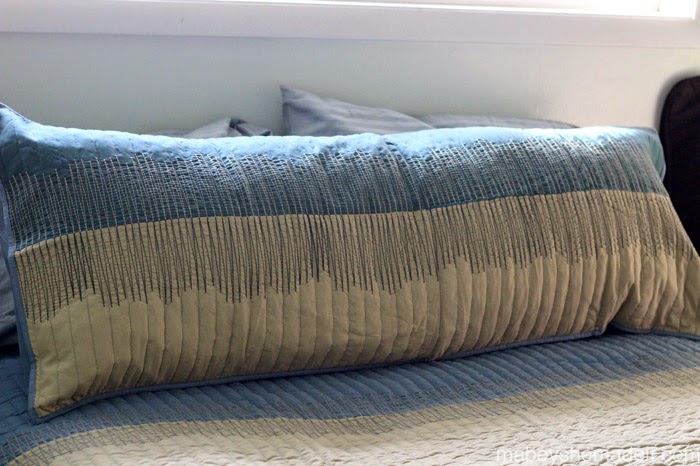
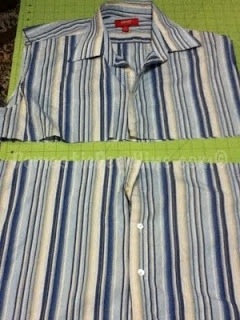
Have you ever gotten a new bed set and wished that there was a matching body pillow cover? My mom likes to put a body pillow on every bed instead of separate pillows, so when she got a new set, she asked if I’d turn the two shams included into a body pillow cover. I thought she was brilliant. So I did. Here’s how I did it if you’d like to follow along! Here are the shams I started with:

First, I measured the body pillow. It’s (obviously) a different shape than your shams, so we’ll have to alter them just a bit. My body pillow was a little shorter than the combined length of the two shams, so I needed to shorten the shams. I cut the opposite ends of the shams open so that the combined length of the shams was about 1″ longer than the length of the body pillow.

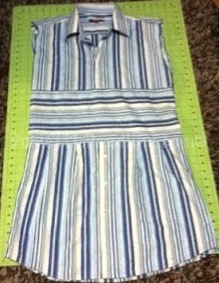
Then I turned one sham inside out, and stuffed one inside the other so the right sides were together.

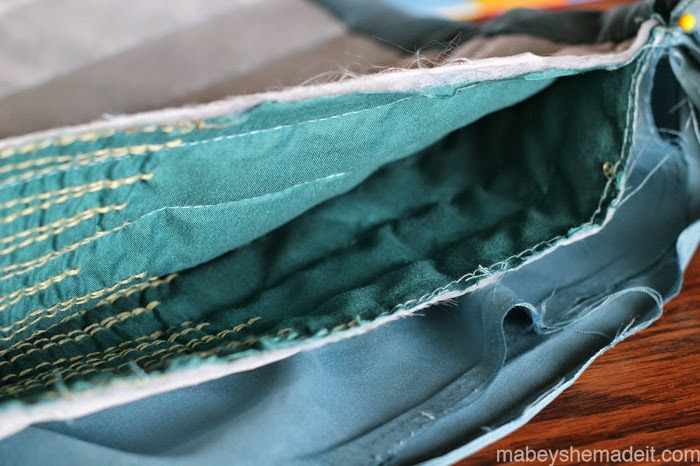
Now pin the front of the shams together (right sides together) making sure to align the design of the shams and the top and bottom seams.

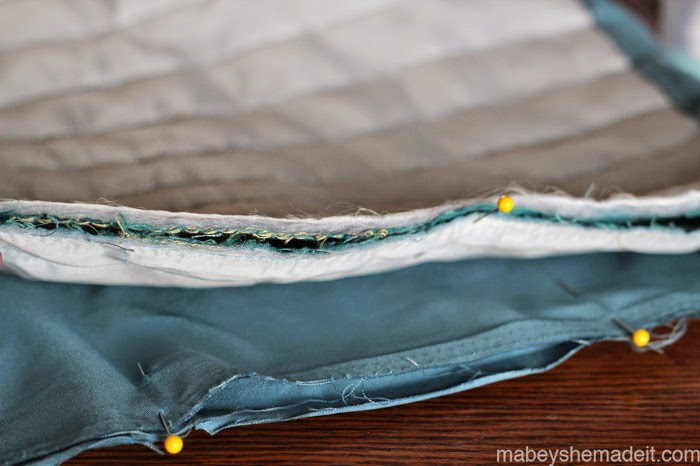
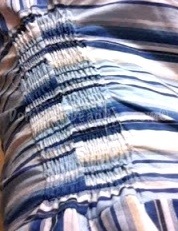
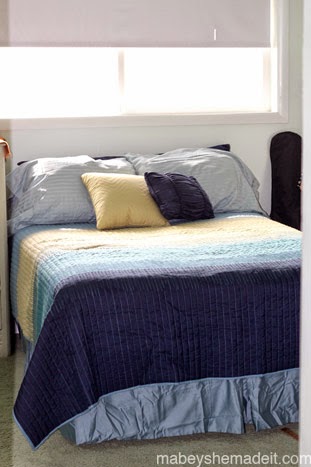
Then sew all the way around to make a long tube. I also measured the height of the pillow, and adjusted the height of my shams to be 1″ bigger than the pillow once the two shams were connected. Now, all you have to do is slide your body pillow into one of the envelope slots (I actually used both slots to help get such a long pillow inside the case) and make your bed. Here it is before:

And after the sham transformation! 

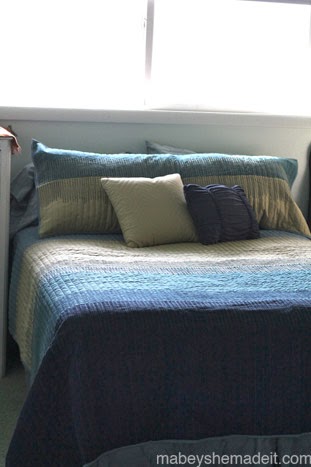
It’s a pretty easy fix, but I love how it gives you more freedom to dress your bed how you’d like while not having to buy an extra body pillow cover. And it’s fewer pillows to take off the bed at the the end of the night. I like that part too! If you’d like to see more of what I’m up to, please come visit me over at Mabey She Made It!

___________________
Genius, didn’t I tell you!?

 What a smart lady (sounds like her momma is pretty smart too)! Make sure you head over and check out more of Lisa’s awesomeness.  Be patient though, she’s had some problems with her blog recently and is working like a crazy lady to get it all put back together.  You can check out all of last month’s posts!

This post was written by Krista and originally appeared on While He Was Napping.


April 2, 2014 by Krista

{Printable} April Calendar (& March)

I’m sorry I missed last month.  I was planning on putting it up the night I ended up going into labor, so I hope you’ll forgive me.  It’s included below, in case you want to try to catch up.  I printed mine out last year and I don’t even have the whole first week of March filled in yet… Life with a newborn was a bit crazy last month.  But, I did try to write things down in my phone so I could go back and fill it in.

Anyway, below are March and April calendars.  Just right click and save to your computer.  You will have to save the images individually.  Print and you are ready to fill out your calendar.  If you want a single download you can find the whole set for the entire year in my Etsy Shop.  I’ve had several people say they like them or Project Life stuff.  Enjoy!

Let me know if you have problems… it might take me a few days to respond though.  I’m still learning how to survive with three hooligans.  Thanks!

This post was written by Krista and originally appeared on While He Was Napping.


April 1, 2014 by Krista

{Domestic Deadline} Men’s Shirt to Dress Re-Fashion

Today, Emily from Domestic Deadline is here to share a fun tutorial with us.  She’s got a great upcycle project she’s going to show us how to do.  I love upcycle projects.  The whole “I made it for FREE!” aspect makes me all kinds of happy.  Unfortunately, I don’t have a lot of time to figure out how to refashion things, so I’m glad Emily will be showing us how to do this.  Let’s get to it!

___________________________

Hi! I’m Emily from Domestic Deadline. I work part time in construction, cook from scratch and am always attempting to decorate my house both functionally and beautifully. Of course, there is always some sort of craft project in the way of the cleaning and other domestic duties. Today I’d like to share one of my favorite upcycling projects with you. I like to have some comfy dresses to throw on in spring and summer when I don’t have to wear grubby work clothes and don’t want to just wear shorts and t-shirts. Sometimes just throwing a dress on can make you feel so much better. Sometimes making the dress makes you feel even better, especially when someone asks where you got it from! First find a really big men’s dress shirt that you like the pattern of, the bigger the better. Here is what I started with
:20140227-155812.jpg
Time to deconstruct! I used a seam ripper and took off the pocket and arms. I could have just cut the arms off but decided by taking the french seam out, putting the arms back together would be easier, and it was. No need to iron (I’ll do anything to avoid ironing).
20140227-155819.jpg

Then slice the top half off. I measured down about 3 inches from the bottom of the arm hole. I probably should have gone another inch, but I think it ended up working. Watch out for the buttons, you may have to adjust where you cut

20140227-155831.jpg
Now cut the arm open and cut out the largest piece possible, like so:
20140227-155840.jpg
Set those pieces aside, time to go back to the top section. Fold under the edges and sew up the arm holes. If you need to bring it in, now is the time. My seam ripper is acting as an arrow, this is where I sewed to make the arm hole shorter and bring it in across the front.
20140227-155848.jpg

Next we are going to attach the largest sections from the sleeves. Don’t worry about sewing them together just yet. Even them up across the front and the back.

20140227-155854.jpg

Once the two pieces are attached, sew from under the arm straight down to the bottom. This makes it lay nicer than if you sew the two sleeve pieces into a tube first.

Now we reattach the bottom portion of the shirt. I missed a few pictures here, but here’s the lowdown. Line up the buttons, the back centers and the side seams and pin those places. Since your skirt piece is probably wider than the top portion, add a few pleats by pinning them into place evenly across the front and back.

20140227-155901.jpg

Here are the pleats:
20140227-155910.jpg

I basted all my seams and then serged but you can also zig zag to finish them. You can stop here if you like. I wanted the dress to have a bit more shape and since there was no way to match up the stripes at the sides and still have enough fabric, I wanted to conceal this a bit. Mark off 2.5-3 inches on either side of the side seam.

20140227-155916.jpg

Shirr several rows on both sides. I originally started in the middle of the panel but decided to shirr the whole thing, making it lay nice and flat across the front of me, not adding any extra width to my middle!

20140227-155922.jpg

Now it’s a dress, well, at least for someone who isn’t almost 6 feet tall like me!

20140227-155928.jpg

If you are tall like me or want a longer dress, cut the bottom off straight and using a coordinating fabric add a band as thick as you like across the bottom. Mine was a 6 inch strip, but once stitched on and hemmed, about 5 inches show.

20140227-155940.jpg

Tip: Sew the bottom half of the dress closed along the buttons, this way you don’t have to worry about one coming undone and exposing something you don’t want seen!

Please stop by and visit me over at Domestic Deadline and check out:

  • Some of my recipes
  • Attempts at organizing
  • Or various craft projects

If you enjoyed this post, please leave a comment or subscribe to my RSS feed. You can also follow me on Facebook,Twitter, or Instagram. Most sleepless nights I can be found on Pinterest.

___________________________

What a super cute dress!  I might have to try this… that would be a perfect style for a nursing dress with the buttons and all.  Thanks so much for sharing this, Emily!  Go check out even more awesome stuff on Domestic Deadline and tell Emily “hi!”

This post was written by Krista and originally appeared on While He Was Napping.


March 21, 2014 by Krista

Nautical Net Lantern & Vase #craftmonthlove

This post is sponsored by Jo-Ann Fabric & Craft Stores.  I was provided with compensation for my supplies and time. Regardless of compensation, all content contained in this post is 100% original, honest and mine.

March is National Craft Month!  Yippee!  And Jo-Ann can help out with all your spring crafting needs by offering you a fabulous coupon and some amazing ideas on their Spring Crafting inspiration site.  This year, there are some super fun trends that are creeping into the season’s decor and crafting fashions.  Pantone’s amazing color of the year is a gorgeous radiant orchid, and who can choose between the florals and geometric patterns that are all the rage?  However, my favorite trend right now is, without a doubt, nautical!

When I was invited to participate with Jo-Ann in the National Craft Month celebration and found out the themes for this craft challenge, I knew I wanted to do something nautical.  I have always loved the sea, even as a young girl.  I miss the time in my life when things were laid back and carefree enough that I could make a trip to the ocean half a dozen times a year.  And then I had kids… and somewhere in all that I seem to have traded beach trips for dirty diapers.  So, this was the perfect opportunity to bring some of the tranquil sea to my home decor with these Nautical Net Lanterns.

NAUTICAL NET LANTERN & VASE
 
Materials:

– Glass Vases
– Jute Twine
– Scissors
– Hot Glue Gun & Glue Sticks
– Decorative Sand (or sand from a beach trip)
– Decorative Shells (or shells from a beach trip)

Directions:
– Pull off a length of twine approximately two and a half times as long as your vase is tall.  For example, I used a vase that was 18 inches tall, so my first length of twine was about 45 inches long (18+18+9=45).  Cut the twine and tie a loop knot in the middle as seen in the photo below.  Set this piece aside for now.

– Cut off three more pieces of twine, each approximately 3 inches shorter than your first piece of twine (43″ in my case).
– Attach each of the pieces of twine to the loop you created in the first piece of twine in the previous step. Do this by folding a length of twine in half and holding the ends together.  Wrap the doubled piece of twine around the loop and stick the ends through the center hole and pull tight.

– Repeat with the remaining two strands of twine until your loop looks more like a box with two strings coming off each corner.


– Take one strand of twine from one corner and a second strand from an adjacent corner.  Tie a simple square knot in the two strings so it creates a little leaf-shape with the twine.


– Repeat the previous step with the remaining strings of twine.  Depending on the base of your vase, you should be able to tie the bottom of your netting in only one or two layers.  It will look similar to this when you complete the first layer.

– At this point, you know everything you need to know to construct the net.  You just repeat the last two steps until you’ve tied a net tall enough to hold your vase.  I suggest placing your vase inside the net after you’ve completed the first row or two of knots.  It will help shape your net more evenly if you can see where the knots lay on the vase.  It will also help keep your strings from becoming a messy jumbled up nest.

– When you get to the top of your vase, gather the strings over the top and twist them together to form a handle.  I did a modified braid (that, to be honest, I don’t know how I did it) on one of my vases and my husband pulled out his impressive weaving skills for the other.  Weave the strings together however you prefer and then fold it back to create a loop.  I then took some extra twine and wrapped it around the base and ends of the weaving.  Secure the twine with hot glue.  **If you have large fillers for your nautical net lanterns, put them inside the vases before you tie the strings together.**


– Fill your vases with the sand and sea shells.  I also used a candle I had at home in one of the vases.  These would be a fun place to show off some of your beach treasures from trips and vacations – sea shells, sand, driftwood, and the like.

– Display your Nautical Net Lanterns on tabletops or by hanging.  If your vases have flat bottoms, they might not sit level on a table top with the knots, but I was able to get mine to stand up fairly well.  I would feel comfortable using them as table centerpieces or on a bookshelf, but I probably wouldn’t display them on an entry table or somewhere that often gets bumped or has the potential of getting knocked over.  If you do stand them on a tabletop, be sure to pull the strings tight when you tie them together on the top of the vase so the net will be tight on the vase.  {You might also consider upcycling old jars for this project.}

Can you feel the ocean breeze and smell the salt?  Can you feel the sand between your toes?  Or the rocking of the waves under your feet?  Maybe not quite, but it’s the closest I’ve come to the sea in a while and I can’t wait to enjoy these Nautical Net Lanterns in our master bathroom!

Don’t forget your coupon!  Now head out for your own supplies to make a fabulous set of Nautical Net Lantern for your home… or wedding or beach house or anywhere you could use a little seaside tranquility.


This post was written by Krista and originally appeared on While He Was Napping.
 

March 13, 2014 by Krista

{Creative Home Keeper} Power Smoothie

Victoria is back again today with an awesome recipe! This is definitely something I can use… who needs an energy boost more than a momma with a newborn and a two-year-old recovering from surgery?! In case you could use a little boost too, let’s get to the good stuff!


Hi it’s me again! Today I’m sharing another family favorite recipe that my kids love and helps  give us some fuel to start out our day.

power smoothie

I’m a huge fan of smoothies but not all are created equal. Depending on what you include in yours, some smoothies can have as much sugar (if not more) than a milk shake. But made with some simple ingredients smoothies can also provide a wealth of nutrients and vitamins. I make this Power Smoothie just about every morning and both of my kids (ages 1 and 3) LOVE it! In fact if it’s a morning where I don’t make one my son whines for it. While my kids are pretty good eaters when it comes to vegetables, it’s always a bonus to sneak in some more in creative ways. One of the reasons I have termed this a Power Smoothie is because it contains some power greens, either Kale or Spinach. Let’s be honest Kale is not exactly the easiest green to eat in it’s raw form but it contains so many nutrients that it is an important leafy green to eat. I have found that by blending it in a smoothie you hide the bitter taste among the sweet berries. You can use any greens, I started with spinach and then switched to Kale, to add to your smoothie.


Print This Recipe
{Creative Home Keeper} Power Smoothie

Prep time:  5 mins

Total time:  5 mins

Serves: 2 servings

Ingredients
  • 1 cup frozen berries (I prefer to use blackberries, blueberries and raspberries)
  • 2 Tbsp ground flax (heaping spoonfuls)
  • 1½ cup Kale or Spinach (about 2 big, heaping handfuls)
  • 1 Banana ½ cup fresh Pineapple or 1 small Kiwi
  • 1 cup Almond or Coconut milk (I prefer to use Coconut milk for the good fats but it is usually more expensive plus harder to find than Almond milk. Just be sure to read the ingredient label, I buy the unsweetened variety that doesn't contain any extra sugars or added ingredients. Some day I'm going to attempt to make my own!)
  • ¼ - ½ cup of water to help blend smooth
  • **optional 2 Tbsp almond butter for protein
Instructions
  1. Combine all the ingredients in the blender, I start with only ¼ cup of water, and blend until smooth.
  2. Add more water to thin the smoothie out if you wish, I prefer to have a thinner smoothie.
  3. This makes enough for me to have a glass and to fill two sippy cups about halfway full for my kids.
3.2.2885

This is great paired with some turkey sausage or a bowl of oatmeal for a complete nourishing breakfast.  The ground flax provides essential omega-3 fatty acids and fiber which is good to help balance out the natural sugars from the fruits and helps you to feel full longer. This is a favorite among our family in the morning but I have also made this a few times during the day for lunch or a simple pick me up. I hope you enjoy! Be sure to stop by Creative Home Keeper for me family favorites!power smoothie blender


Thanks Victoria! That sounds delicious! Check out all of Victoria’s awesome content on Creative Home Keeper.


This post was written by Krista and originally appeared on While He Was Napping.

  • « Previous Page
  • 1
  • …
  • 65
  • 66
  • 67
  • 68
  • 69
  • …
  • 231
  • Next Page »

I'm Krista. Ringleader here on While He Was Napping, wife to my handsome Mr. Right & momma to my THREE energetic boys, Big J (9), Little J (6) & Little N (4). We FINALLY added a beautiful little girl to our family last December.

I’m knee-deep in Tonka trucks & Thomas trains. I survive our crazy days with Vanilla Coke, Sonic slushies, sweet snuggles and little giggles. When I tuck them in tight & kiss them good night, I get a little time to create & just be me.


It all happened
while (s)he was napping
Want More of My Story?

Privacy Policy

While He Was Napping respects your privacy and is committed to keeping any personal information collected on this website confidential. To find out what information we collect and how it is used or what options you have regarding your information, see our full privacy policy here. Creative Commons License The website found at whilehewasnapping.com and all subdomainsauthored and published by Krista is licensed under a Creative Commons Attribution-NonCommercial-NoDerivs 3.0 Unported License.

Pretty Chic Theme By: Pretty Darn Cute Design