Ok… so, you know the drill. Click the image for your free, watermark-free download. Use the white background to print on any paper you’d like. Or grab yourself one with a colored background.


Enjoy!
Krista
momma gets stuff done
Ok… so, you know the drill. Click the image for your free, watermark-free download. Use the white background to print on any paper you’d like. Or grab yourself one with a colored background.
Enjoy!
Krista
Welcome to this week’s par-tay! I haven’t actually done much this week… Little Monkey decided to touch the stove after church on Sunday… and it was a Drill Weekend, so I home with him by myself. Guess my little man is taller than I thought and I suppose it’s time to start cooking on the back burners. Anyhow, we’ve been dealing with 2nd degree burns this week and that hasn’t left much time for crafting. Especially since nap time has only been about an hour long the last few days.
So, here’s to hoping your week has been a little more crafty than mine. And to the craft-a-thon that will have to happen next week in order for me to get all of our Christmas/Wedding gifts ready before they need to be delivered the week of Thanksgiving. Annd… some features:
Oh, and check out the {Our} Home for the Holidays series over at One Artsy Mama. I’m posting about one of our holiday family traditions on Saturday.

Now, Let’s PARTY!


These were scrumptiously yummy. But, what do you expect when you take one of our very favorite recipes and then wrap it in bacon. Heaven to my taste buds.
BACON WRAPPED CHICKEN BITES

Ingredients:
– Chicken breast, thawed
– Bacon strips
– Marinade Sauce (recipe below)
– Block of cream cheese
Directions:
1) Cut your chicken breasts into bite-sized pieces. But don’t make them too small. Think between a bite-size and a fun-size candy bar.
2) Prepare the marinade and let the chicken bits soak for 6-24 hours. The longer they soak the more intense the flavor will be. Don’t soak for more than 24 hours unless you like your flavors really strong. This is our go-to marinade:
MARINADE
1 cup soy sauce
2 cups 7-up
1 cup oil
1 tsp. horseradish
1 tsp. garlic salt
3) Prepare a baking sheet by lining it with tin foil. Preheat the oven to 375F. Open and unwrap the bacon. Cut the bacon strips in half. Drain the marinade off the chicken.
4) Lay down a strip of bacon, a piece of chicken and cut off a small chunk of cream cheese and place it on top of the chicken. Sprinkle with a little garlic powder or any other seasonings you’d like. Wrap the bacon around the chicken and cream cheese. Place on the baking sheet.
4) Repeat step 4 with all the piece of chicken and bacon. Bake for 35 mins or until the middle of the meat is no longer pink and the juices run clear.
Krista
These are yummy and kid-friendly. Prep time is approximately 30 mins. AND, they freeze excellently for nights that you need a quick dinner fix.
PIZZA ROLLS

Ingredients:
2 cups of warm water
3 Tbs yeast
1/2 cup vegetable oil (I have substituted olive oil and decrease the measurement to 1/3 cup. It works fine.)
1/2 cups of sugar
2 beaten eggs
1 Tsp salt
5-6 cups flour
Pepperoni (your preference on how much)
Cheese (again, your preference)
1/2-1 cup Pizza Sauce
*You may put in any other pizza toppings you like. We have tried these with black olives, hamburger, pineapple and Canadian bacon, onions, green and red bell peppers, mushroom bits and bacon bits. It’s all very yummy.
Directions:
– Mix the yeast and water together in a small bowl. Combine all ingredients, except the flour, in a large bowl and mix well. This is where I call on my amazing KitchenAid and let it do all the hard work.
– Add the flour a cup at a time until it is no longer sticky. When your dough is mixed well, take it out of the bowl. Roll into a rectangle.
– Use a basting brush or the back of a spoon and spread the pizza sauce onto your dough. I don’t love red sauces, so I only use about 1/2 cup. You may want more on your pizza rolls. Add your pizza toppings to the top of the sauce. You’ll want to be sparing, but not too sparse, so they will still roll well.
– Roll the dough into a log. Try to keep the roll tight.
– Cut off sections of your dough log, approximately an inch in width. It should look like a cinnamon roll at this point.
– Place on a lightly greased baking sheet. You can sprinkle cheese on the tops of the rolls too, if you’d like. Bake @ 375F degrees for 15-20 minutes.
– If you want to freeze, let the rolls cool and then store each one in it’s own zip top baggie and freeze. Keeps for 2-3 months.
Krista
I am a list kind of girl. To-do lists, shopping lists, menu plan lists, ideas lists, address lists… it goes on and on. Especially when I’m busy… and who isn’t busy during the holiday season, right? So, I decided to try and save myself some sanity and begin this crazy season a little more organized than I normally am. Enter the Holiday Hubbub Binder. Well, mine is actually a folder, but it has already saved me a few headaches. Or at least it’s kept all my scheming in one general place. In my folder I have pages that I designed to help me organize my holiday planning. There are budget sheets, menu plan calendars, calendars for the everyday stuff, lists of gift ideas I’ve been collecting, addresses I need to send out holiday cards, lists of my family and their clothing sizes, hobbies and things they like. There’s even a page for me to write down things I want (in case My Mr Right should get stumped this gift giving season) and a place to keep receipts (in case anything needs to go back to the store). My folder contains 19 pages. And it’s been a lifesaver!

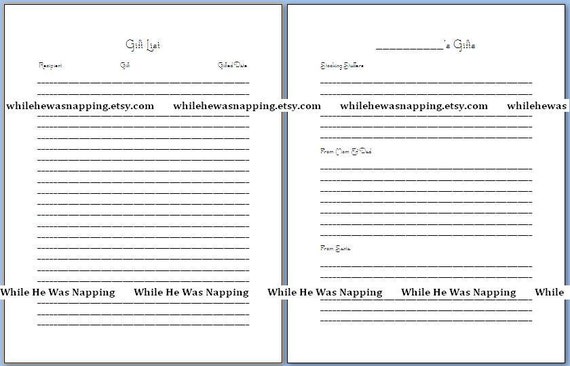

For your free downloading enjoyment, I have an abbreviated version of my organizer available HERE. It contains calendars, a page to organize your gift lists, an address collector, the thank you list to keep track of the gifts you are given, and a to-do list. If you’re having a hard time with 4shared, make sure you are logged in. Don’t have an account? It’s free to sign up and then you’ll have access to download things hosted on the site. (P.S. I’m not affiliated with 4shared in anyway. I just like the user interface for their site and so that’s what I use.)
If you would like the whole 18 page version of my organizer, it’s available HERE. It’s a printable and I will email the file to you within 12 hours. It contains everything in the free version, plus a RECEIPTS page, a budget organizer page, wish list page, menu plan calendars, gift buying guide information sheet, and individual gift organizers.


Happy Holidays, may they be organized and stress-free! Or at least a little more organized and a little less stressful.
 The website found at whilehewasnapping.com and all subdomainsauthored and published by Krista is licensed under a Creative Commons Attribution-NonCommercial-NoDerivs 3.0 Unported License.