While He Was Napping

momma gets stuff done

  • Home
  • About
  • Archive
  • Do It Yourself
    • Crafts
      • No Sew
      • Painting
      • Paper Crafts
      • Repurpose Projects
      • Vinyl
      • Washi Tape
      • Kid’s Crafts
      • Fonts
    • Sewing
    • Decorate
      • Home Decor
      • Holiday Decor
    • Celebrate
      • DIY Gifts
      • DIY Your Party
  • Recipes
    • Beverages
    • Appetizer
      • Bread
      • Other Appetizers
    • Snacks
    • Main Dish
      • Meat
        • Chicken
        • Beef
        • Pork
        • Seafood
      • Vegetarian
      • Slow Cooker
      • 30 Minute Meals
    • Dips & Sauces
    • Salads
    • Pasta
    • Soup
    • Dessert
      • Cookies
      • Brownies
      • Cupcakes and Cake
      • Box Mix Recipes
      • Other Sweet Treats
    • Breakfast Food
      • Pancakes
      • Waffles
      • Muffins
      • Other Breakfast Food
  • Family
    • Babies
      • Pregnancy
      • Newborns
      • The 1st Year
    • Toddlers
    • Preschoolers
    • Kindergartners
    • 6-8 Year Olds
    • The Grown Ups
      • Date Night
      • Romantic Gifts
    • Self Care
  • For the Home
    • Cleaning
    • Organizing
    • Emergency Preparedness
  • Travel
    • Travel Tricks & Tips
    • Traveling with Kids
  • Tech & Gadgets
    • Must-Have Apps
    • Techy Home Appliances
    • Gadgets & Electronics
    • Blogging Tips
  • Printables
    • Posters
      • Quote Printables
      • Subway Art Printables
    • Printable Organizers
    • Printable Journals
    • Learning Printables & Worksheets
    • LDS Printables
  • Holidays
    • New Year’s
    • Valentine’s Day
    • St. Patrick’s Day
    • Easter
    • Cinco de Mayo
    • Mother’s Day
    • Father’s Day
    • 4th of July
    • Back to School
    • Halloween
    • Thanksgiving
    • Christmas
    • Holiday & Seasonal Printables

Archives for October 2013

October 22, 2013 by Krista

{Somewhere in the Middle} Mummy Mason Jars

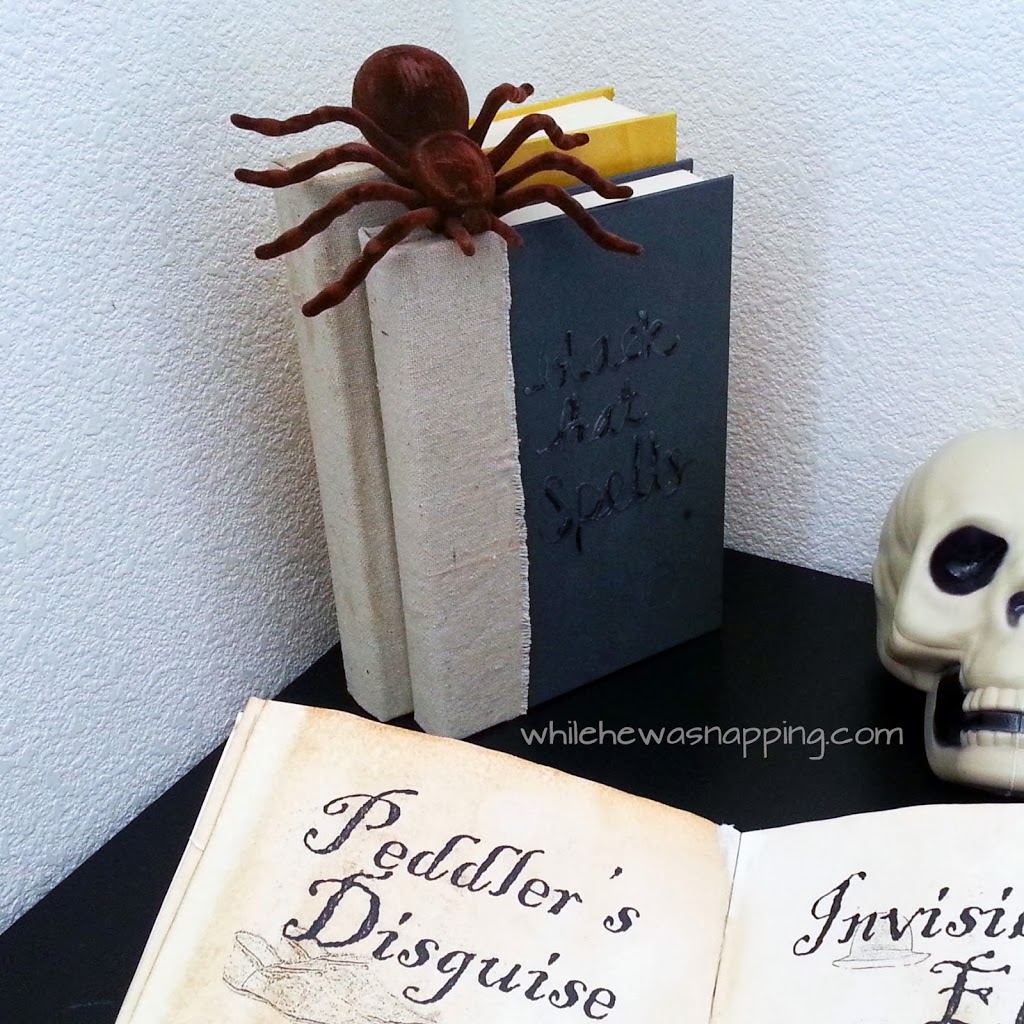
I want to introduce you to another Contributor today: Rebekah at Somewhere in the Middle.  I think she was a little worried when I asked for Halloween projects this month (to keep with October Spooktacular), but she totally knocked it out of the park!  I love these!  I am adding them to our Halloween Countdown Calendar so I can do them with my boys.  So, without further adieu…

_______________________________________________________________

Mummy Jars

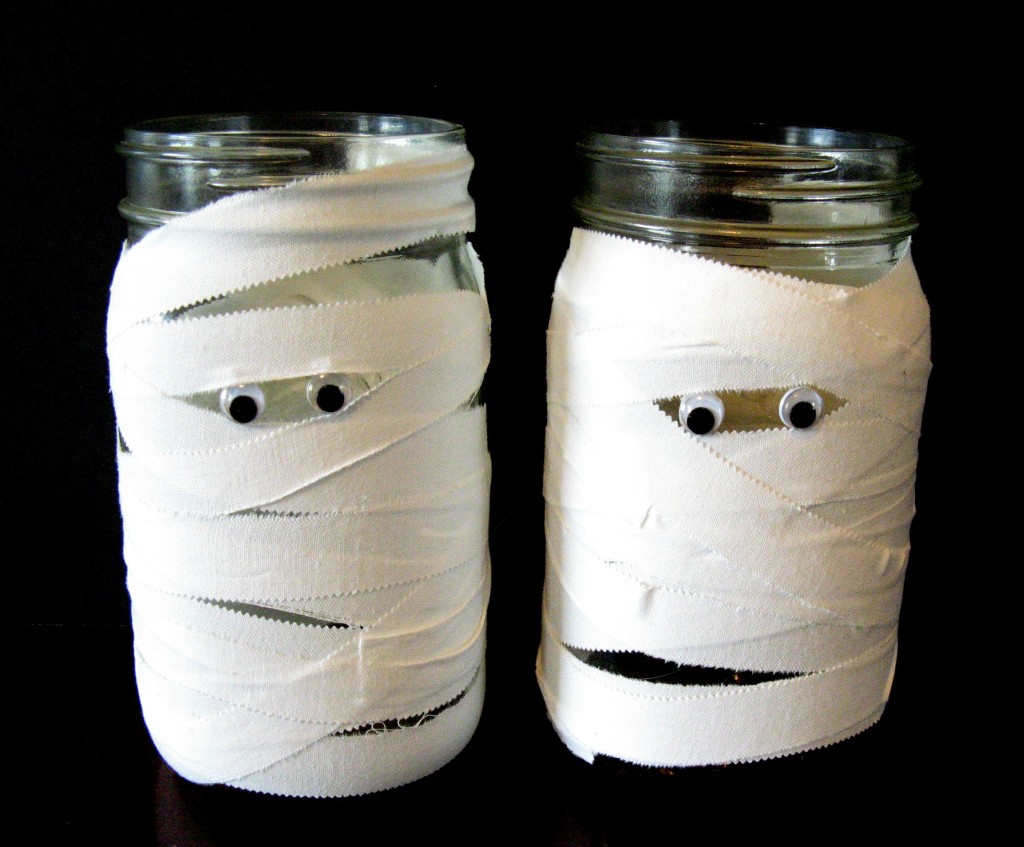
Please tell me that I’m not the only one living in disbelief that we’re already halfway through October. I could have sworn that just last week was the start of summer break! Although I do have to say, Texans pretty much rejoice at the arrival of October every year, so I can’t complain too much. My girls and I whipped out these adorable mummy jars in record time; they only take about ten minutes to complete from start to finish.
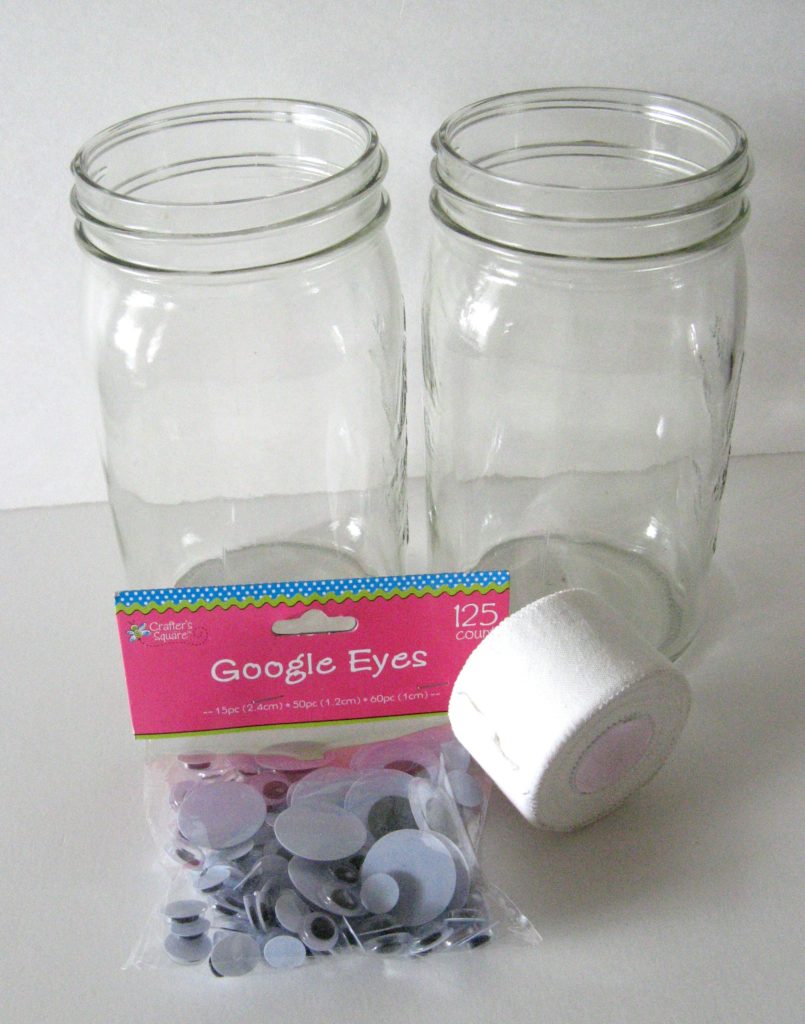
Mummy Jar Supplies

SUPPLY LIST
Mason Jars
Athletic Tape
Googly Eyes

Start by sticking (or gluing) your eyes on the jar. Mummy Jars - add eyes

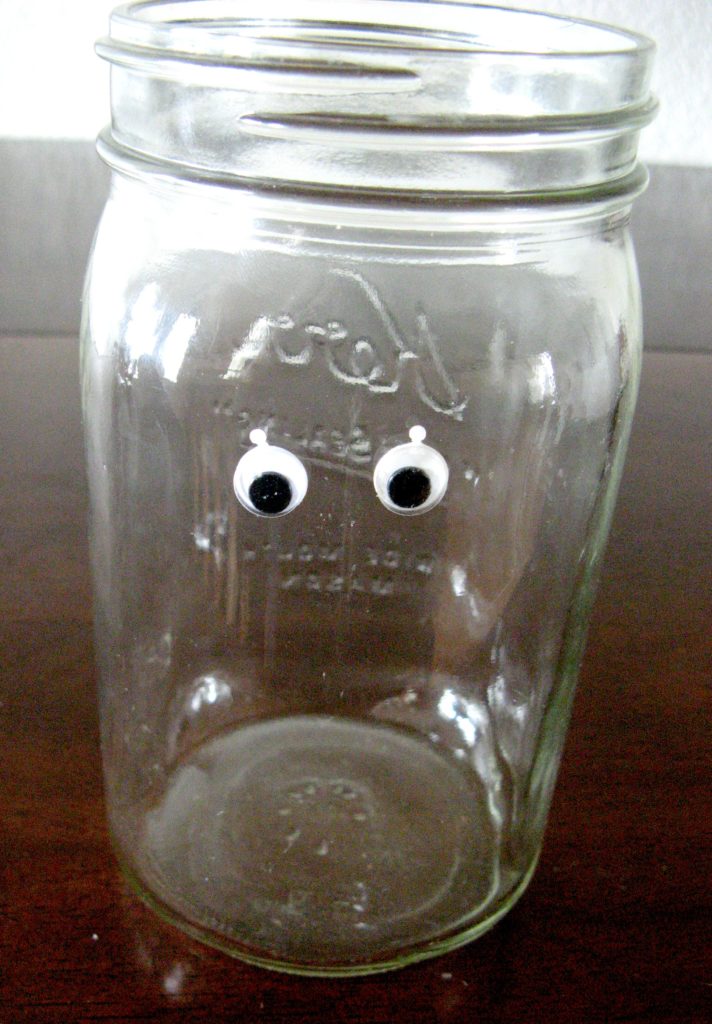
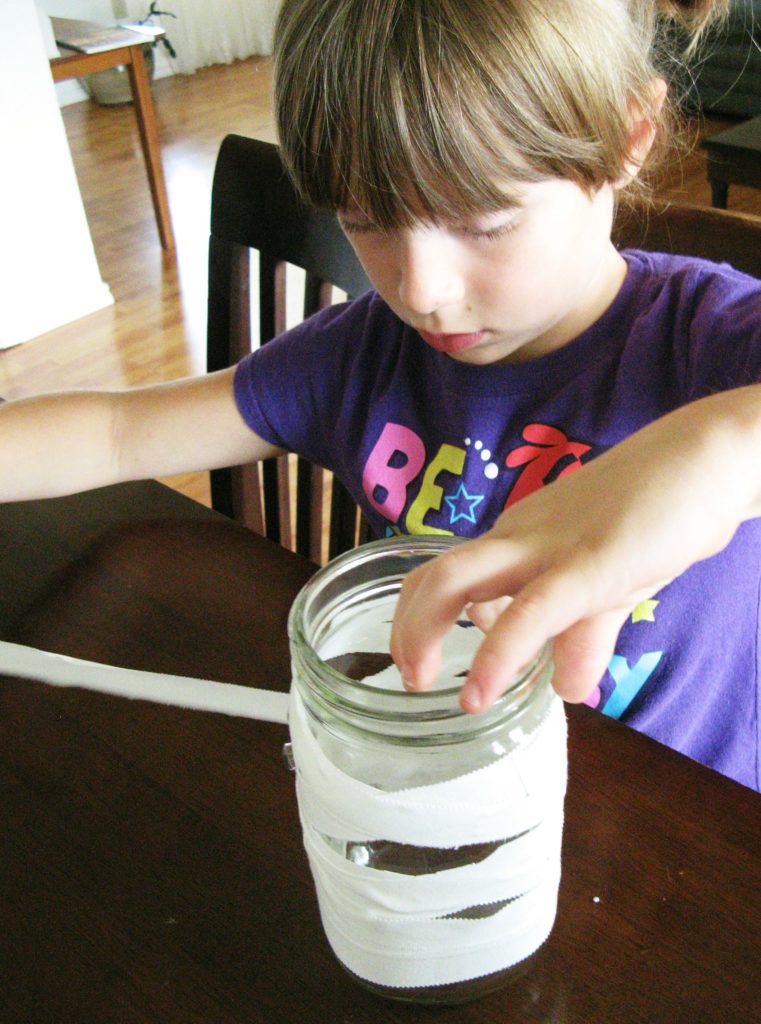
Then just randomly wrap the tape around the jar until it looks like a mummy (making sure not to cover the eyes up).

Mummy Jars - wrap

And that’s it! Make as many as you want. They’d make adorable treat jars at a party or luminaries lining your walkway or porch! Or, like my girls, you can carry them around in your arms and talk to them like they’re your baby and best friend all “wrapped up” in one. 😉

Mummy Jar

_______________________________________________________________

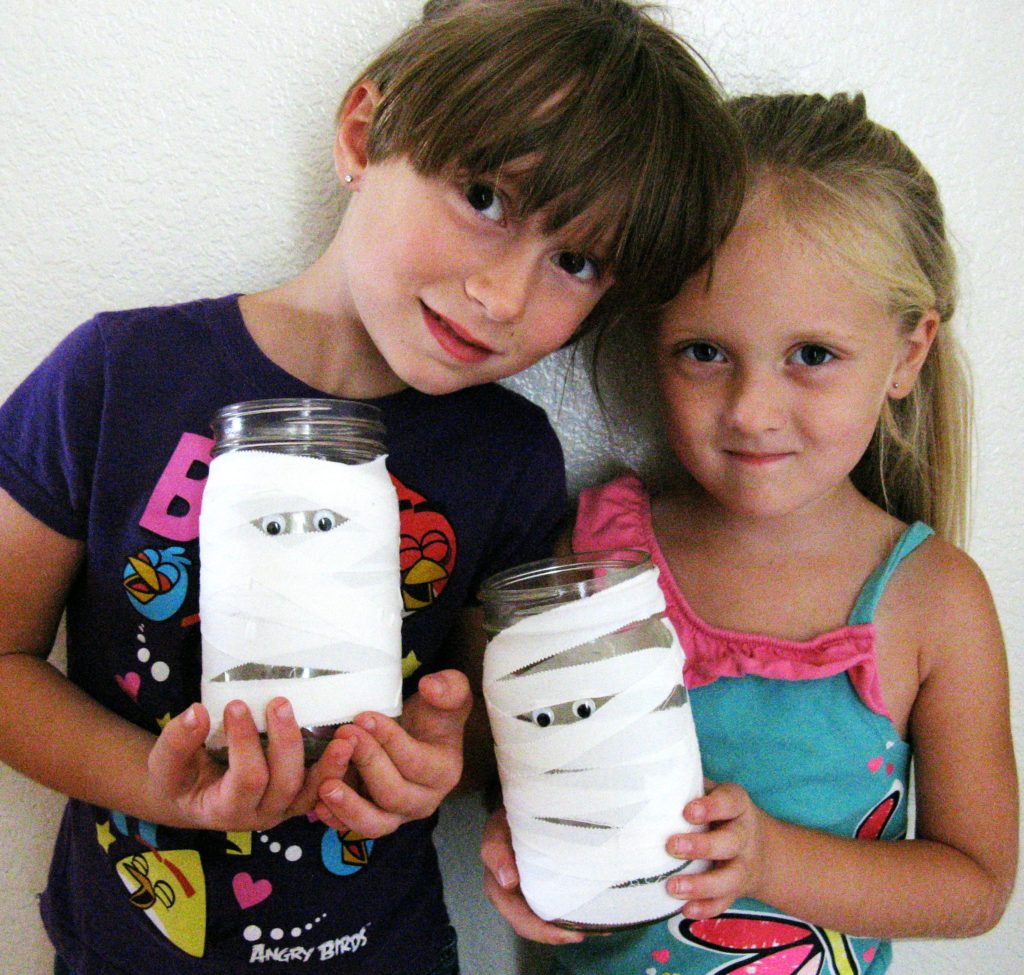
Eep.  Too awesome, am I right?!  And so easy!  I wanna use them as luminaries… The boys can help and I still get something functional and cute, rather than something that hangs on our “masterpiece wall” for week (or six months…)  Now go check out all the fun Rebekah’s got going on over at Somewhere in the Middle!

 
This post was written by Krista and originally appeared on While He Was Napping.

October 21, 2013 by Krista

[October Spooktacular} Slime

Today, I am going to share a super easy way to entertain your kids for a few minutes.  Mine spent about half an hour with this activity.  This slime is a little messy, it’s probably one of the easiest messy kid’s activities and clean up is a breeze!

SLIME
Corn-Starch-amp-Water-Slime
Materials:
– Medium mixing bowl
– 1 cup corn starch
– 1/4 cup water
– Food coloring (optional)
– Baking tray (optional)
– Cookie cutters or other utensils (optional)
Directions:
– Mix the corn starch and water in the mixing bowl.  Stir it slowly to get it all mixed together, otherwise you’ll make a mess and won’t get far.
– Add in a couple drops of food coloring (we did yellow) if desired and stir until mixed.
– Pour mixture onto a baking sheet and let the kids play with the cookie cutters and other utensils.
– Clean up any spills with a paper towel or dish cloth and sweep into the trash can.  Use a damp towel for any fine powder.
Halloween-Slime
 Both of my kids played with this longer than I expected them to, which was a nice surprise for me.

Slime

Get all science-y and explain about Non-Newtonian fluids if you like or just let the kids go to town.  Even my child that can’t stand to have his hands messy was up to is elbows in this one.  Score!

October 16, 2013 by Krista

Vinyl Halloween Sign & Printable

So, I’m not sure that this Halloween Sign qualifies as “subway art”, but I don’t really know what else to call it either.  In any case, I love how it turned out and now I want to make something larger and more permanent with the technique.  And probably not Halloween-themed, since you know – permanent.  Maybe this will get done some time…  Oh, and there’s a freebie printable version at the bottom of the post if you’re looking for a super easy Halloween Sign.  Enjoy!

VINYL HALLOWEEN SIGN
Vinyl Halloween Sign
Materials:
– Vinyl
– Cricut or other cutting tool (I’m so jealous of all those Silhouettes out there…)
– 8.5×11″ Document Frame
– Orange paper (or other color)
Directions:
I still have the .scut file I designed in SCAL for my Cricut if anyone wants it.  That is such an outdated method though that I didn’t bother to upload it.  Shoot me an email if you live under the same rock I do and want the file.  At least until I can figure out if there’s a way to convert the file to svg and then everyone can have fun.  Know any secrets, please share.  =)
– I designed the file with three fonts: Arvo, which I got from fontsquirrel.com, Trick or Treat 2 and Evilz I found on fontspace.com.  Click each link to be taken to the font page where you can download.  All are commercial use friendly.
– After I had my file designed I cut it with my Cricut and then weeded the vinyl.
– Then I cleaned the glass on a Dollar Tree frame and stuck the vinyl to the glass.
– I opened up the frame and stuck an orange piece of paper inside and then sealed the frame again.
Vinyl Halloween Sign
That’s it.  Easy peasy, but I love the look of this vinyl Halloween Sign.  And it’s super simple to change.  This is totally my kind of project.
For an even easier version, grab the watermark-free Halloween Sign printable.
Free Printable Halloween Subway Art Sign with Graphics


This post was written by Krista and originally appeared on While He Was Napping.
 

October 16, 2013 by Krista

{Guest Post} Halloween Parties for Kids

Today I have Angela here to guest post.  She’s going to share some ideas for throwing a fun kids’ Halloween party.  Here’s Angela:


I’m Angela Johnson , a keen collector of craft supplies. I spend a lot of time organizing my collection, using some of them and writing about my projects for HairBowCenter.com.


Crafting an Epic Halloween Party for Kids

So you’ve got your invitations sent out explicitly stating the details of your costume party, and the fact that your kids are so excited to see all of their friends there. Now it’s time to make sure it’s the best Halloween party of their lives.

 
Spooky scenery
Kids want one thing – to have fun! Set the scene for an exciting fun filled party with lots of color. Make a cute statement using fun Halloween characters like black cats, ghosts, and Frankenstein. Print these out and have your kids color them in. String them together and hang them around the party.
Make glowing green ghosts to add a kid friendly supernatural element. Use a sharpie to color the eyes and mouths onto the balloons. If the party is for smaller children, I suggest you make the faces silly and light-hearted rather than really creepy. Place a green glow stick in them before you inflate them. Attach them in pairs or threes all around the party.
©Martha Stewart
Another fun balloon idea is this flying bat from HalloweenMania.co.uk. It’s just a bit more complicated but still super easy. Print this template and cut out eyes and fangs using white foam, and the ears and wings using black foam. Color the tips of the fangs with red sharpie. Stick on the pieces with double sided sticky tape.
©HalloweenMania
 
Ghoulish Games
Pop Goes the Pumpkin is a great idea from Martha Stewart that also doubles as a decoration. This game is better for supervised kids around the age of four to ten, if using push pins. The older kids will love it too if you let them use darts while in a big space. They will love taking turns picking which balloon to pop. Some of the balloons will have candy and confetti, and some won’t which adds suspense.  
©Martha Stewart
I’ve simplified Martha’s supply list and instructions to make it a bit to make it easier and less fancy (find the tutorial here). You’ll need:
  • 35 orange Balloons
  • ¼ Inch grosgrain ribbon in black, orange or Halloween print
  • Green paper for the pumpkin stem
  • Scotch tape and pushpins
  • Small thin candy and confetti to go inside the balloons
  • Hooks to hang the board on the wall
  • 4 by 5 ½ foot board
Put candy and confetti in most of the balloons and then blow them up. Tape or pin the balloons onto your board in a pumpkin shape to the board (it’s easiest if you start with the edges and work your way in). Cut your ribbon into strips about three inches long. Tie two ribbons onto each of the pushpins. Use the green paper to cut out a stem for the pumpkin and tape it on. Let the games begin!
 
Fiendish food
Kids love pigs in a blanket, so these little mummies will be the perfect balance to all that Halloween sugar. Get the recipe here, and let your kids help wrap the dogs. Use some veggie dogs for the vegetarians out there, and you’ll have a happy group of party goers.
©Life in the Lofthouse

Halloween is my favorite time of year to throw parties, especially with my children’s help. There are so many creative ways to celebrate your friends and family. Get inventive with your kids and let them help throw a party for their friends. They’ll be so excited once Halloween finally rolls around, they won’t be able to stop smiling.

Thanks for sharing the fun ideas, Angela!  My boys love those mummy dogs.  Sometimes they ask for them in May.  I also love the idea of having your kids help plan the party!  What a great way to get them involved and to (hopefully) lessen your workload a little.


This post was written by Krista and originally appeared on While He Was Napping.  Links included in guest posts are included by the guest post author and are not necessarily reflective of this blog or its author.

October 15, 2013 by Krista

DIY Spell Books with 12 Spells

I have been wanting some Spell Books to go with my Potion Bottles and Witch Hat.

I had a specific vision though. I wanted three spell books that didn’t open and one that did.

The open one, I wanted to have spells in it. Spells that sounded somewhat legit but weren’t super dark and scary. And not just one spell, but multiple spells.

So, I Googled that right up and guess what I found on the internet? EEK. In short, nothing that fit my vision. So, I had to make my own. I actually made up all the spells and designed all the pages. It was more time consuming than expected an, believe it or not, I don’t know any spells.

DIY SPELL BOOKSDIY Spell Books with step by step instructions and two ways to make them. The perfect finishing touch to your Halloween display.

Spell Book Materials:

– Books.  I got mine at Dollar Tree.  I pulled the dust jackets off at the store and the books I thought I could age the best were the ones I purchased.
– Coffee grounds or Tea bag and a small pot filled with hot water.  I used coffee.
– Oven and baking sheet
– Spells, printed on white paper and cut to the size of your book (You can purchase mine in my Etsy shop or make up your own)
– Tacky Glue
– Canvas (I used scrap pieces from a painter’s drop cloth)
– Hot glue gun and glue sticksDIY Spell Books


Spell Book Directions
STAINING THE PAGES:

DIY Spell Books

– Begin by printing off and cutting to size your spells. I HIGHLY suggest printing these on card stock on a laser printer. I was a little worried about the pages smearing and tearing when they’re wet, but I had no problems. Measure your book to find the dimensions you’ll need.

You can purchase the spells I designed in my Etsy shop or make up your own.  I did find a few online, but I wanted all of mine to coordinate with the same layout and I wanted more than I could find.
– I used the same staining method for the pages and books as I did for my Potion Bottle labels (see that post for photos of the process).  Boil the hot water on the stove and simmer with your coffee grounds or tea bags in the water for about ten minutes.
– Place a spell on the baking tray and cover it with a bit of the coffee mixture. Press it down so it’s nice and saturated.  Let it set for a few minutes if you want a darker stain. Drain any excess coffee back into the pot. Place the baking tray in a warm oven (I set mine to 200F). Let the paper dry in the oven for approximately 5-10 minutes. Keep an eye on it; paper can catch on fire, after all.
– Remove the pan from the oven. The paper will still be damp. Carefully, pull it off the tray and, if possible, hang it to dry. Mine took about 8-12 hours to dry, but I waited overnight to be sure I wouldn’t tear them on accident.
– Repeat for all the remaining pages.

DIY Witch's Potion Bottles

CONSTRUCTING THE CLOSED SPELL BOOKS:

DIY Spell Books

DIY Spell Books

For my closed spell books, I used real books. I wanted to cover the majority of the spines, as they had the book title and author’s name stamped on them. One of my books was titled Called Out of Darkness, which I deemed appropriate enough to remain uncovered. However, Every House Needs a Porch (or something similar) wasn’t quite what I was looking for.
– I measured the spine cover on the book and cut a piece of canvas to fit over it.  I stained it in the coffee mixture and then let it dry.

DIY Spell Books
– Once dry, I hot glued the cover onto the book. I actually used Mod Podge on one book. It gives a more form-fitting cover to the book, but made the canvas really stiff. Not a big deal on a book. I opted for hot glue on my second book for the sake of ease and speed. No drying time for hot glue.
–  I hot glued the excess canvas at the top of the books.
– Then I took the coffee mixture and a sponge brush and put it on the covers of the books. I also used a little dirt and some of the coffee grounds and rubbed them into the covers. Make it look worn and dirty. I attempted staining the cover on one book with some olive oil, but it eventually all dried out.

DIY Spell Books

 DIY Spell Books

– I used some stamps and stamped “Potions” on one book.  I also used hot glue to write out a title on another book.  The third (the book with the title on the spine) I left alone.

*Note: I did stain the pages of the open spell book too.  It looked funny with the stained pages and the off-white pages of the book.  I just poured the coffee mixture over the pages and let it seep through them.  Then, I used the sponge brush in the coffee to darken the edges to my liking.  Let it dry.  You’ll probably need to fan the pages out a bit.

DIY Spell Books

DIY Spell Books

INSERTING THE SPELL PAGES INTO THE OPEN BOOK:
– Once all the pages are dry, find where you want your spells in the book.  You could intersperse them through out the book or just put them all in one place.  I did the latter.  I glued the spells back-to-back and then put a line of glue down the spine inside the book and stuck the spells into the glue.  If you glue the spells throughout the book, simply glue each spell to a page in the book.  I did end up needing to tear about 5 pages out of the book so my papers would fit.  I’m sure those will pop up in another project though.

DIY Spell Books

DIY Spell Books
– Repeat with the remaining pages and let it all dry.
– To get the book to stay open, you may have to bend and work the pages a bit so the glue and once-wet paper isn’t so stiff.

Ta-da.  Set out your DIY Spell Books and get to spooking the neighbors.  Oh, the worst part of this is waiting for all the drying times.  Well, and the coffee part – at least for me.  I loathe the smell of coffee…

DIY Spell Books

This post was written by Krista and originally appeared on While He Was Napping.

  • « Previous Page
  • 1
  • 2
  • 3
  • 4
  • Next Page »

I'm Krista. Ringleader here on While He Was Napping, wife to my handsome Mr. Right & momma to my THREE energetic boys, Big J (9), Little J (6) & Little N (4). We FINALLY added a beautiful little girl to our family last December.

I’m knee-deep in Tonka trucks & Thomas trains. I survive our crazy days with Vanilla Coke, Sonic slushies, sweet snuggles and little giggles. When I tuck them in tight & kiss them good night, I get a little time to create & just be me.


It all happened
while (s)he was napping
Want More of My Story?

Privacy Policy

While He Was Napping respects your privacy and is committed to keeping any personal information collected on this website confidential. To find out what information we collect and how it is used or what options you have regarding your information, see our full privacy policy here. Creative Commons License The website found at whilehewasnapping.com and all subdomainsauthored and published by Krista is licensed under a Creative Commons Attribution-NonCommercial-NoDerivs 3.0 Unported License.

Pretty Chic Theme By: Pretty Darn Cute Design