While He Was Napping

momma gets stuff done

  • Home
  • About
  • Archive
  • Do It Yourself
    • Crafts
      • No Sew
      • Painting
      • Paper Crafts
      • Repurpose Projects
      • Vinyl
      • Washi Tape
      • Kid’s Crafts
      • Fonts
    • Sewing
    • Decorate
      • Home Decor
      • Holiday Decor
    • Celebrate
      • DIY Gifts
      • DIY Your Party
  • Recipes
    • Beverages
    • Appetizer
      • Bread
      • Other Appetizers
    • Snacks
    • Main Dish
      • Meat
        • Chicken
        • Beef
        • Pork
        • Seafood
      • Vegetarian
      • Slow Cooker
      • 30 Minute Meals
    • Dips & Sauces
    • Salads
    • Pasta
    • Soup
    • Dessert
      • Cookies
      • Brownies
      • Cupcakes and Cake
      • Box Mix Recipes
      • Other Sweet Treats
    • Breakfast Food
      • Pancakes
      • Waffles
      • Muffins
      • Other Breakfast Food
  • Family
    • Babies
      • Pregnancy
      • Newborns
      • The 1st Year
    • Toddlers
    • Preschoolers
    • Kindergartners
    • 6-8 Year Olds
    • The Grown Ups
      • Date Night
      • Romantic Gifts
    • Self Care
  • For the Home
    • Cleaning
    • Organizing
    • Emergency Preparedness
  • Travel
    • Travel Tricks & Tips
    • Traveling with Kids
  • Tech & Gadgets
    • Must-Have Apps
    • Techy Home Appliances
    • Gadgets & Electronics
    • Blogging Tips
  • Printables
    • Posters
      • Quote Printables
      • Subway Art Printables
    • Printable Organizers
    • Printable Journals
    • Learning Printables & Worksheets
    • LDS Printables
  • Holidays
    • New Year’s
    • Valentine’s Day
    • St. Patrick’s Day
    • Easter
    • Cinco de Mayo
    • Mother’s Day
    • Father’s Day
    • 4th of July
    • Back to School
    • Halloween
    • Thanksgiving
    • Christmas
    • Holiday & Seasonal Printables

August 22, 2011 by Krista

Iron On Fabric Transfers

Back in June, I had a little something I needed to tell My Mr. Right.  But, I didn’t want to just blurt it out.  It was a Sunday, so I was limited to my on-hand stash.  Not only that, we had an Army BBQ that afternoon.  It was mandatory for My Mr. Right to attend and we hadn’t gotten to see much of him so Little Monkey and I decided to go, and took Little Monkey along too.  Because of that, I was also limited on my time frame to complete my project.

(affiliate link)


If you have never used iron-on transfers, you really ought to try them.  They are a little on the pricey side, but every once in a while, they are worth it.  And they are pretty easy to use.  You will need printable, iron-on transfers, you can purchase them at craft stores (but I got the cheap Wal-Mart knock off.  Brand doesn’t really matter.  However, there is a certain kind for dark fabrics, so make sure you get the right ones) and an ink jet printer.

Here’s the How:
1)  Design your label or appliqué in Paint, Word or Photoshop.  The lion clip art is just from the Word clip art collection.
2)  Print it according to the instructions that come with the transfers.  Make sure you mirror the image, if you’re instructed to do so.  My printer has a “t-shirt transfer” setting in the set-up menu.  When I selected that, it mirrored the image for me (which I had forgotten to do).  So, if your printer has a similar setting, make sure you don’t end up mirroring the image twice and ending up right back where you started.
3)  Let the ink dry completely.  Cut your image out.  The more detailed you get with your cutting the better your image will wear, especially if your fabric stretches.  Turn your iron on to hot, with no steam.  Place your transfer image side down and press firmly with the hot iron for 2-3 minutes.
4)  Carefully, pull the backing off your image.  If there are parts that stick, lay the backing down and put the iron back on it.  Let the image cool before you stretch it.  Once it’s cool, wear.  Launder inside out.

Iron On Transfer - Im not lion Im gonna be a big brother

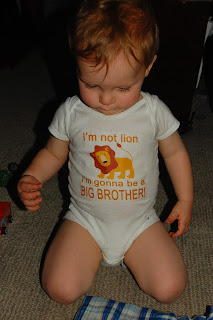
This made my announcement a lot more memorable than the last time I announced our impending parenthood… but, we’re not gonna go down that road…  =]  And we have a fun little keepsake too…

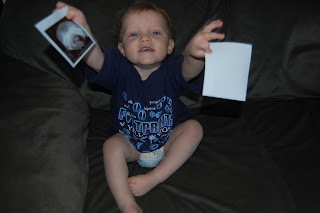
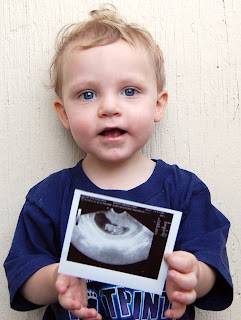
Well, we used to.  We used it to tell my parents and siblings that we’re adding another cub to our den.  That went well and we decided to take it to My Mr. Right’s family reunion and put Little Monkey in it to announce it to the rest of his family.  We were camping and eating huckleberries and raspberries.  It’s now a filthy, stained hot mess and I’m a little bit scared to try and launder it.  I have a suspicion it might end up in the trash…  But, it was fun while it lasted.

And, just because these are cute…


August 19, 2011 by Krista

Weekend Wander #43

Welcome to another weekend party!  I was soo thrilled with last week’s party.  You guys linked up some awesome stuff!  I decided that I’m going to try to start spotlighting some of the links on Facebook throughout the week, so come join me over there and check out some of the really awesome stuff that you guys link up.  Also, thanks for sticking around and checking out some of the links.  That’s what this party is for… to help discover other awesome stuff.  If you link and run, you miss out.  So, stick around and check out the awesomeness!  Ok, here are some of my faves from last week:

Ever made beef jerky?  I haven’t, but this marinade recipe at Sweet Ava Kate makes me want to try it…
I love a good upcycle!  Check out what these organizers are made from at Craftionary.
I’m not a fan of red sauce and so pizza is an “every-so-often” type of deal for me.  Especially with my increased frequency of heartburn these days.  This tasty recipe at RACKS & Mooby sounds right up my alley.
Another great upcycle… Just Down the Hall made a darling shirt from an old tee.
And… I have to give a shout out to my most favorite cookies ever.  Sensible Shoppers shares the easy, no-bake recipe for these tasty morsels of delicious chocolate.
Whew!  Good stuff!  I told ya it was a great party.  Grab a featured button if you’d like, ladies.  Thank you t everyone for linking up.  It was incredibly difficult to choose just a few projects.
And now, let’s get this week going!  Show me whatcha been doin’!  GO!

August 17, 2011 by Krista

Wooden Plaques

These are super versatile, completely customizable, and can suit any taste.  I did this one for my Little Monkey.  I’ve done other ones for friends getting married.  Teacher’s gifts, neighbor gifts and home decor.  It will work for all of those.
DSC_0938
This is super simple and fairly inexpensive.  Here’s the how:

1)  You will need a piece of wood.  I prefer 1×6 and cut it to the length you want.  For wedding gifts I usually make them 18-24 inches long.  For signs in kid’s rooms, teachers and neighbors I usually stick to 12-15 inches.  Most home improvement stores will cut the board for you, for a small fee.  Totally worth it.

2)  Prime your board with your choice of primer.  I just use cheap spray paint.  Keep in mind what color you want to make your sign.  If it’s a light color, use a white primer.  Save a gray primer for your darker colored projects.
2011-07-23_14-39-05_188
3)  When your primer is dry, give your board 2-3 coats of your choice of color.  You can use spray paint, interior latex paint or even acrylic craft paint.  Last year, I did several of these for Christmas gifts.  I spray painted a couple of projects, but it was awfully cold and ended up resorting to acrylic paint.  It worked just fine.

4)  When your boards are dry, you can ink or stress your board if you want.  You can then put any saying you would like to on them.  You can use vinyl or you can paint them on with a stencil.  If you’re incredibly brave, free-hand paint you words.  I use vinyl a lot.  It’s a little more expensive, but it’s a bit easier and can look more professional, depending on how steady your paintbrush hand is.
 2011-07-23_14-39-19_114
5)  Seal your board with a clear sealant.  Attach wall hanging hardware to the back of the board.  Hang.  Or gift wrap.  Which ever the circumstances call for. 
2011-07-23_14-39-31_843 

Krista

August 16, 2011 by Krista

Backless Framed Vinyl Quotes

Today is my parent’s 26th wedding anniversary.  I have such a hard time coming up with gifts for them.  My dad is the kind that never wants anything, or at least, he’ll never admit to it.  My mom, well, it’s not that she doesn’t want to decorate their home, it’s more that she doesn’t know how and doesn’t take the time to experiment till she finds something she likes.  Well, she finally painted their bedroom this summer.  They’ve lived in the same house for over 10 years…  So, I decided to make something that would go with that decor.


It was incredibly easy and amazingly frugal.  It took less than an afternoon to come up with the idea and finish it.  It’s totally customizable and that makes it so versatile. 


Here’s the How:

1)  Decide on a quote or image.  I found this quote on Pinterest.  As well as this one.  {Side note: the first gift I ever received from My Mr. Right was a braided paracord bracelet.  He made it at Annual Training, which was the first of many separations in our relationship.  I was totally taken by surprise when he gave it to me.  He made it mostly because he was bored and needed something to do to pass the time, but it has become one of my most favorite possessions.  Something so small and simple.  That story will make sense when you see the quote I chose.} I had a hard time deciding which one to choose, but ultimately went with the first one.  I designed my text in Sure Cuts A Lot.  {Another side note: If you have a Silhouette or other craft cutter, I highly recommend Sure Cuts A Lot.  Unfortunately, it no longer works with the Cricut, due to Provo Craft.  Long story that leaves me less than impressed with Provo Craft, but whatever.}

2)  I took one of my on-hand picture frames and spray painted it with my on-hand spray paint.  It took about three coats for good coverage.  Take the glass out before you paint.  While you’re waiting for the paint to dry, clean the glass.

2011-08-15_16-46-30_923

3)  Cut out your vinyl and apply it to the glass.  When the frame is dry, reassemble the pieces and wrap with a pretty ribbon.  You can choose to leave the backing of the frame out (like I did) to create a backless frame.  I am really loving that look, it isn’t as common and I think it looks simple, yet elegant with the wall showing through.

2011-08-15_16-45-14_206

Easy peasy and you can change it up to fit your needs, your recipient, the occasion, time of year, ect. 

2011-08-15_16-51-31_70

Here’s to my parents and another year of wedded bliss.  And to all the love birds out there.  Remember, small things become great when done with love.  Isn’t love amazing! 


Krista


August 14, 2011 by Krista

Simple Mason Jar Lantern (PB Knock Off)

I saw these on Pottery Barn.  Cute, right?  But $8 a piece?  I don’t think so.  Not when I can buy a case of 12 canning jars for that. 

Hanging Mason JarSource


So, what do all crafters think when they see things like this?  Yes, hi, my name is Krista and I have “I-can-make-that” syndrome.  So, I did just that. 

2011-08-10_14-58-03_581

Here’s the How:


Materials:

Mason Jar or other similar glass jar (do you save your spaghetti sauce jars?)

Wire, your choice of color and gauge


Directions:

1)  Wash out your jar, especially if you are recycling a bottle.

2)  Wrap your wire around the jar, just below the threads that hold the lid on.  If you are using a thin gauge wire you will probably want to wrap it around several times.  If you want the look of a braided wire, twist and braid it before you start wrapping. 

DSC_2226

3)  For the handle, twist the wire around the strand(s) that you put around the mouth of the jar.  Pull out however much wire you want to make the length of the handle.  Loop it around the other side of the wire that is around the mouth of the jar. 

DSC_2224DSC_2225

4)  I wanted a braided handle, so I wrapped the wire together every time I made another loop in my handle.

DSC_2224

5)  Fill with your desired substance (sand, salt, candles, whatever your little heart desires).  Hang and enjoy.  Ooh-la-la!

2011-08-10_14-55-55_266 2011-08-10_14-57-44_489

This was free for me, as I had everything on hand.  If you upcycle a jar, the cost will be less than $5 and you can make as many lanterns as you have jars.  Less than $20 will get you a set of 12 canning jars and the wire.  How pretty would these be out on the patio after sunset?  L-O-V-E!


Krista


Pin It

  • « Previous Page
  • 1
  • …
  • 160
  • 161
  • 162
  • 163
  • 164
  • …
  • 231
  • Next Page »

I'm Krista. Ringleader here on While He Was Napping, wife to my handsome Mr. Right & momma to my THREE energetic boys, Big J (9), Little J (6) & Little N (4). We FINALLY added a beautiful little girl to our family last December.

I’m knee-deep in Tonka trucks & Thomas trains. I survive our crazy days with Vanilla Coke, Sonic slushies, sweet snuggles and little giggles. When I tuck them in tight & kiss them good night, I get a little time to create & just be me.


It all happened
while (s)he was napping
Want More of My Story?

Privacy Policy

While He Was Napping respects your privacy and is committed to keeping any personal information collected on this website confidential. To find out what information we collect and how it is used or what options you have regarding your information, see our full privacy policy here. Creative Commons License The website found at whilehewasnapping.com and all subdomainsauthored and published by Krista is licensed under a Creative Commons Attribution-NonCommercial-NoDerivs 3.0 Unported License.

Pretty Chic Theme By: Pretty Darn Cute Design