While He Was Napping

momma gets stuff done

  • Home
  • About
  • Archive
  • Do It Yourself
    • Crafts
      • No Sew
      • Painting
      • Paper Crafts
      • Repurpose Projects
      • Vinyl
      • Washi Tape
      • Kid’s Crafts
      • Fonts
    • Sewing
    • Decorate
      • Home Decor
      • Holiday Decor
    • Celebrate
      • DIY Gifts
      • DIY Your Party
  • Recipes
    • Beverages
    • Appetizer
      • Bread
      • Other Appetizers
    • Snacks
    • Main Dish
      • Meat
        • Chicken
        • Beef
        • Pork
        • Seafood
      • Vegetarian
      • Slow Cooker
      • 30 Minute Meals
    • Dips & Sauces
    • Salads
    • Pasta
    • Soup
    • Dessert
      • Cookies
      • Brownies
      • Cupcakes and Cake
      • Box Mix Recipes
      • Other Sweet Treats
    • Breakfast Food
      • Pancakes
      • Waffles
      • Muffins
      • Other Breakfast Food
  • Family
    • Babies
      • Pregnancy
      • Newborns
      • The 1st Year
    • Toddlers
    • Preschoolers
    • Kindergartners
    • 6-8 Year Olds
    • The Grown Ups
      • Date Night
      • Romantic Gifts
    • Self Care
  • For the Home
    • Cleaning
    • Organizing
    • Emergency Preparedness
  • Travel
    • Travel Tricks & Tips
    • Traveling with Kids
  • Tech & Gadgets
    • Must-Have Apps
    • Techy Home Appliances
    • Gadgets & Electronics
    • Blogging Tips
  • Printables
    • Posters
      • Quote Printables
      • Subway Art Printables
    • Printable Organizers
    • Printable Journals
    • Learning Printables & Worksheets
    • LDS Printables
  • Holidays
    • New Year’s
    • Valentine’s Day
    • St. Patrick’s Day
    • Easter
    • Cinco de Mayo
    • Mother’s Day
    • Father’s Day
    • 4th of July
    • Back to School
    • Halloween
    • Thanksgiving
    • Christmas
    • Holiday & Seasonal Printables

November 4, 2015 by Krista

Nutter Butter Snowmen Cookies

I can’t think of a better way to kick off the chilly season than with some fun in the kitchen. Celebrate the first snow fall, with these fun and super easy Nutter Butter Snowmen cookies!

I often run out of steam and energy before we’re finished when I’m in the kitchen with my boys; so, I decided to skip the baking part and just jump right to the fun part. We used Nutter Butter Cookies and candies to decorate and make snowmen!

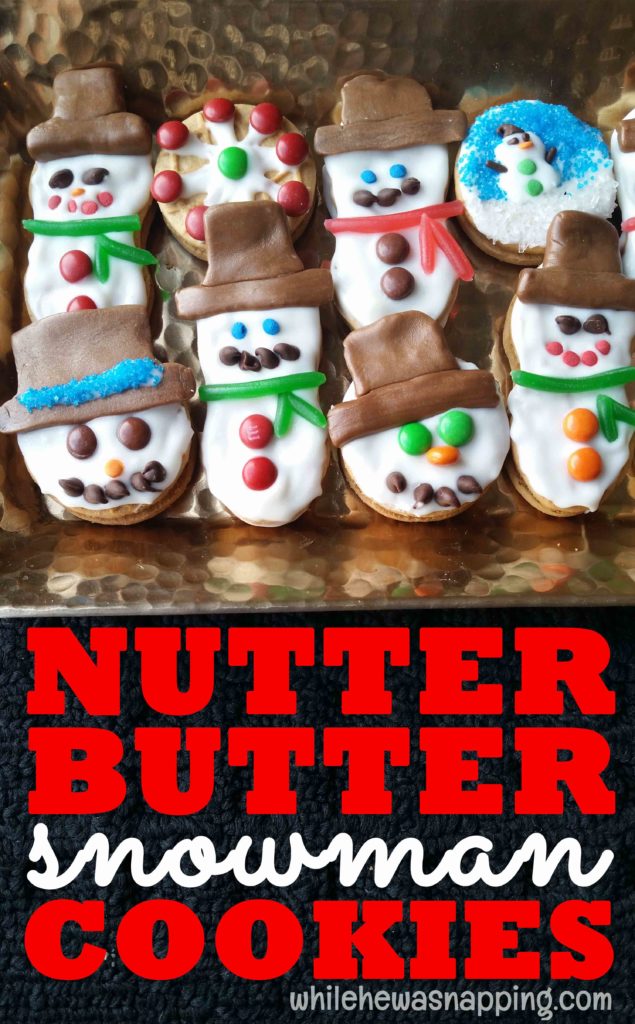
NUTTER BUTTER SNOWMAN COOKIES
Nutter Butter Snowmen Cookies

Print This Recipe
Nutter Butter Snowmen Cookies

Prep time:  30 mins

Total time:  30 mins

Decorate Nutter Butter cookies and turn them into a winter wonderland! Create friendly snowmen with candies and white dipping chocolate.
Ingredients
  • Nutter Butter Cookies
  • White Dipping Chocolate
  • Mini Chocolate Chips
  • Mini Chocolate Candies
  • Mini Peanut Butter Candies
  • Chocolate Flavored Roll Candies
  • Red and Green Licorice
  • Confetti Sprinkles
  • Nutter Butter Snowmen Cookies Ingredients
Instructions
  1. Melt the white chocolate.
  2. Nutter Butter Snowmen Cookies Melt White Chocolate
  3. Work one cookie at a time so you can get it completely decorated before the chocolate hardens.
  4. Nutter Butter Snowmen Cookies Snowman Cookie Construction
  5. Spread the white chocolate on one side of the Nutter Butter cookie with the back of a plastic spoon.
  6. Shape the chocolate roll candies into the shape off a top hat. I actually found it easier to make several at a time and have them ready to go straight on the cookies as soon as I got the chocolate spread.
  7. Use the mini chocolate candies, the mini peanut butter candies and the confetti sprinkles to create eyes and buttons on the snowmen. The orange peanut butter candies perpendicular on the cookies made a great nose on the round snowman faces.
  8. Use the licorice to make a scarf for the snowman.
Notes
The best part of these cookies is that you can decorate them however you want! Your imagination is the limit. My kids liked the snow globe, but my favorite was the snowman faces. Get creative.
3.4.3177

Decorating these cookies was a ton of fun and, while my boys ate more candy than they put on their cookies, it was definitely more conducive to the length of their attention spans. There wasn’t a long wait time while the cookies baked. We got in, got it done and moved on to other activities.

These would be perfect for neighbor goody plates this holiday season. My kids loved the snow globe cookie, but it wasn’t as pretty as I had in my head so I only did one of those. My favorites were the snowman faces.

Nutter Butter Snowmen Cookies Large Nutter Butter Snowman Closeup

Nutter Butter Snowmen Cookies Nutter Butter Snowman Face Closeup


Tips and Tricks I Discovered While Making Nutter Butter Snowman Cookies

  • I loved that the cookie decorations were trapped in the melting chocolate after it hardened. It was less messy when my kids were eating them… and that’s definitely a win. You could definitely substitute the melting chocolate for frosting too, if that is more your style.
  • I opted to just spread the melted chocolate on one side of the cookie because I like Nutter Butter cookies as they are and didn’t want to change the taste too much. I didn’t want the dipping chocolate to overpower the Nutter Butter cookie flavor. And it cut down on sugar a little bit.
  • I used my little melting pot to keep the chocolate warm and melted. It worked great. A small slow cooker would probably work as well. Just make sure you don’t over heat your chocolate or it will get grainy. You can also just heat it in a microwave-safe dish in the microwave in 30-second intervals until it’s melted. If you have access to a melting pot, I would highly suggest using it.
  • It was much easier to shape several hats before I started putting the chocolate on the cookies. Then I just had to grab one and stick it on. I didn’t have to worry about moving quickly before the chocolate hardened.
  • Use a toothpick to help you place the little candies on the cookies. The candies are tiny and kind of hard to position with larger hands. My boys did great if I was steadying their hands. A toothpick lets you push the candies right where you want them.
  • Use an orange peanut butter candy bit for the snowman face nose. Stand it up on the cookie to make it look more carrot shaped and give your cookie more dimension.


October 31, 2015 by Krista

Happiness is Homemade Link Party

I am super excited to get to co-host the Happiness is Homemade link party put on by Lisa at Blogghetti, Cathy from A Peek Into My Paradise and Brittany from Mommy on Demand this month. I used to have my own link party back in the day before I had three boys and a teensy weensie bit more time to spend hopping around the blogosphere and setting up link parties. I’ve missed it! So, I’m super excited to get to co-host this month and get my feet back into the link party scene.

So, what this means for you: you can link up here on While He Was Napping for the month of November and your awesome projects, recipes and all the other amazing things you’ve been doing will be seen on SIX other awesome blogs! So, get to sharing! Leave a comment with your link numbers and I’ll share them on social media!

___________________________________________

I’m still in shock that Halloween is now over and now its time to start Christmas Shopping…eek! Where did the year go!?

Hope everyone had a safe and fun Halloween!

We appreciate each of spending time us and making our parties alot of fun!! This month we are introducing 4 new co-host’s so please make sure you take the time to follow these lovely ladies! If you are interested in co-hosting with us in December fill out the rafflecopter below!!

HIH 3 Hosts

[Read more…]

October 29, 2015 by Krista

Controlling the Paper Clutter

This post brought to you by Fellowes Brands. The content and opinions expressed below are that of While He Was Napping.

I don’t know about you, but my house seems like it gets it hit by a bomb… or two… around this time of year. The kids bring home even more papers from school, stores are sending out sale papers, companies are doing their end-of-year policy updates, and we’re approaching a major election year so there’s all kinds of political mailers coming in as well. That’s a lot of paper coming through my front door.

We haven’t always been awesome at filing the mail when it comes through the door. It, often times, gets dropped somewhere on the kitchen counter. As if it isn’t hard enough to keep the kitchen counters clean… and, I hate to admit it, but I do have a box of old papers in my bedroom that is full of mail from our countertops. Clearly, I still have some improving to do in getting rid of paper clutter in our home, but I have been doing a lot better with this new system. Ready to cut down on your paper clutter? Here’s the how:

1. Start now with all the new papers that come in your home. Once you get in the habit of getting rid of the stuff coming in, you can add a step or two here and there to get rid of the stuff already there. It’s so much easier to get rid of stuff a step at a time, rather than a big purge. Now, if you have the time for a big purge, then by all means. But, shy of burning my house down and just starting all over, I don’t have time to get rid of every single paper in one sitting. Besides, I’d much rather play with my cute boys than go through tedious piles of paperwork.

When papers get brought into your house, go through them immediately. Take five minutes and just get it done.

2. I have two paper trays on my counter. Hey, it’s better than a stack of (unopened) mail! One for “things that need attention”, like bills, insurance things, a wedding announcement, coupons – if it has an expiration date or deadline. And one for “things to file”, like report cards, most DMV papers and other documentation, school papers or projects my kids bring home that I want to keep – if it is going to be kept long-term.

Once a week, I clear out the trays. I deal with the stuff that needs attending and then file the things that are being kept where they belong. My filing boxes are a whole ‘nother story! The paper trays actually work really well for me. If having them in the kitchen doesn’t appeal to you, put them somewhere else. Maybe putting them in your office or something would work better for you. If so, I’m totally jealous you have an office!

Keeping the Paper Clutter Down with Fellowes 79Ci Shredder

3. Now, think of all that stuff you got rid of. Feels good to not have it cluttering your home, right? Some paperwork shouldn’t just be thrown out though. Even outdated paperwork can have sensitive information on it. That’s where a good shredder comes into play.

I have been using a Fellowes 79Ci shredder and I just love the sleek design and advanced technology. The SilentShred™ Technology lets me work on getting rid of our paper clutter during nap time without fear of waking the babies. Its patented 100% Jam Proof System is fantastic and has completely lived up to the promise in all the shredding I’ve done with it so far. The heavy-duty cross-cut blades can handle up to 16 pages at a time and you don’t have to take out staples or paper clips either, which is such a time saver.

Another thing that I love is the extended 20 minute run time. I can get everything shredded all in one sitting and I don’t have to wait for the shredder to cool down. There’s also a cool little Energy Savings System feature that maximizes efficiency 100% of the time, both when you are actively using the shredder or when it’s in standby. If we ever get our bedroom office center set up like we want to, I will move this shredder in there and leave it on all the time. For now, it’s in our dining room and I unplug it after I use it, simply because I don’t want my kids to shred things! Which brings me to my absolute favorite feature: the patented SafeSense® Technology that automatically stops shredding when hands touch the paper opening so I don’t have to worry about little fingers. Obviously, you should still be cautious and not allow children to use the shredder but that safety feature allows me to feel confident in leaving it in our easily-accessible dining room.

4. Now that you’re getting into the routine of getting rid of the paper before it piles up, what do you do about the already piled paper? Well, you have to go through it. But, here’s my trick to do it quickly: sort it out by type of paper.

So, you have a pile of old mail: 3 pages from your insurance company, 2 medical bills, 3 utility bills, 2 credit card bills, some advertising pieces and a postcard from Grandpa and Grandma on vacation.

First, pitch that advertising in the trash! Anything that is addressed to … ” or current resident” doesn’t need to take up your space. Make an exception for coupons, if that’s your thing, but that’s about all the exceptions I can think of.

Second, separate the mail into the categories listed above: insurance documents, medical, utility, credit card and personal.

You can stop there for now if you need to or keep going.

Third, choose a pile and open up the main page. Depending on how much time I have, I try to start with the biggest pile. Get the worst done first. If it’s a bill that had already been paid, shred it. Your bank will have documentation of the payment and most companies have the option to look up your account online, including payment history. You don’t need the statement. If it had not been paid, it goes to the “needs attention” paper tray to be dealt with.

If the paper is something medical, legal or otherwise needs to be kept, put it in the “to be filled” tray.

If the paper is personal, decide whether you need to keep it or not. Something like a postcard from Dad or Grandpa and Grandma is something I will hang on the fridge for a while (like until they get back – not like months or years), share with my boys and then throw out. If it’s too sentimental, consider taking a photo of it and then discarding. You’ll have the photo to look back at later if you really want to. If you do keep it, file it away so it has a place. Don’t let it clutter.

Keep working your way through the piles, one at a time. I find I usually add to my piles before I ever get them all gone through completely. I still find the occasional box of papers that need to be sorted, but it’s getting better.

Mostly, I LOVE that my kitchen counters aren’t covered in old mail! I love knowing or personal information is safely destroyed with the Fellowes 79Ci shredder so I don’t have to worry. The 79Ci is available at Amazon and Office Superstores with a suggested retail price of $239.99. I love that I can use the shredder while my children are napping or when they are awake, I don’t have to plan getting rid of clutter papers that come into my home, I can just do it. This means I have more time to spend with my kids, doing festive holiday activities and that my house doesn’t look like a bomb went off. At least, not a paper bomb. We’re still working on a toy factory explosion problem. But that’s a whole different problem.

Visit Sponsors Site

October 27, 2015 by Krista

Directional Halloween Sign with BEHR® Marquee Paint

I want to thank Behr for sponsoring this post. I was provided with compensation for products used and my time to share this project. All content is original and honest, pinky promise!

Growing up, my family didn’t celebrate Halloween much.  I remember trick-or-treating maybe a handful of times and we attended a few carnivals and Halloween parties.  But, my mom doesn’t like Halloween.  And I get that.  Well, I kinda get that.  The gore and guts, no thanks.  No thanks at all.  I like the cutesy, fun part of Halloween.  And decorating with the cutesy, fun side of Halloween makes me happy.  It’s the kick off to the holiday season!  So I put together a fun Halloween project that turned out fabulously, thanks to BEHR® MARQUEE® Interior Paint & Primer!

DIRECTIONAL HALLOWEEN SIGN

Behr Marquee Halloween Directional Sign


MATERIALS

– 8 ft long 1″x6″ pine board
– 6 ft long 1″x4″ pine board
– Pencil
– Square box or other square to use as a template to make your arrows
– Tape measure
– Jig saw and saw blades
– Belt Sander and/or Sandpaper
– BEHR MARQUEE paint samples in:

  • Torch Red
  • Birthstone
  • Green Dynasty
  • Lamplit
  • Teal Motif
    Behr Marquee Halloween Sign Interior Paint Products

– BEHR PREMIUM PLUS ULTRA® Interior Paint & Primer In One in Black (I would’ve gotten this in MARQUEE as well, but the hardware store couldn’t mix the color I needed with MARQUEE.  The PREMIUM PLUS ULTRA was a great paint too.)
– Paint brushes or foam rollers (I used rollers and foam brushes)
– Newspaper or other covering to protect your work surface
– 1 1/4″ screws
– 3/32″ drill bit
– drill and screwdriver
– black vinyl
– craft cutter or craft knife
– masking tape or transfer tape
– blunt object to press down vinyl
– Polyurethane to seal boards


DIRECTIONS

MARKING THE BOARDS FOR THE HALLOWEEN SIGN

– Use the square box or other square to create arrows on the board.  Line up the point of your box in the middle of the board.  Mark the point of the box to create the point of the arrow.
Behr Marquee Halloween Sign Mark Board for Cutting
– Decide how long you want your arrows to be.  I made mine all different lengths: 12 inches, 16 inches, 18 inches, 20 inches, and 24 inches.  There was a little left over at the end of my board.  Measure and mark all your arrows with the box and the pencil.
Behr Marquee Halloween Sign Mark Board for Cutting Arrows

CUTTING THE BOARDS FOR THE HALLOWEEN SIGN

– Use the jig saw to cut the boards apart.  I let Mr. Napping do this part for me, as I hadn’t ever used the jig saw before and we were on a time limit; he was leaving on a work trip.  I didn’t want to end up missing fingers because of a lack of experience and familiarity.  Be sure to brace the board while you cut.
Behr Marquee Halloween Sign Cut the Board Arrows
– After you have all your arrows cut out, sand the wood until it’s smooth.  We used a belt sander for the majority of the sanding and then I did some touch up with sandpaper before I put on a coat of paint.  Don’t skip the sanding, your paint will turn out so much better if you take the time to prep your boards.
Behr Marquee Halloween Sign Sand the Boards


PAINTING THE BOARDS FOR THE HALLOWEEN SIGN

– Paint each board one of the five colors of the MARQUEE colors.  That’s right, no primer! The MARQUEE collection of paint has a One-Coat coverage guarantee over previously coated surfaces when tinted to any of the 372 colors in the MARQUEE Interior One-Coat Color Collection and applied to previously painted surfaces.  I was very impressed with the coverage even though the boards were not previously coated.  And not having to wait for a primer to dry was fabulous. My least favorite part about painting projects is all the waiting time between coats of paint.  The MARQUEE paint covered my project well and dried fast, which made me a happy momma because it meant I didn’t have a paint project on my kitchen counter for a week before it was completed.  There is also exterior paint available in the MARQUEE line which has some great weather-resistant properties.  If you’re new to painting, Behr has some great directions on how to correctly choose supplies, prepare and prime before you paint.

Behr Marquee Halloween Sign Paint the arrows

– Let the paint dry for a minimum of two hours.  Sand lightly with fine grit sand paper.  This mostly just removes any weird brush strokes or paint puddles that may have gathered and dried during that first coat so your next coat doesn’t just add to the weirdness.
Behr Marquee Halloween Sign Single Coat of Paint
– Paint another coat of paint on each board.  Let dry a minimum of two hours.
– Paint the 6-foot pine board with the black paint.  Let dry and set aside for now.
Behr Marquee Halloween Sign Paint Support Board


APPLYING THE VINYL FOR THE HALLOWEEN SIGN

– Cut out of black vinyl any text and graphics you want to use on your signs with a craft cutter or a craft knife.  I used my craft cutter for my signs.  You can find the links to the jpg files I used to cut from here: TEXT and GRAPHICS.  The files are formatted to 12×12 inches, as that is what fit my cutter.  You can alter the images as you need to fit the dimensions you have available.
Behr Marquee Road Signs Images Behr Marquee Road Signs Text
– Weed out all the negative space from your vinyl and discard it.  I prefer to use masking tape to transfer vinyl, rather than transfer tape.  To do so, place a layer of tape over the image either from top to bottom or bottom to top until it’s covered with tape.  I find it easier to get the vinyl to stick when I’m only pulling off a small layer of tape at a time – and masking tape is usually less sticky than transfer tape, so there’s never any gooey residue left behind.  Use whatever you prefer to transfer vinyl for this part.
– Place the vinyl on the board you choose and begin removing the masking tape a layer at a time.  If the vinyl pulls back up, replace the tape and rub firmly with a blunt object (the handle of a butter knife or scissor handles work well).  Then, pull the tape up again.  It works best if you pull the tape back at a 180-degree angle.
– When the tape is removed from the vinyl, rub the vinyl down firmly with the blunt object.
– Repeat the vinyl transfer process with each board.
Behr Marquee Halloween Sign Applying Vinyl with Masking Tape

SEALING THE BOARDS FOR THE HALLOWEEN SIGN

– Apply a thin layer of Polyurethane to each board.  I intend to use this sign indoors and only applied a single coat to the face of the board.  I didn’t seal the edges or the back.  Let dry thoroughly, overnight if possible.  Polyurethane can be a great sealant and protector once it’s dry, but it can bubble if it gets too hot, is applied too quickly or if items are placed on it before it completely dries.  So, let it dry really well.
Behr Marquee Halloween Sign Seal the boards

Behr Marquee Halloween Sign Let Sealant Dry Thoroughly


ASSEMBLING THE SIGN FOR THE HALLOWEEN SIGN

– On the BACK of the black board , lay out the arrows and arrange them however you like.  Mark the placement with your pencil.
Behr Marquee Halloween Sign Layout Sign
– Turn the black board over and drill pilot holes with the drill bit.  You can drill all the way through the black board.  I decided to do two screws in each board so that the boards won’t twist or spin.
Behr Marquee Halloween Sign Mark Board to Attach Arrows
– Once you have the pilot holes drilled, you can position the boards underneath the black board and sink the screws through the black board into the arrow boards.  By working from the back of the sign, your screws will be hidden.  The boards are also thick enough you won’t need to worry about the screws poking through the front of the arrows.
Behr Marquee Halloween Sign Screw Sign Together

Behr Marquee Halloween Sign Attach Arrows to Board

DISPLAYING THE HALLOWEEN SIGN

– This sign will be used at a Halloween party and I’m simply going to set the sign up against a wall in an infrequently trafficked area.  It’s large enough to see, but hopefully it won’t get played with too much.  Because all I really need to complete my day would be my three boys running around with pointy sticks screwed to a really long stick.  It’s like the ultimate sword.  Call the Emergency Room and alert them now.  My younger sister has also asked to borrow the ultimate sword, I mean sign, for decor for a Halloween party she is co-chairing for the all the college kids at church.
Behr Marquee Halloween Directional Sign and Halloween Decor


So, there you have it.  A fun and cutesy Halloween sign.  No guts or gore here.  Skeleton Street is about as close as I’ll get to that.  This seems like a lot of steps, but it’s actually a really easy paint project.  Definitely something you could do in a day or two, tops.
Behr Marquee Halloween Sign and Interior Paint Products

What are you dying to do with BEHR paints?


This post is brought to you by BEHR. Color that’s True to Hue. If you feel it, you can find it. Visit True to Hue. Behr sponsored this blog post. The opinions, photos and text are all mine, honest.

October 21, 2015 by Krista

Caramel Apple Nachos

Caramel and apple is one of my favorite fall flavor combinations. The sweet, crisp apples and the delectable caramel, what’s not to love? Maybe the stickiness, but that just doesn’t seem to bother me when I’ve got that delicious combination tickling my taste buds. These caramel apple nachos are one of our go-to snacks after school. They are just sweet enough to be a treat, but are still mostly fruit. I also love being able to adjust the amount of caramel and chocolate on them.

CARAMEL APPLE NACHOS

Caramel Apple Nachos Overhead


Ingredients:
– 1-2 Apples • I love green Granny Smith apples or Galas
– Caramel sauce • make your own or use your favorite ice cream sundae topping
– Chocolate sauce • I like a thicker hot fudge
– Knife
– Cutting board
– Plate
– Nuts, if desired

Directions:
– Core and slice your apples into thin slices with the knife.
– Layer the apple slices on your plate.
– Drizzle caramel sauce on the apples.
– Drizzle chocolate sauce on the apples.
– Chop up the nuts, if you want nuts.
– Sprinkle over the apples.
Serve and enjoy!

Check out the video to see just how easily this comes together. It is super simple and always a yummy treat.


A video posted by Krista Wolff (@whilehesnapping) on Oct 21, 2015 at 11:03am PDT

The caramel and chocolate will start to soak into the apples the longer they sit. I like it that way, it’s like caramel infused apple slices; but, it doesn’t look quite as pretty. So, keep that in mind if you are thinking about serving them for a party or something.

Caramel Apple Nachos CloseUp


Speaking of parties, I like to do this as a caramel apple bar of sorts when we have people over. Let your guests start with apple slices and build their own nachos. Everyone gets what they want and how much they want.

Topping ideas we love:
– mini marshmallows
– white chocolate chips
– cinnamon and brown sugar
– chopped nuts
– whipped cream

  • « Previous Page
  • 1
  • …
  • 26
  • 27
  • 28
  • 29
  • 30
  • …
  • 231
  • Next Page »

I'm Krista. Ringleader here on While He Was Napping, wife to my handsome Mr. Right & momma to my THREE energetic boys, Big J (9), Little J (6) & Little N (4). We FINALLY added a beautiful little girl to our family last December.

I’m knee-deep in Tonka trucks & Thomas trains. I survive our crazy days with Vanilla Coke, Sonic slushies, sweet snuggles and little giggles. When I tuck them in tight & kiss them good night, I get a little time to create & just be me.


It all happened
while (s)he was napping
Want More of My Story?

Privacy Policy

While He Was Napping respects your privacy and is committed to keeping any personal information collected on this website confidential. To find out what information we collect and how it is used or what options you have regarding your information, see our full privacy policy here. Creative Commons License The website found at whilehewasnapping.com and all subdomainsauthored and published by Krista is licensed under a Creative Commons Attribution-NonCommercial-NoDerivs 3.0 Unported License.

Pretty Chic Theme By: Pretty Darn Cute Design